How To Replace 2012 Chevy Malibu Headlights Easy
When your 2012 Chevy Malibu’s headlights go out, it’s not just annoying, it can be a safety issue. Many people find the idea of changing car parts a bit scary, thinking it’s a job for a mechanic. But learning how to replace headlights on a 2012 Chevy Malibu is actually pretty straightforward.
You don’t need a lot of fancy tools, and we’ll guide you through each step so you can get those lights shining bright again safely. Let’s find out how simple it can be.
Getting Ready to Replace Your Chevy Malibu Headlights
This section covers what you need to know before you start working on your 2012 Chevy Malibu headlights. We’ll talk about why you need to change them, the tools you’ll need, and how to make sure you get the right replacement bulbs. Having everything ready will make the actual process much smoother and faster.
It’s all about preparation.
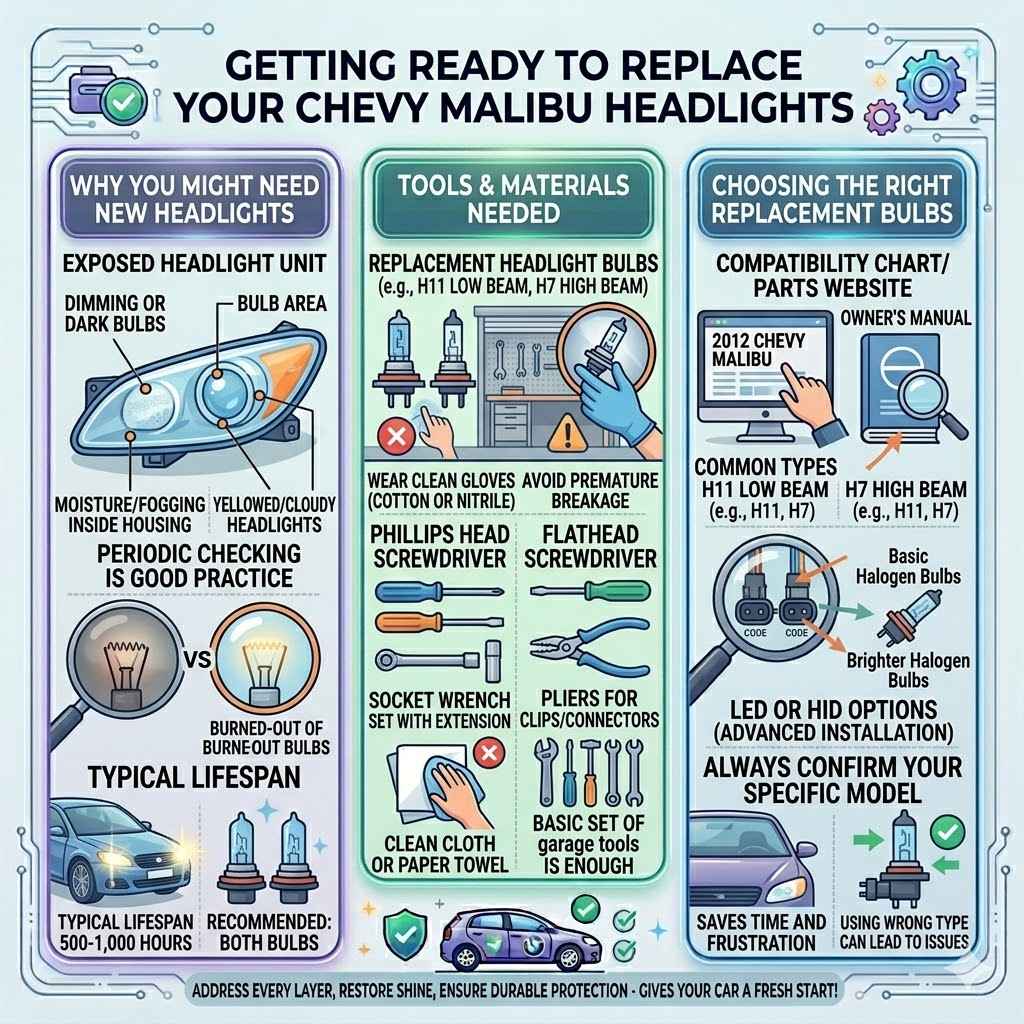
Why You Might Need New Headlights
Headlights don’t last forever. Over time, the bulbs can burn out, making them dim or completely dark. This usually happens after many hours of use.
Sometimes, moisture can get inside the headlight housing, causing fogging and reducing light output, even if the bulb is still working. If your Malibu’s headlights are yellowed or cloudy, they might not be shining as brightly as they should, which is also a sign they might need attention.
A headlight bulb typically lasts between 500 to 1,000 hours of use. However, this can vary based on the type of bulb and how often you drive with your lights on. Some bulbs might fail earlier due to electrical issues or physical damage.
It’s a good idea to check your headlights periodically, especially before long trips or if you notice any dimness.
When one headlight burns out, it’s often recommended to replace both. This ensures both lights have similar brightness and color, which looks better and can improve your visibility. Plus, the other bulb might not be far behind in its lifespan.
Tools and Materials Needed
To successfully learn how to replace headlights on a 2012 Chevy Malibu, having the right tools makes the job much easier. Most of the time, you won’t need many special tools. Often, a basic set of tools you might already have in your garage will be enough.
Here’s a list of what you’ll likely need:
Replacement headlight bulbs: Make sure you get the correct type for your 2012 Chevy Malibu. Check your owner’s manual or look up the bulb type online. Common types include H11 for low beams and H7 for high beams, but always verify for your specific model.
Gloves: It’s important to wear clean gloves, especially cotton or nitrile ones. Touching the glass part of a new halogen bulb with your bare fingers can leave oil residue. This residue can heat up unevenly when the bulb is on, causing the bulb to break prematurely.
Screwdriver set: You might need a Phillips head screwdriver or a flathead screwdriver depending on what fasteners hold the headlight assembly in place or access panels.
Socket wrench set: Sometimes, bolts are used to secure parts. A small socket set with an extension might be helpful.
Pliers: In some cases, you might need pliers to gently remove clips or disconnect electrical connectors that are stuck.
A clean cloth or paper towel: This is useful for wiping away any dust or debris from the headlight area before installing the new bulb.
Having these items ready will save you time and frustration. It’s always better to have a tool and not need it than to need a tool and not have it when you’re in the middle of the job.
Choosing the Right Replacement Bulbs
Selecting the correct bulbs is a critical step in knowing how to replace headlights on a 2012 Chevy Malibu. Using the wrong type of bulb can lead to poor lighting, damage to your headlight system, or even be illegal. Your car’s owner’s manual is the best place to find the exact bulb specifications for your 2012 Chevy Malibu.
It will list the bulb types needed for the low beams, high beams, and any other exterior lights.
If you don’t have your owner’s manual handy, you can also find this information by looking up your car’s make, model, and year on automotive parts websites. These sites usually have a lookup tool where you enter your car’s details, and it will show you compatible bulbs. You can also find compatibility charts at auto parts stores.
Bulb types are usually identified by a letter and number combination, like H4, H7, H11, or 9006. These codes tell you the bulb’s base type, filament arrangement, and intended use (e.g., low beam, high beam, fog light). For the 2012 Chevy Malibu, the common bulbs are H11 for the low beams and H7 for the high beams, but again, always confirm this for your specific vehicle.
When buying bulbs, you’ll see different options. Basic halogen bulbs are the most common and affordable. You might also find brighter halogen bulbs, which can provide more light but may have a shorter lifespan.
LED or HID (High-Intensity Discharge) bulbs are other options, but these often require more complex installation and might not be street-legal or compatible with your Malibu’s existing wiring and housing without modifications. For a simple
Step-by-Step Guide How to Replace Headlights on a 2012 Chevy Malibu
Now that you’re prepared, let’s get to the hands-on part of learning how to
Accessing the Headlight Bulbs
The first major step in replacing your headlights is gaining access to the bulbs. For most 2012 Chevy Malibu models, the headlight assemblies are relatively accessible from under the hood. You won’t typically need to remove the entire bumper or headlight housing, which makes this a manageable DIY task.
Open the hood of your 2012 Chevy Malibu. Locate the back of the headlight assembly. You should see a large plastic cover or a metal bracket that protects the bulb and its wiring.
This cover is usually secured with clips, screws, or a twist-lock mechanism. Depending on your specific trim level, there might be minor variations.
For the low beam bulbs (often H11), you’ll usually find them towards the inner side of the headlight assembly. The high beam bulbs (often H7) will be located next to them. Take a look at the back of each headlight unit.
You’ll see wires leading to a connector plugged into the back of the bulb holder.
Sometimes, there might be an air intake hose or a fluid reservoir that obstructs the view or access. If this is the case, you might need to carefully remove or reposition these parts to get a clear path to the headlight bulb. Be gentle; these components are usually attached with clips or simple bolts.
Before you begin removing anything, it’s a good idea to take a quick photo with your phone. This can help you remember how things were arranged, especially if there are multiple hoses or wires in the area. This visual reference can be very useful later.
Removing the Old Headlight Bulb
Once you have clear access to the back of the headlight assembly, you can proceed to remove the old bulb. This is where you’ll be interacting directly with the electrical connector and the bulb itself. The process is generally similar for both low and high beam bulbs.
First, locate the electrical connector attached to the back of the bulb. This connector is usually a plastic housing with wires leading into it. There might be a small tab or clip on the connector that you need to press or lift to release it from the bulb socket.
Gently pull the connector straight back, away from the bulb. Avoid yanking or twisting, as this can damage the wires or the connector.
After disconnecting the electrical connector, you’ll see the bulb itself. Halogen bulbs are typically held in place by a spring clip, a metal bracket, or a twist-lock mechanism. For the H11 and H7 bulbs commonly used in the 2012 Chevy Malibu, it’s usually a twist-lock system.
You will need to gently turn the bulb base counter-clockwise, usually about a quarter turn, to unseat it from its socket.
As you turn it, you should feel it release. Once it’s loose, you can carefully pull the bulb straight out of the housing. Be careful not to drop the old bulb, as it might still be hot if the lights were recently on.
If it is hot, wait for it to cool down completely before handling.
Inspect the socket where the bulb was. Ensure there’s no visible corrosion or damage. If there is, clean it gently with a dry cloth.
This step is key to a successful replacement.
Installing the New Headlight Bulb
With the old bulb removed, it’s time to install the new one. This is the reverse of the removal process, but with a few important precautions to ensure the new bulb lasts as long as possible.
Take your new headlight bulb. Remember to handle it by the plastic or metal base only. If you have to touch the glass part, make sure your hands are clean and dry, or use your gloves.
Any oil from your skin can create hot spots on the glass when the bulb is on, leading to premature failure.
Align the tabs on the base of the new bulb with the corresponding slots in the headlight socket. Gently insert the bulb straight into the socket. Once it’s seated correctly, twist the bulb base clockwise about a quarter turn until it locks securely into place.
You should feel it seat firmly.
After the bulb is locked, reconnect the electrical connector to the back of the new bulb. Make sure it snaps into place firmly. Give it a gentle tug to confirm it’s secure.
If you had to remove any air intake hoses or other components to get access, reattach them now. Double-check that everything is put back securely and in its original position.
Before closing the hood, it’s a great idea to test your new headlight. Turn on your car’s ignition and switch on the headlights to ensure the new bulb is working correctly. If it doesn’t light up, double-check the connector and the bulb’s seating.
Sometimes, bulbs can be installed slightly out of alignment.
Troubleshooting Common Headlight Issues
Even with a clear guide, sometimes things don’t go perfectly when you’re learning how to replace headlights on a 2012 Chevy Malibu. This section covers common problems you might encounter and how to fix them. Knowing these solutions can save you a lot of guesswork and frustration.
New Bulb Doesn’t Light Up
This is a common problem after replacing a bulb. The first thing to check is the connection. Make sure the electrical connector is pushed on all the way and that the clip has engaged.
Sometimes, the connector might look like it’s on, but it’s not making full contact.
Next, verify that the bulb is seated correctly in the socket. It needs to be twisted and locked in place. If it’s slightly misaligned, it won’t make proper contact with the socket, even if it feels secure.
Try removing it and reinserting it, making sure the tabs line up perfectly.
If the bulb still doesn’t light up, try swapping the new bulb with the one on the other side (if it’s the same type). If the bulb then lights up on the other side, your new bulb might be faulty. While rare, new parts can sometimes be defective.
If the bulb still doesn’t work in the other socket, the issue might be with the car’s wiring harness or the fuse. Check the fuse box for the headlight circuit; a blown fuse will prevent the bulb from working.
A blown fuse is usually indicated by a visibly broken wire inside the fuse. You can
Headlight Aim Is Off
After replacing a bulb, you might notice that the headlight beam is not aimed correctly. It could be too high, too low, or pointing to the side. This can happen if the bulb wasn’t installed perfectly straight or if the headlight assembly was bumped during the process.
Proper headlight aim is crucial for safe driving, ensuring you can see the road ahead without blinding oncoming drivers.
Your 2012 Chevy Malibu has adjustment screws on the headlight assembly that allow you to fine-tune the beam’s position. These screws are usually accessible from the back or top of the headlight unit. You’ll typically find one screw for vertical adjustment (up and down) and sometimes another for horizontal adjustment (left and right).
To adjust the aim, you’ll need a flathead screwdriver or a socket wrench, depending on the screw type. Park your car on a level surface facing a wall or garage door at night or in a dimly lit area. Turn on your headlights.
You should see the beams of light on the wall. Measure the height of the center of the low beam headlights from the ground. Adjust the vertical screw so the top of the beam is about 2-3 inches below the center line of the headlight, or about knee-high on a wall about 25 feet away.
This is a general guideline; consult your owner’s manual for precise specifications.
You can also check the horizontal alignment. The beams should be mostly straight ahead, with a slight tendency to point outwards toward the driving lane. Make small adjustments and check the results frequently.
It’s important to get this right for both safety and legal reasons.
Moisture or Fogging in the Headlight Housing
If you notice moisture or fogging inside your headlight assembly, it means the seal around the housing might be compromised. This is common over time as rubber seals age and crack, or if a small rock chip damages the lens. While replacing the bulb, it’s a good time to check for this.
Minor fogging might dissipate on its own after the lights have been on for a while and the moisture evaporates. However, persistent moisture can lead to corrosion of the bulb socket and internal electrical components, and it will dim the light output. If you see water pooling inside, it’s a more serious issue.
For minor condensation, you can try leaving the headlight assembly cover slightly ajar for a day or two in a dry environment to allow it to air out. If the problem persists, you may need to reseal the headlight housing. This can involve carefully removing the headlight assembly, cleaning the mating surfaces, and applying a new bead of automotive-grade silicone sealant specifically designed for headlights.
In more severe cases, where the housing is cracked or the internal reflectors are damaged by moisture, you might need to replace the entire headlight assembly. This is a more involved repair, but it ensures a proper seal and optimal light performance.
Advanced Tips and Considerations
Once you’ve mastered the basics of how to replace headlights on a 2012 Chevy Malibu, you might want to explore some advanced options or learn about other related maintenance. These tips can help you get the most out of your headlights and keep them in top condition.
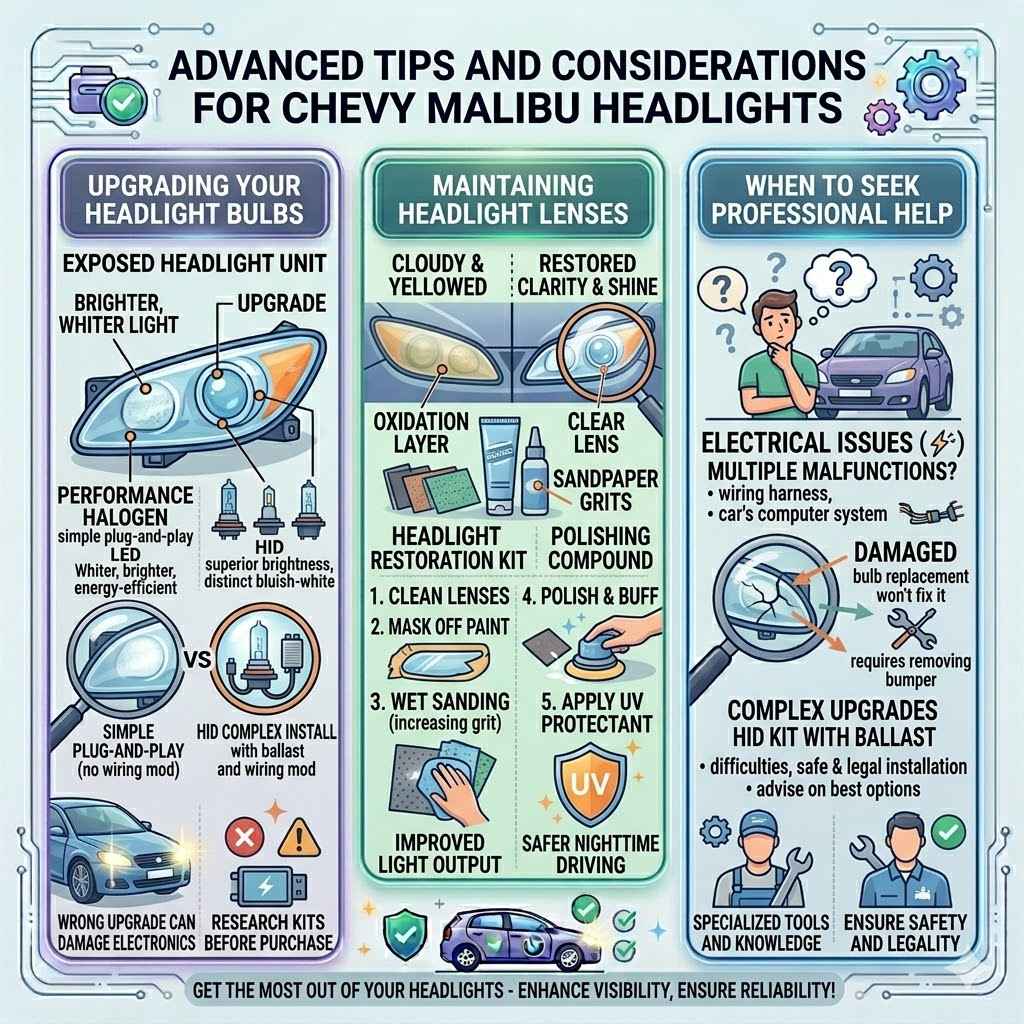
Upgrading Your Headlight Bulbs
Many drivers look to upgrade their standard halogen bulbs for brighter, whiter light. There are several options to consider when upgrading. You can opt for “performance” halogen bulbs that offer higher brightness than standard ones.
These are a simple plug-and-play replacement, using the same wattage and fitting your Malibu’s existing system.
Another popular upgrade is to LED bulbs. LED headlights provide a much whiter and brighter light output than traditional halogens. They are also more energy-efficient and can last significantly longer.
However, when switching to LED bulbs, it’s crucial to ensure they are designed to
HID (High-Intensity Discharge) bulbs are another option, offering superior brightness and a distinct bluish-white light. However, HID conversions are often more complex. They require ballasts to ignite the gas within the bulb, and the installation can involve significant wiring modifications.
It’s also important to ensure that any HID or LED upgrade is legal in your area, as some brighter or differently colored lights can be prohibited for road use.
Always research specific LED or HID kits for compatibility with your 2012 Chevy Malibu before purchasing. Check reviews to see how well they perform and if any modification is needed for installation. Using the wrong upgrade can lead to flickering lights, poor beam pattern, or even damage to your car’s electrical system.
Maintaining Headlight Lenses
Headlight lenses can become cloudy or yellowed over time due to exposure to sunlight, weather, and road debris. This oxidation reduces the amount of light that can pass through, significantly dimming your headlights. Fortunately, you can restore them with a headlight restoration kit.
These kits typically include a series of sandpaper grits of increasing fineness and a polishing compound. The process involves carefully sanding away the oxidized layer of plastic, starting with the coarsest grit and moving to the finest. After sanding, you use the polishing compound to restore clarity and shine.
Some kits also include a UV protectant coating to apply afterward, which helps prevent them from yellowing again quickly.
The restoration process usually takes about an hour or two. It requires patience and a systematic approach. First, clean the headlight lenses thoroughly.
Then, mask off the surrounding paintwork with painter’s tape to protect it from the sanding. Follow the kit’s instructions for wet sanding, gradually increasing the grit number. After sanding, wipe the lenses clean and apply the polishing compound, buffing until clear.
Finally, apply the protective coating as directed.
A well-restored headlight lens can significantly improve your Malibu’s light output, making nighttime driving safer. It also gives your car a cleaner, more polished appearance. For severely damaged or deeply oxidized lenses, professional restoration or replacement of the entire headlight assembly might be necessary.
When to Seek Professional Help
While learning how to
One situation where professional help is recommended is if you suspect a more complex electrical issue. If replacing a fuse doesn’t solve the problem, or if multiple electrical components in the front of your car are malfunctioning, there might be a wiring harness issue or a problem with the car’s computer system. Diagnosing and repairing these kinds of faults often requires specialized tools and knowledge that only a trained mechanic possesses.
Another reason to visit a mechanic is if the headlight assembly itself is damaged. If the housing is cracked, the mounting points are broken, or the internal reflectors are corroded, a simple bulb replacement won’t fix the problem. Replacing the entire headlight assembly is a more involved job that might require removing the bumper or making other adjustments.
A professional can ensure the new assembly is fitted correctly and sealed properly.
Finally, if you’re attempting an advanced upgrade like HID or a complex LED kit and encounter difficulties, a mechanic can help ensure the installation is done safely and correctly, meeting all legal requirements. They can also advise on the best upgrade options for your specific vehicle.
Frequently Asked Questions
Question: How long does it take to replace a headlight on a 2012 Chevy Malibu
Answer: For most people, replacing a headlight on a 2012 Chevy Malibu takes about 15 to 30 minutes per bulb if they are doing it for the first time. If you’ve done it before, it can be even quicker, perhaps 10 minutes per bulb.
Question: Can I replace just one headlight bulb or should I replace both
Answer: It’s highly recommended to replace both headlight bulbs at the same time. This ensures that both headlights have similar brightness and color, which is important for visibility and the overall appearance of your car.
Question: Do I need to remove the headlight assembly to change the bulb
Answer: In most cases for a 2012 Chevy Malibu, you do not need to remove the entire headlight assembly. Access to the bulbs is usually available from behind the assembly under the hood.
Question: What kind of tools are absolutely necessary for this job
Answer: Typically, you’ll need gloves to handle the new bulb, and possibly a screwdriver or socket set if there are any fasteners holding an access panel or cover in place.
Question: Can I use a brighter bulb than what my owner’s manual recommends
Answer: While some brighter bulbs are available, it’s best to stick to the manufacturer’s recommended bulb type and wattage. Using a bulb that is too powerful can overheat the wiring and headlight housing, potentially causing damage or being a fire hazard.
Wrap Up
Learning how to replace headlights on a 2012 Chevy Malibu is a practical skill that saves you time and money. By following the simple steps for access, removal, and installation, you can easily restore your car’s lighting. Always ensure you have the correct bulbs and handle them with care.
If you encounter issues or plan upgrades, remember that professional help is available.