How to Restore Old Car Paint: A Step-by-Step Guide to Bringing Your Classic Back to Life
Hey there, car enthusiast! If you’re like me, there’s something magical about an old car. Maybe it’s the curves of a classic Mustang or the rugged charm of a vintage pickup truck. But let’s be honest—time isn’t always kind to these beauties. Faded, scratched, or oxidized paint can make even the coolest classic look tired. I’ve spent countless hours in my garage, bringing old car paint back to life, and I’m excited to share what I’ve learned with you. Restoring old car paint isn’t just about looks; it’s about preserving a piece of history and making your ride shine like it did back in the day.
In this guide, I’ll walk you through every step, from assessing the damage to applying that final glossy finish. Whether you’re a weekend warrior or a first-timer, I’ve got you covered with practical tips and tricks. Let’s dive in and make your car sparkle!
Why Restoring Old Car Paint Matters
I’ll never forget the first time I saw my ’67 Chevy Impala. The body was solid, but the paint? It was dull, chalky, and scratched—like the car had been through a sandstorm. Restoring the paint wasn’t just about making it pretty; it was about protecting the metal underneath and keeping the car’s value intact. Old car paint fades due to UV rays, weather, and neglect. Oxidation turns vibrant colors into a powdery mess, and scratches expose the metal to rust. A good restoration stops this damage in its tracks. Plus, a shiny car turns heads at car shows and makes you feel proud every time you hit the road. It’s a labor of love, but the results are worth it.
Assessing the Condition of Your Car’s Paint
Before you grab any tools, take a close look at your car’s paint. I learned this the hard way when I started polishing my old Ford Falcon without checking the damage first. Walk around your car in good lighting. Look for these common issues:
- Fading: The paint looks dull or lighter in spots, especially on the hood or roof.
- Oxidation: A chalky, powdery coating on the surface, often white or gray.
- Scratches: Light surface scratches or deeper ones that cut through the clear coat.
- Swirl Marks: Tiny circular scratches from improper washing or waxing.
- Peeling: Paint flaking off, exposing primer or metal.
Run your hand over the surface. If it feels rough, you’re likely dealing with oxidation. Deep scratches might need more than a polish, while light ones can often be buffed out. Knowing what you’re up against helps you plan the right approach. For my Impala, I had heavy oxidation on the hood but only light scratches on the doors. This told me I’d need different techniques for different areas.
Gathering the Right Tools and Supplies
Restoring car paint isn’t cheap, but it’s way less expensive than a professional repaint. Over the years, I’ve built up a collection of tools that make the job easier. Here’s what you’ll need:
| Tool/Supply | Purpose | Where to Find |
|---|---|---|
| Car Wash Soap | Cleans dirt without stripping wax | Auto parts stores |
| Microfiber Cloths | Gentle cleaning and drying | Online or auto stores |
| Clay Bar Kit | Removes contaminants from paint | Auto detailing shops |
| Polishing Compound | Removes oxidation and light scratches | Auto parts stores |
| Dual Action Polisher | Buffs paint safely for beginners | Online or hardware stores |
| Polishing Pads | Works with polisher for different tasks | Auto detailing shops |
| Wax or Sealant | Protects the restored paint | Auto parts stores |
| Masking Tape | Protects trim and glass | Hardware stores |
| Bucket with Grit Guard | Keeps wash water clean | Online or auto stores |
| Sandpaper (2000-3000 grit) | Smooths deep scratches (optional) | Hardware stores |
I recommend investing in a dual-action polisher if you’re serious about car care. It’s safer than a rotary polisher and gives great results. For my first restoration, I used hand polishing, and let me tell you—my arms were sore for days! A polisher saves time and effort.
Step 1: Washing the Car Thoroughly
The first step is getting your car squeaky clean. Dirt, grime, or bugs left on the surface can scratch the paint when you start polishing. I always use the two-bucket method: one bucket with car wash soap and water, and another with just water to rinse your sponge or mitt. This keeps dirt from getting back onto the car.
Start by rinsing the car with a hose to remove loose debris. Then, wash from top to bottom using a microfiber mitt. Don’t use dish soap—it strips wax and dries out the paint. Rinse thoroughly and dry with microfiber towels to avoid water spots. I once skipped drying my car properly, and the water spots made my polishing job twice as hard. Take your time here—it sets the stage for everything else.
Step 2: Clay Bar Treatment for a Smooth Surface
After washing, your car might feel clean, but tiny contaminants like tree sap or tar can still stick to the paint. A clay bar is your best friend here. I was amazed the first time I used one on my Falcon—the paint felt like glass afterward.
Spray a lubricant (usually included in a clay bar kit) onto a small section of the car. Gently rub the clay bar over the area in straight lines. You’ll hear a slight scratching sound at first—that’s the clay pulling out contaminants. Keep going until the surface feels smooth. Fold and knead the clay to expose a clean side as it gets dirty. Work in small sections, and don’t skip this step. It makes polishing way more effective.
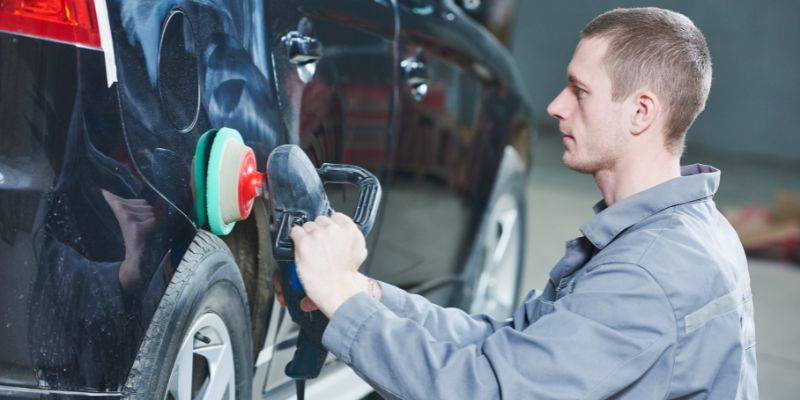
Step 3: Polishing to Remove Oxidation and Scratches
Now comes the fun part—bringing back that shine! Polishing removes oxidation, light scratches, and swirl marks. If you’re using a dual-action polisher, attach a foam polishing pad. Apply a small amount of polishing compound to the pad—think dime-sized drops. Work in small sections, about 2×2 feet, and move the polisher in overlapping passes. Keep the polisher moving to avoid burning the paint.
For my Impala, the hood was so oxidized that I needed a heavier cutting compound first, followed by a finer polish for shine. If you’re polishing by hand, use a microfiber cloth and a lot of elbow grease. Check your progress often. The paint should start looking vibrant and glossy. If you see deep scratches that don’t buff out, you might need to wet sand (more on that later).
Step 4: Wet Sanding for Deep Scratches (Optional)
Some scratches are too deep for polishing alone. On my Chevy, I had a nasty scratch on the door that went through the clear coat. Wet sanding was my solution, but it’s not for beginners. If you’re not confident, skip this or practice on a junkyard panel first.
Soak 2000-grit sandpaper in water for 10 minutes. Spray the scratched area with water and gently sand in straight lines, not circles. Keep the area wet to avoid damaging the paint. Check often—you’re only removing a tiny layer of clear coat or paint. Once the scratch is gone, polish the area to restore the shine. Wet sanding is risky, so go slow and stop if you’re unsure.
Step 5: Applying Wax or Sealant for Protection
Polishing makes your car look amazing, but it also removes any remaining wax or sealant. Without protection, the paint will fade again fast. I learned this after polishing my Falcon and skipping wax—the shine dulled in weeks.
Apply wax or sealant with a foam applicator pad in thin, even layers. Work in small sections and let it haze over (usually 5-10 minutes). Buff it off with a clean microfiber towel. Wax gives a warm, deep shine, while sealants last longer and are easier to apply. I prefer a synthetic sealant for my daily driver because it holds up better in rain and sun. Apply two coats for extra protection.
Step 6: Maintaining Your Restored Paint
Your car looks incredible now, but keeping it that way takes effort. I made the mistake of parking my restored Impala under a tree, and sap ruined my hard work in days. Wash your car every two weeks with the two-bucket method. Avoid automatic car washes—they cause swirl marks. Reapply wax or sealant every 2-3 months, depending on your climate. If you live in a sunny state like California, UV rays are your enemy, so consider a ceramic coating for longer-lasting protection.
Park in a garage or under a car cover when possible. If you notice bird droppings or tree sap, clean them off immediately—they can eat through paint fast. I keep a spray bottle of quick-detailer in my trunk for emergencies. Regular maintenance keeps your car looking showroom-ready.
Common Mistakes to Avoid
I’ve made plenty of mistakes restoring car paint, so let me save you some headaches:
- Skipping the Clay Bar: Polishing over contaminants grinds them into the paint, causing scratches.
- Using Too Much Compound: More isn’t better—it can clog pads and make a mess.
- Polishing in Direct Sun: Heat can make compounds less effective and damage paint.
- Not Testing Products: Always test on a small area first. I once used a too-aggressive compound and dulled my paint.
- Rushing the Job: Take your time. Rushing leads to uneven results or damage.
When to Call a Professional
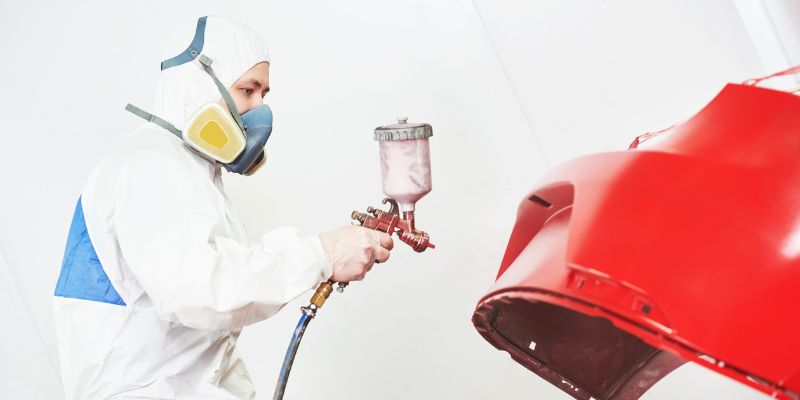
Sometimes, the damage is too much for a DIY fix. If your paint is peeling badly or there’s rust, a professional repaint might be needed. I tried fixing rust on my old truck myself, and it was a nightmare—rust kept coming back. Pros have the tools and experience for major repairs. Get quotes from a few shops and check their reviews. A good detailer can also handle tough polishing jobs if you’re not comfortable with a polisher.
The Joy of a Restored Classic
Restoring old car paint is more than a chore—it’s a journey. Every scratch you buff out, every dull spot you bring back to life, feels like a victory. When I finished my Impala, I took it to a local car show, and the compliments were endless. People couldn’t believe it was the same faded car from months before. The process taught me patience and gave me a deeper appreciation for my classic. Your car has stories to tell, and a shiny paint job lets those stories shine. Grab your tools, put on some music, and enjoy the process. Your classic deserves it, and so do you.
FAQs
How long does it take to restore old car paint?
It depends on the car’s condition and your experience. For my Impala, it took two full weekends—about 12-15 hours total. Washing and clay bar treatment take 2-3 hours, polishing can take 6-8 hours, and waxing adds another 1-2 hours. Deep scratches or wet sanding can add more time. Spread the work over a few days to avoid rushing.
Can I restore car paint without a polisher?
Yes, but it’s harder. Hand polishing works for light oxidation and scratches, but it’s time-consuming and less effective. I did it on my first car, and my arms were killing me! A dual-action polisher is worth the investment for better results and less effort.
How often should I wax my car after restoration?
Wax or sealant should be reapplied every 2-3 months. If you live in a harsh climate with lots of sun or rain, do it every 6-8 weeks. I wax my Chevy every 2 months because I drive it often, and it keeps the shine perfect.
Is it safe to use dish soap to wash my car?
No, dish soap strips wax and dries out paint. I made this mistake once, and my car looked duller after washing. Use a car-specific soap designed to be gentle on paint and preserve wax.
Can I restore paint on a car with rust?
Light surface rust can sometimes be sanded and polished, but deep rust needs professional attention. I tried fixing rust myself and regretted it— it spread fast. If you see rust, consult a pro to prevent further damage.