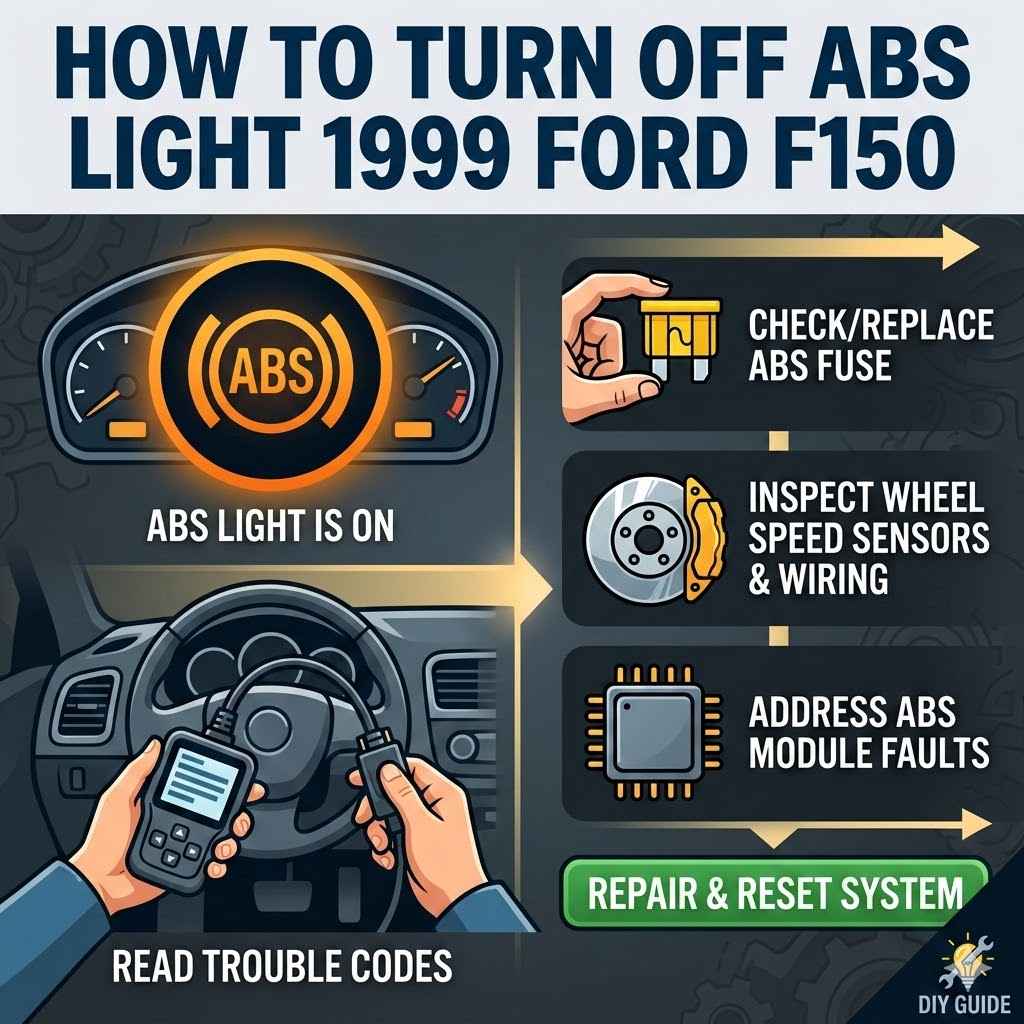
How To Turn Off ABS Light 1999 Ford F150
It can be a bit tricky when that ABS warning light pops on your dashboard, especially for beginners. You might wonder why it’s on or how to fix it on your 1999 Ford F150. Many people search for How to Turn Off ABS Light on a 1999 Ford F150 because it’s a common issue that can feel confusing at first.
But don’t worry! This guide will break it down into easy steps so you can figure out what’s happening and get that light off. Let’s get started on finding the solution.
Understanding Your ABS Light
The Anti-lock Braking System (ABS) light on your 1999 Ford F150 is a signal from your truck’s computer that something is not quite right with the ABS. This system is important for safe braking, especially on slippery roads. When the light is on, it means the ABS might not be working as it should.
It’s good to know what this means for your truck and how to approach the problem. We will explore the common reasons for this light to appear and what you can do.
What the ABS Light Means
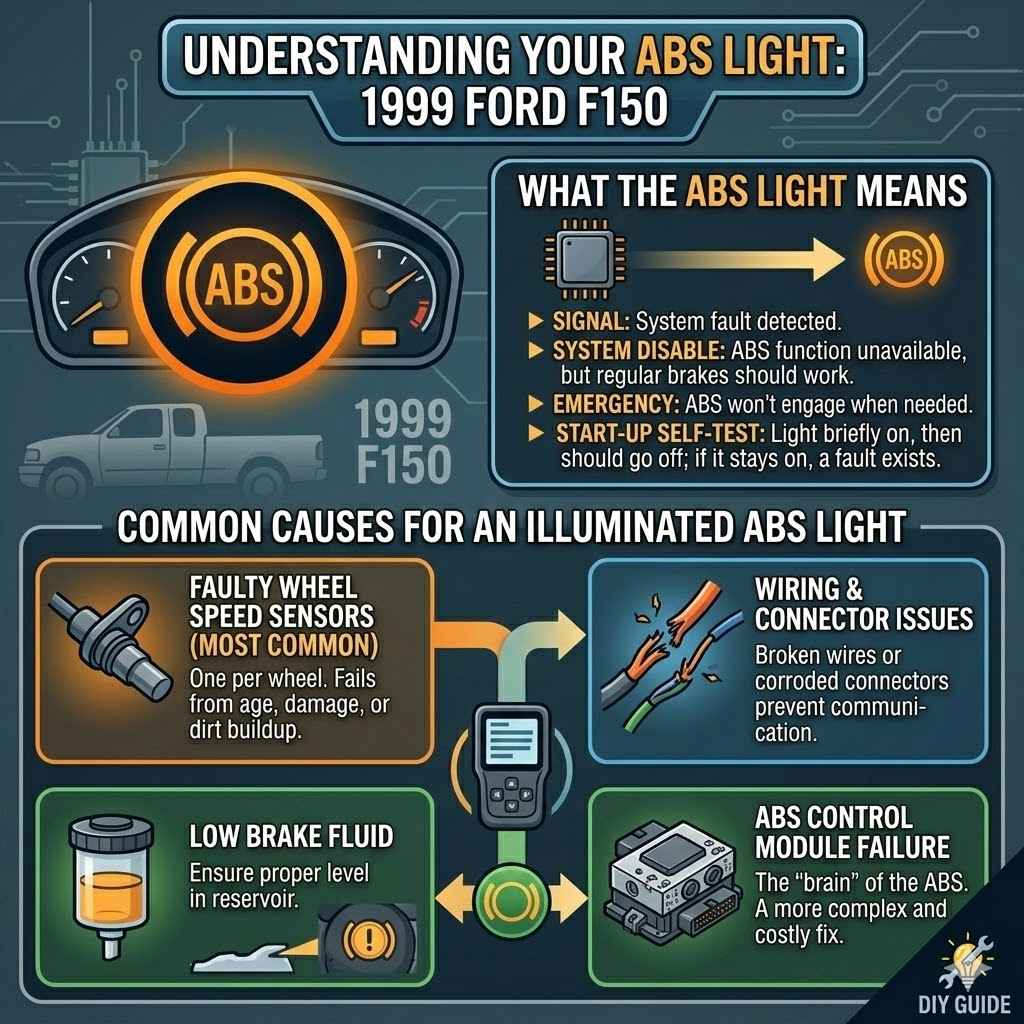
The ABS light is your truck’s way of telling you it has detected a problem within the Anti-lock Braking System. This system uses sensors to monitor wheel speed and prevents them from locking up during hard braking. If a sensor fails or there’s an issue with the ABS control module, the light will come on to alert you.
It does not necessarily mean your regular brakes have stopped working. However, it does mean the ABS feature is disabled until the problem is fixed.
When you first start your truck, the ABS light should briefly illuminate and then turn off, just like the check engine light. If it stays on after starting or comes on while you are driving, it indicates a fault. This is a signal that the ABS system may not engage if you need it in an emergency.
Common Causes for an Illuminated ABS Light
Several things can cause the ABS light to stay on. One of the most frequent culprits is a faulty ABS wheel speed sensor. These sensors are located at each wheel and can get dirty, damaged, or simply wear out over time.
Another possibility is a problem with the wiring or connectors leading to these sensors. Sometimes, the ABS control module itself can have issues, but this is less common than sensor problems. Low brake fluid levels can also sometimes trigger the ABS light, especially if it also affects the brake warning light.
Another common issue is dirt or debris that gets stuck around the wheel speed sensors. This can block the sensor’s ability to read the wheel’s rotation accurately. Road salt, mud, or even small stones can cause this.
A damaged tone ring, which the sensor reads, can also be the cause.
Faulty Wheel Speed Sensors: These are the most common cause. There’s one for each wheel. If one stops working correctly, the ABS light will turn on. They can fail due to age, damage from road debris, or dirt buildup.
Wiring and Connector Issues: The wires that connect the sensors to the ABS control module can become damaged. Loose or corroded connectors can also prevent the system from communicating properly. This is especially true in older trucks that have seen a lot of weather.
Low Brake Fluid: While primarily for the regular brake system, very low brake fluid can sometimes trigger the ABS light. Ensure your brake fluid reservoir is filled to the correct level.
ABS Control Module Failure: The control module is the “brain” of the ABS system. If it malfunctions, it will cause the light to illuminate. This is usually a more expensive fix.
Troubleshooting Steps for Your F150
When your ABS light is on, it’s best to start with the simplest checks. This approach helps you avoid unnecessary repairs. We will walk through a series of steps, from visual inspections to more involved diagnostics.
Following these steps can help you pinpoint the issue and decide if you can fix it yourself or if you need professional help.
Visual Inspection of Sensors and Wiring
The first step in troubleshooting is a good look around. You’ll want to examine the ABS sensors at each wheel and their associated wiring. These sensors are typically mounted near the brake rotor or hub.
Look for any obvious signs of damage, such as cracks, cuts, or corrosion. Also, check the wiring harnesses for any loose connections, frayed wires, or damage from road debris.
Make sure the sensors are securely attached. Sometimes, a sensor can come loose. Pay close attention to the connectors; dirt or moisture can cause poor contact.
You might need to carefully clean these connectors.
Here’s what to look for specifically:
ABS Wheel Speed Sensors: Locate the sensor at each wheel. It’s usually a small plastic or metal component with a wire going into it. Check for cracks, impact marks, or anything obstructing the sensor’s tip.
Wiring Harnesses: Follow the wires from the sensors. Look for signs of abrasion, pinching, or cuts. Ensure the wires are not hanging loose or rubbing against any moving parts of the suspension or drivetrain.
Connectors: Disconnect the wiring harness from the sensor and inspect the pins for corrosion or bending. Clean them gently with electrical contact cleaner if needed. Reconnect them firmly.
Checking Brake Fluid Level
A simple check that can sometimes solve the problem is looking at your brake fluid. The ABS system relies on hydraulic pressure, just like your regular brakes. If the brake fluid is too low, it can cause issues that trigger warning lights.
Locate the brake fluid reservoir under the hood. It’s usually a translucent plastic container near the brake master cylinder.
Check the fluid level against the MIN and MAX marks on the reservoir. If it’s low, add the correct type of brake fluid. The owner’s manual will specify the type.
Be aware that if your brake fluid is consistently low, it could indicate a leak in your brake system, which needs immediate attention.
Here’s how to check it:
- Open the hood and find the brake fluid reservoir.
- Observe the fluid level.
- If it is below the MIN line, add the recommended type of brake fluid.
- If you are adding fluid frequently, have your brake system inspected for leaks.
Reading ABS Codes
To get a more precise idea of what’s wrong, you’ll need to read the diagnostic trouble codes (DTCs) stored in your truck’s computer. For a 1999 Ford F150, you can often use an OBD-II scanner. Many auto parts stores will read these codes for free.
The codes will point you toward the specific sensor or circuit that is failing.
If you own an OBD-II scanner, you can plug it into the diagnostic port, usually located under the dashboard on the driver’s side. Turn the ignition key to the “ON” position without starting the engine, and follow the scanner’s instructions. The scanner will display a code, often starting with “C” for chassis or body issues, like C1155 for a wheel speed sensor.
Understanding these codes is key:
- OBD-II Scanner: A handheld device that connects to your truck’s diagnostic port.
- Diagnostic Port Location: Typically under the steering column.
- Code Interpretation: Codes like C1155 often relate to a specific wheel speed sensor circuit. The code description will give you clues.
Testing Wheel Speed Sensors
If your OBD-II scanner points to a specific wheel speed sensor, you can test it. This often involves using a multimeter. First, disconnect the sensor and check its resistance.
The correct resistance value can usually be found in a repair manual for your truck. A sensor with no resistance or extremely high resistance is likely bad.
You can also test the sensor while the wheel is spinning, though this can be tricky. With the engine running and the scanner connected, watch the wheel speed data for each sensor. If a sensor’s reading is erratic, jumps around, or reads zero when the wheel is clearly turning, it’s probably faulty.
Here are the steps for testing:
- Disconnect the suspect wheel speed sensor.
- Set your multimeter to measure resistance (ohms).
- Touch the multimeter probes to the sensor terminals.
- Compare the reading to the specification in your F150’s repair manual.
- If the reading is out of spec, the sensor needs replacement.
Replacing ABS Components
Once you’ve identified a faulty part, replacing it is the next logical step. For many DIY mechanics, replacing a wheel speed sensor is a manageable task. It’s important to use quality parts to ensure the fix lasts.
How to Replace a Wheel Speed Sensor
Replacing a wheel speed sensor is usually straightforward. You’ll typically need a socket set, possibly a torque wrench, and possibly a flathead screwdriver for prying. First, safely lift the front or rear of the truck and remove the wheel where the faulty sensor is located.
The sensor is usually held in place by one or two bolts.
Carefully unbolt the old sensor. It might be a bit seized, so gentle persuasion might be needed. Then, unplug the electrical connector.
Install the new sensor, ensuring it’s seated properly. Reconnect the electrical connector and bolt the sensor back in place. Remember to tighten the bolts to the manufacturer’s specifications.
Finally, put the wheel back on and lower the truck.
Here are the general steps:
- Safety First: Jack up the truck and secure it with jack stands. Remove the wheel.
- Locate Sensor: Find the ABS wheel speed sensor.
- Unbolt and Disconnect: Remove the bolt(s) holding the sensor and unplug its connector.
- Install New Sensor: Position the new sensor and secure it with its bolt(s).
- Reconnect and Reassemble: Plug in the electrical connector, reinstall the wheel, and lower the truck.
Replacing Other ABS Parts
If the issue isn’t a wheel speed sensor, you might need to look at other components. This could include the ABS wiring harness or the ABS control module. Replacing a wiring harness can be more involved, as it may require routing new wires along the chassis.
The ABS control module is a more complex part. It’s typically located under the hood or behind the dashboard. Replacing it often involves disconnecting multiple electrical connectors and may require programming by a dealership or specialist.
If you suspect the control module, it’s often best to seek professional diagnosis and repair.
When dealing with other parts:
- Wiring Harness: If wires are damaged, replacement might involve careful routing and securing of new cables.
- ABS Control Module: This is a critical component. Replacement may require specialized tools or software.
- Professional Help: For complex parts like the control module, consulting a mechanic is wise.
Resetting the ABS Light
After repairing a fault, the ABS light should turn off on its own. However, sometimes it might need a manual reset. You can try disconnecting the truck’s battery for about 15-30 minutes.
This will reset the truck’s computer, including the ABS module. Reconnect the battery and start the truck. The ABS light should now be off.
If the light remains on after a battery disconnect and a known repair, it might indicate that the problem wasn’t fully resolved or that the computer needs to be cleared with an OBD-II scanner capable of resetting ABS codes. Some scanners have a specific function for this.
To reset the light:
- Disconnect the negative terminal of your truck’s battery.
- Wait for 15-30 minutes.
- Reconnect the battery terminal.
- Start the truck and check if the ABS light has gone out.
- If it persists, use an OBD-II scanner to clear the codes.
When to Seek Professional Help
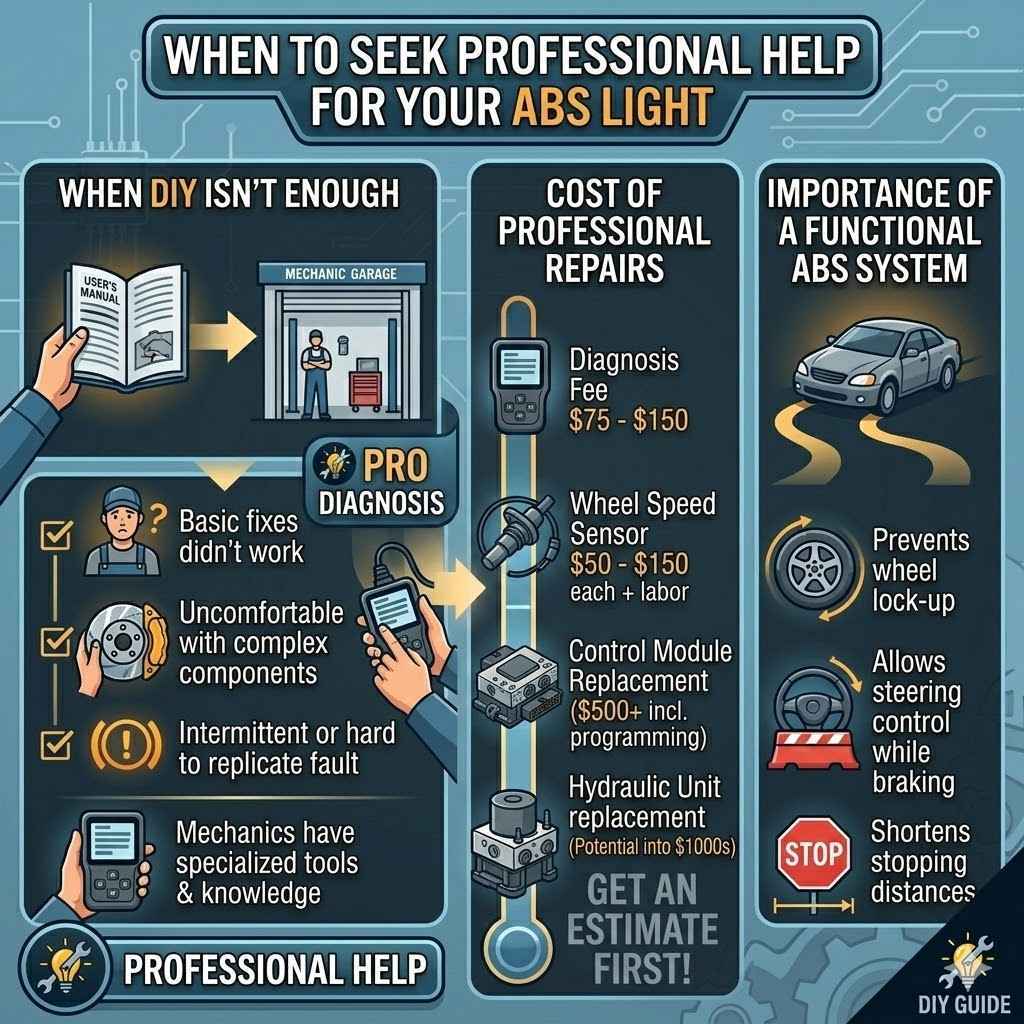
While many ABS issues can be diagnosed and fixed at home, some situations call for expert advice. If you’ve gone through the basic troubleshooting steps and the light is still on, or if you’re uncomfortable with certain repairs, it’s time to call in the professionals. Mechanics have specialized tools and knowledge to diagnose complex problems quickly.
When DIY Isn’t Enough
There are times when the problem is more complex than a simple sensor
Consider professional help when:
- The ABS light stays on after trying basic fixes.
- You are uncomfortable working with electrical systems or brake components.
- The problem seems intermittent or hard to replicate.
Cost of Professional Repairs
The cost of having a mechanic fix your ABS light can vary widely. It depends on the part that needs replacing and the labor involved. Simple sensor replacements might be relatively affordable, costing a few hundred dollars for parts and labor.
However, if the ABS control module or hydraulic unit needs replacement, the cost can go up significantly, potentially into the thousands. Always get an estimate before authorizing repairs.
Here’s a general idea of costs:
- Diagnosis Fee: Many shops charge a fee to diagnose the problem. This can range from $75 to $150.
- Part Replacement: Wheel speed sensors typically cost $50-$150 each, plus labor.
- Control Module Replacement: This can be $500 or much more, including parts and programming.
Importance of a Functional ABS System
A working ABS system is crucial for your safety. It helps you maintain steering control during hard braking by preventing the wheels from locking up. This allows you to steer around obstacles while stopping.
Driving with a non-functional ABS system means you’ll have longer stopping distances and could lose steering control in an emergency. It is important to address the ABS light promptly.
A functional ABS system:
- Prevents wheel lock-up during hard braking.
- Allows for steering control while braking.
- Shortens stopping distances on most surfaces.
Frequently Asked Questions
Question: Can I drive my F150 with the ABS light on
Answer: Yes, you can usually drive your 1999 Ford F150 with the ABS light on. However, the Anti-lock Braking System will not be operational. Your regular brakes will still work, but you won’t have the benefit of ABS in emergency braking situations, meaning longer stopping distances and a potential loss of steering control.
Question: How long does it take to fix an ABS light
Answer: The time it takes to fix an ABS light depends on the cause. Replacing a wheel speed sensor can often be done in an hour or two. More complex issues, like a faulty ABS control module or wiring problems, could take several hours or require professional diagnosis.
Question: Where is the ABS control module located on a 1999 Ford F150
Answer: On a 1999 Ford F150, the ABS control module is typically located under the hood, often mounted on the firewall or near the master cylinder. Its exact location can vary slightly, so consulting your owner’s manual or a repair guide is recommended.
Question: Do I need to bleed the brakes after replacing an ABS sensor
Answer: Generally, you do not need to bleed the brakes after replacing an ABS wheel speed sensor, as it is an electronic component and does not interfere with the hydraulic brake lines. However, if you disturbed brake lines or replaced other brake components, bleeding might be necessary.
Question: Can a bad alternator cause the ABS light to come on
Answer: While a weak or failing alternator can cause various electrical issues and warning lights due to low voltage, it’s not a direct cause of the ABS light specifically. However, if the voltage is extremely low, it could affect the performance of the ABS module and indirectly trigger the light.
Final Thoughts
Addressing the ABS light on your 1999 Ford F150 involves simple checks first, like looking at sensors and brake fluid. Reading codes with a scanner is a smart next step. If you find a faulty wheel speed sensor, replacing it yourself is often possible.
If the problem is more complex, or you’re unsure, seeking professional help ensures your truck is safe and reliable.