How to Vinyl Wrap a Car: Proven Effortless Guide
Learning how to vinyl wrap a car is achievable for beginners! This guide breaks down the process into simple, actionable steps, helping you transform your vehicle’s look with confidence and save money on custom paint jobs. We cover essential tools, preparation, application, and finishing touches for a professional result.
Hey there, fellow car enthusiasts! I’m Md Meraj, and I know the feeling. You love your car, but you’re craving a fresh look. Maybe you’ve seen those stunning custom wraps and thought, “That’s way too complicated for me!” It’s true, changing your car’s appearance can seem like a job for the pros. But what if I told you that with the right guidance and a little patience, you can achieve an amazing transformation yourself? This guide is designed to make learning how to vinyl wrap a car feel effortless. We’ll walk through everything you need to know, from choosing the right materials to the final squeegee strokes. Get ready to give your ride a whole new personality!
Why Vinyl Wrap Your Car? A Beginner’s Look
Thinking about a new look for your car? Vinyl wrapping offers an exciting alternative to traditional paint jobs. It’s not just about aesthetics; it’s a smart way to protect your car’s original paint and even boost its resale value. Let’s dive into why this DIY project is becoming so popular.
The Benefits of Going Vinyl
- Variety is the Spice of Life: The sheer range of colors, finishes (like matte, satin, gloss, carbon fiber, and chrome), and patterns available in vinyl wraps is astounding. You can achieve almost any look imaginable without compromising the original paint.
- Paint Protection: A vinyl wrap acts as a shield for your car’s original paint. It protects against minor scratches, rock chips, UV rays, and even light weather wear. This means your factory paint stays in pristine condition underneath.
- Cost-Effective: Compared to a professional custom paint job, vinyl wrapping is often significantly more affordable, especially when you do it yourself!
- Reversible and Temporary: Unlike paint, vinyl wrap is not permanent. If you want to change your mind or sell your car, the wrap can be removed, often leaving the original paint in perfect condition.
- Faster Installation Time: While intricate wraps take time, a full car wrap can generally be completed much faster than a multi-stage paint job.
Essential Tools and Materials for Your First Wrap
Before we get our hands dirty, let’s make sure you have everything you need. Having the right tools makes a huge difference in how smoothly the process goes. Think of this as your trusty toolkit for the job!
What You’ll Need
- Vinyl Wrap Film: This is your main ingredient! Choose a reputable brand and a color/finish you love. For beginners, consider cast vinyl as it’s more conformable and forgiving.
- Heat Gun or Powerful Hair Dryer: Essential for activating the adhesive and making the vinyl stretchy enough to conform to curves.
- Squeegees: You’ll want a few different types. A felt-edged squeegee is gentle on the vinyl surface, while a firmer squeegee can help with tensioning and pressing out air.
- Cutting Tools: A sharp, retractable utility knife or a specialized vinyl wrap knife with a small, sharp blade is crucial. You’ll also need an X-Acto knife for intricate areas.
- Magnets: Strong magnets are incredibly helpful for temporarily holding the vinyl in place while you position it or during large panel wraps.
- Primer/Adhesion Promoter: Especially for edges and difficult areas, a vinyl primer can help ensure a long-lasting bond. Check your vinyl manufacturer’s recommendations.
- Rubbing Alcohol and Microfiber Cloths: For thoroughly cleaning the car’s surface before application. This is a non-negotiable step!
- Masking Tape: To protect edges that you don’t want to cut into.
- Gloves: To keep both your hands and the vinyl clean.
- Measuring Tape: For calculating how much vinyl you’ll need.
- Patience and a Friend (Optional but Recommended!): This project is much easier and more fun with an extra pair of hands and a good attitude.
It’s worth investing in quality tools. They will make the application process much smoother and the final result look more professional. Don’t be afraid to experiment with smaller pieces of vinyl beforehand to get a feel for how it stretches and adheres.
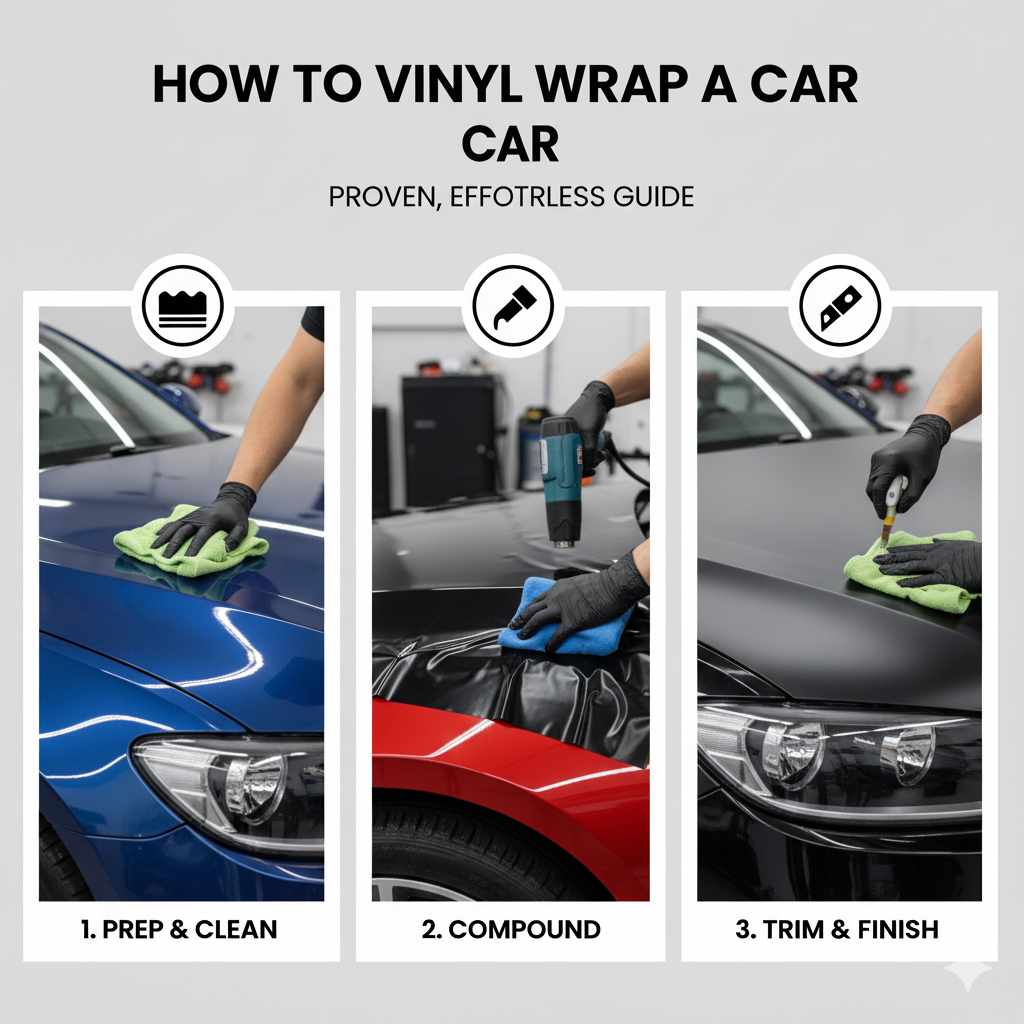
Preparation is Key: Setting Up for Success
This is arguably the most important step. A clean, well-prepared surface is the foundation of a smooth, bubble-free, and long-lasting vinyl wrap. Rushing this stage is a recipe for frustration later on!
Step-by-Step Surface Prep
- Thorough Washing: Wash your car meticulously. Use a quality car soap and clean water. Pay attention to all body panels, including door jams and under wheel wells.
- Decontamination: After washing, use a clay bar kit (following its instructions) to remove any bonded contaminants like tar, bug residue, or industrial fallout. This will ensure the vinyl adheres properly.
- Deep Cleaning with Alcohol: This is crucial! Wipe down every surface you plan to wrap using a mixture of isopropyl alcohol and distilled water (about 50/50 concentration), or a dedicated automotive surface prep spray. This removes any residual oils, waxes, or silicones that could prevent adhesion. Use clean microfiber cloths and change them frequently.
- Remove Loose Parts: Take off any trim pieces, emblems, or door handles that will get in the way. The cleaner your lines are, the better the wrap will look. If you can’t remove them, you’ll practice more advanced techniques to wrap around them.
- Inspect the Surface: Look for any imperfections like deep scratches or dents. While vinyl can hide minor imperfections, significant damage might show through or cause application issues.
A clean surface means the adhesive on the vinyl can properly bond to the car’s paint. Think of it like applying a sticker – if the surface underneath is dirty, the sticker won’t stick well. This step ensures your wrap stays put and looks flawless.
Applying the Vinyl Wrap: Panel by Panel
Now for the main event! Applying the vinyl requires patience and a gentle touch. We’ll break it down for a typical panel, like a fender or door.
Getting Started with Application
- Measure and Cut: Roll out your vinyl and cut a piece that is significantly larger than the panel you are wrapping. Leaving at least 4-6 inches of excess around all edges is a good rule of thumb. This extra material gives you room to work with.
- Peel Backing Paper: Carefully peel back about 4-6 inches of the backing paper from one edge of the vinyl sheet.
- Position and Tack: Align the exposed adhesive side of the vinyl with the starting edge of your panel. Use your magnets to hold it loosely in place, or press down the peeled section firmly with a squeegee to tack it.
- Controlled Unrolling and Squeegeeing: Slowly and steadily peel back the rest of the backing paper with one hand while using your squeegee in the other. Work in overlapping strokes, moving from the center outwards towards the edges. Apply firm, even pressure with the squeegee to push out air bubbles and ensure good adhesion.
- Heating for Conformity: As you approach curves and edges, gently heat the vinyl with your heat gun on a medium setting. Don’t overheat it – you want it pliable, not melting! Stretch the vinyl gently over curves, using the heat to help it conform. Work in sections, heating, stretching, and squeegeeing as you go.
- Trimming Excess Vinyl: Once the main panel is covered and adhered, use your sharp utility knife to trim the excess vinyl. Leave about 1-2 inches of overhang around the edges.
- Tucking and Sealing: Carefully tuck the remaining 1-2 inches of vinyl into panel gaps, under trim, or around edges. An X-Acto knife can be useful here for precision. Apply a bit of heat to soften the vinyl for tucking. For edges that will be exposed, use a vinyl primer and then press the tucked vinyl down firmly.
Dealing with Curves and Intricate Shapes
Curves are where vinyl wrap really shines, and also where beginners might get a bit nervous. The key is heat and patience.
- Heat and Stretch: Use your heat gun to gently warm the vinyl. It will become more elastic.
- Gentle Pulling: With steady, even pressure, gently pull the vinyl over the curve. Avoid pulling too hard, as this can thin the vinyl and cause it to tear.
- Work in Sections: Don’t try to wrap a complex curve all at once. Heat, stretch, and squeegee a small section at a time.
- Squeegee to Anchor: Once a section is stretched and in place, squeegee it firmly to anchor it.
- Trim and Tuck: As before, trim excess and tuck neatly.
Tackling Air Bubbles
If you notice a small bubble escaping after applying the vinyl, don’t panic!
- Small Bubbles: You can often lift the edge of the vinyl just enough to let the trapped air escape, then re-adhere and squeegee it down.
- Larger Bubbles: For slightly larger bubbles, you can often use a fine needle to gently prick the center of the bubble. Then, carefully push the air out with your squeegee and reapply a bit of heat to seal the tiny hole.
Remember that some minor imperfections are normal for a first-time wrap. The goal is a significant improvement and a learning experience!
Advanced Techniques and Tips for a Pro Finish
Once you’ve wrapped a few flat or gently curved panels, you might encounter areas that require a little more finesse. These tips will help you achieve that professional-looking finish.
Wrapping Around Emblems and Mouldings
This is where precision is key.
- Option 1: Remove Them. If possible, removing emblems and mouldings is the easiest way to get a clean wrap.
- Option 2: Wrap Over Then Cut. Apply the vinyl over the emblem/moulding. Once adhered, use a very sharp blade (like an X-Acto knife) to carefully trim around the edges of the emblem/moulding. This requires a steady hand.
- Option 3: Slice and Tuck. For badges that are slightly raised, you can apply the vinyl over them, then carefully cut a slit in the vinyl where the edge of the badge meets the paint. Then, heat the vinyl and tuck it neatly under the badge.
Sealing Your Edges
Properly sealing the edges ensures the vinyl doesn’t lift over time, especially in high-stress areas like door edges or around mirrors.
- Use Primer: Apply a vinyl adhesion promoter to areas where the vinyl will be stretched thin and tucked, such as door jambs or around body lines.
- Heat and Stretch: Gently heat the vinyl so it becomes pliable.
- Snug Tuck: Stretch the vinyl as little as possible while tucking it into gaps and under edges. Over-stretching can weaken the adhesive.
- Firm Press: Use your squeegee or finger to firmly press the tucked vinyl into place.
The Importance of Post-Heating
After the main application and trimming, a final pass with the heat gun is important. This is called post-heating. It helps the vinyl’s adhesive set properly, especially on curved surfaces and edges. Gently wave the heat gun over the wrapped areas, focusing on edges and complex contours. Don’t get it too hot; you’re just reactivating and setting the adhesive.
Maintaining Your New Vinyl Wrap
You’ve done it! Your car looks amazing. Now, how do you keep it that way?
Caring for Your Wrapped Car
- Gentle Washing: Hand wash your car using a pH-neutral car soap and a soft microfiber wash mitt. Avoid abrasive brushes or harsh chemicals.
- Automatic Car Washes: Be cautious. While many are fine, high-pressure jets and harsh brushes can damage wrapped surfaces. If you use one, opt for touchless washes if possible.
- Avoid Pressure Washing Edges: Never aim high-pressure washers directly at the edges of your wrap, as this can lift them.
- Watch for Damage: Regularly inspect your wrap for any signs of lifting or damage. Small nicks or tears can often be repaired by experienced professionals, or by carefully applying a patch if it’s a very minor issue.
- Parking Smarts: Try to park in shaded areas to protect the wrap from prolonged sun exposure, which can eventually degrade the material.
Proper maintenance will ensure your vinyl wrap stays looking great for many years. It’s often easier to maintain than a painted surface, as dirt and grime tend to slide off more easily.
When to Call in the Professionals
While this guide aims to empower you to do it yourself, there are times when professional help is the best route. If you’re aiming for flawless perfection on a high-end vehicle or tackling extremely complex shapes, a professional installer has the experience, tools, and controlled environment to deliver the best results. They also have access to a wider range of high-quality vinyl films. Additionally, if you find yourself frequently struggling with bubbles, lifting edges, or complex curves after your initial attempts, don’t hesitate to seek advice or assistance from a wraps specialist.
FAQ: Your Vinyl Wrapping Questions Answered
Here are some common questions beginners have about wrapping their cars.
Frequently Asked Questions About Vinyl Wrapping
| Question | Answer |
|---|---|
| How much vinyl do I need for a car? | A general rule of thumb is to add 20-30% extra material to your car’s total square footage. Using an online vinyl wrap calculator for your specific car model is the best way to get an accurate estimate, ensuring you have enough for mistakes or intricate panels. Remember, it’s always better to have too much than too little! |
| Can I wrap my car in the garage or outdoors? | Ideally, wrapping should be done in a clean, temperature-controlled environment like a garage. Outdoor wrapping is possible but significantly increases the risk of dust, debris, and environmental contaminants getting trapped under the vinyl, which can lead to bubbles and an unappealing finish. Maintaining a clean work area is paramount. |
| How long does vinyl wrap typically last? | The lifespan of a vinyl wrap depends heavily on the quality of the material, the installation quality, and how well it’s maintained. High-quality cast vinyl from reputable brands, when professionally installed and cared for, can last anywhere from 3 to 7 years, sometimes even longer. DIY installations might have a slightly shorter lifespan if not perfectly executed or maintained. |
| What’s the difference between cheap and expensive vinyl wrap? | Cheaper vinyl is often thinner, harder to stretch, more prone to tearing, and less durable. It may also fade faster and leave adhesive residue behind when removed. Expensive, high-quality cast vinyl is formulated for conformability, durability, UV resistance, and clean removability. It’s designed to stretch smoothly over complex curves without thinning out too much. Always check what makes vinyl wrap different. |
| Can I wrap over existing scratches or dents? | Vinyl wrap can cover minor imperfections like swirl marks or very light scratches. However, it will not hide significant dents or deep scratches. In fact, the vinyl might even highlight them. It’s best to repair major body damage before wrapping for the smoothest and most professional result. |
| How difficult is it to remove vinyl wrap? | Removing vinyl wrap is generally straightforward, especially if it was applied correctly and is of good quality. The most common method involves using heat (a heat gun) to soften the adhesive. Once heated, the wrap can usually be peeled off slowly at a sharp angle. Residue might remain, which can be cleaned with adhesive remover. Always refer to the manufacturer’s removal instructions if available. For guidance on keeping surfaces clean and ready for potentially future application, the EPA offers advice on greener cleaning, which can be relevant for surface preparation. |
Conclusion: Your Car, Your Canvas!
Learning how to vinyl wrap a car might seem daunting at first, but as you can see, it’s a totally achievable DIY project. By taking your time, preparing your surface meticulously, and using patient, steady application techniques, you can transform your vehicle’s appearance dramatically. You’ve gained the knowledge about the essential tools, the step-by-step process, and the tricks to achieve a professional finish. Remember, practice makes perfect, and your first attempt is a learning experience. Protect your investment, express your style, and take pride in the work you’ve done. So grab your tools, pick out your favorite color, and get ready to make your car stand out from the crowd!