What Is the Correct Order to Connect Car Battery Terminals
Many people wonder about connecting car battery terminals. It might seem tricky, especially if you’re new to car care. You don’t want to make a mistake.
This guide will show you the simple, safe way to do it. We’ll walk through each step so you can feel confident. Ready to learn how to connect your car battery correctly?
Why Terminal Order Matters
Understanding What Is the Correct Order to Connect Car Battery Terminals? is very important for car safety and proper battery function. Connecting the terminals in the wrong sequence can cause sparks, damage your car’s electrical system, or even lead to battery damage. This happens because the car’s electrical system is always looking for a complete circuit.
When you connect the wrong terminal first, you can create a power surge. This surge can affect sensitive electronics like the car’s computer. It’s a common point of confusion for beginners, but the correct order is quite straightforward once you know it.
This section explains why the sequence is so critical and what could go wrong if it’s ignored. We will cover the basic principles behind electrical circuits in your car and how a battery fits into that system. Getting this right protects your vehicle’s components.
Understanding the Battery Terminals
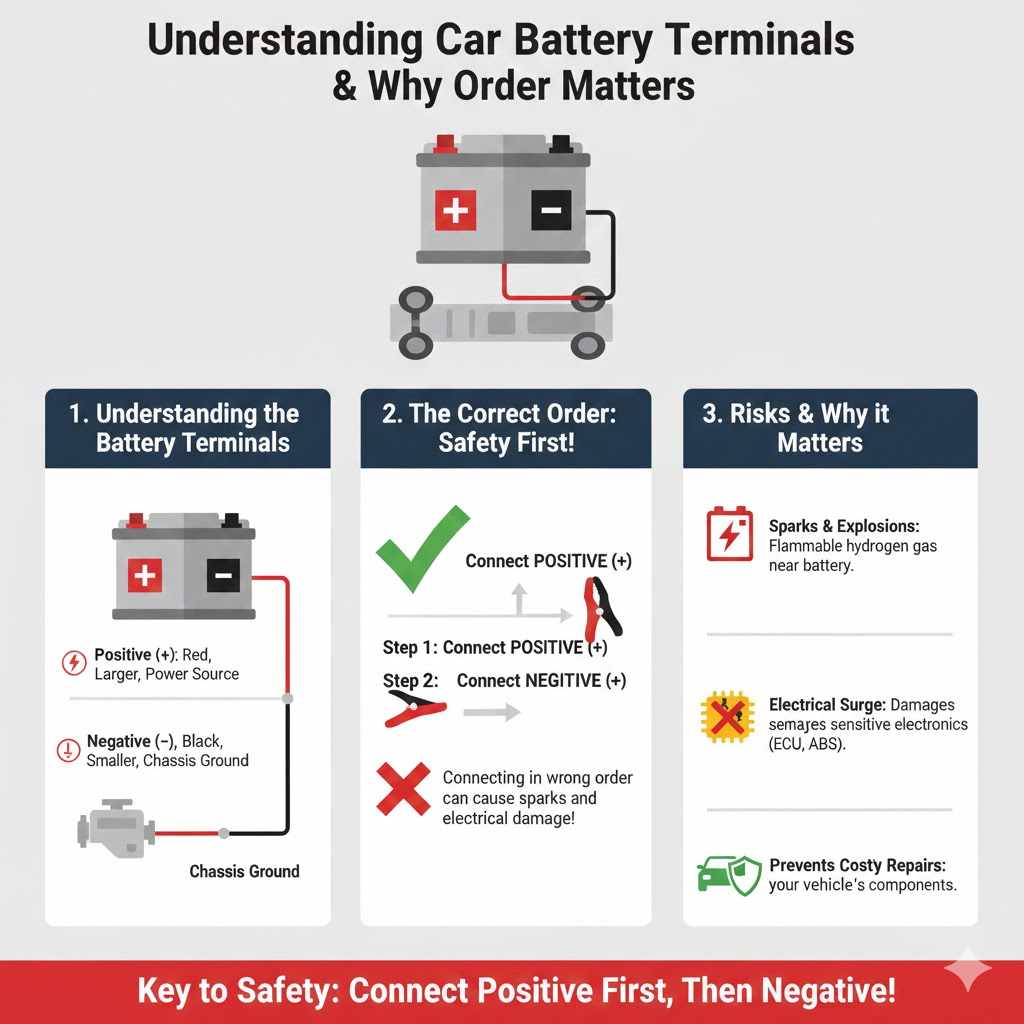
Car batteries have two main posts, called terminals. One is positive, and the other is negative. You can usually tell them apart easily.
The positive terminal is marked with a plus sign (+). It’s often a bit larger than the negative terminal. The negative terminal is marked with a minus sign (-).
It’s also sometimes colored black, while the positive is red. Batteries use these terminals to deliver electrical power to your car’s engine and all its electronic parts. Think of them as the entry and exit points for electricity.
When you connect jumper cables or install a new battery, you need to make sure these connections are solid and in the right order.
The negative terminal is typically connected to the car’s chassis, which is the metal frame of the vehicle. This is called grounding. The positive terminal directly supplies power to the car’s electrical system.
Understanding this basic setup helps explain why the order of connection is so vital. It’s all about how electricity flows and what happens when you create unintended paths for that flow. Without proper grounding, a lot of systems in your car wouldn’t work.
The battery’s role is to provide that initial spark and then sustained power.
The Risk of Sparks and Electrical Damage
When you connect the battery terminals, you’re completing an electrical circuit. The car’s electrical system has a ground connection, which is usually the metal frame of the car. If you connect the negative terminal first, and there’s a metal tool touching both the negative terminal and the car’s frame, you could create a small spark.
This is generally harmless, but if it happens near the battery, it can be dangerous because batteries can release flammable hydrogen gas. This gas can ignite from a spark, causing the battery to explode. That’s why safety is paramount.
More importantly, connecting the positive terminal first and then the negative can cause a significant surge of electricity. This surge can damage sensitive electronic components in your car. Modern cars have many computers and control modules that are expensive to replace.
A simple mistake when connecting a battery could lead to costly repairs. For instance, the Engine Control Unit (ECU) or the Anti-lock Braking System (ABS) module could be fried by a sudden voltage spike. This is why knowing What Is the Correct Order to Connect Car Battery Terminals? prevents such costly accidents.
Positive and Negative Systems Explained
In a car’s electrical system, the positive (+) terminal of the battery is the source of electrical potential, like a pump pushing water. The negative (-) terminal is typically connected to the vehicle’s metal body, acting as a return path for the electricity. This metal body is called the chassis ground.
So, when you connect the negative cable, you are essentially connecting to the entire car’s metal structure. The positive cable directly feeds power to the car’s electrical components. This setup is a standard in automotive design, allowing for simpler wiring.
This grounding system is efficient because it uses the car’s metal frame as a common return path for all electrical circuits. Instead of running a separate wire back to the battery for every single light, radio, or sensor, they all connect to the chassis. The electricity then flows from the positive terminal, through the component, and back to the negative terminal via the chassis.
This design relies heavily on good electrical contact between all metal parts. It’s a clever way to reduce weight and complexity.
The Correct Order for Connecting Battery Terminals
Now, let’s get to the main point: the correct order. It’s a simple sequence that ensures safety and prevents damage to your car’s electrical system. Following these steps carefully will give you the confidence to handle battery connections.
We’ll explain each part of the process, from preparing the terminals to making the final secure connection. Remember, the goal is to avoid sparks and protect your car’s delicate electronics. This knowledge is a key part of basic car maintenance.
Step 1 Loosen and Remove Old Cables
Before you connect anything, if you are replacing a battery or disconnecting one, you need to remove the old cables. When disconnecting, you always remove the negative cable first. This is the black cable.
Use a wrench that fits the nut on the cable clamp. Loosen the nut until you can lift the cable off the battery post. Then, set the cable aside where it won’t accidentally touch the battery terminal.
After removing the negative cable, you can then remove the positive cable.
Removing the negative cable first is a safety measure. It breaks the connection to the car’s chassis ground. This means even if your wrench touches the car’s metal body while you’re working on the positive terminal, there’s no complete circuit, so no spark.
Once the negative cable is off, the positive cable is safe to remove. Always ensure the engine is off and the keys are out of the ignition before starting this process. A small spark near the battery can be hazardous due to flammable gases.
Step 2 Prepare the Battery Terminals
It’s important that the battery terminals and the cable connectors are clean. Over time, corrosion can build up on the posts and clamps. This corrosion looks like a white or bluish powdery substance.
It’s a poor conductor of electricity and can prevent a good connection. You can clean them using a wire brush, a battery terminal cleaner tool, or even sandpaper. Make sure to clean both the battery posts and the inside of the cable clamps.
A clean connection ensures a strong flow of electricity.
Wear gloves and eye protection when cleaning battery terminals. The corrosion can be an irritant. After cleaning, you can apply a thin layer of petroleum jelly or a dielectric grease to the terminals.
This helps prevent future corrosion. Some people use terminal protector spray, which also works well. A clean, grease-free connection is crucial for optimal battery performance and longevity.
It ensures that the full power of the battery can reach the car’s starter and electrical systems without resistance.
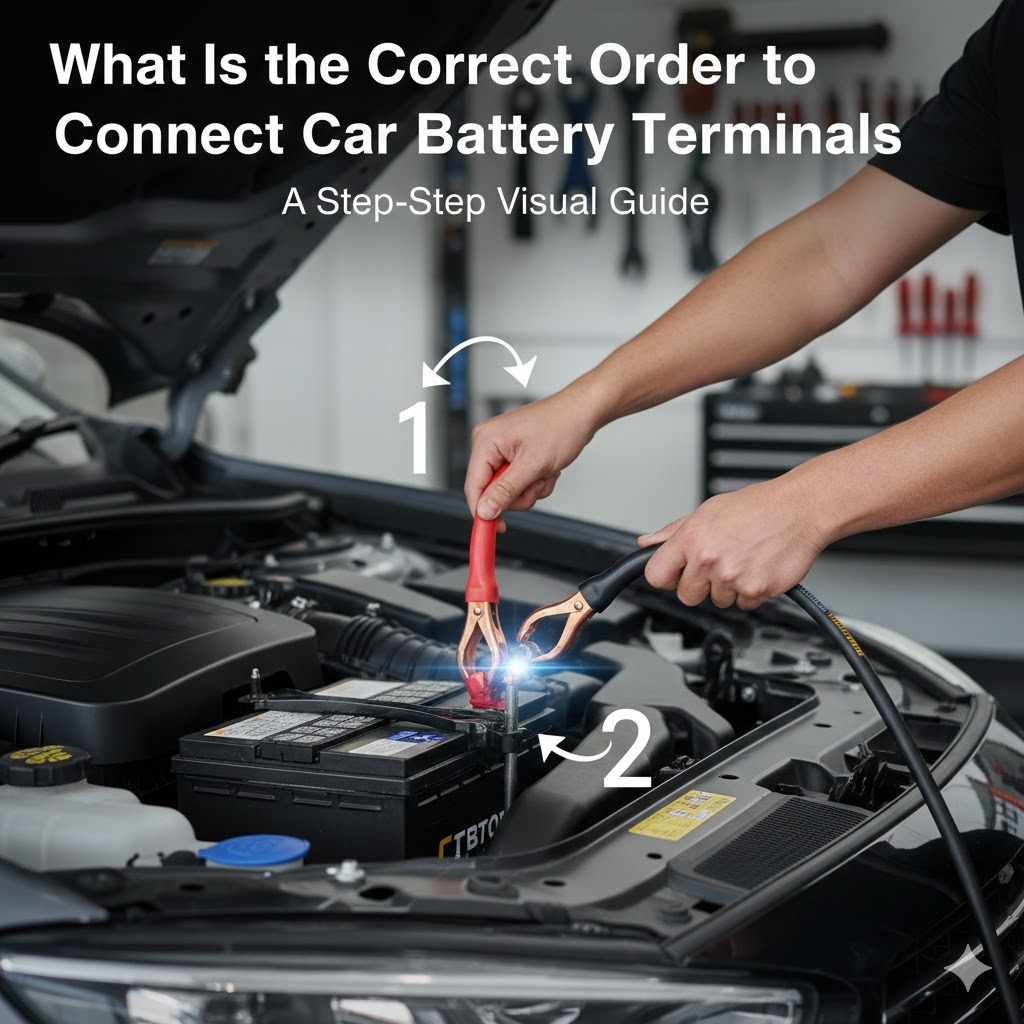
Step 3 Connect the Positive Cable First
When it’s time to connect the battery, the order is reversed from disconnecting. You always connect the positive cable first. This is the red cable, marked with a plus sign (+).
Place the clamp firmly onto the positive battery post. Make sure it sits all the way down. Then, tighten the nut with your wrench until the clamp is snug and secure.
It should not be able to wiggle or turn easily. This connection establishes the primary power source for the car.
Attaching the positive cable first is part of the safety protocol. Since the negative terminal is still disconnected from the car’s chassis, there’s no complete circuit yet. This means that even if your wrench touches metal parts of the car while you’re tightening the positive clamp, you won’t create a spark.
This significantly reduces the risk of igniting any residual hydrogen gas from the battery or damaging electrical components. A secure connection here is vital for starting the car.
Step 4 Connect the Negative Cable Last
After the positive cable is securely attached, you can then connect the negative cable. This is the black cable, marked with a minus sign (-). Place the clamp onto the negative battery post.
Ensure it is seated properly. Tighten the nut with your wrench until the clamp is firm and does not move. Once the negative cable is connected, the battery is fully installed, and the car’s electrical system is now powered.
This is the final step in the connection process.
Connecting the negative cable last completes the circuit. By this point, the positive cable is secure, and the risk of sparks from touching the car’s chassis is minimal. The negative cable’s connection to the chassis ensures that the entire vehicle’s metal frame acts as the return path for electrical current.
This is why it’s the final connection. It finalizes the electrical pathway needed for your car to start and run. Double-check both connections to make sure they are tight and secure.
Troubleshooting Common Battery Issues
Sometimes, even after connecting the battery correctly, you might encounter problems. This section helps you identify and fix common issues related to car batteries and their connections. We’ll look at signs of a weak battery, corroded terminals, and loose connections.
Knowing these problems can save you time and money by letting you fix minor issues yourself before they become bigger ones. We aim to empower you with practical solutions.
Signs of a Weak or Dead Battery
A weak or dead battery can show several signs. The most common is a slow engine crank when you try to start the car. Instead of the engine turning over quickly, it might sound sluggish, like it’s struggling.
You might also notice that your car’s headlights are dimmer than usual, especially when the engine is off. Other electrical components, like the radio or power windows, might also work slower or intermittently.
Clicking sounds when you turn the key are another indicator. This often means the battery has enough power to engage the starter solenoid but not enough to turn the engine over. Sometimes, a warning light on your dashboard will illuminate, usually shaped like a battery.
This light signals a problem with the charging system or the battery itself. If you’ve tried starting the car multiple times and it won’t turn over, it’s very likely your battery needs attention, either charging or replacing.
Dealing with Corrosion on Terminals
Corrosion on battery terminals is a common problem. It’s usually a white or bluish powdery substance. This corrosion is a form of oxidation that builds up over time.
It acts as an insulator, preventing a good electrical connection between the battery post and the cable clamp. This can lead to starting problems, dim lights, and a generally weak electrical system. The good news is that it’s usually easy to fix yourself.
To clean corrosion, you’ll need some basic tools: a wire brush or a battery terminal cleaning tool, gloves, and eye protection. You can also use a mixture of baking soda and water to neutralize the acid that causes corrosion. Apply the paste to the terminals and brush them clean.
Rinse with water and dry thoroughly. Some mechanics recommend applying a thin layer of dielectric grease or petroleum jelly after cleaning to prevent future corrosion. This simple step can significantly improve your battery’s performance.
Loose Cable Connections
A loose connection at the battery terminals is another frequent cause of electrical issues. If the cable clamps are not tightened properly onto the battery posts, they can’t conduct electricity effectively. This is similar to how corrosion affects the connection.
Even if the terminals are clean, a loose clamp means a poor connection. Signs of loose connections include intermittent electrical problems, a car that starts sometimes but not others, or warning lights on the dashboard.
Checking for loose connections is simple. After ensuring the battery is properly connected (positive first, then negative), try to wiggle the cable clamps on the posts. They should feel solid and not move at all.
If they wiggle, use your wrench to tighten the nuts on the clamps. Make sure they are snug but don’t overtighten them, as this can damage the battery posts or the clamps themselves. A good, tight connection is essential for reliable car operation.
Battery Maintenance Tips
Keeping your car battery in good shape can prevent many common issues. Regular maintenance ensures it lasts longer and performs reliably. These tips are simple and can be done by most car owners without special tools.
They focus on keeping the battery clean, charged, and protected from extreme conditions. Good maintenance practices save you from unexpected breakdowns and costly repairs.
- Keep Terminals Clean: As discussed, corrosion is a major enemy of battery connections. Regularly inspect your battery terminals for any signs of white or bluish buildup. If you see any, clean them promptly using a wire brush and a baking soda-water paste. A clean terminal ensures a solid electrical path for power to flow efficiently to your car’s systems. This simple act of cleaning can prevent starting problems and ensure all electrical components receive the power they need without interruption. Don’t forget to apply a thin layer of dielectric grease after cleaning to help prevent future corrosion from forming.
- Check for Loose Connections: Make sure the battery cable clamps are securely tightened onto the battery posts. A loose connection can cause intermittent electrical problems, making your car hard to start or causing accessories to malfunction. Periodically give the clamps a gentle wiggle. If they move, tighten them with a wrench until they are snug. This ensures a consistent flow of electricity, crucial for reliable vehicle operation.
- Keep the Battery Charged: If your car is used for very short trips or sits for long periods, the battery might not get fully recharged by the alternator. In such cases, consider using a battery trickle charger. These devices keep the battery topped up without overcharging it. A properly charged battery lasts longer and is more reliable, especially in cold weather when batteries tend to perform worse.
- Protect from Extreme Temperatures: Extreme heat can degrade battery components faster, while extreme cold reduces battery power. If possible, park your car in a garage or shaded area during very hot or very cold weather. This helps prolong the battery’s lifespan and ensures it can deliver consistent performance in challenging conditions.
Safety Precautions When Working with Batteries
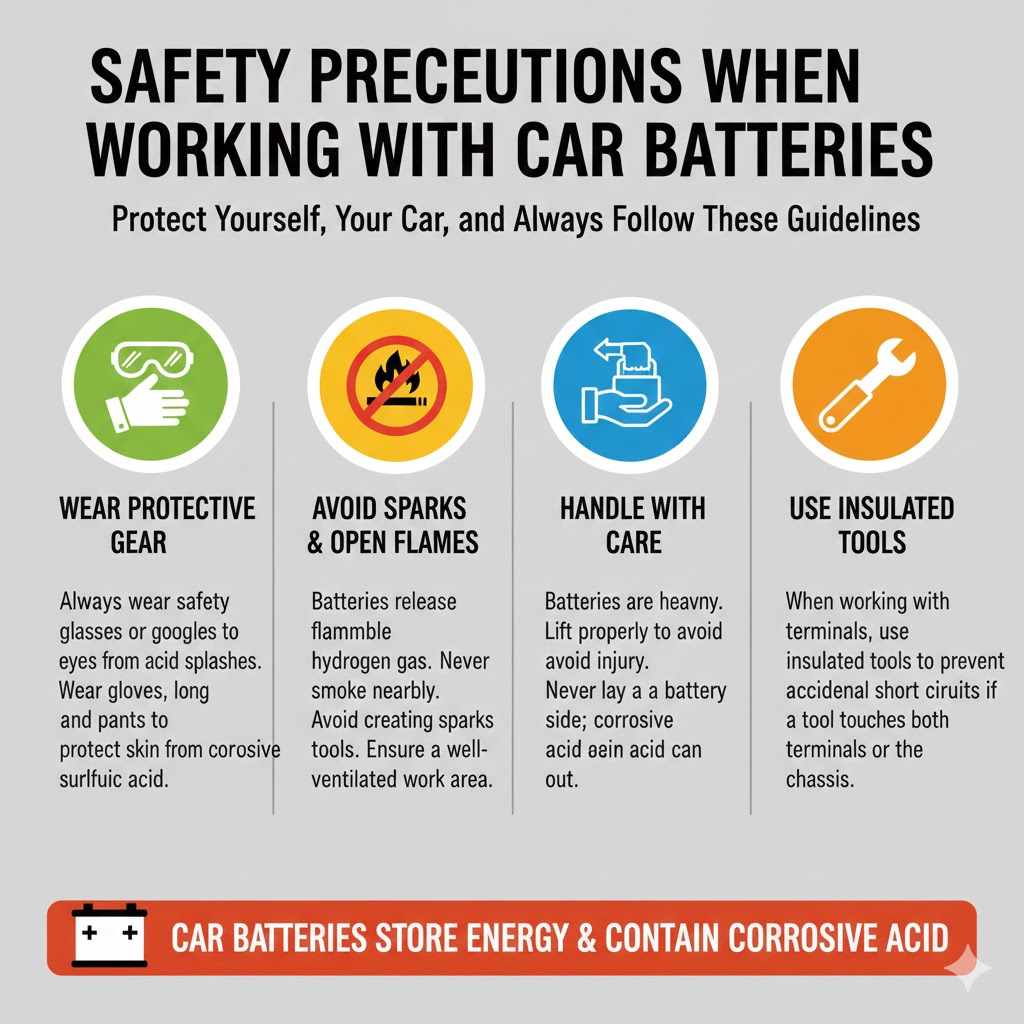
Car batteries store a lot of energy and contain corrosive acid. It’s essential to take safety precautions when working with them. These precautions protect you from injury and prevent damage to your car.
Always follow these guidelines to ensure a safe experience.
- Wear Protective Gear: Always wear safety glasses or goggles to protect your eyes from acid splashes. Wear gloves to protect your skin from the corrosive sulfuric acid. Long sleeves and pants are also recommended.
- Avoid Sparks and Open Flames: Car batteries can release flammable hydrogen gas. Never smoke near a battery, and avoid creating sparks with tools or metal objects. Ensure your work area is well-ventilated.
- Handle with Care: Batteries are heavy. Lift them properly to avoid injury. Never lay a battery on its side, as the acid can leak out.
- Use Insulated Tools: When working with battery terminals, use insulated tools if possible. This can help prevent accidental short circuits if a tool touches both terminals or a terminal and the car’s chassis.
Frequently Asked Questions
Question: What is the number one rule for connecting car battery terminals
Answer: The number one rule is to always connect the positive (+) terminal first and the negative (-) terminal last. This order helps prevent dangerous sparks and protects your car’s electrical system from damage.
Question: Can I connect the negative terminal first
Answer: No, you should never connect the negative terminal first when installing a battery or jumper cables. Connecting the positive terminal first and the negative last is the safe and correct procedure.
Question: What happens if I connect the battery terminals in the wrong order
Answer: Connecting the terminals in the wrong order can cause sparks, which may ignite flammable hydrogen gas released by the battery, leading to an explosion. It can also create a power surge that damages your car’s sensitive electronic components.
Question: How do I know which terminal is positive and which is negative
Answer: The positive terminal is usually marked with a plus (+) sign and is often red. The negative terminal is marked with a minus (-) sign and is often black. The positive post is typically slightly larger than the negative one.
Question: Do I need to disconnect the battery before cleaning the terminals
Answer: Yes, it is safest to disconnect the battery before cleaning the terminals. Always disconnect the negative cable first, then the positive cable. After cleaning and reassembling, connect the positive cable first, then the negative.
Summary
Knowing What Is the Correct Order to Connect Car Battery Terminals? is essential for safety and your car’s health. Always connect the positive terminal first and the negative terminal last. This prevents sparks and protects electrical components.
Keep terminals clean and connections tight for reliable performance. Following these simple steps ensures your car battery is connected correctly and safely.