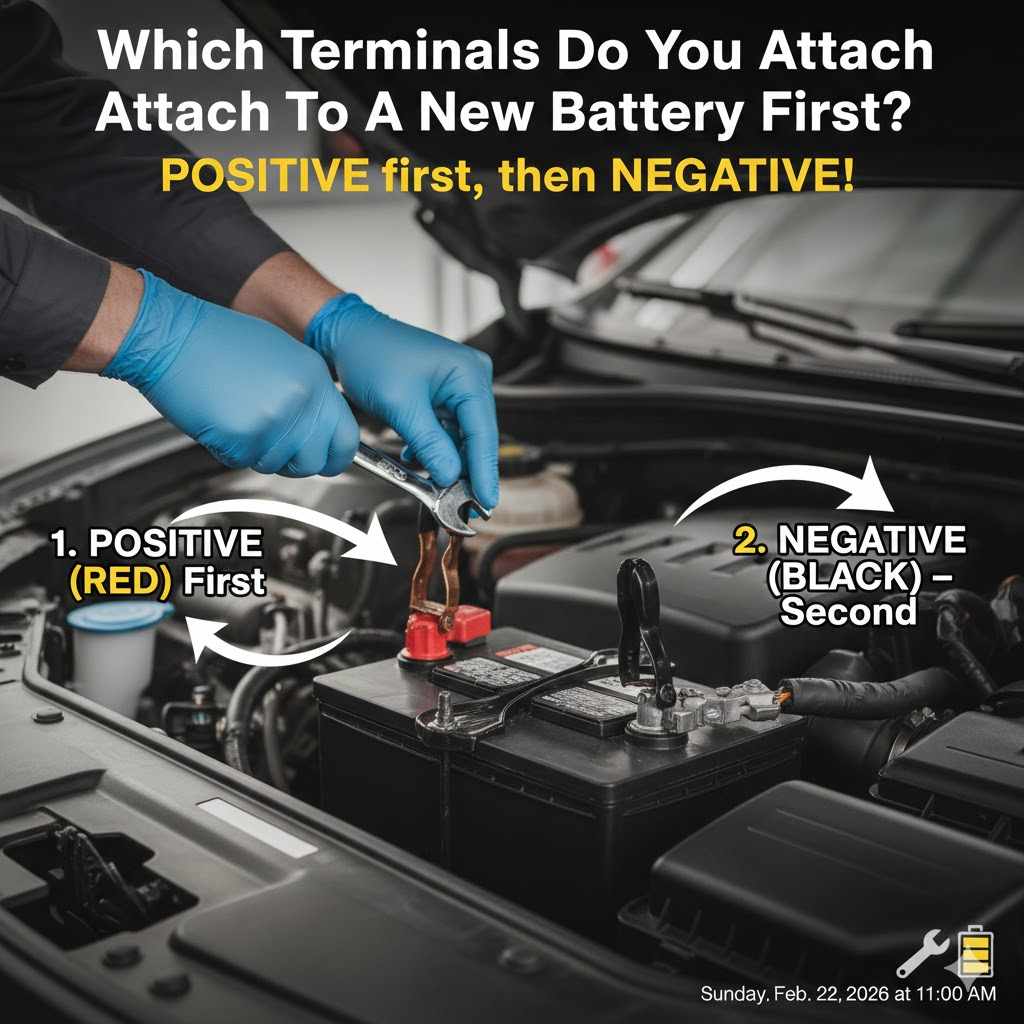
Which Terminals Do You Attach To A New Battery First
Figuring out which terminals do you attach to a new battery first positive or negative can seem tricky when you’re new to car maintenance. It’s a common question, and for good reason. Getting it wrong could cause problems.
But don’t worry! It’s actually quite simple once you know the right order. We’ll walk you through it step-by-step, making sure you connect your new battery safely and correctly.
Get ready to learn a straightforward process that will boost your confidence.
Connecting Your New Battery Safely
This section guides you through the essential steps for safely installing a new car battery. We will cover the preparation needed before you even touch the battery, the critical order of connecting terminals, and what to do immediately after to ensure a secure and functional setup. Understanding these steps is key to preventing sparks and ensuring the electrical system of your vehicle is not damaged.
Safety first is the mantra here, and knowing the correct procedure makes all the difference.
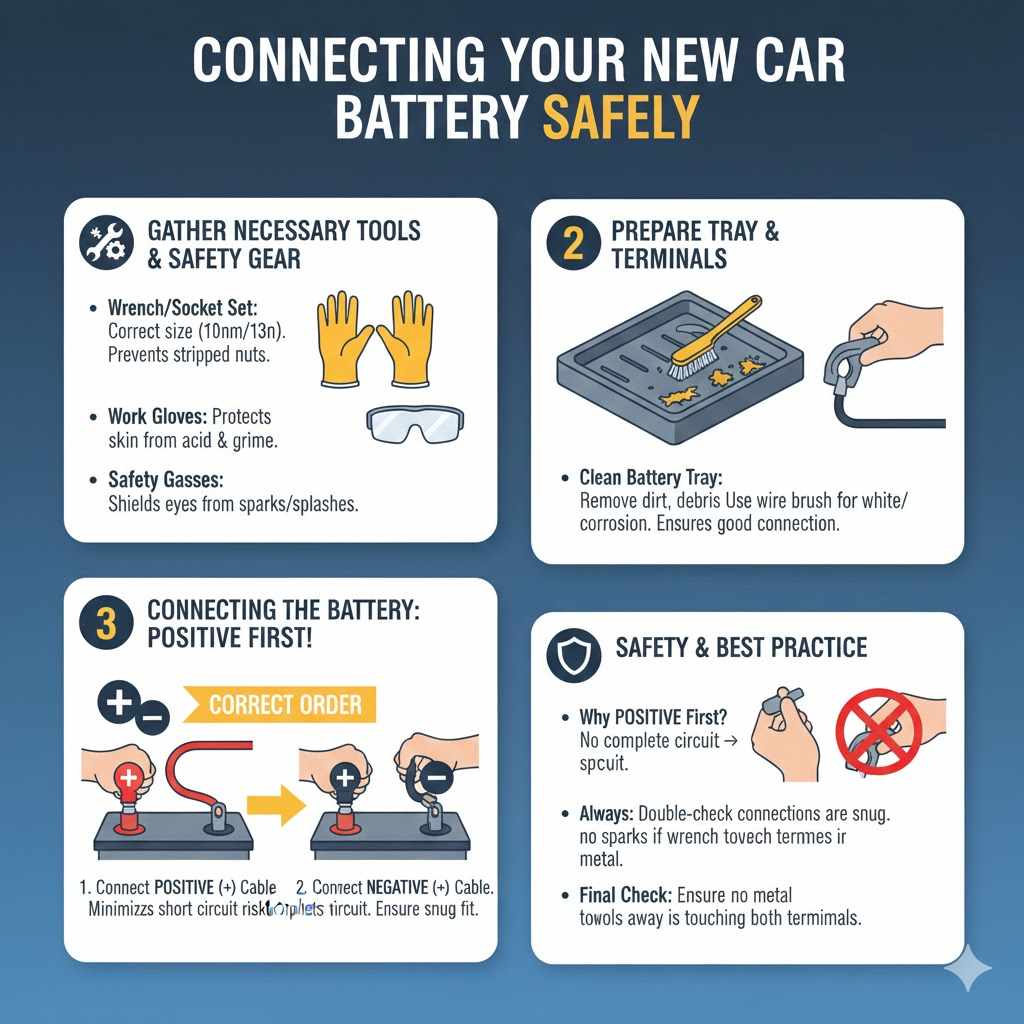
Gathering Necessary Tools and Safety Gear
Before you begin, make sure you have everything you need. This includes your new battery, appropriate wrenches or socket sets that fit the battery terminal nuts, and work gloves. Safety glasses are also a must to protect your eyes from any potential debris or acid splashes.
Having these items ready will make the installation process smoother and safer.
- Wrench or Socket Set: You need the right size tool to loosen and tighten the battery cable clamps. Often, this is a 10mm or 13mm wrench, but it can vary by vehicle. Having a set ensures you’ll have the correct size on hand.Using the wrong size tool can strip the nuts or damage the clamps, making them difficult to secure properly. A well-fitting tool ensures a firm connection, which is vital for electrical flow.
- Work Gloves: Car batteries contain sulfuric acid, which is corrosive. Gloves protect your skin from burns and irritation. They also help keep your hands clean from grease and dirt often found around the battery tray.While modern batteries are well-sealed, there’s always a small risk of exposure. Good quality work gloves are a simple but effective protective measure.
- Safety Glasses: Protecting your eyes is paramount. When working with car batteries, there’s a chance of sparks or minor splashes. Safety glasses act as a barrier, preventing serious eye injury.Even if you’re experienced, accidents can happen. Always wear safety glasses when working on your car’s electrical system.
Preparing the Battery Tray and Terminals
A clean battery tray is important. Remove any dirt, debris, or corrosion. You can use a wire brush to clean the tray.
This ensures the battery sits securely and prevents potential electrical issues from contaminants.
Check the battery terminals on your vehicle’s cables. If they are corroded, clean them thoroughly with a wire brush or a battery terminal cleaner. Corrosion looks like a white or bluish powdery substance.
Clean terminals allow for a better electrical connection. This means your car will start more reliably and your electrical components will function as they should.
Which Terminals Do You Attach To A New Battery First Positive Or Negative
This is the core question many people ask. The established and safest method is to connect the positive terminal first, then the negative terminal. This order minimizes the risk of accidentally creating a short circuit.
When you connect the positive cable first, the negative terminal of the battery is still disconnected. This means there’s no complete circuit for electricity to flow if you accidentally touch metal with your wrench.
Once the positive cable is secured, you then connect the negative cable. This completes the circuit and powers up your vehicle’s electrical system. Always ensure the clamps are snug and secure on both terminals.
Understanding The Importance Of Terminal Connection Order
The sequence in which you connect battery terminals is not arbitrary; it’s a safety protocol designed to prevent electrical hazards. Understanding why this specific order is crucial can help you avoid potential problems and ensure you’re working safely around your vehicle’s power source. This isn’t just a suggestion; it’s a fundamental aspect of battery maintenance.
The Risk of Short Circuits
A short circuit happens when electricity takes an unintended path, usually bypassing the normal circuit and going directly to ground. In the context of a car battery, this often occurs if your wrench touches both the positive terminal and a metal part of the car’s chassis while you are working. This can cause a shower of sparks, damage the tool, the battery, and even other electronic components.
When you connect the negative terminal last, the battery is already partially connected through the positive terminal. If your wrench touches the negative terminal and a metal part of the car, it creates a short circuit because the entire vehicle’s metal frame is connected to the negative battery terminal. This is why the positive-first approach is vital.
The consequences of a short circuit can range from minor annoyances like blown fuses to significant damage to your car’s sensitive electronics. In extreme cases, a powerful short circuit can even cause a battery to overheat or explode, which is a serious safety hazard. Therefore, adhering to the correct connection order is a primary safety measure.
How Connecting Positive First Prevents Sparks
Connecting the positive terminal first leaves the negative terminal disconnected. The negative terminal of a car battery is always connected to the vehicle’s metal frame, which acts as a ground. If you’re holding a metal wrench and accidentally touch the positive terminal to the car’s chassis before the negative cable is attached, you create a direct path for current to flow from the positive terminal, through the wrench, and to the chassis.
This uncontrolled flow of electricity results in sparks.
By connecting the positive cable first and securing it, the battery’s positive pole is now attached to the car’s electrical system. When you then attach the negative cable, you are completing the circuit. If your wrench touches the negative terminal and the chassis at this point, it’s simply connecting ground to ground, which is exactly what the negative cable does.
This does not create a short circuit because the path is the intended one.
This method effectively isolates the battery’s power source until the last possible moment, significantly reducing the chance of sparks or damage. It’s a simple procedural change that greatly enhances safety during battery installation.
The Role of the Ground Strap
The negative battery cable is often referred to as the ground strap because it connects the battery’s negative terminal to the car’s chassis. This connection is fundamental to how a car’s electrical system works. All the electrical components in your car are designed to draw power from the positive terminal and return it to the negative terminal via the chassis.
This grounding system provides a common reference point for all electrical signals and ensures that electricity flows correctly through the intended circuits. Without a proper ground connection, many parts of your car, from the headlights to the engine control unit, would not function.
When you connect the negative cable last, you are establishing this crucial ground connection. It is the final step in powering up the vehicle and completing the electrical loop. Ensuring this connection is secure is as important as the positive connection.
Step-by-Step Guide To Attaching New Battery Terminals
Now that you understand why the order matters, let’s go through the actual process of connecting your new battery. This guide aims to be clear and easy to follow, ensuring you can perform this task with confidence and safety. We will break down each action into simple, manageable steps.
Step 1 Secure The Positive Connection
Take the positive cable (usually marked with a ‘+’ sign and often colored red). Place the clamp onto the positive terminal of the new battery. Use your wrench to tighten the nut on the clamp.
Make sure it is snug and does not move.
It’s important that this connection is firm. A loose positive connection can lead to intermittent power issues, making your car stall or electronics flicker.
Visually inspect the connection to ensure the clamp is fully seated on the terminal and tightened securely. Do not overtighten, as this can damage the terminal or the clamp.
Step 2 Secure The Negative Connection
Next, take the negative cable (usually marked with a ‘-‘ sign and often colored black). Place the clamp onto the negative terminal of the battery. Tighten the nut on this clamp with your wrench.
Again, ensure it is snug and secure.
This connection completes the electrical circuit for your vehicle. Like the positive connection, a loose negative connection can cause problems, but it is also the point where sparks are more likely if handled incorrectly before being attached.
Double-check that both cable clamps are tightly secured to their respective terminals and that neither cable can be easily pulled off.
Step 3 Applying Anti-Corrosion Grease
Once both terminals are securely connected, you can apply a thin layer of anti-corrosion grease to the terminals and clamps. This special grease helps prevent the build-up of corrosion, which can impede electrical flow over time.
This step is optional but highly recommended, especially if you live in an area with high humidity or salt in the air. It helps extend the life and efficiency of your battery connections.
You can usually find this grease at auto parts stores. Apply it with a small brush or even a gloved finger.
Step 4 Final Check and Startup
Before closing the hood or putting away your tools, take a moment to do a final check. Ensure no tools are left near the battery or engine bay. Make sure the battery hold-down mechanism is secure.
Now, you can try starting your car. Turn the key or press the start button. The engine should crank and start smoothly.
If it doesn’t, don’t panic; re-check your connections and ensure they are tight.
Listen for any unusual noises and observe your dashboard lights. Everything should look normal. Congratulations, you’ve successfully installed your new battery!
Common Mistakes And How To Avoid Them
Even with clear instructions, some common mistakes can happen during battery installation. Knowing what these are beforehand can help you steer clear of them. We’ll cover the most frequent errors and provide simple tips to ensure a smooth process.
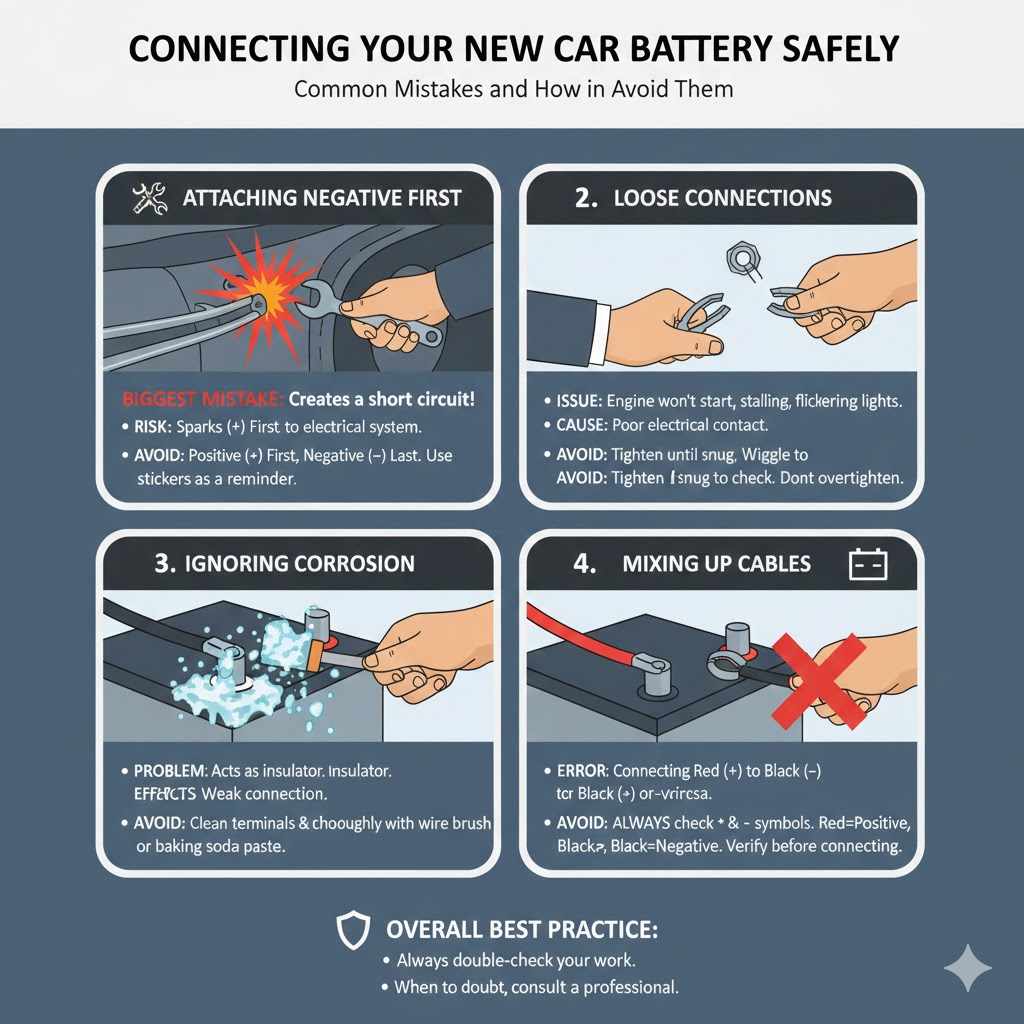
Attaching Negative First
The most critical mistake is connecting the negative terminal before the positive one. As discussed, this creates a significant risk of creating a short circuit when your tool touches the negative terminal and the car’s metal body. This can cause sparks and potential damage.
To avoid this, always make it a habit to remember: Positive First, Negative Last. You can even put a sticker on your battery or tools as a reminder if needed.
If you ever feel unsure, stop and re-read the instructions or consult a professional. It’s better to be safe than sorry.
Loose Connections
Another common issue is not tightening the terminal clamps enough. A loose connection can lead to the engine not starting, stalling, or electrical problems like flickering lights or a radio that cuts out. It can also cause the terminals to overheat.
Ensure that when you tighten the nuts on the clamps, they are snug. Try to gently wiggle the clamp after tightening; it should not move at all. If it still moves, tighten it a bit more.
Remember, you want a tight electrical connection, but you don’t want to overtighten and strip the threads of the bolt or crack the battery terminal itself.
Ignoring Corrosion
Some people might rush the process and attach cables to terminals that are heavily corroded. This corrosion acts like an insulator, preventing a good electrical connection. While it might seem to work initially, it will likely cause problems down the line.
Always take the time to clean both the battery terminals and the cable clamps thoroughly. A wire brush is usually sufficient for removing light corrosion. For heavier build-up, specialized battery cleaning tools or a baking soda and water paste can be effective.
A clean connection is a strong connection, ensuring your battery performs at its best.
Mixing Up Cables
Although less common with modern battery designs that often have different-sized terminals, it’s still possible to mix up the positive and negative cables. This can happen if the markings are unclear or if someone is working in low light.
Always look for the ‘+’ symbol for the positive terminal and cable, and the ‘-‘ symbol for the negative. Red is typically positive, and black is negative, but never rely solely on color. The symbols are the definitive identifiers.
Connecting the wrong cables can cause immediate damage to your vehicle’s electrical system. Double-checking the symbols before attaching each cable is essential.
Frequently Asked Questions
Question: What happens if I connect the negative terminal first
Answer: If you connect the negative terminal first and then touch your wrench to the positive terminal and the car’s metal frame, you will create a short circuit, leading to sparks and potential damage to your vehicle’s electrical system.
Question: Can I use any type of wrench to connect battery terminals
Answer: It’s best to use a wrench or socket that precisely fits the nuts on your battery cable clamps. Using the wrong size can strip the nuts or damage the clamps, leading to a loose connection.
Question: Is it safe to touch the battery terminals with my bare hands
Answer: It is not recommended. While modern batteries are sealed, car batteries contain sulfuric acid, which can irritate the skin. Always wear gloves for protection.
Question: How do I know which terminal is positive and which is negative
Answer: The positive terminal is usually marked with a plus sign (+) and often has a red cover. The negative terminal is marked with a minus sign (-) and typically has a black cover.
Question: What if my new battery doesn’t have covers on the terminals
Answer: You should still be able to identify the positive and negative terminals by the plus (+) and minus (-) markings directly on the battery casing. Always confirm the markings before connecting cables.
Conclusion
When connecting a new battery, always attach the positive terminal first, followed by the negative terminal. This simple order prevents sparks and protects your car’s electrical system. Ensure all connections are tight and clean for optimal performance.