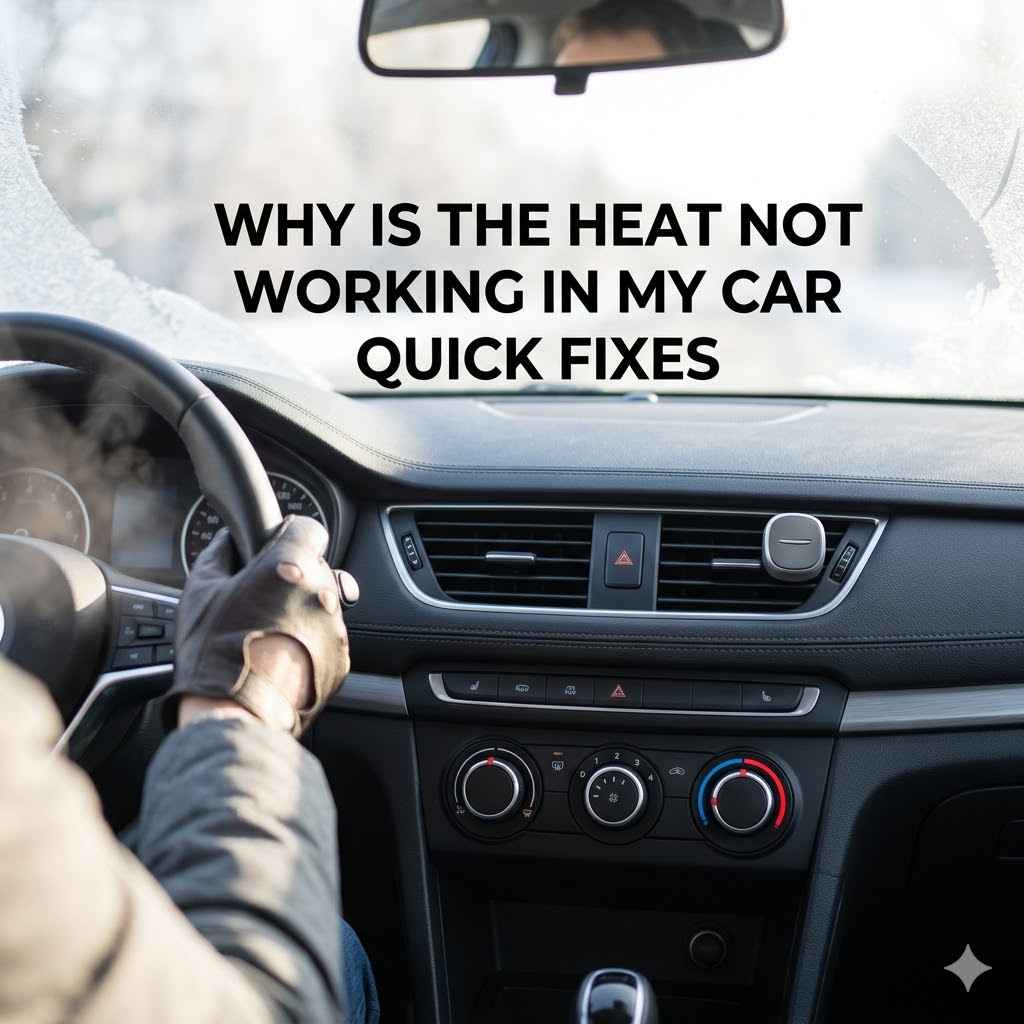
Why Is The Heat Not Working In My Car? Quick Fixes
When your car heater suddenly stops working, it can be a real headache, especially when it’s cold outside. You might wonder, Why Is the Heat Not Working in My Car? Quick Fixes are often sought because these issues can seem tricky.
Many beginners get worried thinking it’s a big repair job. But often, the fix is simpler than you imagine. This guide will walk you through some easy checks you can do yourself.
We’ll show you how to get warm air blowing again without needing a mechanic right away. Let’s figure out what’s going on.
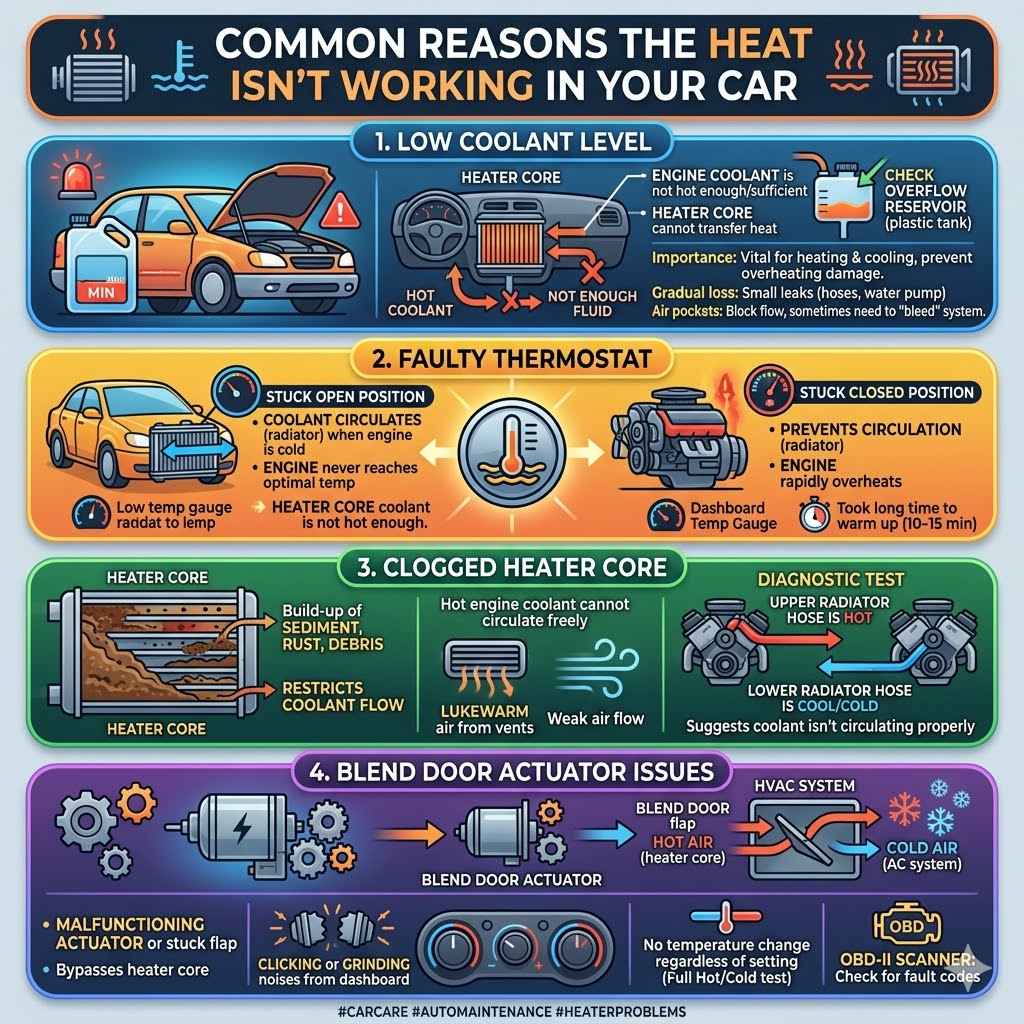
Common Reasons The Heat Isn’t Working In Your Car
Many drivers face the frustrating problem of a car heater that blows only cold air. This issue can stem from several common causes, ranging from simple fluid levels to more complex system component failures. Understanding these reasons is the first step to finding a solution.
Often, a lack of heat is tied to the car’s cooling system, as the heater core uses hot coolant from the engine to warm the cabin air. If this flow is interrupted or the coolant is not hot enough, you won’t get any heat.
Low Coolant Level
One of the most frequent culprits behind a car not producing heat is a low coolant level. The engine’s coolant, also known as antifreeze, circulates through the engine block to keep it from overheating. A portion of this hot coolant is then diverted to the heater core, a small radiator located behind your dashboard.
This hot coolant warms the air that your car’s fan blows into the cabin. If the coolant level drops too low, there simply isn’t enough hot fluid to transfer heat effectively to the heater core. This can happen due to leaks in the cooling system, such as a cracked hose or a faulty water pump.
When your car’s coolant is low, the heater core may not receive enough hot fluid to do its job. This means the air passing over it will remain cool. It’s like trying to heat a room with a radiator that has no hot water running through it.
You can check your coolant level by looking at the overflow reservoir, usually a translucent plastic tank under the hood. If the level is below the “min” or “low” mark, you’ve likely found your problem.
Why checking coolant is important:
Coolant is vital for both engine cooling and cabin heating. A deficiency impacts both systems.
Low coolant can lead to engine overheating, which is a serious and expensive problem. Addressing a low coolant issue promptly can prevent further damage. It’s essential to use the correct type of coolant specified for your vehicle, as mixing different types can cause system damage.
Always check the owner’s manual for the right coolant and the recommended procedure for topping it up safely.
Leaks are a common cause of low coolant. Finding and fixing these leaks is crucial for long-term system health.
Small cracks in hoses, radiator leaks, or a failing water pump seal can all cause gradual coolant loss. Regularly inspecting hoses for cracks or swelling and checking for puddles under your car can help identify leaks early. Addressing a leak when it’s small is much cheaper than repairing major engine damage caused by overheating.
Air pockets can form in the cooling system, especially after a coolant flush or if the system has been opened.
These air pockets can block the flow of coolant to the heater core, preventing heat from being produced. This is why “bleeding” the cooling system is sometimes necessary after maintenance. Air trapped in the system can also create false readings on the temperature gauge or lead to localized hot spots in the engine, potentially causing damage.
If you’ve recently had coolant work done, air in the system might be the reason for no heat.
Faulty Thermostat
The thermostat is a small but critical component that regulates the engine’s operating temperature. It acts like a gatekeeper, controlling when coolant flows from the engine to the radiator. When the engine is cold, the thermostat stays closed, allowing the engine to warm up quickly.
Once the engine reaches its optimal operating temperature, the thermostat opens, allowing coolant to circulate through the radiator for cooling.
If the thermostat gets stuck in the open position, coolant will circulate to the radiator even when the engine is cold. This prevents the engine from reaching its normal operating temperature. Consequently, the coolant flowing to the heater core will not be hot enough to provide adequate heat to the car’s cabin.
Conversely, if the thermostat is stuck closed, coolant won’t circulate properly, leading to engine overheating and potentially damaging the engine, while also preventing heat from reaching the cabin.
A thermostat that fails to open correctly can prevent the engine from warming up sufficiently. This means the coolant that flows to the heater core will never get hot enough to warm your car’s interior. This is a common issue, especially in colder climates.
You might notice your car takes a very long time to warm up, or the temperature gauge never quite reaches the middle. This indicates the engine is running too cool, and the thermostat is likely the culprit.
Signs of a faulty thermostat include:
Engine temperature gauge reading lower than normal or fluctuating erratically.
Your car’s dashboard temperature gauge is a key indicator. If it consistently reads very low, even after driving for a while, it suggests the engine is not reaching its designed operating temperature. This is a strong sign that the thermostat is stuck open.
The engine may also feel like it’s not running as efficiently as it should.
The engine is taking an unusually long time to warm up.
Normally, a car engine should reach its optimal operating temperature within 10-15 minutes of driving, depending on the outside temperature. If your car still blows cool air or the temperature gauge is still low after much longer than this, the thermostat is probably not working correctly. It’s failing to close off the cooling system to allow the engine to get up to temperature.
Overheating issues despite the engine appearing to run cool.
While this seems contradictory, a thermostat stuck closed can cause rapid overheating because coolant cannot reach the radiator to be cooled. However, a thermostat stuck open can also lead to overheating in extreme conditions or when under heavy load, as the engine might struggle to maintain an optimal temperature and can be forced to work harder.
Clogged Heater Core
The heater core is essentially a miniature radiator that sits inside your car’s dashboard. Hot engine coolant flows through it, and the car’s blower fan pushes air across its fins. This process transfers heat from the coolant to the air, which is then directed into the passenger cabin.
Over time, sediment, rust, and debris can build up inside the heater core, restricting the flow of coolant.
When the heater core becomes clogged, the hot coolant cannot circulate freely through it. This significantly reduces the amount of heat that can be transferred to the air. You might experience lukewarm air instead of hot air, or no heat at all, even if the engine is at its proper operating temperature and the thermostat is working correctly.
A severely clogged heater core can even lead to reduced engine cooling efficiency because the coolant is not flowing properly throughout the entire system.
A clogged heater core is a common problem, especially in older vehicles or those that haven’t had their cooling systems flushed regularly. The buildup of gunk inside the narrow passages of the heater core acts like a dam, preventing the hot coolant from reaching all parts of the core. This means the air blown across the core doesn’t get heated effectively.
Sometimes, you might notice a sweet smell inside the car, which can indicate a coolant leak from a damaged heater core, but a clog is about restricted flow.
Identifying a clogged heater core:
Lukewarm air coming from the vents when the engine is fully warmed up.
If your car’s temperature gauge shows the engine is at its normal operating temperature, and you still only get weak, lukewarm air from your vents, a clogged heater core is a strong possibility. The coolant is hot, but it’s not flowing through the heater core effectively enough to transfer sufficient heat to the air. It’s a sign that the system is trying to work, but something is blocking the heat transfer.
Reduced airflow from vents, sometimes accompanied by fogging or condensation on the inside of the windshield.
A very restricted heater core can sometimes affect overall airflow, though this is less common than just reduced heat. More often, a clogged heater core is about the heat transfer itself. If there’s a leak in the heater core, coolant can seep out and cause fogging, but a pure clog is about flow restriction leading to poor heating performance.
The upper radiator hose is hot, but the lower radiator hose is cool or cold.
This is a more advanced diagnostic test that suggests coolant isn’t circulating properly. If the coolant is hot as it enters the radiator system (upper hose) but not circulating through the engine and back out to be cooled (indicated by the lower hose temperature), it points to a blockage somewhere in the system. The heater core is a likely candidate for such a blockage if the engine is otherwise functioning correctly.
Issues With The Blend Door Actuator
The blend door actuator is an electric motor that controls a flap or “door” inside your car’s HVAC (Heating, Ventilation, and Air Conditioning) system. This door is responsible for mixing hot air from the heater core with cold air from the AC system to achieve the desired cabin temperature. It essentially directs airflow to either pass through the heater core for heat or bypass it for cooler air.
If the blend door actuator malfunctions or gets stuck in a position that doesn’t allow air to pass through the heater core, you will not receive any heat, even if the heater core itself is working perfectly. The actuator might fail due to an electrical issue, a stripped gear, or simply wear and tear. Sometimes, you might hear clicking or grinding noises coming from behind the dashboard, which can be a sign of a failing blend door actuator.
When the blend door actuator is not working correctly, it can’t move the blend door to the position needed for heating. This means the air bypasses the heater core, or is stuck on a path that doesn’t allow it to be heated. You might be able to select “heat” on your climate control, but the system simply can’t direct the air through the hot heater core.
This is a common cause of sudden loss of heat, especially if you hear strange noises from the dashboard area.
Troubleshooting a blend door actuator:
Listen for clicking or grinding noises from the dashboard when you adjust the temperature settings.
These sounds are often indicative of a failing blend door actuator. The gears inside the actuator may be stripped or damaged, causing it to struggle or fail to move the blend door properly. If you hear these noises, it’s a strong clue that this component might be the source of your heating problem.
It means the motor is trying to work but can’t complete its task.
Try changing the temperature setting from full hot to full cold and back again, observing if the air temperature changes at all.
If you can’t get any change in air temperature, regardless of the setting, the blend door actuator is likely stuck in one position, preventing the system from mixing air correctly. It’s a simple test to see if the system is responsive to your temperature commands. A working blend door should allow for a noticeable shift from hot to cold air.
Check for diagnostic trouble codes (DTCs) if you have access to an OBD-II scanner.
Modern vehicles often store fault codes for HVAC system components, including blend door actuators. A scanner can tell you if the car’s computer has detected a problem with the actuator’s performance or electrical circuit. This is a more technical step, but it can provide a definitive answer if other checks are inconclusive.
Always consult your vehicle’s service manual for specific code meanings.
Simple Checks You Can Do At Home
Before you call a mechanic or worry about expensive repairs, there are several straightforward checks you can perform right at home to diagnose why your car’s heat isn’t working. These steps are designed for people with little to no automotive experience and can often pinpoint the issue quickly. By systematically going through these checks, you can save time and money, and potentially fix the problem yourself.
Check The Coolant Level And Condition
The first and most important step is to check your car’s coolant level. This is a simple visual inspection that can tell you a lot. Coolant is crucial for both engine cooling and providing heat to your cabin.
If the level is low, there won’t be enough hot coolant to warm the air.
How to check:
Ensure your engine is cool. Never open the radiator cap on a hot engine, as pressurized hot coolant can spray out and cause serious burns.
Safety first is key. Let your car sit for at least an hour after driving, or preferably overnight, to ensure the engine and its fluids have cooled down completely. This prevents dangerous pressure build-up and the risk of scalds from hot coolant.
Always refer to your owner’s manual for the specific location of the coolant reservoir and radiator cap.
Locate the coolant reservoir, which is usually a translucent plastic tank with “Min” and “Max” lines marked on it. Check if the coolant level is between these lines.
The coolant reservoir allows you to easily see the coolant level without opening the pressurized system. If the level is below the “Min” line, your system is low. Also, look at the color and clarity of the coolant.
It should be a bright, consistent color (green, orange, pink, etc.) and free from rust, oil, or debris. Dirty or sludgy coolant indicates a problem within the cooling system.
If the level is low, add the correct type of coolant (refer to your owner’s manual) to the reservoir until it reaches the “Max” line. If you don’t have coolant, you can top it up with distilled water in a pinch, but this should be a temporary fix, and you should get the proper coolant mix as soon as possible.
Using the correct coolant is vital. Mixing different types or colors of coolant can create chemical reactions that form sludge and damage your cooling system. If you’re unsure about the type of coolant, it’s best to consult your owner’s manual or a mechanic.
Adding coolant can sometimes resolve the heating issue immediately if it was simply low.
Inspect Hoses For Leaks Or Damage
Your car’s cooling system relies on a network of rubber hoses to circulate coolant. These hoses carry hot coolant from the engine to the heater core and back. Over time, they can degrade, crack, swell, or become brittle, leading to leaks.
A leak in any part of the cooling system, including the heater hoses, will result in a loss of coolant, which directly affects heating performance.
Checking these hoses is a relatively easy task that can reveal the source of a coolant leak. You’ll want to look for any signs of wear, such as cracks, bulges, or soft spots. Also, check around the hose clamps for any signs of dried coolant residue, which indicates a slow leak.
How to inspect hoses:
With the engine cool, visually inspect all visible coolant hoses under the hood. Look for cracks, splits, bulges, or any signs of leakage around the fittings.
Focus on the hoses connected to the radiator and the heater core (often two smaller hoses going through the firewall into the cabin). Gently squeeze the hoses; they should feel firm but pliable. If a hose feels excessively hard, brittle, or mushy, it’s nearing the end of its life and should be replaced.
Look for any tell-tale white, green, or colored crusty residue around clamps, which signals a leak.
Feel the hoses for firmness. They should be firm but have some give. If they feel mushy or excessively hard and brittle, they need replacement.
This tactile check is just as important as the visual one. A hose that feels too soft might be about to burst, while one that’s rock hard indicates it’s degraded and likely to crack. Proper hose condition ensures the coolant can flow freely without escaping.
Replacing a worn hose is a preventative measure that can save you from a roadside breakdown.
Check for any wet spots or stains on the engine or ground underneath the car that could indicate a coolant leak.
Coolant leaks can be small and intermittent, making them hard to spot. If you notice any dampness on engine components or a small puddle of colored liquid under your car, it’s a sign of a leak. The color of the liquid will usually match your coolant color.
Follow any wetness back to its source to pinpoint the leak.
Examine The Heater Control Valve (If Applicable)
Some vehicles, particularly older models or those with manual climate control systems, use a heater control valve. This valve is usually located in the engine bay, connected to one of the heater hoses that go through the firewall. Its purpose is to regulate the flow of hot coolant to the heater core.
By opening or closing, it controls how much hot coolant enters the heater core, thereby controlling the amount of heat entering the cabin.
If this valve fails, it can get stuck in a closed position, preventing hot coolant from reaching the heater core. This would result in no heat, even if all other components are working perfectly. Conversely, if it’s stuck open, you might have excessive heat.
Some newer cars integrate this function into the blend door actuator or climate control module, so not all vehicles will have a separate heater control valve.
How to check the heater control valve:
Locate the valve. It will be on one of the heater hoses going into the cabin. It often has a vacuum line or an electrical connector attached to it.
The heater control valve is usually a small, metal or plastic component. Trace the hoses that enter the firewall from the engine bay – one of them will likely connect to this valve. If there’s a vacuum line, it means the car’s computer controls its position.
If it has an electrical connector, it’s also electronically controlled.
Check if the valve moves when you change the temperature setting in the car. You might need a helper to adjust the controls while you observe the valve.
For vacuum-controlled valves, you might see the diaphragm inside move slightly when the temperature setting is changed. For electronically controlled valves, you might see a lever or actuator on the valve move. If it doesn’t move at all when temperature is adjusted, it suggests a control issue either with the valve itself or the system commanding it to move.
Inspect the vacuum line or electrical connector for damage or disconnection.
If the valve is vacuum-operated, a disconnected or cracked vacuum hose will prevent it from functioning. Similarly, if it’s electronically controlled, a loose or damaged connector could be the problem. Ensure these connections are secure and that there are no visible signs of damage to the lines or wires themselves.
When To Seek Professional Help
While many car heating issues can be resolved with simple DIY checks, there are times when professional assistance is necessary. If you’ve gone through the basic troubleshooting steps and haven’t found the cause, or if you’re uncomfortable performing certain checks, it’s best to consult a qualified mechanic. Some repairs require specialized tools, knowledge, or safety precautions that are best handled by experts.
Attempting complex repairs without the necessary expertise can lead to further damage or safety hazards. For instance, working with the engine’s cooling system under pressure requires caution, and diagnosing electrical issues within the HVAC system can be complicated. Knowing when to hand over the reins to a professional can save you significant stress and expense in the long run, ensuring your car’s heating system is repaired correctly and safely.
Here are signs it’s time to call a professional:
You’ve checked the coolant level and hoses, and everything appears normal, but you still have no heat.
If you’ve diligently checked the most common and accessible issues like coolant levels and hose integrity, and the problem persists, it indicates a less obvious or more complex fault. This could involve internal engine issues, a failing water pump, or a completely blocked heater core that requires specialized flushing or replacement.
You hear strange noises coming from under the hood or dashboard, such as hissing, grinding, or loud fan sounds.
Unusual noises often point to mechanical failures. A hissing sound might indicate a coolant leak under pressure, grinding could signal a failing water pump or a damaged fan motor, and loud fan noises could mean the blower motor is struggling or obstructed. These issues require careful diagnosis to pinpoint the exact source of the noise.
You suspect a leak but can’t find its source, or the leak involves the radiator or other complex components.
Coolant leaks can be hard to track, especially if they are small or occur only when the system is hot and under pressure. Radiators, water pumps, and heater cores are more complex parts to access and repair. A mechanic has the tools and experience to safely pressurize the system, identify elusive leaks, and perform the necessary repairs or replacements.
You’re uncomfortable working with car fluids or the engine compartment.
Your comfort and safety are paramount. If dealing with automotive fluids like coolant makes you uneasy, or if you’re not confident in your ability to safely access and inspect engine components, it’s always best to seek professional help. Mechanics are trained to handle these situations safely and efficiently, giving you peace of mind.
Diagnosing Specific Problems
When the heat in your car isn’t working, it’s helpful to try and narrow down the potential causes. A systematic approach can help you understand the specific issue. By observing how your car behaves and performing targeted checks, you can get closer to a solution.
This section will guide you through diagnosing particular symptoms.
Symptoms of a Bad Water Pump
The water pump is responsible for circulating coolant throughout the engine and the rest of the cooling system, including the heater core. If the water pump fails, coolant will not flow properly, leading to a lack of heat and potential engine overheating. Signs of a failing water pump can vary but often include visible leaks, strange noises, and temperature gauge issues.
A worn water pump might have a bearing that begins to make a whining or grinding noise. You might also see coolant leaking from the weep hole on the pump itself, which is a designed-in feature to indicate seal failure. If the pump impeller corrodes or breaks apart, it won’t circulate coolant effectively, leading to both heating problems and the risk of engine damage due to overheating.
Key indicators of a faulty water pump:
A persistent whining or grinding noise coming from the front of the engine, especially when the engine is running.
This noise often originates from the water pump’s bearing. As the bearing wears out, it can become noisy. The sound might change with engine speed, becoming louder or higher-pitched as you accelerate.
If you hear this, it’s a strong indication that the water pump needs attention.
Coolant leaks appearing from the front of the engine, often near the belts, and specifically from the water pump’s “weep hole”.
Most water pumps have a small hole designed to let a tiny bit of coolant escape when the internal seal starts to fail. This is an early warning sign. If you see a steady drip or a trail of coolant coming from this area, the water pump is likely on its way out.
The engine temperature gauge reads higher than normal, or the temperature fluctuates erratically.
If the water pump isn’t circulating coolant effectively, the engine will overheat. The temperature gauge is your primary indicator. If it starts creeping up into the red zone, or jumps around unusually, it suggests a problem with coolant flow, and the water pump is a prime suspect.
How To Test The Radiator Fan
The radiator fan helps cool the engine by drawing air through the radiator, especially at low speeds or when the car is stationary. While it’s primarily for engine cooling, a malfunctioning radiator fan can indirectly affect cabin heat. If the fan isn’t working, the engine might overheat, and in some systems, this overheating can cause the car’s computer to reduce the engine’s overall operating temperature to prevent damage, thus impacting heat output.
More directly, if the engine overheats due to a bad fan, the system might shut off accessories to protect the engine, which could include reducing the heater’s performance or turning it off altogether. Testing the fan is usually straightforward, often involving observing it during operation or checking its electrical connections.
Testing your radiator fan:
Start the car and let it idle. Turn on the air conditioning. In most vehicles, the radiator fan should automatically engage when the AC is on, regardless of engine temperature.
The air conditioning system generates heat that needs to be dissipated by the condenser, which is located in front of the radiator. To facilitate this, the radiator fan is typically activated when the AC is running. If the fan doesn’t spin when you turn on the AC, there’s likely an electrical issue or a problem with the fan motor itself.
Continue to let the car idle and monitor the engine temperature gauge. As the engine warms up, the fan should cycle on and off automatically to maintain the optimal operating temperature.
This is the fan’s primary function. If the temperature gauge starts to climb significantly past the normal halfway mark and the fan doesn’t kick in, it means the fan is not operating as intended. This can lead to overheating and, subsequently, poor heating performance in the cabin.
If the fan doesn’t engage in either scenario, check the fuse and relay for the radiator fan. These can often be found in the fuse box under the hood or dashboard. Consult your owner’s manual for their location.
Fuses and relays are common points of failure for electric fans. A blown fuse or a faulty relay will prevent power from reaching the fan motor. Replacing a blown fuse is a simple fix.
If the fuse is good, the issue might be the relay, or a problem with the wiring or the fan motor itself.
Can You Flush The Heater Core At Home
Yes, it is often possible to flush the heater core at home to remove clogs and improve heating performance. This process involves circulating a cleaning solution through the heater core to dislodge any sediment or debris that may have built up over time. It’s a more involved DIY task but can be very effective if done correctly.
The goal is to reverse the flow of coolant through the heater core, pushing out the accumulated gunk. This typically requires disconnecting the heater hoses and using a garden hose and a flushing agent. While it can save money on professional service, it’s important to be careful and follow the steps precisely to avoid damaging the heater core or making the problem worse.
Steps for flushing the heater core:
Allow the engine to cool completely. Disconnect the two heater hoses that go through the firewall into the passenger cabin.
Locating these hoses is key. They are usually rubber and are the only ones that lead into the firewall. Make sure the engine is cold to avoid burns from residual hot coolant.
Have rags or towels ready to catch any spilled coolant.
Attach a garden hose to one of the disconnected heater hoses and flush with water. Then, attach the hose to the other disconnected heater hose and flush again. You should see dirty water coming out of the other hose.
Repeat this process until the water runs clear.
This is the core of the flushing process. By reversing the flow, you’re more effectively dislodging blockages. Flushing with plain water first helps remove loose debris.
You can also use a commercial heater core flush solution according to its product instructions.
Once the water runs clear, reconnect the heater hoses securely. Refill the cooling system with the proper coolant mixture and bleed any air from the system.
After flushing, it’s critical to reconnect everything properly and refill the system. Air pockets can prevent proper coolant circulation and heating. Bleeding the system removes these air pockets, ensuring the coolant can flow freely to the heater core and the engine.
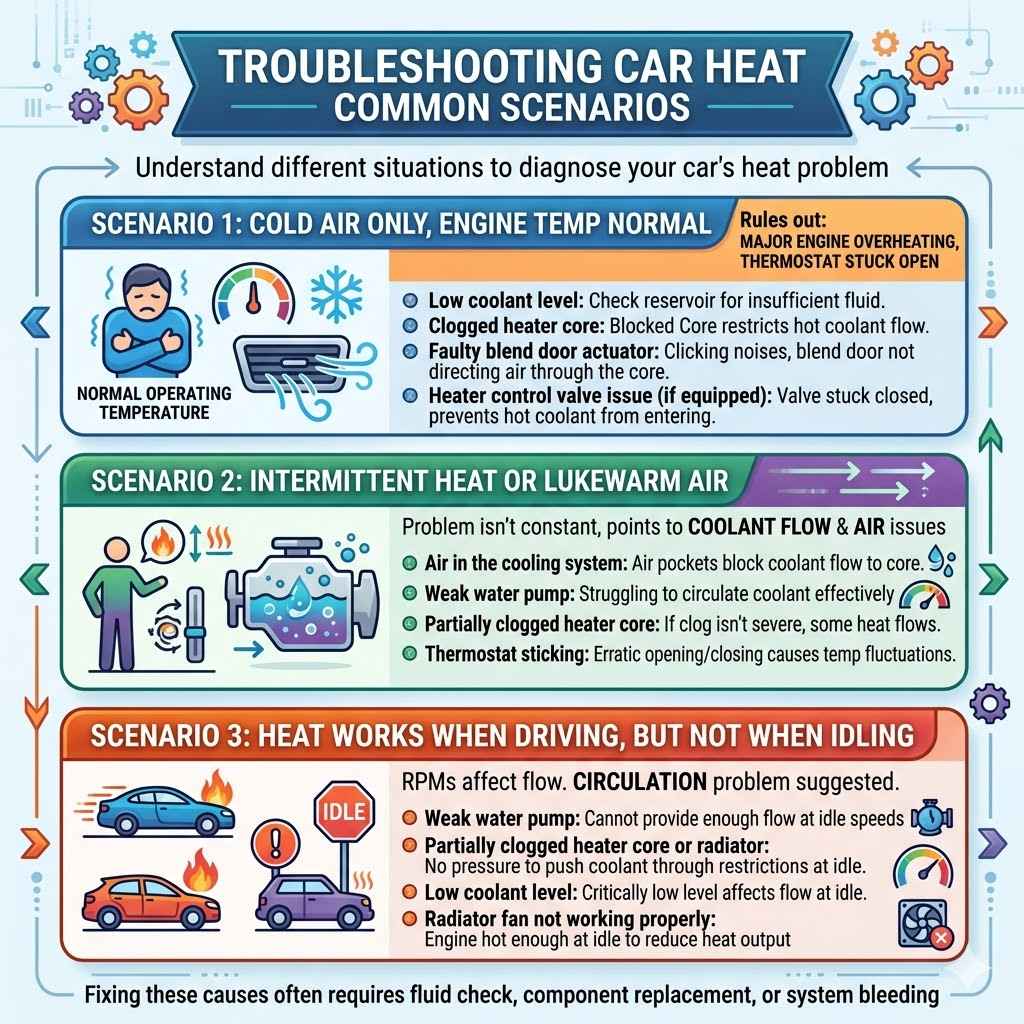
Troubleshooting Common Scenarios
Let’s look at some common scenarios that car owners encounter when their heat isn’t working. Understanding these specific situations can help you diagnose your own car’s problem more accurately. Each scenario points towards different potential causes and solutions.
Scenario 1: Cold Air Only, Engine Temp Normal
You get into your car on a chilly morning, turn the heat on, and are met with only cold air. However, your car’s temperature gauge shows the engine is running at its normal operating temperature. This situation often rules out major engine overheating or a thermostat stuck open.
Possible causes:
Low coolant level: Even if the engine isn’t overheating, a low coolant level might mean there isn’t enough coolant to circulate to the heater core. Check the reservoir.
Clogged heater core: The engine is hot, and coolant is circulating, but it can’t flow freely through a blocked heater core to transfer heat.
Faulty blend door actuator: The system is set to heat, but the blend door isn’t directing air through the heater core. You might hear clicking noises.
Heater control valve issue (if equipped): The valve might be stuck closed, preventing hot coolant from entering the heater core.
Scenario 2: Intermittent Heat Or Lukewarm Air
Some days your car’s heat works fine, but other days it blows lukewarm or only works sometimes. This inconsistency can be tricky to diagnose because the problem isn’t constant. This often points to issues related to coolant flow or air in the system.
Possible causes:
Air in the cooling system: Air pockets can intermittently block coolant flow to the heater core. Bleeding the system is often the solution.
Weak water pump: The pump might be struggling to circulate coolant effectively, especially at lower RPMs. This can lead to heat that comes and goes.
Partially clogged heater core: If the clog isn’t severe, coolant might still flow enough to provide some heat, but not as much as it should.
Thermostat sticking: The thermostat might be opening and closing erratically, causing the engine temperature and thus the coolant temperature to fluctuate.
Scenario 3: Heat Works When Driving, But Not When Idling
This is a classic symptom that strongly suggests a problem with coolant circulation. When you’re driving, the engine RPMs are higher, which usually means the water pump is spinning faster and circulating coolant more effectively. When you stop and idle, the RPMs drop, and if the water pump is weak or the system has a partial clog, the coolant flow may become insufficient to heat the cabin.
Possible causes:
Weak water pump: The pump may not be able to provide enough flow at idle speeds.
Partially clogged heater core or radiator: At idle, there isn’t enough pressure to push coolant through a restricted passage.
Low coolant level: While the engine might stay within normal operating temperature at speed, a low level can become critical for heater performance at idle when coolant flow is reduced.
Radiator fan not working properly: If the fan isn’t on, the engine might get hot enough at idle for the system to reduce heat output to prevent overheating.
Frequently Asked Questions
Question: Why is my car blowing cold air even though my engine is hot?
Answer: This could be due to several reasons, including a low coolant level, a clogged heater core, a faulty thermostat that’s stuck open, or a malfunctioning blend door actuator that isn’t directing air to the heater core.
Question: Can I just add more coolant to fix my car’s heating problem?
Answer: Adding coolant can fix the problem if the only issue is a low coolant level. However, if the coolant is low due to a leak, you need to find and fix the leak first. Simply topping it up without addressing the leak will only provide a temporary solution.
Question: How often should I flush my car’s cooling system?
Answer: It’s generally recommended to flush your cooling system and replace the coolant every 30,000 to 50,000 miles, or as specified in your vehicle’s owner’s manual. Regular flushing helps prevent blockages and corrosion.
Question: Is it safe to drive my car if the heat isn’t working?
Answer: It is generally safe to drive your car if the heat isn’t working, as long as the engine is not overheating. However, in very cold weather, lack of heat can make the driving experience uncomfortable and can cause windows to fog up, reducing visibility.
Question: What is the most common cause of a car not having heat?
Answer: The most common causes are a low coolant level or a clogged heater core. These issues directly impact the flow of hot coolant needed to warm the cabin air.
Summary
When your car’s heat mysteriously vanishes, the reason often boils down to coolant levels, flow, or the components that manage it. Checking your coolant, inspecting hoses for leaks, and understanding issues like a clogged heater core or faulty blend door actuator are key steps. Many simple fixes are within your reach, but don’t hesitate to get professional help if needed.