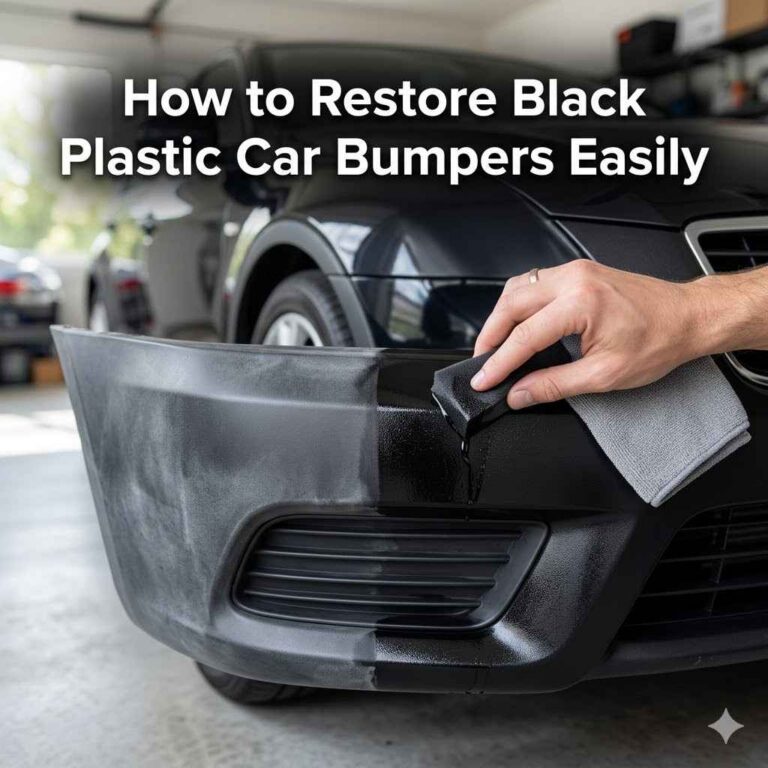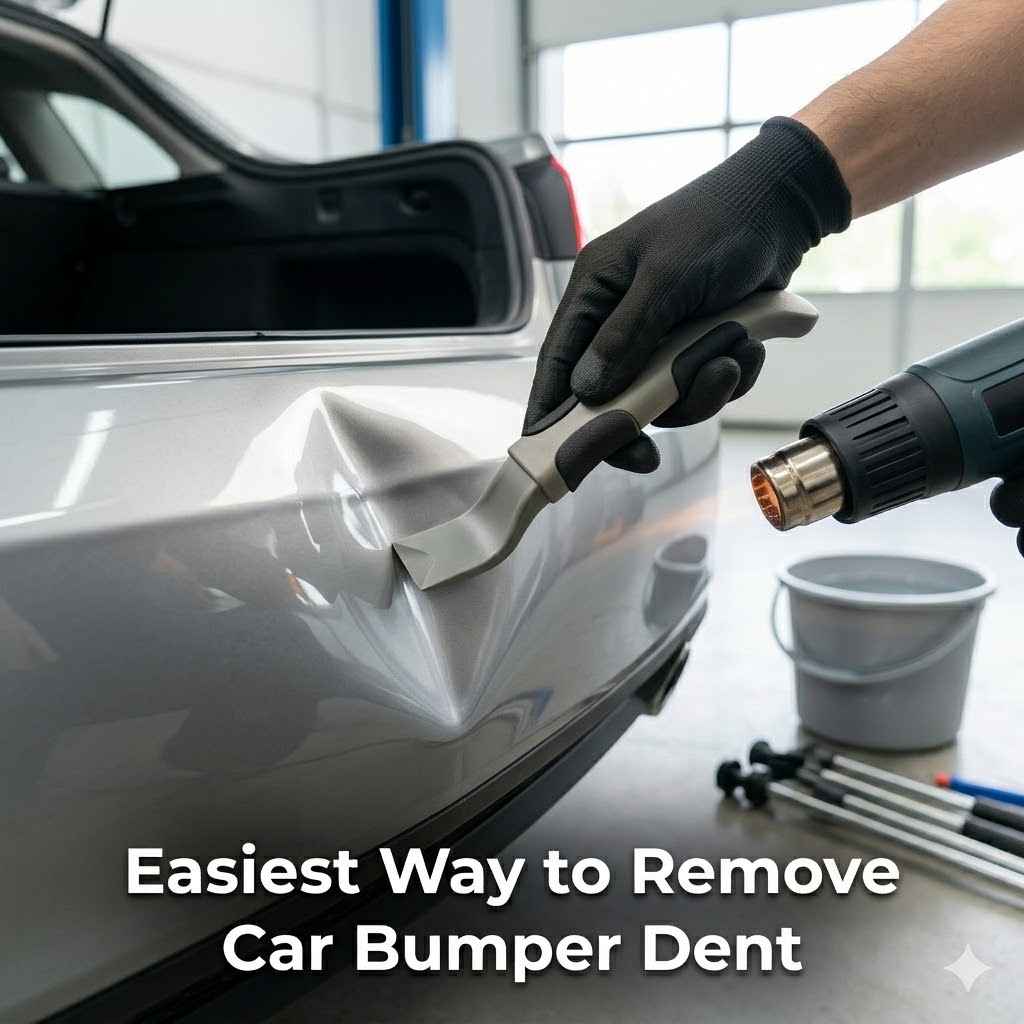
Easiest Way to Remove Car Bumper Dent
Fixing a dent in your car bumper can seem like a big job, especially if you’ve never done it before. You might worry about making it worse or spending a lot of money at a repair shop. But don’t worry!
There are simple ways to handle this common problem right at home. This guide will show you the Easiest Way to Remove a Dent from Car Bumper with clear, easy steps. Get ready to make your car look great again without any fuss.
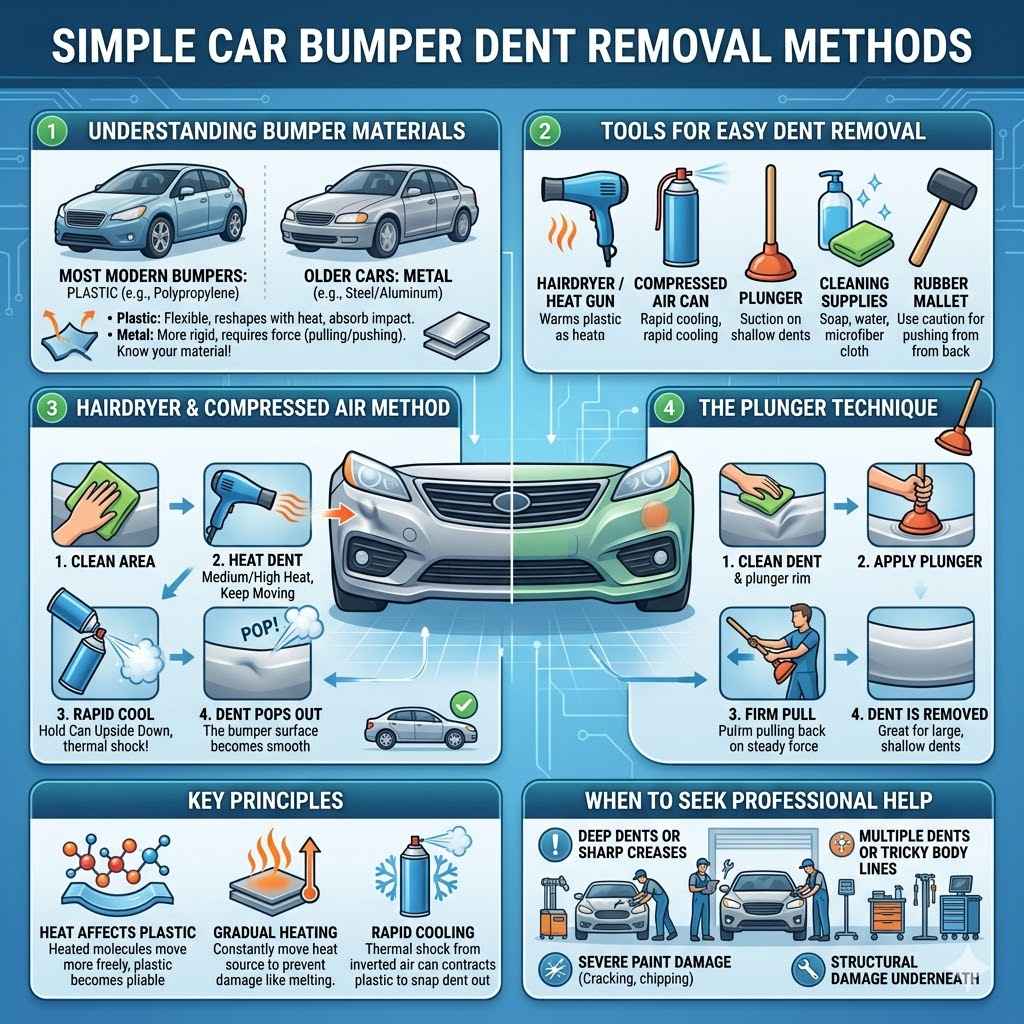
Simple Car Bumper Dent Removal Methods
Dealing with a dent in your car’s bumper is a common frustration for many car owners. These dents can happen from minor bumps in parking lots or everyday wear and tear. Often, people think they need professional help, which can be costly.
However, many bumper dents can be fixed using methods that are surprisingly easy for beginners. This section will explore the most straightforward approaches to make your bumper look smooth again. We will cover tools and techniques that require minimal effort and skill, proving that you can tackle this common car issue yourself.
Understanding Bumper Materials
Car bumpers are made from different materials, and knowing this helps in choosing the right dent removal method. Most modern bumpers are made of plastic, specifically thermoplastics like polypropylene or polyurethane. These materials are flexible and can often be reshaped when heated.
Older cars might have metal bumpers, which require different techniques, often involving pulling or pushing the dent out. Understanding your bumper’s material is the first step to a successful repair. It prevents you from using a method that could damage the material further, like applying too much heat to certain plastics or using methods that could crack them.
Plastic bumpers are designed to absorb impact, which is why they often dent rather than break. This flexibility is key to why many DIY dent removal methods work. However, different types of plastic have varying degrees of heat resistance and pliability.
For example, some tougher plastics might require more sustained heat or a specific type of temperature shock to regain their original shape. On the other hand, softer plastics can be manipulated more easily. This knowledge guides you in selecting the appropriate tools and the right amount of force or heat.
Metal bumpers, while less common on new cars, are typically made of steel or aluminum. These dents are often more rigid. Removing dents from metal bumpers usually involves techniques that apply force directly to the metal to pop the dent out or push it back into place.
This might include using specialized dent puller tools or carefully applying heat to expand and contract the metal. For a beginner, identifying the material is crucial to avoid accidental damage and ensure the dent removal process is effective and safe for the car’s exterior.
Tools for Easy Dent Removal
Gathering the right tools is essential for the easiest way to remove a dent from your car bumper. You don’t need a professional garage full of equipment. Many common household items can be surprisingly effective.
The goal is to gently coax the dent out without causing further damage to the paint or the bumper material. Having these basic items on hand will make the process much smoother and more successful.
One of the most popular and effective DIY tools is a hairdryer or a heat gun. These are used to gently heat the plastic bumper. Heat makes the plastic more pliable, allowing it to return to its original shape.
It’s important to use a moderate heat setting, especially with a hairdryer, to avoid melting or discoloring the plastic. A heat gun offers more control but requires caution to prevent overheating. The idea is to warm the area around the dent, not to make it excessively hot.
Another common tool is a can of compressed air, often used for cleaning computer keyboards. When inverted, this can sprays a very cold substance. This rapid cooling effect, following heat, can cause the plastic to contract quickly and pop the dent out.
This thermal shock method is a popular technique for many minor dents. You’ll also need some basic cleaning supplies like soap and water, and a soft cloth to clean the area before you start and after you finish.
For slightly more stubborn dents, a plunger can be surprisingly effective. A clean sink or toilet plunger can create a vacuum seal on the dented area. By pulling on the plunger handle, you can often pull the dent outwards.
The key is to get a good seal and apply steady, firm pressure. It works best on larger, shallower dents where the plunger can get a solid grip on the surface. A suction cup dent puller, available at auto parts stores, is a more specialized version of this tool and can be very effective.
You might also find tools like a rubber mallet useful, but these should be used with extreme caution. They are typically used on the backside of the dent if you can access it. The idea is to gently tap the dented area outwards.
However, improper use can create high spots or damage the paint. For beginners, it’s often best to stick to methods that pull the dent from the outside rather than push from the inside, at least until you gain more confidence.
Hairdryer and Compressed Air Method
This method is a go-to for many people because it uses readily available items and is quite effective for plastic bumpers. First, clean the dented area thoroughly with soap and water to remove any dirt or debris. This prevents scratching during the process.
Then, using a hairdryer on a medium to high heat setting, warm the dented area for about 1-2 minutes. Keep the hairdryer moving to avoid concentrating heat on one spot, which could damage the paint or plastic. You want the plastic to feel warm to the touch, not hot.
Once the area is heated and the plastic is more pliable, take your can of compressed air. Turn the can upside down. Spray the cold propellant directly onto the center of the dent for about 10-15 seconds.
The rapid cooling will cause the plastic to contract quickly. This temperature change often makes the dent pop back into its original shape. You might hear a popping sound, which is a good sign that it’s working.
If the dent doesn’t pop out completely on the first try, you can repeat the process. Sometimes, a second or third attempt is necessary. It’s important to let the bumper cool down slightly between attempts.
This method works by exploiting the thermal expansion and contraction properties of plastic. The heat makes it flexible, and the sudden cold makes it contract, effectively pulling the dent out. Be patient and don’t rush the process.
It’s a fantastic example of the Easiest Way to Remove a Dent from Car Bumper using simple physics.
The Plunger Technique
The plunger technique is incredibly simple and can be surprisingly effective for dents that are relatively shallow and have a decent surface area for the plunger to adhere to. Start by cleaning the dented area and the rim of the plunger thoroughly. You want a good, clean seal.
Slightly wetting the rim of the plunger can help create a better vacuum seal. Then, place the plunger directly over the dent, pressing down firmly to create a strong suction.
Once the plunger is securely attached, pull back on the handle with a steady, firm motion. The goal is to pull the dent outwards. You might need to experiment with the angle and force of your pull.
Sometimes, a quick, sharp pull works best, while other times, a slow, consistent pull is more effective. If the plunger loses its seal, reposition it and try again. This method relies on creating enough negative pressure to draw the dented material back into its original position.
It’s important to note that this method is best suited for larger, shallower dents on flexible surfaces like plastic bumpers. Deep creases or sharp dents are less likely to respond well to this technique. If you have a large, roundish dent, the plunger is a fantastic, low-cost option to try.
It’s a testament to how simple tools can achieve great results in car dent removal, making it a prime candidate for the Easiest Way to Remove a Dent from Car Bumper.
How Heat Affects Plastic Bumpers
Plastic bumpers are designed to be somewhat resilient to impacts, and this resilience is largely due to their ability to flex and, importantly, to respond to heat. When plastic is heated, its molecules gain kinetic energy and move more freely. This increased molecular movement makes the material softer, more flexible, and more easily shaped.
For dent removal, this means that a heated bumper can be more easily persuaded to return to its original, undamaged form.
The critical aspect of using heat is control. Too little heat, and the plastic won’t become pliable enough to move. Too much heat, and you risk melting the plastic, causing it to warp permanently, or damaging the paint.
The goal is to achieve a temperature where the plastic is warm and yielding, but not hot to the point of being soft or gooey. Think of it like warming up modeling clay before you shape it; it needs to be warm enough to be malleable, but not so hot that it loses its structure.
When the heated plastic cools, it tends to retain the shape it was in as it cooled. This is why the rapid cooling from compressed air can be so effective. The plastic, having been made pliable by heat, is then quickly shrunk back into its original, un-dented form.
This principle of thermal expansion and contraction is the core mechanism behind many DIY dent removal techniques for plastic bumpers. It’s a scientific approach to fixing a common car problem, making the Easiest Way to Remove a Dent from Car Bumper accessible through understanding basic principles.
The Importance of Gradual Heating
Applying heat gradually is crucial for safe and effective dent removal. When you apply heat too quickly or too intensely, you run the risk of permanently damaging your car’s bumper. Rapid, intense heat can cause the paint to bubble or blister, or it can warp the plastic itself.
These kinds of damage are much harder and more expensive to fix than the original dent.
Using a hairdryer on a medium or high setting, and keeping it moving constantly over the dented area, ensures that the heat is distributed evenly. This gradual warming allows the entire affected area of the bumper to become pliable without overheating any single spot. It’s about warming the material enough to allow it to flex back into shape naturally, rather than forcing it with extreme temperatures.
For those using a heat gun, it’s even more important to be cautious. Always keep the heat gun moving and maintain a safe distance from the bumper surface. Start with a lower heat setting and gradually increase it if needed.
Check the temperature by touch periodically. The goal is to make the plastic warm and flexible, not hot enough to burn your hand or melt the material. This careful, gradual approach is fundamental to achieving the Easiest Way to Remove a Dent from Car Bumper without causing new problems.
Cooling Methods and Their Effects
After heating the plastic bumper to make it pliable, the cooling process is just as important for setting the repair. The most common and effective cooling method for DIY dent removal is using a can of compressed air held upside down. When inverted, compressed air releases a liquid propellant that is extremely cold.
Spraying this cold propellant onto the heated dent causes the plastic to contract rapidly.
This rapid contraction, often referred to as thermal shock, helps to pull the dented area back into its original shape. The quick change in temperature makes the plastic molecules tighten up, effectively “snapping” the dent out. You will often hear a distinct “pop” sound when this happens, signaling that the dent has been released.
It is important to apply the cold spray strategically and not overdo it. A few short bursts are usually sufficient. Allowing the bumper to return to ambient temperature between heating and cooling cycles can also be beneficial.
This allows the plastic to relax, making it more receptive to the shaping process. The combination of controlled heating and rapid cooling is what makes this method so successful for many types of bumper dents. It’s a simple yet ingenious way to address the Easiest Way to Remove a Dent from Car Bumper by leveraging basic science.
DIY Dent Removal Scenarios and Examples
Many common situations lead to bumper dents, and knowing how to tackle them can save you time and money. For instance, a minor parking lot scrape can leave a small, frustrating dent. Understanding the easiest way to remove a dent from your car bumper means you can often fix these issues yourself without needing a mechanic.
Let’s look at some real-world examples of how these simple methods can be applied effectively.
Scenario 1: The Shopping Cart Bump
Imagine you’re at the grocery store, and a runaway shopping cart gently bumps your rear bumper. You notice a small, rounded dent, about the size of a golf ball. It’s not deep, but it’s noticeable.
For this, the hairdryer and compressed air method is ideal. Clean the area. Heat the dent and the surrounding plastic with a hairdryer for about a minute, keeping the dryer moving.
Then, invert the compressed air can and spray the dent for 10-15 seconds. In many cases, you’ll hear a pop, and the dent will vanish. This entire process might take less than five minutes, proving how accessible the Easiest Way to Remove a Dent from Car Bumper can be.
Scenario 2: The Low-Speed Parking Maneuver
You’re backing into a tight parking spot, and your bumper lightly scrapes against a low wall or post. This leaves a slightly larger, shallower dent, perhaps several inches across. Here, the plunger technique might be your best bet.
Ensure the dented area and the plunger are clean. Apply the plunger firmly over the dent to create a strong suction. Give the plunger handle a sharp, steady pull.
If it doesn’t come out fully, reposition the plunger and try again. This method can be very effective for wider, less severe dents, demonstrating another simple approach to fixing bumper damage.
Case Study: A Recovered Parking Lot Dent
Sarah had a small dent on her front bumper from a minor parking lot incident. She was worried about the cost of repair. She found a guide recommending the hairdryer and compressed air method.
After cleaning the bumper, she warmed the dented area with her hairdryer for about 90 seconds. Then, she used the inverted compressed air can and sprayed the dent. To her surprise, the dent popped out on the first try.
She was thrilled that she could fix her car herself with just two common items, saving her over $100 she would have spent at a body shop.
Case Study: The Effectiveness of the Plunger
Mark had a slightly larger, flatter dent on his rear bumper after a gentle bump from another car. He decided to try the plunger method. He used a clean toilet plunger, ensuring it sealed well around the dent.
After a couple of firm pulls, the dent started to come out. He had to reposition the plunger a few times, but eventually, the bumper returned to its original shape. Mark was impressed by how simple and effective this tool was for a dent that looked like it might require professional attention.
When to Seek Professional Help
While many dents are fixable with DIY methods, there are times when it’s best to call in the experts. Understanding your limits is key to avoiding further damage. If a dent is very deep, has sharp creases, or involves a tear in the plastic, it might be beyond the scope of simple home remedies.
Trying to force these kinds of dents out could crack the bumper or make the damage worse, leading to a more expensive repair down the line.
Another indicator for professional help is if the paint is severely damaged. If the paint is cracked, chipped, or flaking around the dent, a DIY approach won’t fix that. Professional auto body shops have specialized tools and techniques for paint repair and matching, ensuring a seamless finish.
They can also assess if the impact has caused structural damage to the bumper or underlying components that you might not be able to see or address yourself.
If your bumper has multiple dents, or if the dent is located on a complex body line or edge, it can be challenging for a DIYer to achieve a perfect result. Professionals have the experience and equipment to work on these trickier areas. While the Easiest Way to Remove a Dent from Car Bumper is often a DIY solution, knowing when to trust a professional ensures the best possible outcome for your vehicle’s appearance and integrity.
Benefits of DIY Bumper Dent Repair
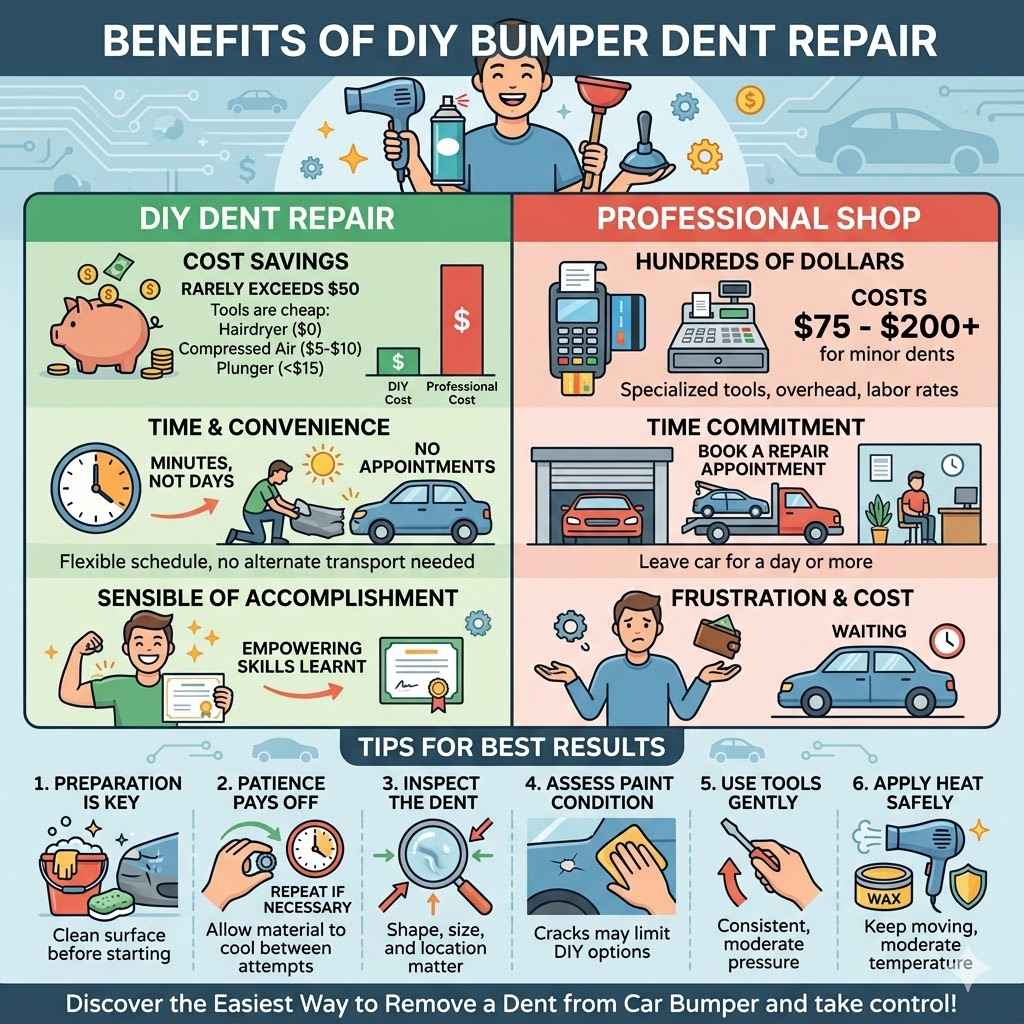
Tackling bumper dents yourself offers several advantages over taking your car to a professional repair shop. The most immediate and obvious benefit is cost savings. Professional repairs can easily run into hundreds of dollars, depending on the severity of the dent and the shop’s labor rates.
By using simple, inexpensive tools and techniques, you can achieve excellent results without breaking the bank. This makes keeping your car looking its best much more affordable.
Another significant benefit is the convenience. You can perform DIY dent repair at your own pace, on your own schedule, without needing to book an appointment or arrange for transportation while your car is in the shop. Whether it’s a sunny afternoon in your driveway or a quick fix during your lunch break, the flexibility is a major plus.
This accessibility means you can address minor cosmetic issues as soon as they appear, preventing them from becoming bigger worries.
Beyond savings and convenience, successfully repairing a dent yourself can provide a great sense of accomplishment. It’s empowering to learn new skills and be able to maintain your vehicle’s appearance. This knowledge can give you the confidence to tackle other minor car maintenance tasks in the future.
For many car owners, discovering the Easiest Way to Remove a Dent from Car Bumper is the first step into a world of accessible auto care.
Cost Savings Compared to Professionals
The financial difference between DIY bumper dent repair and professional services is substantial. For a minor dent, a professional body shop might charge anywhere from $75 to $200 or more for paintless dent repair (PDR) or even a simple plastic bumper repair. This cost often includes labor, overhead, and profit margins.
The tools required for professional PDR, like specialized rods and lights, are expensive and require significant training to use effectively.
In contrast, the tools needed for the easiest DIY methods are remarkably cheap, if not already in your home. A hairdryer can be found in most households. A can of compressed air typically costs around $5-$10.
A good quality plunger is usually under $15. Even if you decide to purchase a basic suction cup dent puller kit, you can often find one for $20-$30. The total investment for the most effective DIY methods rarely exceeds $50, and often much less.
This stark cost difference means that even if you attempt a DIY repair and it’s not perfect, you’ve likely saved money compared to a professional. If your attempt is successful, you’ve saved the entire professional repair cost. This makes exploring the Easiest Way to Remove a Dent from Car Bumper a financially smart decision for minor cosmetic issues.
It allows car owners to maintain their vehicle’s appearance without incurring significant expenses.
Time and Convenience Factors
The time commitment for DIY bumper dent repair is typically very short. Heating the area, applying the cooling agent, or using a plunger often takes just a few minutes of active work. Even if you need to repeat a step, the entire process can usually be completed within an hour, often much less.
This is a huge advantage over booking a repair appointment, which might require leaving your car at the shop for a day or more, forcing you to arrange alternative transportation.
The convenience factor also extends to the location. You can perform these repairs right in your own driveway or garage. There’s no need to travel to a repair shop, wait in a waiting room, or deal with the logistics of dropping off and picking up your vehicle.
This makes it incredibly easy to address small dents as soon as you notice them, preventing them from becoming more noticeable or potentially worsening over time. It’s about making car care fit into your busy life.
This immediate accessibility and minimal time requirement are key reasons why learning the Easiest Way to Remove a Dent from Car Bumper is so valuable. It empowers you to take control of your car’s appearance without major disruption to your day. It’s a practical solution for busy individuals who want to keep their cars looking good with minimal fuss.
The Satisfaction of a Successful DIY Fix
There’s a unique sense of pride and satisfaction that comes from successfully fixing something on your own car. When you manage to remove a dent from your bumper using simple tools and techniques, you not only improve the appearance of your vehicle but also gain a boost in confidence. This feeling of accomplishment can be incredibly rewarding.
It’s a tangible result of your effort and learning. You can look at your car and know that you were the one who made it look better. This DIY success can also encourage you to learn more about car maintenance and repair, potentially saving you even more money and time in the future.
It transforms a potential frustration into a learning opportunity and a victory.
Discovering and executing the Easiest Way to Remove a Dent from Car Bumper provides a direct, hands-on experience of problem-solving. This can be more fulfilling than simply paying someone else to do the job. It’s about empowerment and self-reliance, making the visual improvement on your car even sweeter.
Tips for Best Results
Achieving the best results when attempting to remove a dent from your car bumper involves more than just applying heat or pulling with a plunger. It requires a bit of patience, careful observation, and adherence to best practices. Even with the easiest methods, a thoughtful approach can make the difference between a minor improvement and a nearly perfect repair.
These tips are designed to help you maximize your success and keep your car looking its best.
Preparation is key. Always start with a clean surface. Dirt, dust, or grime can scratch the paint or interfere with the effectiveness of tools like plungers or suction cups.
Cleaning the area thoroughly will not only help your chosen method work better but also protect your car’s finish. Pay attention to the type of dent and bumper material, as this will guide your choice of method and the amount of force or heat you apply. Understanding these factors is part of mastering the Easiest Way to Remove a Dent from Car Bumper.
Patience is also a virtue here. Rushing the process or applying too much force can lead to damage. It’s better to try a method gently, repeat it if necessary, and gradually increase pressure or heat, rather than going all-in and potentially causing a bigger problem.
If a method doesn’t seem to be working after a reasonable attempt, don’t force it; consider if another technique might be more suitable or if professional help is needed.
Inspect the Dent Carefully
Before you grab any tools, take a good look at the dent. What is its shape and size? Is it a sharp crease, a shallow depression, or a broad curve?
Is the paint scratched or cracked around the dent? These details are important because they dictate the best approach. A shallow, rounded dent on a flexible plastic bumper is ideal for heat and cold methods or a plunger.
A sharp, creased dent might be much harder to fix with DIY methods and could require more specialized tools or professional attention.
Also, check the material of your bumper. Most modern cars have plastic bumpers, which are generally easier to repair using heat-based methods. Older cars might have metal bumpers, which require different techniques, often involving pulling or hammering.
Knowing if you have plastic or metal will help you avoid using the wrong method, which could cause damage. For instance, excessive heat on a plastic bumper can cause it to melt or warp, while metal dents might need different types of pulling tools.
Understanding the specifics of the dent, such as its location on the bumper (e.g., a flat area versus a complex curve or edge), will also help you anticipate challenges. A dent on a flat section is usually easier to work with than one near a body line. This careful inspection is the first step in applying the Easiest Way to Remove a Dent from Car Bumper effectively and safely.
Assessing Paint Condition
The condition of the paint around the dent is a critical factor in determining the best repair strategy. If the paint is perfectly intact, you have a wider range of DIY options available, especially methods like paintless dent repair (PDR) using heat or suction. These methods aim to restore the metal or plastic without disturbing the paint layer.
However, if the paint is cracked, chipped, or significantly scratched, your DIY options become more limited. While you might be able to push the dent out, the paint damage will still be visible and will likely require professional repainting to restore the bumper’s appearance fully. In such cases, a DIY dent removal attempt might only be a temporary fix, or it could even make the subsequent paint repair more complicated.
It’s important to be realistic about what DIY methods can achieve.
For a truly seamless repair where the paint is compromised, professional body shop services are usually necessary. They have the expertise to repair both the dent and the paint damage, ensuring a factory-like finish. Always weigh the potential for DIY success against the risk of further damaging the paint, which can be a costly mistake.
This assessment is a vital part of deciding on the Easiest Way to Remove a Dent from Car Bumper.
Using the Right Tools Gently
When you’re using tools like a hairdryer, heat gun, plunger, or suction cup, remember that gentleness is key. The goal is to encourage the material to move, not to force it aggressively. With heat, moderate and consistent warming is better than blasting one spot with intense heat.
This allows the plastic to become pliable without becoming brittle or melting.
When using a plunger or suction cup, apply steady, firm pressure rather than jerky, violent pulls. A consistent pull helps the material move smoothly. If the tool loses its seal, reposition it carefully rather than yanking.
For dent pullers with glue tabs, follow the instructions precisely and avoid excessive force when pulling the tab.
Even if you have access to more specialized tools, remember that improper use can cause more damage than the original dent. The Easiest Way to Remove a Dent from Car Bumper relies on understanding the material properties and applying tools with controlled, deliberate movements. Over-aggression is the enemy of a successful DIY repair.
It’s about finesse, not force.
Applying Heat Safely
Safety during heat application is paramount. When using a hairdryer, keep it moving constantly to avoid concentrating heat on one spot. Hold it at a reasonable distance from the bumper, usually a few inches away.
The plastic should become warm and pliable, not hot to the touch to the point of discomfort or potential burning. You don’t want the paint to start looking shiny or discolored, which indicates it’s getting too hot.
If you opt for a heat gun, exercise even more caution. These tools generate much higher temperatures. Always keep the heat gun moving in a sweeping motion and maintain a distance of at least 6-8 inches from the bumper surface.
Start with the lowest heat setting and gradually increase it only if necessary, checking the temperature frequently. Never hold the heat gun in one place for more than a few seconds. Your goal is to make the plastic flexible, not to melt it.
A good rule of thumb is to test the temperature with the back of your hand. If it feels too hot to hold comfortably for a few seconds, it’s likely too hot for the bumper. Proper heat application is foundational to the Easiest Way to Remove a Dent from Car Bumper, ensuring you don’t create new, more difficult problems.
The Role of Patience
Patience is perhaps the most underrated tool in DIY dent removal. Many minor dents can be removed with simple methods, but they might require multiple attempts. Don’t get discouraged if the dent doesn’t pop out immediately.
Sometimes, the plastic needs a bit more warming, or the cooling needs to be applied slightly differently. Allow the material to cool completely between attempts before reheating.
Take your time to reposition tools like plungers or suction cups for the best seal. Rushing these steps can lead to a loss of suction and less effective pulling. If you’re using a hairdryer or heat gun, be patient with the warming process.
Gradual, even heating is more effective and safer than quick, intense bursts.
If a particular method isn’t yielding results after a few patient tries, it might be time to consider if it’s the right method for the dent, or if you’ve reached the limit of what DIY can achieve. This patient, step-by-step approach is a hallmark of finding the Easiest Way to Remove a Dent from Car Bumper that actually works and leads to a satisfactory outcome.
Post-Repair Cleaning and Inspection
Once you believe the dent has been successfully removed, the job isn’t quite finished. Proper cleaning and inspection are crucial to ensure your repair was effective and to catch any minor issues you might have missed. Start by cleaning the entire area with mild soap and water.
This removes any residue from the dent removal process, such as cleaning agents or even slight plastic debris.
After cleaning, carefully inspect the bumper under good lighting. Look at the repaired area from different angles. Does the surface appear smooth and even?
Is there any remaining distortion? Check the paint for any new scratches or damage that might have occurred during the process. A final wipe-down with a clean microfiber cloth will reveal the true result of your efforts.
This final step solidifies your understanding of the Easiest Way to Remove a Dent from Car Bumper.
Checking for Imperfections
After the repair, examine the bumper under various lighting conditions. Natural daylight is often best for spotting imperfections. Look for any lingering waves, high spots, or areas where the surface doesn’t quite match the surrounding undamaged parts of the bumper.
Sometimes, a dent might pop out, but leave a slight ripple or undulation in its place.
It’s also important to check if the repaired area has retained its original texture and finish. Some DIY methods, especially if the heat was too intense, can slightly alter the surface of the plastic, making it look duller or smoother than the rest of the bumper. While these might not be deal-breakers, they are imperfections to note.
If you notice minor imperfections that bother you, and if the paint is intact, you might be able to gently re-warm the area and try to smooth it out further, or use a very fine-grit sandpaper followed by a polishing compound if you’re comfortable with that. However, for significant imperfections, or if the paint is damaged, it might be time to consult a professional.
Protecting Your Repair
Once you’re satisfied with the repair, it’s good practice to protect the area. Avoid washing your car with harsh chemicals or abrasive materials for a few days after the repair, especially if you used heat. This allows the plastic to fully stabilize and the paint to settle.
Consider applying a car wax or sealant to the repaired area, and the rest of the bumper, once it’s clean and dry. This will not only add a layer of protection against future minor scratches and environmental damage but will also enhance the shine and blend the repaired area in better with the rest of the vehicle. A good polish and wax can make a repaired dent look almost invisible.
These final steps are part of ensuring your DIY success lasts. They complete the process of finding and implementing the Easiest Way to Remove a Dent from Car Bumper, leaving you with a car that looks great and is protected for the road ahead.
Frequently Asked Questions
Question: Can I really remove a dent from my car bumper with just a hairdryer?
Answer: Yes, for many common plastic bumper dents, a hairdryer can be very effective. The heat makes the plastic pliable, and when combined with rapid cooling (like from inverted compressed air), it can cause the dent to pop back into place. It’s one of the simplest and most accessible methods for the Easiest Way to Remove a Dent from Car Bumper.
Question: What if my car bumper is made of metal?
Answer: Metal bumpers require different techniques. Heat can be used to expand and contract metal, but it’s less common for DIYers without specialized tools. For metal, you might need to look into suction cup dent pullers designed for metal or even consider professional help, as forcing metal can cause sharp creases.
Question: How deep of a dent can I fix with DIY methods?
Answer: DIY methods are best suited for shallow to medium-depth dents that haven’t creased the material sharply. Deep, sharp dents or those with torn paint are much more challenging and often require professional attention.
Question: Will using heat damage my car’s paint?
Answer: There is a risk of paint damage if you apply too much heat or concentrate it on one spot for too long. Always use moderate heat, keep the heat source moving, and avoid overheating the plastic. If the paint is already compromised, DIY heat methods might exacerbate the damage.
Question: How many times can I repeat the hairdryer and compressed air method?
Answer: You can repeat the process several times, but allow the bumper to cool down between attempts. Be patient and observe how the plastic responds. If you don’t see significant improvement after a few tries, the dent might be too severe for this method.
Conclusion
Fixing a car bumper dent doesn’t have to be expensive or complicated. You’ve learned that the Easiest Way to Remove a Dent from Car Bumper often involves simple household items and basic physics. With careful heating and cooling, or gentle pulling with a plunger, many common dents can be successfully removed at home.
Always inspect the dent first, use your tools gently, and be patient. You can achieve great results and save money.