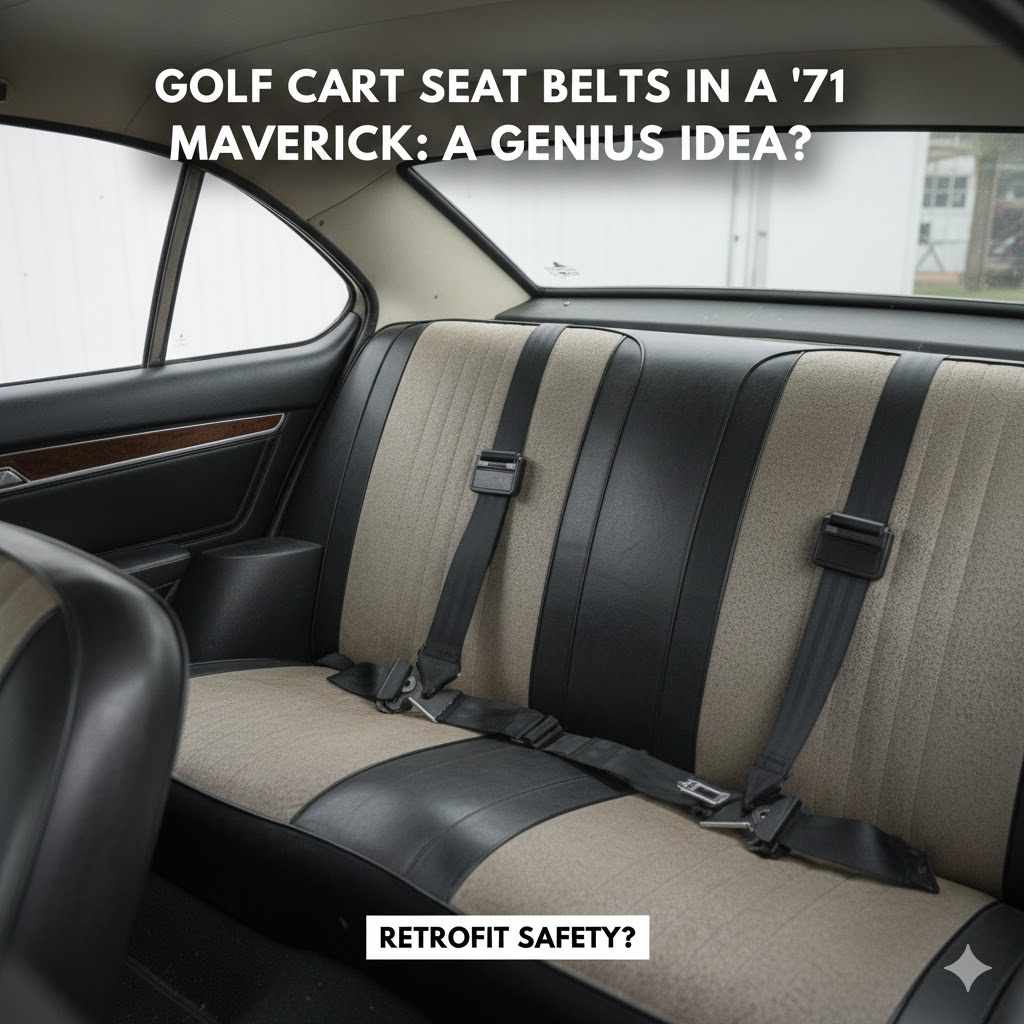
Golf Cart Seat Belts in a ’71 Maverick: A Genius Idea?
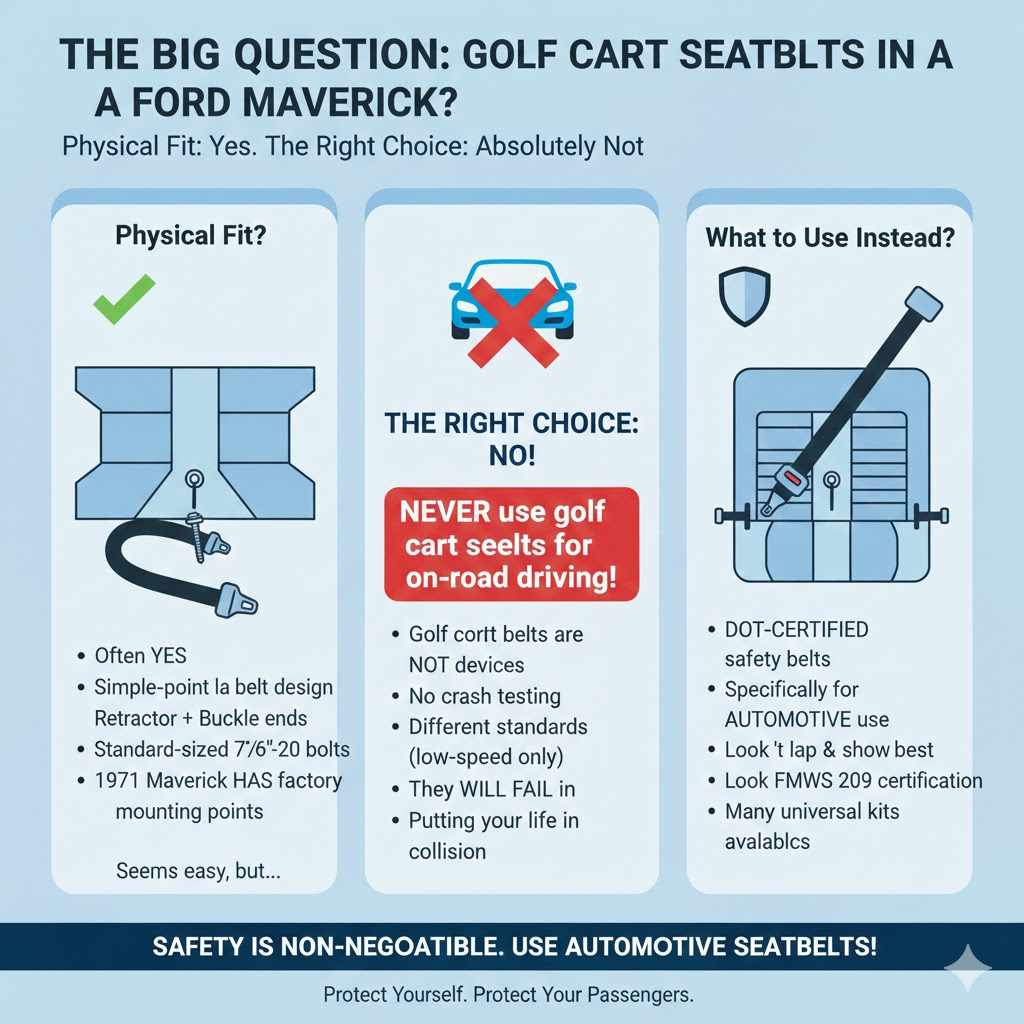
Yes, 2-point retractable seat belts for a golf cart can physically fit a 1971 Ford Maverick, as they use a similar simple bolt-in design. However, it is a critically unsafe idea. Golf cart belts are not designed or tested to meet federal automotive safety standards and will likely fail in a car crash, offering no real protection.
Hello there! It’s your friendly neighborhood auto guide, Md Meraj. I know what it’s like to own a classic car like a ’71 Maverick. It’s a beautiful piece of history, but it might be missing a modern safety feature we all take for granted: reliable seat belts. You might be looking for a simple, affordable fix and stumble upon golf cart seat belts. They look similar, right? They’re cheap and seem easy to install. But this is one of those times where a simple solution can lead to big problems.
I understand wanting to get your classic car safer on a budget. It’s a smart goal! Today, we’re going to look at why using golf cart seat belts in your Maverick is a risk not worth taking. More importantly, I’ll walk you through the correct, safe, and still affordable way to add proper seat belts to your vintage ride. Let’s make your Maverick both classic and safe, the right way.
Golf Cart Seat Belts in a ’71 Maverick: A Genius Idea or a Dangerous Shortcut?
When you’re working on a classic car, creativity is part of the fun. Finding clever ways to solve problems is what being a DIY enthusiast is all about. So, when you see a set of affordable, retractable 2-point seat belts made for a golf cart, the gears in your head start turning. Could this be the perfect, easy solution for your ’71 Maverick? Let’s break it down.
The Big Question: Will They Physically Fit?
Let’s get the first part of the question out of the way. Physically, can you bolt a golf cart seat belt into a Ford Maverick? The answer is often yes.
Most 2-point lap belts, whether for a golf cart or a universal car kit, use a simple design:
- A retractor unit that bolts to the floor or side pillar.
- A buckle end that bolts to the other side of the seat.
- Standard-sized bolts (often 7/16″-20 thread).
Your 1971 Maverick should have factory-drilled mounting points for lap belts, even if the original belts are long gone. These are reinforced holes in the floor pan designed specifically for this purpose. Because the basic mounting mechanism is so similar, you could likely thread the bolts from a golf cart kit right into your Maverick’s existing holes. It seems too easy, and unfortunately, it is.
Safety First: The Critical Difference You Can’t See
Just because something fits doesn’t mean it’s right for the job. This is especially true for safety equipment. A car and a golf cart operate in vastly different worlds, and their safety gear is built to different standards.
Think about it:
- Golf Cart Speed: Tops out around 15-20 mph. The main purpose of the belt is to keep you from sliding off the seat during a sharp turn on a grassy hill.
- Car Speed: Easily travels at 55, 65, or even 75 mph. The purpose of the belt is to restrain a 150-pound person from flying through a windshield during a sudden, violent stop.
The forces involved in a car crash are immense. Automotive seat belts are engineered to handle these extreme forces. They must meet strict government regulations known as the Federal Motor Vehicle Safety Standards (FMVSS). Specifically, FMVSS 209 and 210 cover seat belt assemblies and anchorages.
What Do These Safety Standards Mean?
These standards dictate everything about a seat belt’s construction, ensuring it can save your life:
- Webbing Strength: The fabric strap itself must be able to withstand thousands of pounds of force without tearing.
- Stitching: The thread and stitch pattern are specifically designed not to unravel under extreme tension.
- Retractor Lock: The mechanism that locks the belt during a sudden stop must engage instantly and hold firm.
- Buckle Integrity: The buckle must not break or unlatch under the massive force of an accident.
- Hardware Strength: The metal bolts and brackets must be made of high-grade steel that won’t shear off.
Golf cart seat belts are not required to meet any of these standards. They are made with cheaper materials and simpler construction because they are only designed for low-speed environments. In a real car accident, a golf cart belt would likely shred, the buckle would shatter, or the retractor would fail to lock. It would provide a false sense of security and no actual protection.
Comparing Your Seat Belt Options
To make it crystal clear, let’s compare the options head-to-head. You have three main choices when adding or replacing seat belts in your ’71 Maverick.
| Feature | Golf Cart Lap Belts | Universal Automotive Lap Belts | OEM-Style Reproduction Belts |
|---|---|---|---|
| Safety Rating | None. Not for highway use. | Meets or exceeds FMVSS 209/302. | Meets or exceeds original factory and modern FMVSS standards. |
| Designed For | Low-speed vehicles (under 25 mph). | Any passenger vehicle. Built for highway speeds. | Specifically for your Ford Maverick model year. |
| Webbing/Stitching | Light-duty, may fail under crash forces. | High-tensile strength polyester webbing. | High-tensile strength, often with period-correct look. |
| Price (per seat) | $20 – $40 (Very Cheap) | $50 – $90 (Affordable) | $100 – $200+ (Most Expensive) |
| Installation | Easy, but unsafe. | Easy and safe, bolts into factory holes. | Easy and safe, perfect fit for factory holes. |
| Peace of Mind | Zero. Creates a false sense of security. | Excellent. You are properly protected. | Excellent. You are protected with a classic look. |
As you can see, the only “pro” for golf cart belts is the low price. But when it comes to your safety, saving $30 is not a smart trade-off. Universal automotive lap belts offer the perfect balance of safety and affordability, making them the best choice for this project.
How to Install Proper Seat Belts in Your 1971 Maverick: The Safe Way
Okay, so we’ve established that using proper, automotive-grade seat belts is the only safe way to go. The good news is that it’s still a very straightforward, beginner-friendly DIY job! Your Maverick was built to have these belts, so we’re just putting back what belongs there.
Let’s walk through the process of installing a set of universal 2-point retractable lap belts.
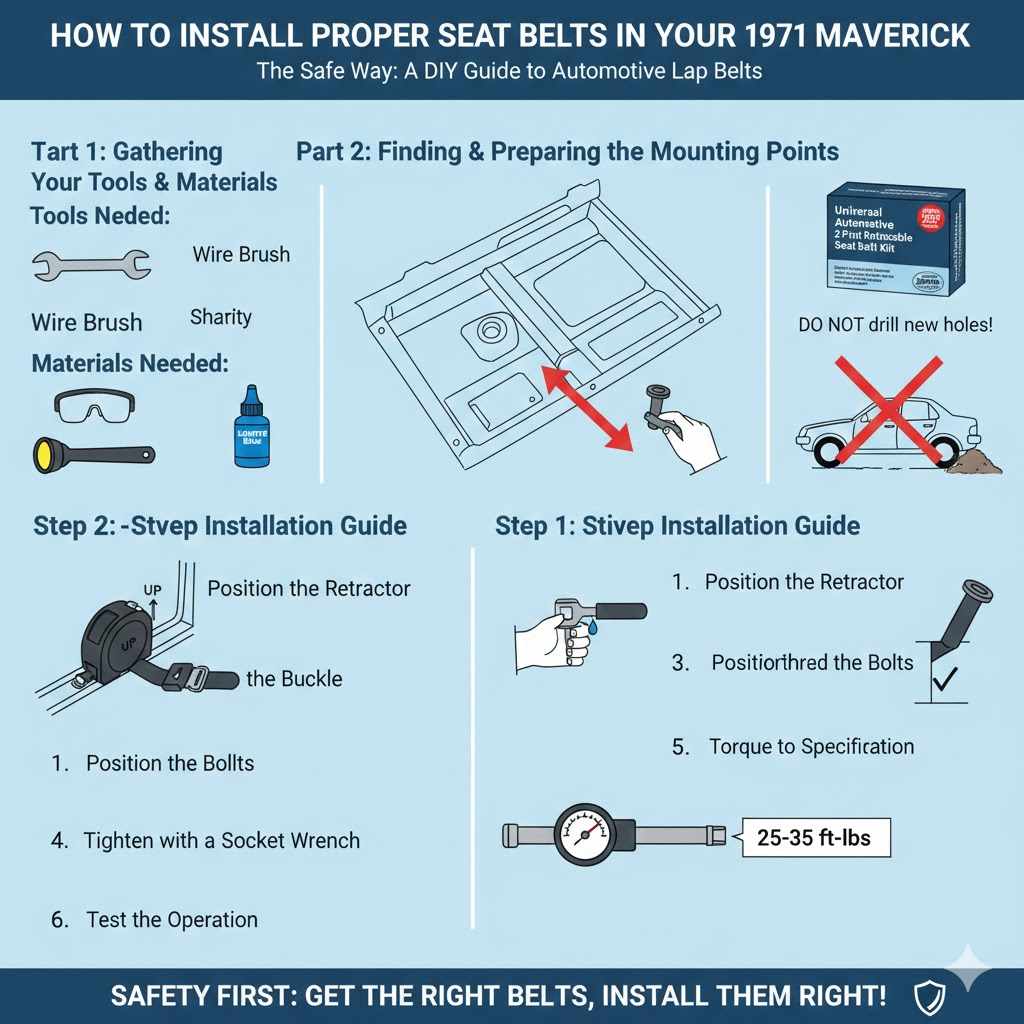
Part 1: Gathering Your Tools and Materials
You don’t need a fancy garage for this. Most of these are basic tools you might already have.
Tools Needed:
- Socket Wrench Set (you’ll likely need a 3/4″ or 13/16″ socket, but check your kit)
- Torque Wrench (very important for safety!)
- Wire Brush
- Shop Vacuum or Brush
- Safety Glasses
- Flashlight or Work Light
Materials Needed:
- A Universal Automotive 2-Point Retractable Seat Belt Kit: Make sure the product description explicitly states that it meets or exceeds FMVSS 209 standards. One kit is usually for one seat.
- Thread-locking compound (like Loctite Blue): This is optional but highly recommended to prevent bolts from vibrating loose over time.
Part 2: Finding and Preparing the Mounting Points
This is the most important preparation step. You must bolt your new seat belts into the factory-reinforced mounting points. Do not drill new holes in the floor pan!
- Locate the Holes: Move the front seat all the way forward or back to give yourself room. Look on the floor pan on either side of the seat. You should find one threaded hole on the transmission tunnel side and one on the rocker panel (door sill) side. They may be covered by carpet or old plugs.
- Clear the Area: If you have carpet, you may need to feel for the bolt holes and cut a small “X” in the carpet to expose them. Use your shop vac to clean out any dirt or debris from the area.
- Clean the Threads: The threads in these holes have been sitting for 50+ years. They are likely rusty or full of gunk. Use a wire brush to scrub the threads clean. You want your new bolts to thread in smoothly and securely. If they are very rusty, you can use a thread chaser or tap (a 7/16″-20 UNF tap is common for seat belts) to clean them perfectly.
Part 3: Installing the New Seat Belts
Now for the fun part! This should only take about 15-20 minutes per seat once the mounting holes are prepped.
Step-by-Step Installation Guide:
Position the Retractor
The retractor is the larger unit where the belt spools up. This typically goes on the outboard side (the side by the door). Make sure the retractor is oriented correctly—it must be mounted vertically (straight up and down) to work properly. Most have an arrow or “UP” indicator. Place it over the mounting hole.
Position the Buckle
The buckle end is the shorter strap. This goes on the inboard side (the side by the transmission tunnel). Place the mounting plate over the hole.
Hand-Thread the Bolts
Your new seat belt kit will come with high-grade bolts and washers. Always use the hardware that comes with the kit. Apply a drop of blue thread-locker to the bolt threads if you are using it. Carefully hand-thread each bolt into the mounting holes. They should go in smoothly. If you feel resistance, stop! Back the bolt out and clean the threads again. Never force a bolt.
Tighten with a Socket Wrench
Once the bolts are threaded in by hand, use your socket wrench to tighten them until they are snug. Don’t go crazy here; the next step is crucial.
Torque to Specification
This is a critical safety step. Seat belt anchor bolts need to be tightened to a specific value to ensure they hold in a crash. The standard torque specification for a 7/16″ Grade 8 seat belt bolt is typically between 25-35 ft-lbs (foot-pounds). Check the instructions with your seat belt kit for the exact value. Set your torque wrench to this value and tighten the bolt until the wrench clicks. This guarantees it’s perfectly tight—not too loose and not too tight.
Test the Operation
Sit in the seat and pull the seat belt out. It should extend smoothly. Now, give it a sharp, quick tug. The retractor should immediately lock. If it doesn’t, check that the retractor unit is mounted perfectly vertically. Click the buckle and unbuckle it a few times to ensure it works properly.
Repeat for the Other Side
Follow the same process for the passenger seat. That’s it! You’ve just made a massive safety upgrade to your classic Maverick.
Frequently Asked Questions (FAQ)
1. What’s the difference between a 2-point and a 3-point seat belt?
A 2-point belt, or lap belt, only goes across your hips. This was standard in the ’71 Maverick. A 3-point belt has a lap portion and a shoulder strap that goes across your chest. A 3-point system provides much better protection by preventing your upper body from lurching forward in a crash.
2. Can I install 3-point seat belts in my ’71 Maverick?
Yes, you can, but it’s a more advanced project. Your Maverick does not have a factory-reinforced mounting point for the shoulder belt on the “B-pillar” (the pillar between the front and back doors). You would need to weld in a reinforced plate to safely anchor the third point. For beginners, sticking with a high-quality 2-point lap belt is the safest and easiest upgrade.
3. Why is using a torque wrench so important?
A torque wrench ensures you tighten a bolt to the exact specification. If a seat belt bolt is too loose, it can work its way out over time. If it’s too tight, you can stretch the bolt or damage the threads, weakening it and causing it to fail in an accident. It’s a vital tool for any safety-related job.
4. My car doesn’t have mounting holes. What should I do?
While a ’71 Maverick should have them, some very early cars did not. If you cannot find them, you must install seat belt anchor plates. This involves drilling holes and using large, thick steel plates under the floor to distribute the force. This is a job best left to a professional auto body or restoration shop to ensure it’s done safely.
5. Are expensive seat belts better than affordable ones?
Not necessarily. The most important factor is the FMVSS safety certification. An affordable $60 universal kit that is certified is infinitely safer than a non-certified belt at any price. More expensive kits often offer features like custom colors, period-correct buckle styles, or longer webbing, but they all must meet the same minimum safety standard to be sold for automotive use in the U.S.
6. Can I reuse old seat belts from a junkyard car?
It is strongly advised not to. Seat belt webbing can degrade over time from UV light exposure, and you never know if a junkyard car was in an accident. A seat belt is a one-time-use device; if it has been through a crash, it must be replaced. New, certified belts are affordable and guarantee your safety.
7. What if my retractable belt locks up during installation?
This is common! The locking mechanism is sensitive to angle. If the retractor isn’t held perfectly upright, the belt will not pull out. Simply stand the retractor upright on a flat surface, and the belt should release. This is why mounting it vertically in the car is so important.
Your Safety is Worth More Than a Shortcut
Bringing a classic car back to life is an incredibly rewarding journey. It connects you to a different era of driving and gives you a sense of pride that you just can’t get from a modern car. Part of that responsibility is making sure it’s safe to be on the road, both for you and your passengers.
While the idea of using golf cart seat belts might seem like a clever, budget-friendly hack, it’s a shortcut that gambles with your safety. The materials and construction are simply not designed to withstand the violent forces of a real-world car accident. It’s a modification that looks like a safety feature but provides none of the protection.
By investing just a little more time and money into a proper, FMVSS-certified universal automotive seat belt kit, you get true peace of mind. The installation is just as simple, fits your Maverick’s original design, and provides the life-saving protection you deserve. Drive your classic with confidence, knowing you made the smart, safe choice. Happy motoring!