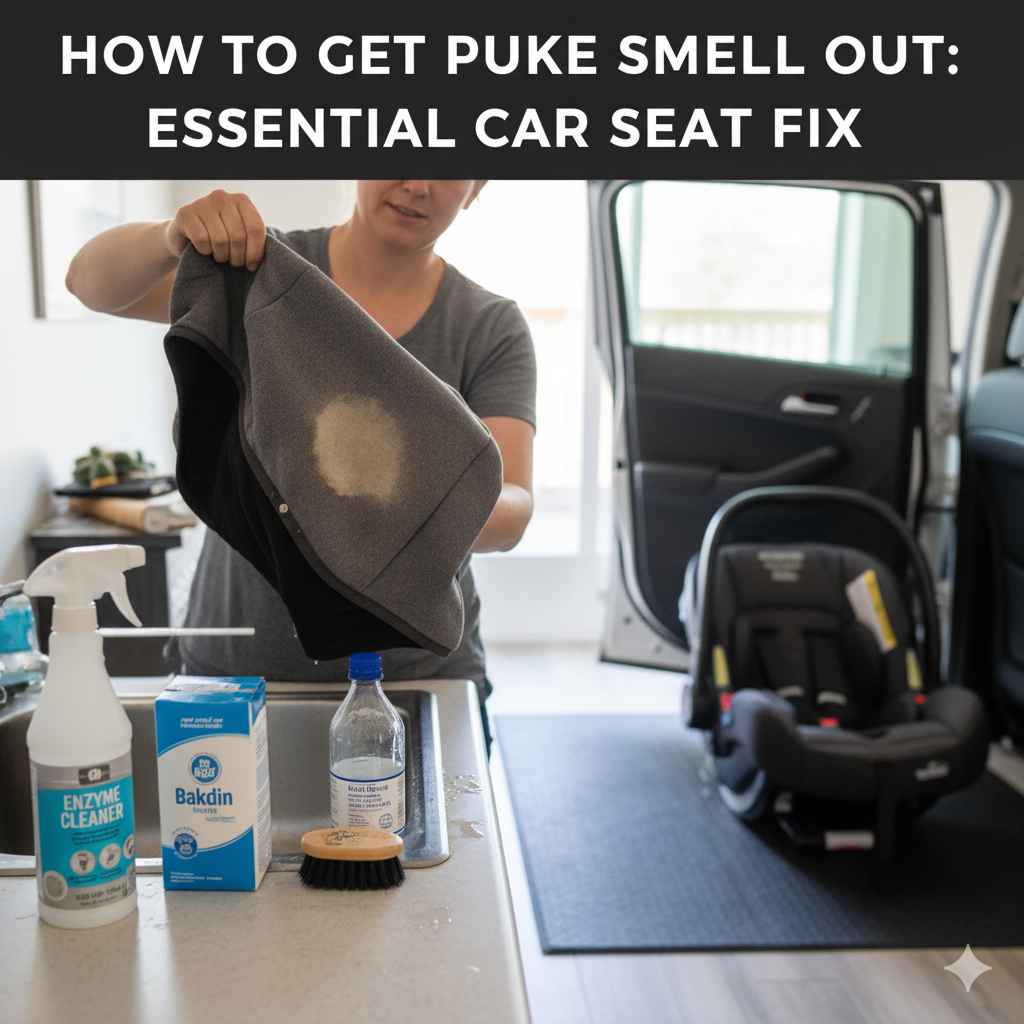
How to Get Puke Smell Out: Essential Car Seat Fix
Don’t let puke smell ruin your car! This guide shows you tested, easy steps to eliminate unwanted odors from car seats with common household items and a little elbow grease. Get your car smelling fresh again quickly and effectively.
Few things can make a car ride more unpleasant than the unmistakable, lingering smell of vomit. It’s a common, albeit unfortunate, travel hazard, especially with kids or pets. That strong, acidic odor can quickly seep into car seat fabric, leaving you wondering if the smell will ever truly disappear. But don’t worry! With the right approach, you can tackle this challenge head-on and restore freshness to your vehicle. We’ll walk you through a simple, step-by-step process that doesn’t require expensive professional cleaning. Prepare to reclaim your car from that unwelcome scent.
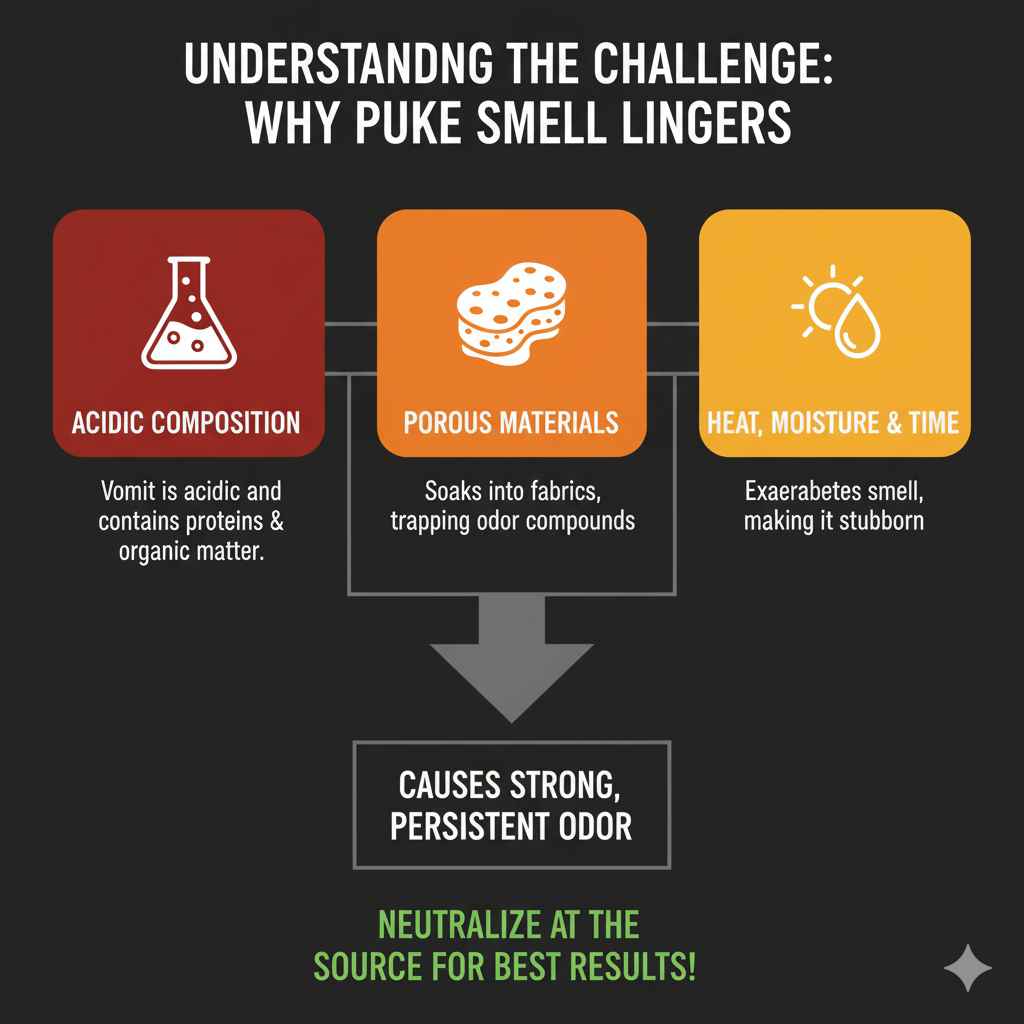
Understanding the Challenge: Why Puke Smell Lingers
Before we dive into the cleaning, it’s helpful to understand why puke smell is so stubborn. Vomit is acidic and contains proteins and other organic matter that break down over time. This decomposition is what produces the strong, unpleasant odor. When it lands on porous materials like car seat fabric, the liquid soaks in, and the odor-causing compounds get trapped. Moisture, heat, and time can all exacerbate the problem, making the smell more intense and harder to remove. The good news is that by neutralizing the odor at its source and thoroughly cleaning the affected area, you can achieve fantastic results.
Essential Tools and Supplies
Gathering your supplies before you start will make the cleaning process much smoother. You likely have many of these items already in your home.
Safety First:
Gloves: To protect your hands from the mess and cleaning solutions.
Protective Eyewear: To prevent any splashes from getting into your eyes.
Cleaning Agents:
Paper Towels or Clean Rags: Plenty of them!
Spray Bottles: One for your cleaning solution, another for plain water.
Baking Soda: A powerful natural deodorizer.
White Vinegar: Excellent for neutralizing odors and breaking down stains.
Mild Dish Soap (e.g., Dawn): For general cleaning and lifting grime.
Enzyme Cleaner: Specifically designed to break down organic matter and odors. This is a superhero product for this job! You can find these at most pet stores or online.
Rubbing Alcohol (Isopropyl Alcohol): Can help with disinfection and drying.
Cleaning Tools:
Soft Bristle Brush or Old Toothbrush: For scrubbing without damaging fabric.
Vacuum Cleaner with Upholstery Attachment: Essential for removing loose debris and residues.
Buckets: For mixing solutions and rinsing.
Microfiber Towels: For drying and buffing.
Step-by-Step Guide to Eradicating Puke Smell from Car Seats
Let’s get down to business! Follow these steps carefully for the best results.
Step 1: Immediate Action & Initial Cleanup (The Soaking Up)
The sooner you tackle the mess, the easier it will be to remove the smell.
1. Remove Solids: If there are any solid remnants, carefully remove them using paper towels or a gloved hand. Dispose of them immediately.
2. Blot, Don’t Rub: Grab clean paper towels or absorbent cloths and blot the affected area. The goal here is to absorb as much liquid as possible. Press firmly, but avoid rubbing, as this can push the vomit deeper into the fabric fibers and spread the stain.
3. Repeat Until Dry: Continue blotting with fresh towels until no more moisture is being absorbed. The area should feel as dry as possible from this initial step.
Step 2: The Vinegar Solution – Neutralize and Deodorize
White vinegar is your friend here. Its acidity helps to break down and neutralize the alkaline odor compounds in vomit.
1. Mix the Solution: In a spray bottle, mix a solution of equal parts white vinegar and cool water. For example, 1 cup of vinegar and 1 cup of water.
2. Spray Lightly: Lightly spray the affected area with the vinegar-water solution. You want to dampen the fabric, not drench it. Over-saturation can sometimes lead to mildew or make drying more difficult.
3. Let it Sit: Allow the solution to sit on the fabric for about 10-15 minutes. This gives the vinegar time to work its magic on the odor.
4. Blot Again: Use clean, dry cloths to blot up the vinegar solution and any loosened residue.
Step 3: Baking Soda Power – The Odor Absorber
Baking soda is a natural deodorizer that works by absorbing odors rather than just masking them.
1. Apply Generously: Once the area is no longer visibly wet from the vinegar solution, liberally sprinkle baking soda over the entire affected area. Make sure to cover it well, even extending a little beyond the original mess.
2. Let it Work: Leave the baking soda on the car seat for at least several hours, or even better, overnight. The longer it sits, the more odor it will absorb. For heavily soiled areas, you can gently work it into the fabric with a soft brush.
3. Vacuum Thoroughly: After the baking soda has had ample time to work, use your vacuum cleaner with the upholstery attachment to remove all the baking soda. Vacuum thoroughly to ensure no grainy residue is left behind.
Step 4 (Optional but Recommended): Enzyme Cleaner – The Ultimate Odor Eliminator
For persistent or strong odors, an enzyme cleaner is often the most effective solution. These cleaners contain biological enzymes that literally break down and digest the organic molecules causing the smell. You can find excellent enzyme cleaners at pet supply stores, often labeled for pet accidents, which are chemically similar to vomit.
1. Choose Your Cleaner: Select a high-quality, reputable enzyme cleaner. Read the product instructions carefully.
2. Apply According to Instructions: Typically, you’ll spray the enzyme cleaner generously onto the affected area, ensuring it penetrates the fabric. Some products may recommend saturating the area.
3. Allow to Dwell: Enzyme cleaners often need time to work. This can range from a few hours to 24 hours or even longer, depending on the product and the severity of the odor. Some products suggest covering the treated area loosely with plastic wrap or a damp cloth to keep it moist, which helps the enzymes remain active. Always follow the specific product’s directions.
4. air dry: After the recommended dwell time, allow the area to air dry completely. This is crucial. Do not use heat to speed up the drying process, as this can sometimes set in any remaining odors.
Step 5: Deep Cleaning for Fabrics and Straps
Don’t forget the parts you might not have initially noticed. Car seat straps, in particular, can trap odors effectively.
1. For Seat Straps: If the straps are heavily soiled and can be unbuckled and removed (check your car seat manual for safety and assembly instructions before attempting this), you can often hand-wash them. Use a mild detergent mixed with cool water and a soft brush. Rinse thoroughly and allow them to air dry completely before reattaching. If the straps are not removable or you’re unsure, follow the steps above for cleaning in place. You can also use a damp cloth with your chosen cleaning solution (vinegar or enzyme cleaner) to wipe down the straps.
2. For Upholstery: For the rest of the seat fabric, you can use a similar approach.
Spot Cleaning: Use a damp cloth with a mild soap and water solution, or your vinegar/enzyme cleaner, to wipe down the entire seat, paying close attention to any stained areas.
Full Seat Clean: If the entire seat is affected or you want a general refresh, you can use a wet-dry vacuum or a carpet cleaning machine (often available for rent) with an appropriate upholstery attachment. Use a cleaning solution recommended for car interiors. Always test any cleaning solution in an inconspicuous area first to ensure it doesn’t cause discoloration.
Step 6: Thorough Drying and Ventilation
Proper drying is critical to prevent mold and mildew, which can create their own unpleasant odors.
1. Air Out: Open all car doors and windows to allow for maximum air circulation. This is the most effective way to dry your car seats naturally.
2. Fan Assistance: If you have a portable fan, you can set it up to blow air directly onto the car seats to speed up the drying process.
3. Sunlight: If possible, park your car in direct sunlight with the windows open. Sunlight can help dry the fabric and also has some natural deodorizing qualities.
4. Check for Dampness: Ensure the seats are completely dry to the touch before closing up the car. This can take several hours, or even a full day, depending on humidity and temperature.
Step 7: Final Deodorizing and Assurance
Once everything is dry, give it a final sniff test. If any faint odor remains, there are a few more tricks up your sleeve.
1. Fresh Air Re-Spray: You can lightly mist the interior with a fabric refresher spray designed for car interiors, or even a diluted solution of essential oils like eucalyptus or peppermint (ensure they are safe for fabric and won’t stain).
2. Activated Charcoal: Placing a few bags of activated charcoal (available at pet stores or online) in your car can absorb residual odors over time.
3. Coffee Grounds: For a more rustic approach, place a small open container of fresh coffee grounds in the car overnight. They are excellent at absorbing odors.
Table: Cleaning Solution Comparison
Here’s a quick look at the most common remedies and their effectiveness.
| Cleaning Agent | Pros | Cons | Best For |
|---|---|---|---|
| White Vinegar & Water Solution | Readily available, natural, effective at neutralizing odors. | Can leave a temporary vinegar smell (which dissipates), may not be strong enough for severe cases. | Mild to moderate odors, initial neutralization. |
| Baking Soda | Excellent natural deodorizer, absorbs odors, safe for most fabrics. | Can be messy to vacuum up, might require multiple applications, doesn’t clean stains as effectively. | Absorbing lingering odors after initial cleaning. |
| Enzyme Cleaner | Specifically designed to break down organic matter, highly effective on strong or old odors, eliminates the source of the smell. | Requires purchase, needs specific dwell time, may require repeat applications for very tough odors. | Stubborn stains and strong, persistent odors. Often the most effective solution. |
| Mild Dish Soap & Water | Good for general grime and lifting surface stains, readily available. | Not a strong odor neutralizer on its own, may require rinsing to avoid residue. | General cleaning of light soiling, pre-treatment before deodorizing. |
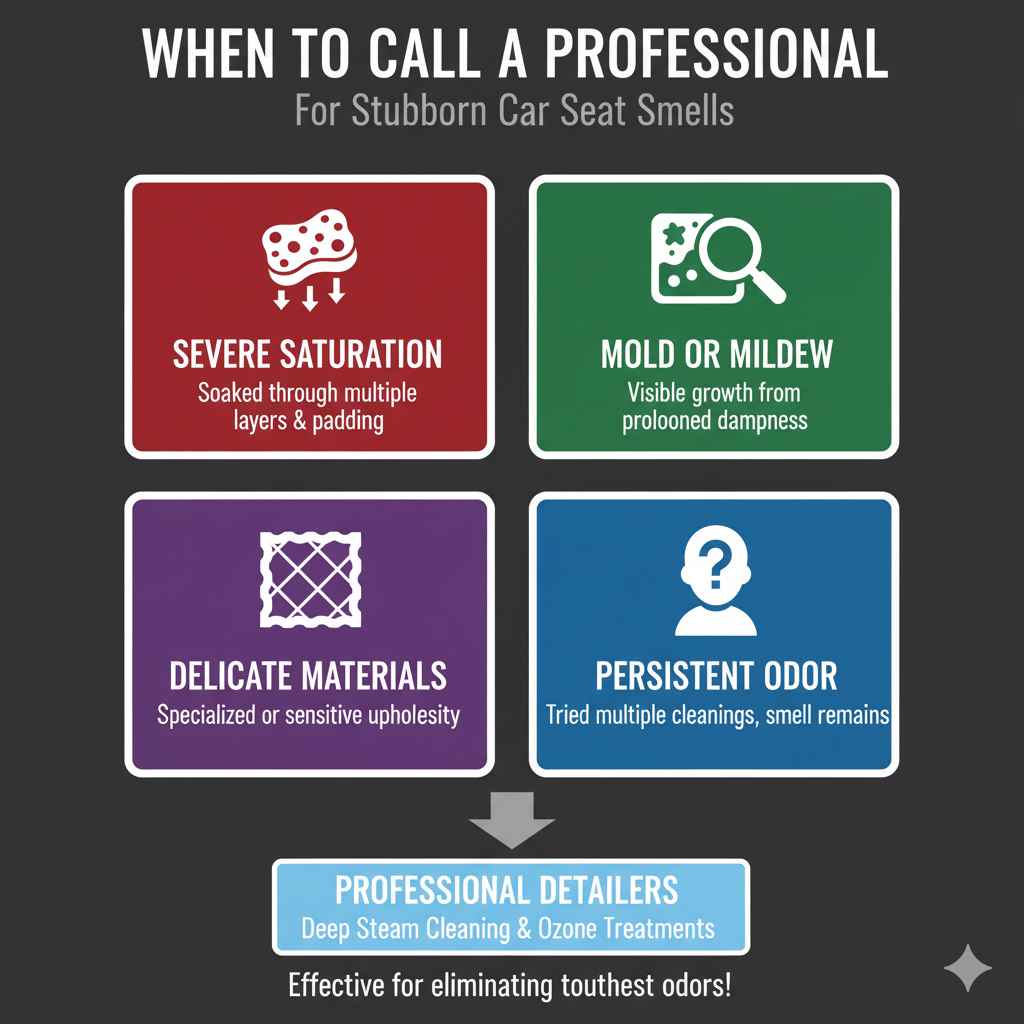
When to Call a Professional
While most puke incidents can be handled with the methods above, there are a few situations where professional help might be beneficial.
Severe Saturation: If the vomit has soaked through multiple layers of the car seat padding and reached the internal structure.
Mold or Mildew: If you notice any signs of mold or mildew growth due to prolonged dampness.
Delicate Materials: If your car has specialized or very delicate upholstery materials that you’re hesitant to treat yourself.
Persistent Odor: If you’ve tried multiple cleaning attempts over several days and the odor simply won’t go away, a professional detailer has access to industrial-grade equipment and specialized treatments.
Professionals can perform deep steam cleaning or ozone treatments, which are highly effective for eliminating stubborn odors.
Frequently Asked Questions About Car Seat Puke Smell
Q1: How quickly should I clean up vomit in my car?
A: As soon as possible! The longer vomit sits, the more it soaks into the fabric and the stronger the odor will become, making it harder to remove.
Q2: Can I use bleach to clean car seats?
A: It’s generally not recommended to use bleach on car seat upholstery. Bleach can damage or discolor fabric, and its fumes can be harsh in an enclosed space. Stick to safer, more specialized cleaners.
Q3: What if the smell still lingers after cleaning?
A: Persistence is key! You may need to repeat the enzyme cleaner step, ensure thorough drying, or try using activated charcoal or coffee grounds to absorb any remaining stubborn odors. Sometimes, a second round of cleaning is necessary for tough smells.
Q4: Are there natural alternatives to enzyme cleaners?
A: Yes! While enzyme cleaners are highly effective, you can try repeated applications of vinegar and baking soda. Ensure the area is completely dry between treatments. Some natural essential oils like tea tree or eucalyptus can also help with deodorizing, but always dilute them and test for fabric safety first.
Q5: How do I prevent puke smell in the future?
A: Keep cleaning supplies handy in your car for immediate action. Consider using car seat covers or protective mats, especially during car sickness-prone periods (like with young children or pets). Planning pit stops before anyone feels unwell can also help!
Q6: Is it safe to use rubbing alcohol on car seats?
A: Rubbing alcohol can be used for spot disinfection and to help lift some stains. However, it can also be drying to some fabrics, so always test it in an inconspicuous area first. Use it sparingly and follow up with other cleaning steps. It’s more of a disinfectant booster than a primary cleaner for this purpose.
Conclusion: Enjoy a Fresh-Smelling Ride!
Dealing with car seat puke smell can feel like a daunting task, but as you’ve seen, it’s entirely manageable with the right steps and a bit of patience. By acting quickly to blot up the mess, using the neutralizing power of vinegar and baking soda, and employing an enzyme cleaner for stubborn odors, you can effectively eliminate the unpleasant smell. Remember to tackle those straps and ensure thorough drying and ventilation. You’ve got this! With these methods, you can restore your car’s interior to its fresh, inviting state, making every journey a more pleasant experience for everyone. Happy cleaning!