How To Identify Positive And Negative Speaker Wires In A Car
It’s a common problem. You want to upgrade your car’s sound system. Maybe you’re adding new speakers.
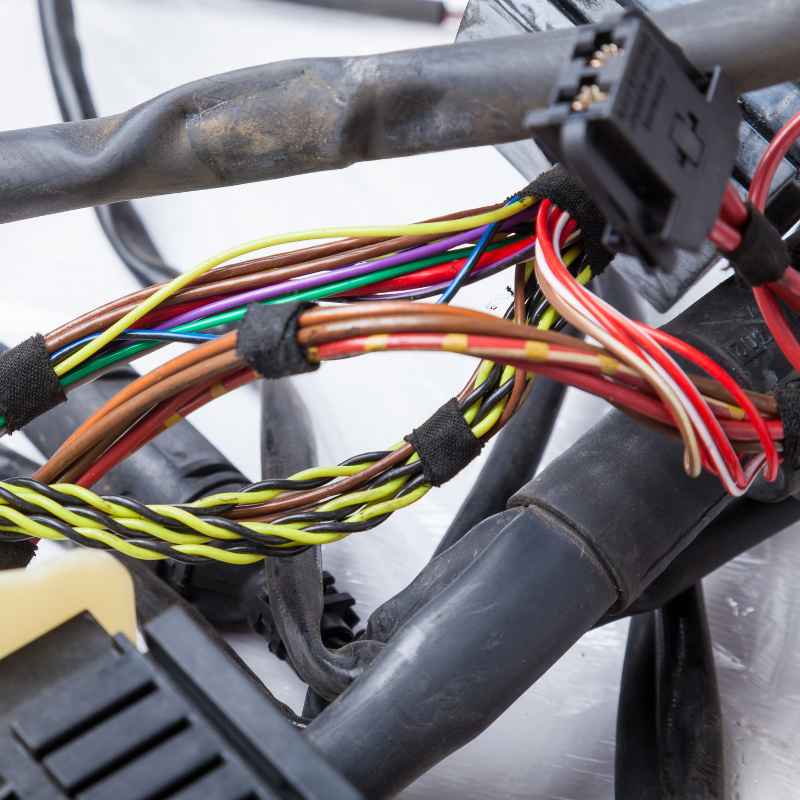
Or perhaps you’re fixing a buzzing sound. You open up the door panel. You see a bunch of wires.
They all look kind of the same. Some are red, some are black, some are even striped. But which one is positive?
And which one is negative? It’s easy to get confused. This can lead to your new speakers not working right.
Or worse, you could even damage your stereo. Don’t worry. We’ve all been there.
This guide will make it simple. We’ll help you find those wires. You’ll know exactly which one to connect where.
Let’s make your car sound amazing.
Understanding positive and negative speaker wires in a car is key for proper audio installation. This guide explains how to identify them using wire colors, common wiring patterns, and simple testing methods. It ensures your car stereo system functions correctly and avoids potential damage.
What Are Positive and Negative Speaker Wires?
Think of your car’s audio system like a team. The stereo is the coach. The speakers are the players.
They need to work together. The stereo sends signals to the speakers. These signals are like instructions.
These instructions tell the speaker’s cone to move. This movement creates sound waves. We hear these as music or voices.
These signals have a direction. This direction is either positive or negative. The speaker cone has a plus (+) and a minus (-) terminal.
You need to connect the positive wire from the stereo to the positive terminal on the speaker. You also need to connect the negative wire from the stereo to the negative terminal on the speaker. This is called wiring in phase.
When wires are in phase, the speaker cones move in the same direction at the same time. This makes the sound clear and full. If the wires are out of phase, one speaker cone might move inward while another moves outward.
This can make the sound weak. It might even sound muddy. It can also cancel out bass notes.
That’s why getting it right is so important for good sound.
The wire colors are there to help. They are like a map. But sometimes, the map can be a little tricky.
Car manufacturers use different color codes. This can change from one car brand to another. It can even change between different models of the same brand.
So, just looking at the color isn’t always enough. You need to know what to look for.
My Door Panel Saga: A Tale of Wires and Worry
I remember the first time I tried to change my car speakers. I had a cool set of aftermarket ones. I was so excited to hear the difference.
I carefully removed the door panel. It felt like performing surgery. Then I saw them.
A nest of wires. Red, blue, black, white, yellow, green, striped ones. My heart sank a little.
The instructions for the new speakers showed simple red and black wires. My car’s wires were anything but simple.
I grabbed my multimeter. I thought that would solve it. But I didn’t really understand what I was looking for.
I’d connect one probe to a wire. Then I’d touch the other to ground. I’d see numbers flicker.
Sometimes positive, sometimes negative. Was I doing it right? I wasn’t sure.
Panic started to set in. I didn’t want to fry my new stereo. I didn’t want to make my music sound worse.
The sun was setting. I could feel frustration building. I sat there for a good hour, just staring at the wires, feeling completely stumped.
It was a humbling moment. It taught me that sometimes, the most basic things need a clear explanation.
Common Car Speaker Wire Colors and Patterns
While car manufacturers don’t have one single, universal standard for speaker wire colors, there are some common patterns you’ll see. Knowing these can give you a good starting point. Remember, these are general guidelines.
Always double-check if you can.
Finding Your Wires: A Quick Scan
General Car Wire Colors:
-
Positive (+) Often:
- Solid colors (e.g., solid blue, solid red, solid yellow)
- Colors with tracer stripes (e.g., white with a blue stripe)
- Brown wires are also frequently positive.
-
Negative (-) Often:
- Black wires
- Wires with black tracer stripes (e.g., red with a black stripe)
- Striped wires where the stripe is the “ground” or “common” color.
Important Note: These are not rules. They are common trends. Always verify.
Let’s break down some of these common scenarios. In many American cars, you might find that the wire connected to the positive terminal of the speaker is a solid color. Think of a solid blue wire, or a solid green wire.
The wire connected to the negative terminal is often black. Or, it might be the same color as the positive wire, but with a black stripe. For example, if you see a blue wire for positive, the negative might be blue with a black stripe.
Some car systems use a different approach. They might use two colors for each speaker. For instance, one speaker might have a yellow wire as positive and a black wire as negative.
Another speaker could use a green wire for positive and a black wire for negative. Still, the black wire often signifies negative. But not always.
Be aware of this.
A Common Pattern: Color + Stripe
Scenario: You find a speaker wire that is solid red. Next to it, you see a red wire with a black stripe.
Likely Setup:
- Solid Red: Positive (+)
- Red with Black Stripe: Negative (-)
This is a very common pairing. The stripe often indicates the negative side.
Other manufacturers, especially imports, might use combinations that are harder to guess. You could see a wire that is, say, brown for positive and white with a brown stripe for negative. Or perhaps a grey wire for positive and a white wire with a grey stripe for negative.
The key takeaway is that a stripe, especially a black stripe, frequently marks the negative wire. But if there’s no stripe, the solid color is usually the positive one.
It’s also useful to remember that front speakers and rear speakers might have different color codes within the same car. Or, the left side speakers might have one set of colors, and the right side speakers another. This is where things can get a bit more confusing.
It’s why a systematic approach is best.
Why It Matters: Phase and Sound Quality
We touched on this briefly, but it’s worth diving into a bit more. When your speaker wires are connected in the correct phase (positive to positive, negative to negative), the speaker cones all push and pull in sync. This is crucial for how we perceive sound.
Imagine two people pushing a box. If they push at the same time in the same direction, the box moves easily. That’s like your speakers in phase.
Now imagine one person pushes while the other pulls. The box might not move much, or it might wobble. That’s like speakers out of phase.
The sound waves they create interfere with each other.
This interference can cause a few problems:
- Loss of Bass: Low frequencies (bass) rely on the air pressure created by speaker cones. If cones are moving opposite ways, they can cancel out bass notes. This makes your music sound thin and weak.
- Reduced Stereo Imaging: A good stereo system creates a “soundstage.” It feels like the music is coming from specific points in front of you. If speakers are out of phase, this illusion breaks down. Sounds can become jumbled and hard to place.
- Overall Muffled Sound: The overall clarity and punch of your music suffer. High frequencies can sound dull. Mid-ranges can sound muddy.
Connecting your speakers correctly isn’t just about making sound. It’s about making the best sound your system is capable of. Getting the phase right is a fundamental step in achieving that.
It’s often overlooked by beginners, but it makes a huge difference.
The “Out of Phase” Sound Test
Symptoms to Listen For:
- Weak or absent bass: This is the most common sign.
- “Hollow” or “tinny” sound: Especially in vocals.
- Music sounds “distant” or “flat”: Lacks presence.
- Difficulty locating instruments: Stereo image is poor.
If your new speakers sound worse than your old ones, check the phase!
When you’re installing new speakers, the positive terminal on the speaker itself is usually marked with a “+”. The negative terminal is marked with a “-“. Sometimes, the terminals are different sizes.
The larger terminal is often positive, and the smaller one is negative. But don’t rely on size alone. Always look for the “+” and “-” symbols.
Using a Multimeter to Identify Speaker Wires
For absolute certainty, a multimeter is your best friend. It’s a tool that measures electrical properties. You can use it to check voltage.
This is how we’ll figure out the polarity of your speaker wires.
First, make sure you have a multimeter. They are inexpensive and can be found at most hardware or electronics stores. You’ll want to set it to measure DC voltage.
Look for a setting that looks like a “V” with a straight line above it, or “DCV.” Set the range to something like 20 volts.
You’ll also need your car stereo to be playing something. A song with a strong, clear bass line is ideal. This helps ensure the speaker is actually getting a signal.
Multimeter Voltage Test Steps
What You Need:
- Digital Multimeter
- Car stereo playing music
- The speaker wires you need to identify
Steps:
- Set your multimeter to DC voltage (DCV) on a low range (e.g., 20V).
- Touch one probe (it doesn’t matter which one yet) to a known ground point in your car. This could be a bare metal part of the car’s chassis, or a black wire that you know is ground.
- Now, take the other probe. Gently touch it to one of the speaker wires.
- Observe the multimeter reading.
Here’s the crucial part: what the multimeter shows tells you the polarity. If you see a positive number (e.g., +0.5V), that means the wire you are touching with the probe is positive relative to ground. If you see a negative number (e.g., -0.5V), the wire you are touching is negative relative to ground.
So, with one probe on a good ground, touch the other probe to each of the two speaker wires for that speaker. The wire that gives you a positive voltage reading is your positive speaker wire. The wire that gives you a negative voltage reading (or zero, if there’s no signal) is your negative speaker wire.
This method works even if the wire colors are completely baffling. It’s a direct electrical test. It’s very reliable.
Just remember to have the stereo playing music. This ensures there’s a signal to measure. And be gentle when touching the probes to the wires.
You don’t want to damage the insulation or short anything out.
Using a 9-Volt Battery Test (With Caution)
Another method, often used by those without a multimeter, is the 9-volt battery test. This can be done quickly, but you need to be very careful. You’re using a battery to briefly send a signal to the speaker.
Get a standard 9-volt battery. You’ll also need two pieces of wire, perhaps with the ends stripped. You’re going to connect these wires to the battery terminals.
Then, you’ll touch the other ends to the speaker wires.
The 9-Volt Battery Test: How It Works
What You Need:
- One 9-volt battery
- Two short pieces of wire (about 6 inches each)
- The speaker wires
Steps:
- Strip a small amount of insulation off both ends of your two short wires.
- Connect one short wire to the positive (+) terminal of the 9-volt battery.
- Connect the other short wire to the negative (-) terminal of the 9-volt battery.
- Crucially: Make sure the car stereo is OFF. Disconnect the speaker wires from the stereo if possible to avoid any electrical feedback.
- Take the wire connected to the battery’s positive terminal. Touch it to one of the speaker wires.
- Immediately touch the wire connected to the battery’s negative terminal to the other speaker wire.
Listen closely. If the speaker cone moves outward when you touch the positive battery wire to the speaker wire, that speaker wire is positive. If the cone moves inward, that speaker wire is negative.
If you accidentally reverse the battery connections, the cone will move in the opposite direction.
Why caution is needed: This test is quick and easy. But you are directly applying voltage. If you do this wrong, or if your stereo is still powered on, you could potentially damage the speaker or the stereo.
Make absolutely sure the stereo is off. And only touch the wires for a very brief moment. You don’t want the battery to drain too quickly, or to overheat anything.
This method is useful if you’re working directly at the speaker and don’t have easy access to the stereo’s wiring. It gives you a clear, audible result. Just remember the safety precautions.
It’s better to be safe than sorry.
Checking Wiring Harnesses and Connectors
Many modern cars have wiring harnesses. These are bundles of wires protected by plastic. They often lead from the car’s main wiring loom to the speaker location.
Sometimes, the connectors on these harnesses are color-coded. This can be a helpful clue.
For example, you might find a connector that plugs directly into the speaker. This connector will have wires going to it. If one of these wires is clearly marked with a “+”, that’s your positive.
The other will be negative. However, many connectors are not so clearly marked. They rely on the car’s internal wiring color code.
Harness Clues: What to Look For
Connector Types:
- Factory Connectors: Often have specific shapes to prevent incorrect installation.
- Aftermarket Adapters: Many companies make adapters that plug into your car’s factory harness and then have standard terminals for your new speakers. These are often color-coded correctly.
Wire Markings:
- Look for tiny embossed numbers or symbols directly on the wire insulation.
- Sometimes, the color itself is the indicator.
If you’re replacing speakers in a car that’s a few years old, you might find that the factory speaker is wired with spade connectors. These are small metal tabs. The speaker has corresponding slots.
You just push them on. If these connectors are different sizes, the larger one is usually positive. The smaller one is negative.
Again, this is a common design, but not a guaranteed rule. Always check the speaker itself for “+” and “-” markings.
Some cars use a wiring harness that needs to be cut. This is more common if you’re installing aftermarket speakers and don’t have a specific adapter. In this case, you’ll be splicing wires.
That’s where knowing the polarity is absolutely essential. Always strip only a small amount of insulation. Twist the wires together securely.
Then, use electrical tape or heat shrink tubing to protect the connection.
Troubleshooting Common Speaker Wiring Issues
So, you’ve wired everything up. You turn on the stereo. And.
nothing. Or maybe just one speaker works. Or it sounds terrible.
Don’t despair. Most speaker wiring problems are easy to fix once you know what to look for.
The most common issue, as we’ve discussed, is being out of phase. If your sound is weak, muffled, or bass is missing, this is the first thing to check. Simply swap the positive and negative wires on one of the speakers.
Try listening again. If the sound improves, you’ve found your problem.
Quick Fixes for Speaker Problems
Symptom: No Sound From One Speaker
- Check Connections: Are the wires securely connected at both the speaker and the stereo?
- Check for Breaks: Is there a break in the wire insulation or the wire itself?
- Check Polarity: Is it possible you wired positive to negative?
Symptom: Weak or Distorted Sound
- Check Phase: Are speakers in phase with each other?
- Check Speaker Impedance: Is the speaker’s ohm rating compatible with your stereo? (Most car stereos expect 4 ohms).
- Check for Shorts: Are any bare wires touching each other or the car’s metal frame?
Another common problem is a loose connection. Wires can vibrate loose over time. If you have a speaker that’s working intermittently, or not at all, check all your connections.
Make sure they are snug and secure. Wiggle the wires gently. If the sound cuts in and out, you’ve found a bad connection.
A short circuit is also a possibility. This happens when a positive wire touches a negative wire, or touches the metal chassis of the car. This can cause your stereo to go into protection mode, or even damage it.
If you suspect a short, disconnect the speaker wires from the stereo. Then, check each wire for continuity to ground or to the other speaker wire. A multimeter set to resistance (ohms) can help here.
You should have no continuity (or very high resistance) between speaker wires or to ground.
Finally, ensure your new speakers are compatible with your stereo’s power output. Most car stereos are designed for speakers with an impedance of 4 ohms. If you install speakers with a lower impedance (like 2 ohms), you can overheat and damage your stereo.
If you install speakers with a higher impedance (like 8 ohms), they might not play very loudly.
Real-World Scenarios and Why They Differ
Every car is a little bit different. Take a 2010 Honda Civic. You might find a solid blue wire for positive and a white wire with a blue stripe for negative.
Now, look at a 2015 Ford F-150. The front left speaker could be a red wire (positive) and a black wire (negative). The front right speaker might be a yellow wire (positive) and a black wire (negative).
This is why relying on a single color code is risky.
Even within the same brand, changes can happen. A sedan from one year might have one set of colors. A truck from the same year, made by the same company, could have entirely different ones.
This is due to different teams working on different models. They might not always sync up on wiring colors.
Environmental factors can also play a role, though less directly. Over time, wires can corrode or insulation can degrade, especially in humid climates or in cars exposed to a lot of moisture. This can make identifying them harder.
Sometimes, a wire that was once clearly marked might become faded or dirty.
Car Model Specifics (General Examples)
Example 1: Older Import Car
- Positive: Often a solid color like brown or grey.
- Negative: Often the same color with a black stripe, or a white wire with that color stripe.
Example 2: Newer Domestic Car
- Positive: Could be red, yellow, or blue.
- Negative: Frequently black, or the same color as positive with a black stripe.
Key: Always test and verify!
User behavior also affects how wires are treated. If someone has previously
When It’s Normal and When to Worry
It’s completely normal to feel a bit confused by car speaker wires. The colors aren’t always straightforward. It’s a common hurdle for anyone trying to do a DIY audio upgrade.
The fact that you’re looking for this information means you’re on the right track to doing it correctly.
You should start to worry if:
- You’ve checked your connections multiple times, and still have no sound from a speaker.
- Your stereo is making unusual noises, like crackling or popping, after you’ve made connections.
- Your stereo keeps shutting off or going into “protect mode.”
- The sound quality is significantly worse after the change, even after you’ve tried swapping wires to fix phase issues.
If you’re just trying to identify positive and negative to connect new speakers, and you’re using a reliable method like a multimeter or the battery test (carefully!), it’s generally safe. The risk comes from making incorrect connections that could damage your equipment.
Simple Checks Before You Connect
Ask Yourself:
- Did I unplug the battery before starting? (Good practice for safety)
- Are the new speakers the correct impedance (ohms) for my stereo?
- Are the wires I’m connecting clean and free of corrosion?
- Do I have a way to test my connections (multimeter, battery)?
If in doubt, pause and research your specific car model.
If you’ve gone through the steps and are still unsure, or if you suspect damage to your stereo, it might be time to consult a professional car audio installer. They have the experience and tools to diagnose and fix complex issues. There’s no shame in asking for help when it comes to electrical systems.
Your car’s electronics are important.
Quick Tips for Identifying Speaker Wires
Here’s a quick rundown of helpful tips:
- Always check the speaker first: Look for the “+” and “-” markings on the speaker terminals. The larger terminal is often positive.
- Refer to your car’s manual: Some manuals may have basic wiring diagrams.
- Use online resources: Websites dedicated to car audio or specific car models often have wire color codes. Search for ” speaker wire colors.”
- When in doubt, test: Use a multimeter. It’s the most accurate method.
- Be patient: Rushing can lead to mistakes. Take your time.
- Disconnect the battery: This is a crucial safety step for any electrical work in a car.
- Use proper connectors: Avoid twisting wires together and just using electrical tape for permanent connections. Use crimp connectors or solder and heat shrink for a secure, lasting connection.
Frequently Asked Questions About Car Speaker Wires
What if my speaker wires are all the same color?
If all your speaker wires are the same color, this is where a multimeter becomes essential. You’ll need to use the voltage test described earlier. With one probe on a known ground, touch the other probe to each wire while the stereo is playing.
The wire that registers a positive voltage is your positive wire. The other is negative. You can also use the 9-volt battery test, but do it with extreme caution and ensure the stereo is off.
Do I need to disconnect the car battery when working on speaker wires?
Yes, it is highly recommended to disconnect the negative terminal of your car battery before working on any speaker wiring. This prevents accidental short circuits, protects your stereo from damage, and ensures your safety. Reconnect it only after you have finished all your connections and secured everything.
Can I just use any wire to connect my speakers?
No, you should use speaker wire that is rated for the power and impedance of your system. Using wire that is too thin (low gauge number) can cause resistance, leading to a loss of sound quality and potentially overheating. It’s best to use speaker wire that matches the gauge recommended for car audio systems, typically between 16 and 18 gauge for most applications.
What does it mean if my speaker wires have stripes?
Stripes on speaker wires are usually a way to differentiate between positive and negative. Often, the solid color wire is positive, and the wire with a stripe (especially a black stripe) is negative. However, this is not a universal rule.
Always verify with a multimeter or the 9-volt battery test if you are unsure, especially if the color coding seems unusual.
How do I know if my speakers are wired in phase?
If your speakers are wired in phase, the cones will move in the same direction simultaneously. You can test this by listening for strong bass and a clear stereo image. If the bass is weak, hollow, or the sound seems “off,” your speakers might be out of phase.
To fix this, simply reverse the connections on one of the speakers (swap positive and negative). If the sound improves, they were out of phase.
What happens if I connect the speaker wires incorrectly?
If you connect the speaker wires incorrectly (positive to negative and negative to positive), the speaker will likely still work, but it will be wired out of phase. This can lead to weak bass, poor sound quality, and reduced stereo imaging. In severe cases, if a speaker wire shorts out against the car’s chassis or another wire, it could damage your stereo receiver.
Final Thoughts: Sound Confidence
Figuring out car speaker wires can seem daunting at first. But with a little knowledge and the right tools, it becomes much simpler. You now know the common patterns, how to use a multimeter, and the importance of correct phasing.
You have the power to make your car audio sound its best. Go forth with confidence, and enjoy the music!