How To Wire Car Audio The Right Way: Step-By-Step Guide
For a great car audio setup, properly wiring your system is key. This means understanding speaker connections, power supply, and secure grounding. Following a step-by-step approach ensures safety and optimal sound quality. We’ll cover essential tips for a reliable installation.
Understanding Car Audio Wiring Basics
Car audio wiring might seem complex. But it’s built on simple ideas. Think of it like a road map for electricity.
This electricity powers your speakers. It also brings sound signals to them. Your car has a battery.
This is the main power source. It sends power through various wires. These wires go to different parts.
This includes your head unit (stereo). It also includes amplifiers. Finally, it reaches your speakers.
Each component needs the right kind of power. It also needs the right signal. Getting the wires connected correctly is vital.
It affects sound quality. It also affects system safety. Loose connections can cause static.
They can even damage your equipment. We want to avoid that. So, we will start with the fundamentals.
This way, you build a strong base of knowledge.
The main wires you’ll see are for power. There are also ground wires. Speaker wires are different.
They carry the sound signal. Understanding what each wire does is the first step. It helps you avoid mistakes later.
We’ll look at how these connect.
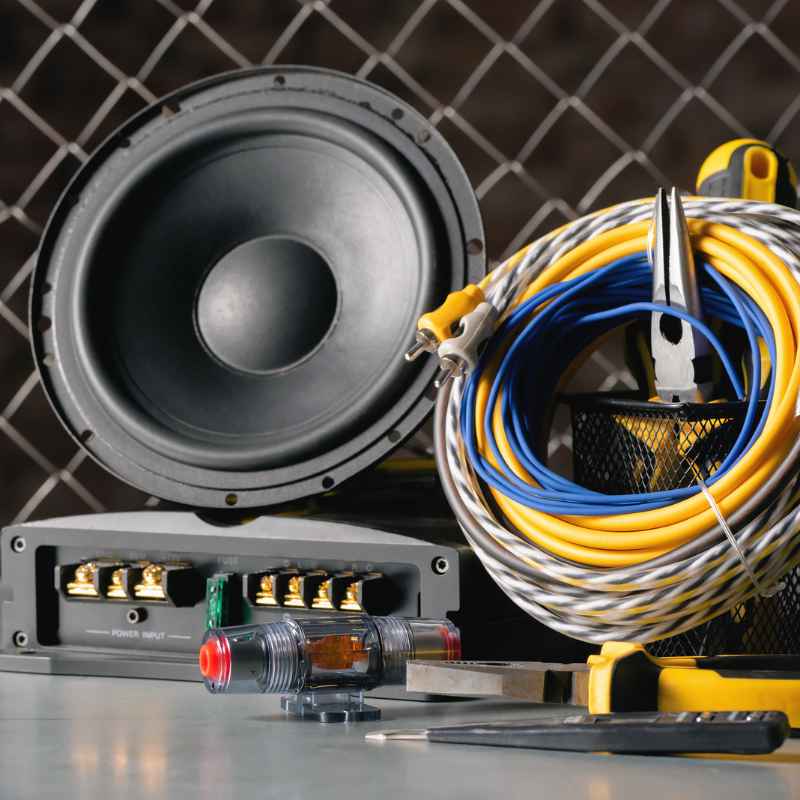
Gathering Your Tools and Materials
Before you start any wiring, get your tools ready. This makes the job smoother. You’ll need some basic items.
A wire stripper is essential. It helps you remove the plastic coating from wires. You’ll also need wire cutters.
Crimpers are very useful. They help secure connectors to wires. A set of screwdrivers is a must.
You’ll need different sizes.
A voltage tester or multimeter is important. It helps check for power. It also confirms ground connections.
Electrical tape is for insulating connections. You might need zip ties. These help keep wires neat.
Heat shrink tubing is another good item. It provides a more secure way to cover connections. Some projects need a wire crimping tool.
It makes strong connections.
For power wiring, you might need an inline fuse holder. This adds a layer of safety. It protects your system from power surges.
You’ll also need the right gauge wire. This is very important. It depends on the power your system uses.
The Importance of Proper Gauge Wiring
Wire gauge refers to its thickness. Thicker wires have a lower gauge number. Thinner wires have a higher gauge number.
Why does this matter so much? Thicker wires can carry more electrical current. This is measured in amps.
Your car’s audio system draws power.
If your wires are too thin, they can overheat. This is a fire risk. It also causes voltage drop.
This means your equipment doesn’t get enough power. It won’t perform its best. Speakers might sound weak.
Amplifiers might not produce full power. It’s like trying to drink a thick milkshake through a tiny straw. The flow is restricted.
For most car audio systems, you’ll use a range of gauges. Amplifier power is a big factor. A small head unit might use 14 or 16 gauge wire.
A powerful amplifier often needs 4 gauge or even 0 gauge wire. Always check your equipment’s manual. It will tell you the recommended wire gauge.
Using the correct gauge wire is crucial for safety and performance. It’s not something to guess at.
Remember, a lower gauge number means a thicker wire. So, 4 gauge is thicker than 16 gauge. Choosing the right gauge protects your investment.
It ensures your system sounds as good as it can. It also keeps your car safe.
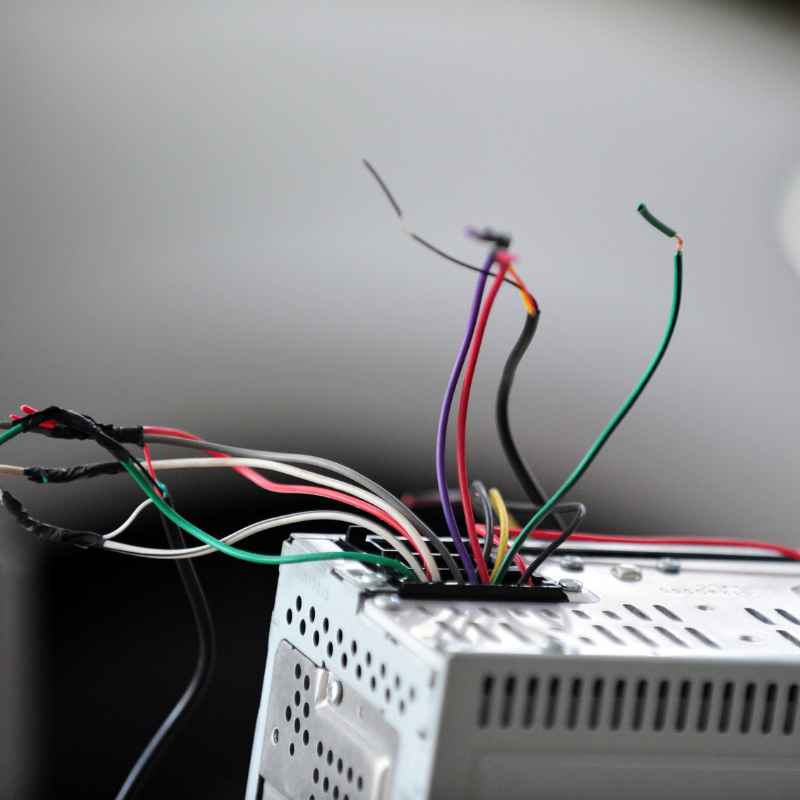
Wiring the Head Unit (Stereo)
Your head unit is the brain of your car audio system. It receives radio signals. It also plays music from other sources.
It needs power. It also needs to send sound signals to speakers or an amplifier. Most head units come with a wiring harness.
This harness has many wires. Each wire has a specific job.
There’s a constant 12V wire. This keeps your radio’s memory. It remembers presets and settings.
There’s a switched 12V wire. This is often called the ACC (accessory) wire. It powers the head unit when the car is on.
The ground wire connects to the car’s metal chassis. This is vital for a good ground. There are also speaker wires.
These are usually in pairs. They are for the left and right speakers.
You’ll need to match your new head unit’s harness. It needs to connect to your car’s existing harness. Many cars have adapter harnesses.
These plug directly into your car’s factory wiring. Then, you connect the new head unit’s harness to the adapter. This avoids cutting factory wires.
It makes installation easier and reversible.
When connecting wires, use crimp connectors or solder them. Then, insulate them with electrical tape or heat shrink tubing. Never let bare wires touch each other or metal parts.
This can cause short circuits. Always disconnect the car battery before starting. This prevents accidental shocks.
Head Unit Wiring Checklist
- Power: Constant 12V, Switched 12V (ACC)
- Ground: Connect to a clean metal chassis point.
- Speaker Wires: Match positive (+) and negative (-) for each speaker.
- Illumination: Connects to car’s dash lights (dims stereo at night).
- Antenna: Connects to car’s antenna lead.
- Remote Turn-On: For amplifier control (if applicable).
This process might seem detailed. But take it one wire at a time. Your car’s manual and the head unit’s manual are your best friends here.
They show you diagrams.
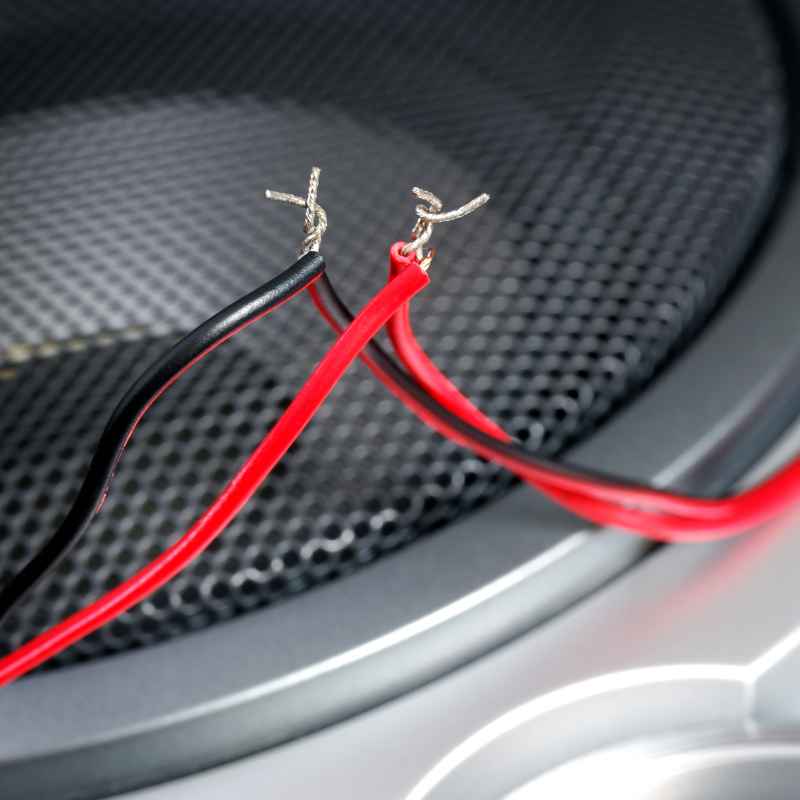
Connecting Speakers: Polarity Matters
Speakers are where the magic happens. They turn electrical signals into sound waves. Connecting them correctly is crucial for good sound.
Each speaker has two terminals. One is for the positive (+) connection. The other is for the negative (-) connection.
The head unit or amplifier also has positive and negative outputs for each speaker.
You must match these up. Connect the positive terminal of the speaker to the positive output from your stereo. Connect the negative terminal of the speaker to the negative output.
This is called maintaining correct polarity. If you get it wrong, the speaker will play out of phase.
What happens then? The speaker cone moves in the opposite direction of other speakers. This cancels out sound waves.
You’ll notice a lack of bass. The sound will seem weak or distant. It won’t have the full impact.
Most speaker wires are marked. One wire might have a solid stripe. The other might have a dashed stripe.
Or one might be a different color. The positive terminal on the speaker is often larger. Or it might have a red dot.
The negative terminal is usually smaller. Check your speaker and wire manuals. They will show you how to identify them.
Always make secure connections. Use crimp connectors. Then, insulate them.
Make sure the wires aren’t loose. This prevents buzzing or popping sounds. Good connections mean clear sound.
Installing an Amplifier: Power, Ground, and Signal
Amplifiers make your music louder and clearer. They take the signal from your head unit. They boost it before sending it to your speakers.
Installing an amplifier involves a few key connections.
First, power. Amplifiers need a lot of power. You’ll run a thick power wire directly from the car battery.
This wire needs an inline fuse. The fuse should be close to the battery. This protects your car from shorts.
The fuse size should match the amplifier’s needs. This is usually listed in the amplifier’s manual.
Second, ground. A good ground connection is vital for an amplifier. It needs a clean, unpainted metal surface on your car’s chassis.
Use a short, thick ground wire. The shorter and thicker the wire, the better the ground. Sand off any paint or rust where the terminal will attach.
A poor ground can cause humming or popping sounds.
Third, signal. You need to send the audio signal to the amplifier. This is usually done with RCA cables.
These run from your head unit’s RCA pre-outs to the amplifier’s RCA inputs. If your head unit doesn’t have RCA outputs, you might need a line-output converter. This device turns speaker-level signals into RCA signals.
Fourth, remote turn-on. This is a small wire. It tells the amplifier when to turn on.
It connects to the “remote” or “power antenna” output on your head unit. When the head unit turns on, it sends a small voltage. This activates the amplifier.
Finally, speaker outputs. The amplifier has terminals for your speakers. Connect your speaker wires from the amplifier to your speakers.
Again, pay close attention to polarity.
Amplifier Wiring Essentials
- Power Wire: From battery, with inline fuse near battery.
- Ground Wire: Short, thick wire to clean chassis metal.
- RCA Cables: For audio signal from head unit to amp.
- Remote Turn-On: Connects to head unit’s remote output.
- Speaker Wires: From amp outputs to speakers.
Take your time with these connections. A solid installation ensures your amplifier works correctly and safely.
Running Wires Through Your Car
This part requires patience. You need to route wires neatly. You also need to keep them safe.
Wires that are loose can get pinched. They can get damaged by moving parts. They can also cause rattles.
Start by planning your wire routes. Power wires from the battery often go through the firewall. There’s usually a grommet for this.
Speaker wires can go through door jambs. Or they can go under the carpet. RCA cables should be kept away from power wires.
This prevents electrical interference. Interference causes humming or static.
Use zip ties to secure wires. Bundle them together. Run them along existing factory wiring harnesses.
This keeps them tidy. It also makes them less visible. Avoid sharp bends.
These can damage the wire insulation. If you need to drill a new hole, use a grommet. This protects the wire from sharp metal edges.
For speaker wire going into doors, use the factory wiring looms if possible. This is the flexible conduit that already exists. It protects the wires from the door’s movement.
Always check your work as you go. Make sure wires aren’t snagged on anything. Ensure they won’t interfere with moving parts.
This includes pedals, seat rails, or door mechanisms. A clean wire run not only looks good. It also contributes to a reliable system.
Some people like to run wires under the carpet. This hides them well. Just be sure the carpet is properly fitted back.
You don’t want wires creating bumps. Other folks run wires along the side of the car. They use the door sills.
This area often has plastic trim. You can gently pry this up to run wires underneath.
Remember safety. Always disconnect the battery. Wear eye protection if you’re drilling.
Be mindful of existing car wiring. Don’t tap into it unless you know what you’re doing. Your goal is a clean, safe installation.
Wire Routing Tips
- Plan First: Map out your routes.
- Separate Power and Signal: Keep RCA cables away from power wires.
- Use Factory Paths: Utilize existing channels and grommets.
- Secure Wires: Use zip ties to keep them tidy and safe.
- Protect from Damage: Use grommets for drilled holes.
- Avoid Moving Parts: Ensure wires don’t snag or get pinched.
Grounding Your Car Audio System Correctly
Grounding is often the most overlooked part of car audio. But it’s super important. A good ground is essential for any electrical system.
For car audio, it’s critical. It provides a path for stray electrical current. It also ensures your equipment receives a clean signal.
What is a ground? It’s a connection to the car’s metal chassis. The chassis is essentially a giant ground.
You need to connect your system’s components to it. The most critical ground is for your amplifier. It needs a short, thick wire.
This wire should go directly to a solid, unpainted metal part of the car’s frame. This could be a seat bolt area or a specific grounding point.
Why is it so important? If your ground wire is too long, it has resistance. This resistance can cause problems.
You might hear a humming noise. This is often called a “ground loop.” It can also make your amplifier’s performance suffer. It might not produce its full power.
To ensure a good ground:
- Choose a solid spot: Find a bolt or stud that goes directly into the car’s frame.
- Clean the surface: Use sandpaper or a wire brush. Remove all paint, rust, and dirt. You need bare metal.
- Use the right lug: Attach a ring terminal lug to the end of your ground wire.
-
Secure tightly: Connect the lug to the chassis.
Make sure it’s very tight.
- Keep it short: The ground wire should be as short as possible.
Your head unit also needs a good ground. It’s usually part of the wiring harness. Connect it securely to the car’s metal.
Poor grounding can lead to all sorts of weird issues. Your stereo might cut out. Your lights might flicker when the bass hits.
These are classic signs of grounding problems.
Think of your ground connection like a drain. If the drain is clogged or too small, water backs up. Similarly, if your ground path is bad, electricity can’t flow freely.
This causes problems.
Connecting a Subwoofer and Amplifier
Subwoofers are what give your music that deep, powerful bass. They require more power than regular speakers. So, they are usually powered by an external amplifier.
The setup involves connecting the subwoofer to the amplifier. Then, the amplifier is wired to power and ground.
First, the subwoofer itself. Subwoofers can have one or two voice coils. Each coil has positive and negative terminals.
How you wire the subwoofer depends on the amplifier. It also depends on whether you have one or two subwoofers. You need to match the subwoofer’s impedance (ohms) to the amplifier’s capabilities.
For a single voice coil subwoofer:
- Single 4-ohm voice coil: Wire it to a 4-ohm stable amplifier channel.
- Single 2-ohm voice coil: Wire it to a 2-ohm stable amplifier channel.
For a dual voice coil subwoofer:
- Two 4-ohm voice coils: You can wire them in parallel to present a 2-ohm load to the amplifier. Or you can wire them in series to present an 8-ohm load. Check your amplifier’s stable impedance.
-
Two 2-ohm voice coils: Wire them in parallel for a 1-ohm load.
Or wire them in series for a 4-ohm load.
The amplifier’s manual is key here. It will tell you what load (in ohms) it can handle. Wiring a subwoofer or amplifier below its stable impedance can damage the amplifier.
It can cause it to overheat or shut down.
Connect the subwoofer to the amplifier using speaker wire. Maintain polarity. The amplifier’s power, ground, and remote turn-on wires are connected as described earlier.
The RCA cables from the head unit bring the audio signal to the amplifier.
Subwoofer Wiring Simplified
- Voice Coils: Understand if your sub has one or two coils.
- Impedance (Ohms): Match sub’s impedance to amplifier’s stable load.
- Parallel vs. Series: Know how to wire dual voice coils for correct ohms.
- Amplifier Limits: Never wire below the amplifier’s minimum impedance.
- Secure Connections: Use quality speaker wire and connectors.
Getting the subwoofer wiring right is crucial. It ensures you get the deep bass you want. It also protects your equipment.
Troubleshooting Common Wiring Issues
Even with careful work, things can go wrong. Don’t get discouraged. Most car audio wiring issues are fixable.
Let’s look at common problems and how to solve them.
No Sound from Any Speakers
This is a common one. First, check your head unit. Is it turning on?
Check the power and ground connections. Are they secure? Is the head unit volume turned up?
Next, check the amplifier. Is it turning on? Look for an indicator light.
If it’s not on, check the remote turn-on wire. Is it getting power from the head unit? Check the main power and ground wires to the amplifier.
Are they secure? Is the fuse in the inline fuse holder intact?
If the amplifier is on, check the speaker wires. Are they connected correctly to the amplifier and speakers? Is the polarity correct?
Sometimes, a faulty head unit or amplifier can also be the culprit.
Sound from Only Some Speakers
If one speaker isn’t working, check its wiring. Is the polarity correct? Is the connection secure?
Is the wire damaged?
If a whole channel (e.g., front left) isn’t working, check the wiring for that channel. It could be a problem with the head unit’s output for that channel. Or it could be a problem with the amplifier’s input or output for that channel.
If you’re using an amplifier, check the speaker wire connections at the amplifier. Ensure they are tight and in the correct terminals. Sometimes, amplifier channels can fail.
Humming or Buzzing Sounds
This is often a ground loop. It means there are multiple ground paths. Or the ground path is poor.
Ensure all your components have a solid ground connection. Make sure the ground wire for your amplifier is short and thick. It should connect directly to the chassis.
Try moving RCA cables away from power wires. This can reduce interference. A ground loop isolator can sometimes help.
But it’s better to fix the root cause with a proper ground.
Another cause can be the alternator whine. This sound changes with engine RPM. It’s usually a power or ground issue.
Sometimes, it requires a noise filter.
Distorted Sound
Distortion can happen when the signal is too strong. Or when equipment is clipping. If the sound is distorted at high volumes, your amplifier might be too small.
Or it might be set too high. Check the gain settings on your amplifier. They should not be set to maximum.
Also, check the speaker wiring. If a speaker wire is frayed, it can cause distortion. Ensure all connections are secure.
System Cuts Out
This can happen if the amplifier is overheating. Check that it has enough ventilation. Ensure the wiring is correct and not causing a short.
Another cause is a voltage drop. If your car’s battery or alternator isn’t strong enough, the system might cut out. Use a multimeter to check the voltage when the system is running.
Check all fuses. A loose fuse can cause intermittent problems.
Troubleshooting Quick Checks
- All Power On? Head unit and amp lights lit?
- Fuses Good? Check main fuses and inline fuses.
- Connections Tight? Every wire and terminal secure?
- Polarity Correct? Speaker wires connected + to + and – to -?
- Ground Solid? Amplifier ground is clean and tight?
- Volume/Gain Settings? Not too high?
When troubleshooting, work systematically. Test one thing at a time. This helps you pinpoint the issue.
Don’t be afraid to double-check your work.
Safety First: Protecting Yourself and Your Car
Working with car electronics involves electricity. Safety should always be your top priority. Always disconnect the car battery before you start.
Use the negative terminal first. This prevents accidental shorts.
Wear safety glasses. Especially if you are drilling. Metal shavings or debris can fly.
Use insulated tools when possible. This reduces the risk of shock. Ensure wires are properly insulated.
Use electrical tape or heat shrink tubing on all connections. Never let bare wires touch metal.
Be mindful of your car’s existing wiring. Don’t cut or tap into wires unless you know their function. You could damage the car’s computer system.
This can be very expensive to fix.
If you are unsure about any step, stop. Research it. Ask for help.
It’s better to be safe than to cause damage. Follow the manuals for your head unit, amplifier, and speakers. They often contain important safety information.
Ensure your wiring is neat and secure. Wires can chafe against sharp metal edges. This can wear through the insulation.
Over time, this can cause a short circuit. Use grommets and zip ties to protect wires. This prevents damage and fire hazards.
Consider consulting a professional if you feel uncomfortable. A qualified installer can ensure your system is wired safely and correctly. Your car and your safety are worth the extra care.
When to Call a Professional Installer
While this guide covers many aspects of wiring car audio, some tasks are more complex. If you’re new to car electronics, it’s okay to seek help. Certain situations might call for a professional installer.
Complex Systems: If you’re installing multiple amplifiers, component speakers, crossovers, or a digital sound processor, it can get complicated. Professionals have the expertise to integrate these components seamlessly.
Lack of Confidence: If you feel unsure about any step, especially those involving power or critical connections, a pro can ensure it’s done right. Mistakes here can be costly or dangerous.
Time Constraints: Installing a full car audio system can take many hours. If you’re short on time, a professional can complete the job efficiently.
Specific Vehicle Challenges: Some cars have very tight spaces or unique wiring harnesses. An experienced installer will know how to navigate these challenges without causing damage.
Warranty Concerns: If your car is under warranty, improper modifications could void certain parts of it. A professional installer can often work within these constraints or ensure the installation is reversible.
Advanced Tuning: Professionals have specialized tools for tuning your system. They can optimize sound quality for your specific car cabin.
Don’t hesitate to reach out to a reputable car audio shop. They can offer advice, perform specific tasks, or handle the entire installation. It’s an investment in a great-sounding system and peace of mind.
Frequently Asked Questions About Car Audio Wiring
What is the most important wire to connect correctly?
The ground wire is arguably the most critical. A poor ground can cause numerous problems, from humming to system failure. It needs to be short, thick, and connected to clean metal.
Can I use speaker wire for power connections?
No, you should never use thin speaker wire for power connections to amplifiers. Power wires need to be much thicker (lower gauge) to handle the current safely and prevent voltage drop. Speaker wire is only for connecting speakers to the head unit or amplifier.
How do I know if my amplifier is stable at 2 ohms?
Check your amplifier’s user manual. It will clearly state the stable impedance loads it can handle. It will usually list 4 ohms, 2 ohms, and sometimes 1 ohm.
If it doesn’t mention 2 ohms, it’s likely not stable at that load.
What does it mean when an amplifier has bridged mode?
Bridging means combining two amplifier channels into one. This creates a more powerful mono output. It’s often used for powering a subwoofer.
You typically connect the positive terminal of the speaker to one channel’s positive output and the negative terminal to the other channel’s negative output. Always consult your manual for specific bridging instructions.
Why do my headlights dim when the bass hits?
This is usually a sign of voltage drop. Your audio system is drawing a lot of power. If your battery or alternator can’t supply enough, the system pulls power from other electrical components, like your headlights.
It could mean you need a stronger power wire, a better ground, or an upgraded car battery/alternator.
Can I reuse old speaker wire?
It’s generally best to use new, good-quality speaker wire. Old wire can be brittle, corroded, or damaged. If it’s in perfect condition and the correct gauge, it might be usable.
But for optimal sound and reliability, new wire is recommended.
What is a fuse for in car audio?
A fuse is a safety device. It protects your system and your car from electrical damage. If too much current flows through the wire (due to a short circuit or fault), the fuse wire melts.
This breaks the circuit and stops the flow of electricity. It prevents fires and component damage.
Final Thoughts on Your Car Audio Wiring Journey
You’ve learned a lot about wiring car audio. It takes care and attention. But it’s a rewarding process.
You’ve seen the importance of proper gauge wire. You understand polarity. You know about grounding.
You’ve even looked at troubleshooting. This knowledge empowers you.
Take your time with each step. Double-check your work. Safety first is key.
Enjoy the process of upgrading your car’s sound. A well-wired system sounds amazing. It also performs reliably for years to come.
Happy listening!