How To Install Capacitor For Car Audio: Proven Guide
Quick Summary: Installing a car audio capacitor is straightforward! You’ll connect it parallel to your amplifier, typically near the battery, to stabilize voltage and prevent power dips. This guide provides step-by-step instructions and essential tips to ensure a safe and successful installation for improved sound quality.
Are you tired of your car’s headlights dimming every time the bass drops? Or maybe you’ve noticed a fuzzy sound when your audio system is really pushing it. These are classic signs that your car’s electrical system is struggling to keep up with the demands of a powerful audio setup. Thankfully, there’s a simple and effective solution: a car audio capacitor! This handy device acts like a mini-reserve battery, smoothing out power delivery and giving your amplifier the consistent voltage it needs to perform at its best.
You might think installing one is a job for a professional, but with a little guidance, you can tackle this yourself. We’re going to walk through exactly how to install a capacitor for car audio, making sure you understand each step clearly and safely. Let’s get your sound system humming without any hiccups!
Why You Need a Car Audio Capacitor
A car audio capacitor, also known as a power capacitor or audio capacitor, is a crucial component for any serious car stereo enthusiast. Its primary job is to store electrical energy and release it quickly when needed. Think of it as a shock absorber for your car’s electrical system. When your amplifier demands a sudden burst of power – like during a deep bass note – the capacitor steps in to provide that immediate surge, preventing voltage drops. Without one, your amplifier has to draw this power directly from the alternator and battery, which can lead to a temporary dip in voltage. This is what causes those annoying headlight dimming effects and can even strain your amplifier, potentially shortening its lifespan.
Here’s a breakdown of the benefits:
- Stabilized Voltage: The most significant benefit is maintaining consistent voltage to your amplifier, ensuring it operates at peak performance.
- Improved Sound Quality: By providing a steady power supply, capacitors can help reduce distortion and improve the clarity and impact of your audio.
- Reduced Strain on Electrical System: They lessen the burden on your car’s alternator and battery, especially during high-demand audio playback.
- Prevent Headlight Dimming: Say goodbye to those pulsating headlights! A capacitor effectively eliminates this common symptom of an overloaded electrical system.
- Faster Amplifier Response: The immediate power delivery from a capacitor allows your amplifier to react more quickly to audio signals.
Understanding Capacitor Basics
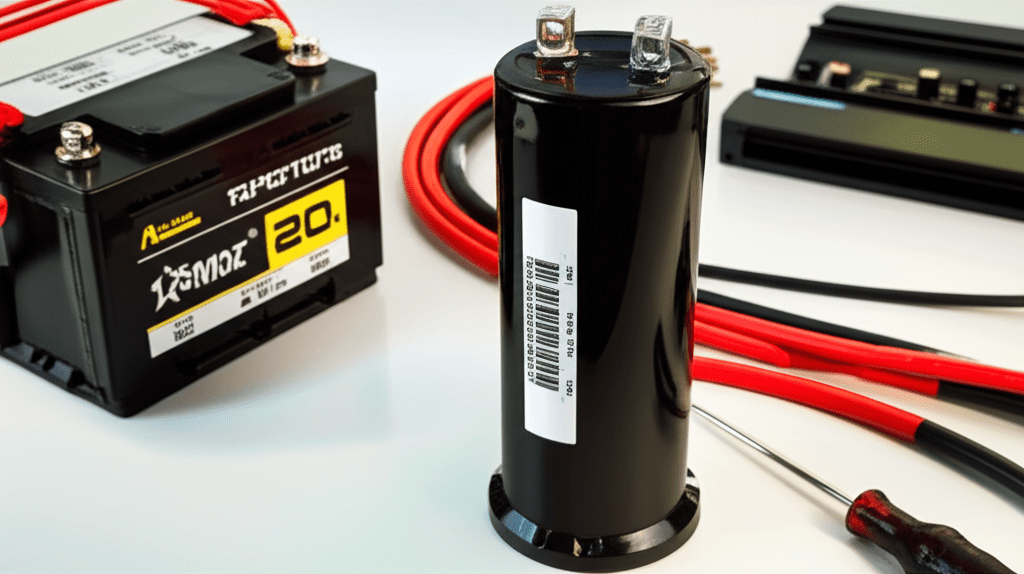
Before diving into the installation, it’s good to understand what you’re working with. A capacitor is essentially two conductive plates separated by an insulating material (a dielectric). The amount of charge a capacitor can store is measured in Farads (F). For car audio, you’ll typically see capacitors in the range of 1 Farad (1F) to 5 Farads (5F) or even higher. The larger the Farad rating, the more energy it can store.
Capacitor Size Chart (General Guidelines):
| Amplifier RMS Wattage | Recommended Capacitor Size |
|---|---|
| Up to 500W | 1 Farad |
| 500W – 1000W | 1.5 – 2 Farads |
| 1000W – 1500W | 2 – 3 Farads |
| 1500W + | 3 – 5+ Farads |
Remember, these are general guidelines. If you have particularly demanding subwoofers or a high-draw amplifier, you might consider a larger capacitor. Always check your amplifier’s specifications for power draw.
Components of a Capacitor Kit:
- The Capacitor: The main unit you’ll be installing.
- Mounting Hardware: Brackets or screws to secure the capacitor.
- Terminal Caps: To protect the capacitor’s terminals.
- Often Included: A resistor (for charging) and sometimes connecting wires or distribution blocks.
It’s crucial to use a capacitor specifically designed for car audio. These are built to handle the fluctuating voltages and demanding discharge rates found in a car’s electrical system.
Tools and Materials You’ll Need
Having the right tools makes the job much easier and safer. Gathering these beforehand will streamline your installation process. You don’t need a full mechanic’s workshop; most items are common household or car repair tools.
Here’s a checklist:
- Capacitor Kit: Ensure it’s the appropriate size for your system.
- Wire Strippers/Cutters: For preparing your power and ground wires.
- Crimping Tool: To securely attach ring terminals to your wires.
- Ring Terminals: Appropriately sized for your capacitor’s terminals and amplifier power/ground connections.
- Screwdriver Set: Both Phillips and flathead, as needed for your vehicle and amplifier.
- Wrench Set or Socket Set: To disconnect and reconnect the car battery terminals.
- Drill (Optional): If you need to make new mounting holes for the capacitor.
- Zip Ties: For neat wire management.
- Electrical Tape: For insulating any exposed wire connections.
- Multimeter (Recommended): To verify voltage and ensure proper connections.
- A Friend (Helpful): An extra pair of hands can be invaluable for holding wires or assisting with tricky installation spots.
For reference, understanding how to use a multimeter for automotive applications can be very helpful. Reputable sources like AutoZone’s guide offer excellent insights into basic electrical testing.
Step-by-Step Installation Guide
Safety first! Working with a car’s electrical system can be dangerous if not done correctly. Always disconnect the battery before starting any electrical work.
Step 1: Disconnect the Battery
Using your wrench or socket set, loosen the nut on the negative (-) terminal of your car battery. Once loose, carefully lift the negative cable off the battery post. Tuck it away so it cannot accidentally touch the terminal. This prevents any accidental short circuits while you work.
Step 2: Charge the Capacitor (Critically Important!)
Capacitors store electrical charge. If you connect them directly, you can cause a spark large enough to damage the capacitor or your vehicle’s electrical system. Most capacitors come with a charging resistor, or you’ll need to purchase one. This is typically a 20-watt, 20-ohm resistor.
Connect a wire from the positive (+) terminal of the capacitor to one end of the resistor. Then, connect the other end of the resistor to the positive (+) terminal of your car battery (or the power distribution block connected to the battery, if applicable). Leave this connected for about 15-30 minutes. You can verify it’s charged by using a multimeter – touch the positive probe to the positive capacitor terminal and the negative probe to a good ground. A charged capacitor will show a voltage reading close to your car’s battery voltage. Once charged, you can permanently connect the capacitor’s positive terminal and then remove the resistor.
Some higher-end capacitors have built-in charging circuits, which simplify this step considerably. Check your capacitor’s manual.
Step 3: Determine Capacitor Placement
The capacitor should be installed as close to your amplifier as possible, ideally between the amplifier and the battery. A good location is often mounted on the firewall, under a seat, or in the trunk near the amplifier. Ensure the location is secure, won’t interfere with any moving parts, and is protected from moisture and extreme heat.
Step 4: Connect the Capacitor’s Ground Wire
A proper ground connection is essential for the capacitor to function correctly. Run a ground wire from the negative (-) terminal of the capacitor directly to a clean, solid metal ground point on your car’s chassis. This ground point should ideally be the same one used by your amplifier’s ground wire, or a nearby substantial metal surface. Use a ring terminal on the capacitor end and ensure the chassis ground contact is free from paint, rust, or dirt. Crimp the ring terminal securely onto the wire. The length of this ground wire should be as short as possible – no more than 18 inches is recommended.
Step 5: Connect the Capacitor’s Positive Wire
Run a power wire from the positive (+) terminal of the capacitor to the positive (+) terminal of your amplifier. This wire should be the same gauge as your amplifier’s power wire. Use a ring terminal crimped securely onto the capacitor end and connect it. Ensure this wire is also routed neatly and away from any moving or hot components. On the amplifier end, connect this wire to the amplifier’s fused power input or a power distribution block that is connected to the amplifier.
Important Note: Do NOT connect the capacitor directly to the positive terminal of the battery unless it’s the very last step (after charging). The connection to the amplifier’s power circuit is typically the permanent way it’s wired into the system, receiving power through the amplifier’s main power feed.
Step 6: Secure the Capacitor
Use the provided mounting hardware or zip ties to securely fasten the capacitor in its chosen location. Ensure it won’t vibrate or move around. Loose components can cause electrical shorts or damage.
Step 7: Reconnect the Battery and Test
Once everything is connected and secured, you can reconnect the negative (-) terminal of your car battery. Double-check all your connections to make sure they are secure and insulated. Turn on your car stereo and test it. Play some music with deep bass to see if the headlight dimming is reduced or eliminated. You can also use a multimeter to check the voltage at the amplifier’s power terminal while playing music to see how stable it is.
Troubleshooting Common Issues
Even with careful installation, you might encounter a few hiccups. Here are some common issues and how to solve them:
- Capacitor Not Charging: Ensure the charging resistor is used correctly. Check that your connections to the positive terminal are secure and that the capacitor itself is not faulty.
- No Power to Capacitor: Verify that the main power wire from the battery (or distribution block) is correctly connected to the capacitor’s positive terminal. Check any fuses in the power line.
- Dimming Persists: Make sure the capacitor is properly sized for your amplifier’s wattage. Check the ground connection; a poor ground is a common culprit. Ensure the capacitor is installed close enough to the amplifier.
- Sparking When Connecting Battery: This usually means the capacitor is not fully charged or the connections are incorrect. Always disconnect the battery before making changes and ensure the capacitor is charged before the final hookup.
- No Sound or Distorted Sound: Double-check all power and ground connections to both the capacitor and the amplifier. Loose connections are a frequent cause of sound issues.
If you are unsure about any step or encounter persistent problems, it’s always best to consult a professional car audio installer.
Capacitor Charging Resistors and How to Use Them
The charging resistor is a simple yet vital component for safely introducing power to your capacitor. Without it, connecting a large capacitor directly to a power source like your car battery can create a significant spark. This is because the capacitor acts like a short circuit until it begins to charge. The resistor limits the initial current flow, allowing the capacitor to charge gradually and safely.
How it Works:
- The resistor is wired in series between the positive power source (e.g., battery terminal) and the positive terminal of the capacitor.
- When you connect the resistor, current flows through it into the capacitor. The resistor dissipates some of the electrical energy as heat, but it controls the rate at which the capacitor’s voltage rises to match the source voltage.
- Once the capacitor is charged (indicated by the voltage across its terminals being close to the source voltage), you then disconnect the resistor and make the permanent connection between the power source and the capacitor’s positive terminal.
Typical Setup:
- Connect a short jumper wire from the capacitor’s positive terminal.
- Connect the other end of this jumper wire to the resistor.
- Connect another short wire from the other end of the resistor to the amplifier’s positive power input terminal (which is usually connected to the battery).
- Wait until the voltage across the capacitor terminals matches the battery voltage.
- Disconnect the wire from the resistor.
- Connect the capacitor’s positive terminal directly to the amplifier’s positive power input terminal, or directly to the battery’s positive terminal (observing polarity).
Many capacitor kits include a dedicated charging resistor. If yours doesn’t, a standard 20-watt, 20-ohm resistor is a common and effective choice. For advanced users or those with very large capacitors, a dedicated capacitor charging unit might be considered, but a resistor is perfectly adequate for most DIY installations.
Capacitor vs. Stinger Battery: Which is Right for You?
While capacitors are excellent for stabilizing voltage and responding to quick power demands, they are not a substitute for a healthy battery. For more extreme sound systems that draw a massive amount of current, a high-performance secondary battery (often called a “Stinger” battery, after a popular brand) might be more appropriate. Here’s a quick comparison:
| Feature | Car Audio Capacitor | Secondary Battery (e.g., Stinger) |
|---|---|---|
| Primary Function | Stores and instantly releases electrical energy to smooth voltage fluctuations. Acts as a buffer. | Provides a dedicated reserve of high-capacity current for the audio system. It’s a true power source. |
| Energy Storage | Low (stores energy like a charged water tank, but delivers it instantly). Measured in Farads. | High (stores significantly more energy like a large reservoir of water). Measured in Ampere-hours (Ah). |
| Best For | Systems that experience voltage drops during bass notes; preventing accessory dimming; amplifiers up to ~1500W RMS. | Very high-power systems (~1500W RMS and above); systems that drain the primary battery; prolonged high-output playback. |
| Installation Complexity | Relatively simple, parallel connection to amplifier power. | More complex, requires proper wiring, potentially upgrading alternator, and careful integration with the primary battery. |
| Cost | Generally lower. | Significantly higher. |
For most aftermarket car audio systems, especially those with amplifiers up to around 1000-1500 watts RMS, a capacitor is an effective and cost-efficient solution. If you’re pushing well beyond that, or if your testing shows your primary battery simply can’t keep up even with a capacitor, then you might need to look into upgrading your battery or alternator.

Frequently Asked Questions (FAQ)
Q1: Do I really need to charge my capacitor before installing it?
A1: Yes, absolutely! Connecting an uncharged capacitor directly to your car’s battery can create a large spark, potentially damaging the capacitor, your stereo, or even your car’s electrical system. Always use a charging resistor or the capacitor’s built-in charging circuit.
Q2: How do I know if my capacitor is the right size for my system?
A2: A good rule of thumb is 1 Farad of capacitance for every 1000 watts RMS of amplifier power. However, it’s always best to check the manufacturer’s recommendations for your specific amplifier and capacitor.
Q3: Can I connect the capacitor directly to my car battery?
A3: While the capacitor draws power from the battery system, it should be wired in parallel with your amplifier. The most common and safest way is to have the capacitor’s positive terminal connected into the positive power feed going to your amplifier, not directly to the battery terminal once it’s charged.
Q4: What happens if I accidentally reverse the polarity when connecting the capacitor?
A4: Reversing the polarity on most car audio capacitors will likely cause them to bulge, vent, or even explode due to internal damage. Always double-check the positive (+) and negative (-) markings on the capacitor and your wiring before making connections.
Q5: Will a capacitor drain my battery if my car is off?
A5: A properly installed capacitor should not drain your battery when the car is off because it is wired into the amplifier’s power circuit, which is typically controlled by a remote turn-on