How to Read AC Gauges on a Car: Pressure Chart + Fault Diagnosis
To read AC gauges on a car, compare the blue (low-side) and red (high-side) pressure gauges to normal R134a values: 25–45 PSI low side and 150–250 PSI high side at 75–85°F. Readings outside this range indicate a specific fault — low refrigerant, a failing compressor, or a restriction in the system. This guide covers how to connect manifold gauges, read every pressure scenario with a full temperature-based chart, and diagnose the four most common AC faults without guessing.
Connect the blue hose to the low-pressure port and the red hose to the high-pressure port. At 75–85°F, normal R134a readings are 25–45 PSI low side and 150–250 PSI high side. Both low = low refrigerant or a leak. Both high = overcharge or condenser blockage. Low low-side + high high-side = orifice tube/expansion valve restriction. High low-side + low high-side = failing compressor.
What Are AC Gauges, and Why Are They Important?
AC gauges, also called manifold gauges, are tools used to measure the pressure in your car’s air conditioning system. They come with two gauges: one for the low-pressure side and one for the high-pressure side. These gauges connect to your car’s AC system with hoses and help you figure out if it’s working properly.
Once you understand what the readings mean, gauges function like a diagnostic decoder. They tell you if your system has the right amount of refrigerant, if there’s a leak, or if something else is wrong — saving you a trip to the mechanic and hundreds of dollars.
Understanding Your Car’s AC System
Before reading gauges, it helps to understand how your car’s AC works. The AC system is a closed loop that circulates refrigerant to cool the air. It has a few key components:
- Compressor: Pumps refrigerant through the system.
- Condenser: Cools the hot refrigerant gas into a liquid.
- Evaporator: Absorbs heat from inside the car, making the air cold.
- Expansion Valve: Controls the flow of refrigerant.
- Refrigerant: The fluid that absorbs and releases heat (R134a in most pre-2021 cars, R1234yf in newer vehicles).
The system has a high-pressure side (from the compressor to the expansion valve) and a low-pressure side (from the expansion valve back to the compressor). Gauges measure pressure on both sides simultaneously, giving you the data to pinpoint what’s failing.
If your AC is intermittently blowing warm air rather than showing a consistent fault on the gauges, see our guide on why car AC blows cold then warm — that symptom often has a different root cause.
What You Need to Get Started
To read AC gauges, you’ll need a few tools:
- Manifold Gauge Set: Includes the gauges, hoses, and fittings. Make sure it’s compatible with your refrigerant type.
- Safety Gear: Gloves and safety glasses — refrigerant can cause frostbite or eye damage.
- Refrigerant: R-134a for most cars built before 2021; newer vehicles use R-1234yf. Check your owner’s manual.
- Thermometer: To measure the vent air temperature (should be 35–45°F in a healthy system).
- Service Manual: Contains specific pressure specs for your exact vehicle.
Recommended: AC Manifold Gauge Set (R134a)
A quality manifold gauge set includes color-coded hoses, quick-connect fittings, and both PSI and temperature scales. Look for one rated for both R134a and R1234yf for future compatibility.
Check Price on AmazonHow AC Gauges Work
A manifold gauge set is a two-gauge diagnostic tool that connects to both the high-pressure and low-pressure ports of a vehicle AC system, measuring refrigerant pressure on both sides simultaneously. This dual reading is what makes it possible to distinguish between a refrigerant leak, a blockage, a compressor failure, and an overcharge — conditions that each produce a different pressure combination on the two gauges.
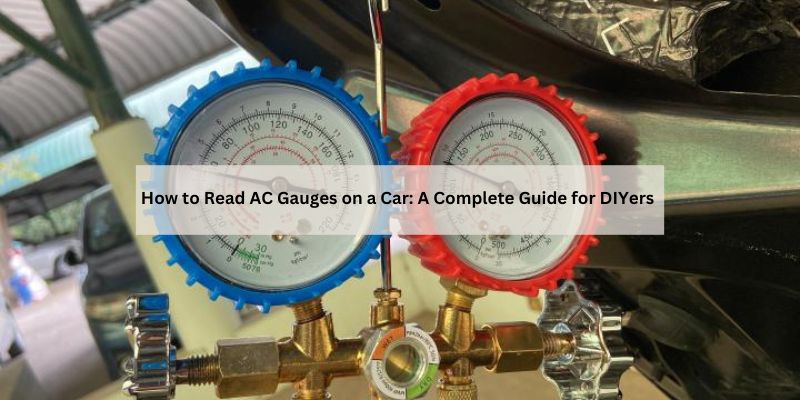
AC gauges have two dials: blue for the low-pressure side and red for the high-pressure side. Each gauge shows pressure in PSI (pounds per square inch). The blue gauge connects to the low-pressure port near the evaporator, and the red gauge connects to the high-pressure port near the condenser. Quick-connect fittings snap onto your car’s service ports and cannot be swapped — the low-side port is smaller to prevent accidental cross-connection.
The gauges often have colored zones (green, yellow, red) to show safe, warning, and danger pressure levels. Many also include temperature scales to estimate refrigerant saturation temperature based on ambient conditions. Understanding how the PSI reading maps to refrigerant state at different temperatures is the key skill for accurate diagnosis.

Step-by-Step Guide to Using AC Gauges
Follow these steps to connect and read your AC gauges correctly:
- Prepare Your Car: Park on a level surface, turn off the engine, and let it cool. Open the hood.
- Wear Safety Gear: Put on gloves and safety glasses before handling any hoses.
- Locate the AC Ports: Find the low-pressure (L) and high-pressure (H) service ports — they’re different sizes to prevent mix-ups.
- Connect the Gauges: Attach the blue hose to the low-pressure port and the red hose to the high-pressure port. Make sure gauge valves are fully closed before connecting.
- Start the Car: Turn on the engine and set the AC to max cool with the fan on high.
- Let the System Stabilize: Wait 2–3 minutes for pressures to reach a steady state before reading.
- Read the Gauges: Note both readings and compare them to the temperature-based chart below.
- Check Vent Temperature: Use a thermometer at the center vent. A healthy system delivers 35–45°F air.
- Disconnect Safely: Close both gauge valves, turn off the car, then carefully remove the hoses and cap the service ports immediately.
R134a AC Gauge Readings Chart by Ambient Temperature
AC gauge readings are not fixed numbers — they rise with ambient temperature. This is the most common DIY mistake: comparing readings taken at 95°F to a chart built for 80°F and misdiagnosing the system as overcharged. Always use a temperature-matched reference when evaluating your readings.
The chart below shows normal R134a operating pressures at common ambient temperatures with the AC running at max cool, fan on high, engine at idle:
| Ambient Temp (°F) | Normal Low Side (PSI) | Normal High Side (PSI) |
|---|---|---|
| 65°F | 25–35 | 135–155 |
| 70°F | 35–40 | 145–160 |
| 75°F | 35–45 | 150–170 |
| 80°F | 40–50 | 175–210 |
| 85°F | 45–55 | 225–250 |
| 90°F | 45–55 | 250–270 |
| 95°F | 50–55 | 275–300 |
| 100°F | 50–55 | 315–325 |
Note for R1234yf vehicles (most 2021+ models): Normal low-side readings are slightly lower at 20–30 PSI, and high-side readings run 170–210 PSI at 80°F. Always verify against your service manual for your specific vehicle.
Reading AC Gauge Measurements
Use the temperature chart above to establish your baseline, then compare your readings to these scenarios:
Normal Readings
When the low side reads 25–45 PSI and the high side reads 150–250 PSI (adjusted for ambient temperature), your system is healthy. The compressor is working correctly, refrigerant levels are adequate, and vent air should measure 35–45°F.
Low Refrigerant
If both gauges show low pressure (e.g., 15 PSI low side, 100 PSI high side), the system is low on refrigerant — usually from a leak. Don’t just add refrigerant: find and fix the leak first. Otherwise you’ll be refilling again in a few weeks, and the refrigerant loss means the compressor is running hot without adequate lubrication.
Overpressurized System
High readings on both sides (e.g., 55 PSI low, 350 PSI high) usually mean too much refrigerant, non-condensable gas (air) in the system, or restricted airflow across the condenser. Overfilling is a common DIY mistake — adding refrigerant slowly and checking the gauge after every short burst prevents this.
Compressor Issues
If the low side is high (50+ PSI) and the high side is low (below 100 PSI), the compressor is not building pressure across the two sides. This means it’s failing or the expansion valve is stuck open. The compressor’s job is to create the pressure differential — when it can’t, both sides equalize at a medium pressure instead of separating into a clear high side and low side.
Blockages
A high low-side reading and an extremely high high-side reading (400+ PSI) typically indicate a clog in the condenser or non-condensable contamination preventing refrigerant from completing its cycle. Cleaning the condenser — dirt and debris block airflow — resolves many cases without replacing any parts.
AC Pressure Diagnostic Chart: What Every Reading Means
The table below covers all six high/low-side pressure combinations and their most likely causes. Use this alongside the temperature chart above to arrive at an accurate diagnosis before spending money on parts:
| Low Side | High Side | Most Likely Cause | First Action |
|---|---|---|---|
| Normal (25–45 PSI) | Normal (150–250 PSI) | System healthy | No action needed |
| Low (<20 PSI) | Low (<150 PSI) | Low refrigerant / leak | Leak test, then recharge |
| High (>55 PSI) | High (>300 PSI) | Overcharge, air in system, or condenser blockage | Check condenser airflow; recover excess refrigerant if needed |
| Low (<20 PSI) | Very high (>300 PSI) | Orifice tube or expansion valve restriction | Replace orifice tube or expansion valve |
| High (>55 PSI) | Low (<150 PSI) | Failing compressor or expansion valve stuck open | Test compressor clutch; check expansion valve operation |
| Fluctuating | Fluctuating | Moisture in system | Evacuate fully, replace receiver/drier, recharge |
For compressor-related faults, also check that the compressor clutch is engaging. If it cycles on and off rapidly, system pressure may be too low to hold the clutch engaged — which points back to a refrigerant leak as the root cause rather than a failed compressor.
Common AC Problems and What Gauges Tell You
Here are the most common AC symptoms and what your gauge readings reveal:
- Weak Cooling: Low pressure on both sides usually means low refrigerant. Check for leaks before refilling.
- No Cooling: If pressures are normal but the air isn’t cold, the problem may be the blend door or evaporator — not the refrigerant level.
- Cycling Compressor: Low pressure causes the compressor to turn on and off rapidly — a symptom of a small leak causing pressure to drop below the compressor’s cut-in threshold.
- Strange Noises: High pressure readings alongside grinding or hissing sounds often indicate a blockage or a compressor straining against a restriction.
If you’ve recently had your AC serviced and it’s already showing abnormal readings, see our guide on how to reset a car air conditioner — some symptoms trace to the control system rather than refrigerant pressure.
Tips for Accurate AC Gauge Readings
To get reliable readings every time:
- Check in the Right Conditions: Test when the outside temperature is 70–90°F. Readings at extreme temperatures require correction against the chart above.
- Run the AC at Max: Set the AC to max cool and high fan speed for consistent pressure stabilization.
- Let the System Stabilize: Wait 2–3 minutes after starting the AC before reading the gauges.
- Use a Temperature-Matched Chart: Generic pressure values without temperature context lead to misdiagnosis — always use the chart in this guide.
- Avoid Overfilling: Add refrigerant in short bursts, checking the gauge after each one, and stop when you reach the normal range for your ambient temperature.
Safety Tips for Using AC Gauges
AC work carries real risks. Follow these precautions every time:
- Wear Protective Gear: Gloves and safety glasses are non-negotiable. Liquid refrigerant causes severe frostbite on contact.
- Work in a Ventilated Area: Refrigerant displaces oxygen in enclosed spaces. Always open the garage door or work outdoors.
- Don’t Overpressurize: Overcharging can burst hoses or damage the compressor. Add refrigerant slowly and check the gauge frequently.
- Check for Leaks Before Adding: Use an electronic leak detector or UV dye kit to find leaks before recharging.
- Dispose of Refrigerant Properly: Venting refrigerant into the atmosphere is illegal under federal law. Use a recovery machine or take the car to a certified shop.

When to Call a Professional
Many AC diagnoses are DIY-friendly, but some repairs need professional equipment. Call a mechanic when your gauges show:
- Compressor failure (high low-side + low high-side with no clutch engagement)
- A major refrigerant leak requiring full system evacuation and flush
- Moisture contamination (fluctuating gauges) — requires deep vacuum and receiver/drier replacement
- R1234yf systems — this refrigerant requires certified handling equipment by law
Complex repairs like compressor replacement and system flushing require recovery equipment that most DIYers don’t have, and handling R1234yf without certification is a federal violation.
Maintaining Your Car’s AC System
To keep your AC running efficiently year-round:
- Run the AC Regularly: Even in winter, run the AC for 10 minutes monthly to keep seals lubricated and prevent refrigerant from migrating out of the system.
- Check Annually: A quick gauge check each spring catches slow leaks before they leave you without AC in the heat of summer.
- Clean the Condenser: Dirt and debris block airflow and drive up high-side pressure. Rinse the condenser with a garden hose yearly.
- Replace Cabin Air Filters: A clogged cabin filter reduces cooling efficiency. Replace every 12,000–15,000 miles.
Conclusion
Reading AC gauges on a car comes down to one skill: matching your blue and red gauge readings to the correct pressure range for your ambient temperature, then using the diagnostic chart to identify which of the four fault patterns you’re looking at. A manifold gauge set and this reference guide can replace a shop diagnostic visit for most common AC problems. Check the gauges each spring before the heat arrives, and you’ll catch issues while they’re still a simple recharge rather than a compressor replacement.
FAQs
What are AC gauges, and why do I need them?
AC gauges (manifold gauges) measure refrigerant pressure on both the high and low sides of your car’s AC system simultaneously. They’re the only tool that accurately identifies whether low cooling is caused by a refrigerant leak, overcharge, compressor failure, or a blockage — without guessing or paying for a shop diagnostic fee.
How do I know if my car’s AC has the right pressure?
Compare your readings to a temperature-matched chart. For R134a at 80°F, normal is 40–50 PSI low side and 175–210 PSI high side. At 85°F, that shifts to 45–55 PSI low and 225–250 PSI high. Using the wrong temperature baseline is the most common cause of AC misdiagnosis.
Can I use AC gauges on any car?
Yes, but your gauge set must match your car’s refrigerant type. Most cars built before 2021 use R134a; newer models use R1234yf, which requires a different gauge set and certified handling procedures. Check the underhood sticker or your owner’s manual before connecting any gauges.
What does it mean if both AC gauges show low pressure?
Both low = low refrigerant, almost always from a leak. Don’t recharge without finding the leak first — the refrigerant will escape again within weeks, and the compressor runs hot without adequate lubrication during that time. Use a UV dye kit or electronic detector to locate the leak before adding refrigerant.
Is it safe to use AC gauges myself?
Yes, with proper precautions. Wear gloves and safety glasses, work in a ventilated area, and never vent refrigerant into the atmosphere — it’s a federal violation. The main risks (frostbite and overpressurizing the system) are easily avoided by working slowly and checking the gauge after each refrigerant addition.
How often should I check my car’s AC with gauges?
Once a year — ideally in spring before hot weather arrives. A slow leak may take 12–18 months to noticeably reduce cooling performance, so annual checks catch the problem while it’s still a simple recharge rather than a compressor replacement from running low for too long.