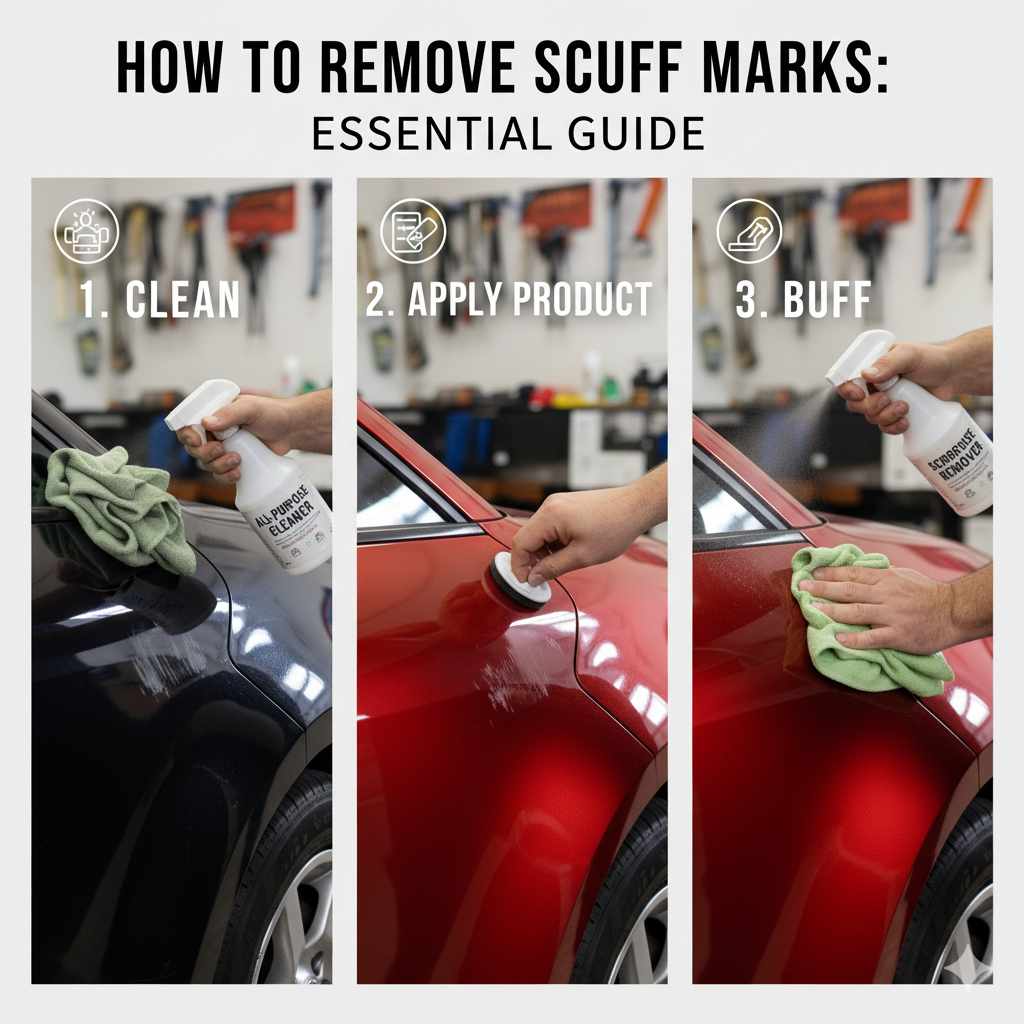
How to Remove Scuff Marks: Essential Guide
Removing scuff marks from your car’s interior is simple! Use mild household cleaners like soap and water or a specialized interior cleaner with a microfiber cloth. For tougher marks, try a magic eraser or rubbing alcohol sparingly, always testing in an inconspicuous spot first. Proper technique protects your surfaces for a fresh look.
Hey there! Ever noticed those annoying dark marks on your car’s interior, maybe on the dashboard, door panels, or even the seats? They pop up from everyday use – your shoes brushing against the door trim, gym bags sliding around, or kids’ toys bumping into things. It’s frustrating because they make an otherwise clean car look messy. But don’t worry! You don’t need a professional detailer or fancy products to get rid of them. You likely have most of what you need right at home. In this guide, I’ll walk you through easy, step-by-step methods to tackle these scuff marks and restore that clean, showroom look to your car’s interior. Let’s make your car look its best!
Understanding Scuff Marks on Your Car’s Interior
Scuff marks are those unsightly smudges and streaks that appear on various interior surfaces. They’re more common than you think and can appear on plastic, vinyl, leather, and even some fabric materials. The most frequent culprits are:
- Shoes and boots (especially the soles)
- Bags and luggage
- Clothing
- Children’s toys and equipment
- General wear and tear
The good news is that most scuff marks are not permanent damage to the material itself. They are usually just residue from whatever caused them, transferred onto the surface. This means they can often be cleaned off with the right approach. However, it’s crucial to use gentle methods first to avoid damaging sensitive interior materials. Aggressive scrubbing or harsh chemicals can sometimes make the problem worse by dulling finishes or even creating new marks.
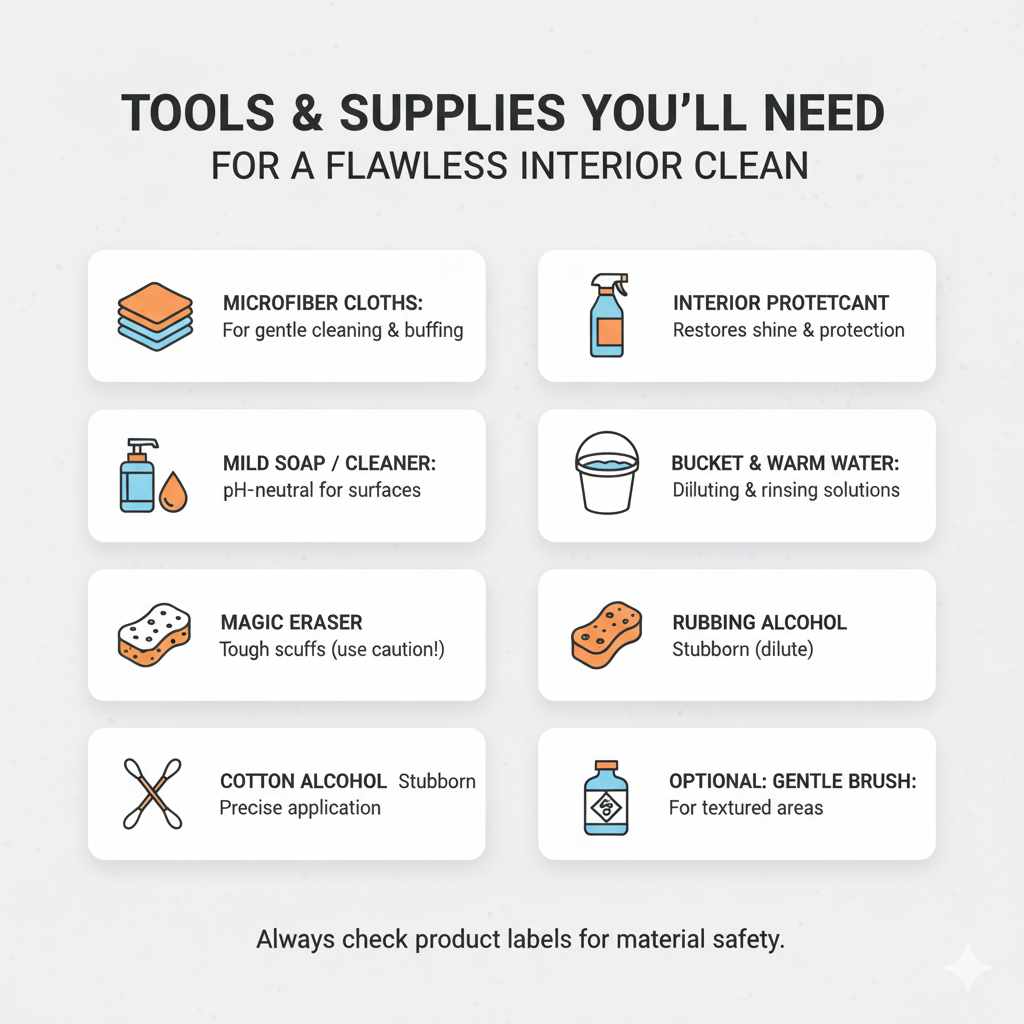
Tools and Supplies You’ll Need
Before you start, gather these common household items and car care essentials. Having them ready will make the cleaning process smooth and efficient.
- Microfiber cloths: These are essential for gentle cleaning and buffing. They trap dirt effectively without scratching surfaces. Keep a few clean ones handy.
- Mild soap or car interior cleaner: A pH-neutral soap (like dish soap diluted in water) or a dedicated car interior cleaner is usually safe and effective.
- Warm water: For diluting cleaners and rinsing.
- Bucket: To hold your cleaning solution.
- Magic Eraser (melamine foam sponge): Excellent for tougher scuffs, but use with caution as it’s mildly abrasive.
- Rubbing alcohol (isopropyl alcohol): Effective for stubborn marks, but should be used sparingly and diluted on certain surfaces.
- Cotton swabs or cotton balls: For precise application of cleaners on small or detailed areas.
- Interior protectant or conditioner: To restore shine and protection after cleaning.
- Optional: Gentle brush (like an old toothbrush or detailing brush): For getting into textured areas.
Always ensure your cleaning products are safe for automotive interior surfaces. A quick check of the product label will usually tell you what materials it’s suitable for. For instance, some leather cleaners are specifically formulated to avoid damaging the leather’s natural oils.
Step-by-Step Guide to Removing Scuff Marks
Let’s get those scuffs gone! Follow these simple steps, starting with the gentlest methods and progressing only if necessary.
Step 1: Test Your Cleaning Solution
This is the most important first step! Before applying any cleaner to a visible scuff mark, test it on a small, inconspicuous area of the same material. This could be on the underside of a seat, a hidden corner of the dashboard, or inside a door pocket. Let it sit for a minute, then wipe it clean. Check for any discoloration, dulling, or damage to the material. If the area looks good, you can proceed with confidence.
Step 2: Gentle Cleaning (Soap and Water Method)
For most light scuff marks, a simple solution of mild soap and water is all you need.
- Mix your solution: In a bucket, add a few drops of mild dish soap to warm water. You want a very dilute solution, not a lot of suds.
- Dampen a microfiber cloth: Dip one of your clean microfiber cloths into the soapy water and wring it out thoroughly. You want the cloth to be damp, not soaking wet.
- Gently wipe the scuff mark: Lightly rub the scuff mark in a circular motion. Don’t scrub aggressively. The goal is to lift the transferred material.
- Wipe with a clean, damp cloth: Use a second clean microfiber cloth, dampened with plain water this time, to wipe away any soap residue.
- Dry the area: Use a third, dry microfiber cloth to gently buff the area dry.
Often, this step alone will remove the majority of scuff marks. If you still see remnants, move on to the next method.
Step 3: Using an Interior Cleaner
If soap and water didn’t fully do the trick, a dedicated automotive interior cleaner can be more effective. These cleaners are formulated to lift dirt and grime without harming plastic, vinyl, or leather.
- Spray directly onto the cloth: It’s usually best to spray the interior cleaner onto a clean microfiber cloth rather than directly onto the surface. This prevents overspray and helps you control the amount of product.
- Wipe the scuff: Gently wipe the scuff mark with the dampened cloth. Use moderate pressure and circular motions.
- Wipe clean: Use a separate clean, dry microfiber cloth to wipe away any cleaner residue and buff the area dry.
For more stubborn marks, you might need to make a couple of passes. Patience is key here.
Step 4: Tackle Tougher Scuffs with a Magic Eraser
A Magic Eraser (which is essentially a block of melamine foam) can be surprisingly effective on hard-to-remove scuff marks. However, it works by being mildly abrasive, so it must be used with extreme care.
- Slightly dampen the Magic Eraser: Wet a corner of the Magic Eraser under running water and squeeze out excess moisture. It should be barely damp.
- Gently rub the scuff: Lightly rub the scuff mark with the damp Magic Eraser. Use very little pressure. Think of it as “erasing” the mark.
- Check frequently: After each gentle pass, check the area. If the scuff is lifting, stop.
- Clean the residue: Once the scuff is gone, wipe the area with a clean, damp microfiber cloth to remove any foam residue.
- Dry and inspect: Dry the area with a clean, dry microfiber cloth. Inspect carefully to ensure the Magic Eraser hasn’t dulled or altered the surface finish. Avoid using on glossy or piano black trim where it can easily cause micro-scratches.
Important Caution: Never use excessive force or scrub vigorously with a Magic Eraser. It can wear down or scratch delicate surfaces. If you’re unsure, it’s better to skip this step.
Step 5: Using Rubbing Alcohol (Use with Extreme Caution)
For very stubborn, dark scuff marks that resist other methods, a small amount of rubbing alcohol can sometimes work. This is a last resort for certain materials and needs careful application.
- Dilute if necessary: For many plastics and vinyl, you might want to dilute rubbing alcohol with an equal part of water. Pure alcohol can be too harsh for some finishes.
- Apply to a cotton swab: Dip a cotton swab or cotton ball into the diluted (or pure, if you’ve tested and it’s safe) rubbing alcohol. Wring out any excess liquid.
- Dab the scuff: Gently dab the scuff mark with the alcohol-soaked swab. Do not rub hard.
- Work sparingly: Use minimal alcohol and work quickly. The goal is to break down the scuff material without damaging the underlying surface.
- Wipe immediately: As soon as the scuff appears to be lifting, immediately wipe the area with a clean, damp cloth to remove the alcohol.
- Dry and protect: Dry the area thoroughly with a clean, dry microfiber cloth. Then, apply an interior protectant.
Critical Warning: Rubbing alcohol can damage or discolor certain interior materials, including some plastics, leather, and painted surfaces. Always test in an inconspicuous area first. If you see any signs of damage, stop immediately and do not use alcohol on that surface again.
Step 6: Treat Specific Materials
Different materials require slightly different approaches. Here’s a quick breakdown:
Plastic and Vinyl
These are generally durable but can be scratched. Mild soap and water or a good interior cleaner are usually sufficient. For tougher marks, proceed to the Magic Eraser or a very carefully tested rubbing alcohol solution. Always follow up with a vinyl protectant to restore the finish and prevent future issues.
Leather Seats
Leather is more sensitive. Always use a cleaner specifically designed for automotive leather. Start with a damp microfiber cloth. If that doesn’t work, use a dedicated leather cleaner, applying it to your cloth, not directly to the seat. Rub gently. Avoid alcohol and abrasive cleaners on leather, as they can dry it out, crack it, or remove its protective coating. After cleaning, always apply a leather conditioner to keep it supple.
For a comprehensive overview of leather care, check out resources from organizations like the Leather and Hide Industries, which often have guides on material care and maintenance.
Carpeted Surfaces
If you have scuff marks on carpeted areas (like door sill protectors or floor mats), use a carpet cleaner suitable for automotive use. For light marks, a damp cloth might work. For tougher ones, spray the cleaner, let it dwell for a moment, and then gently agitate with a soft brush or the carpeted surface itself. Blot with a clean cloth.
Step 7: Protection and Prevention
Once you’ve successfully removed the scuff marks, take a moment to protect the cleaned surface.
Apply a quality interior protectant or conditioner according to the product’s instructions. These products help:
- Restore the original sheen and color of plastic, vinyl, or leather.
- Protect against UV fading and cracking.
- Create a barrier that makes future cleaning easier.
To prevent scuff marks in the future:
- Be mindful of shoes when entering and exiting the car, especially if they are dirty or have deep treads.
- Use mats or protective coverings for items that might slide around, like gym bags or luggage.
- Consider door sill protectors or pre-cut interior films for high-traffic areas.
- Regularly clean your car’s interior to prevent dirt and grime from becoming ingrained and causing marks.
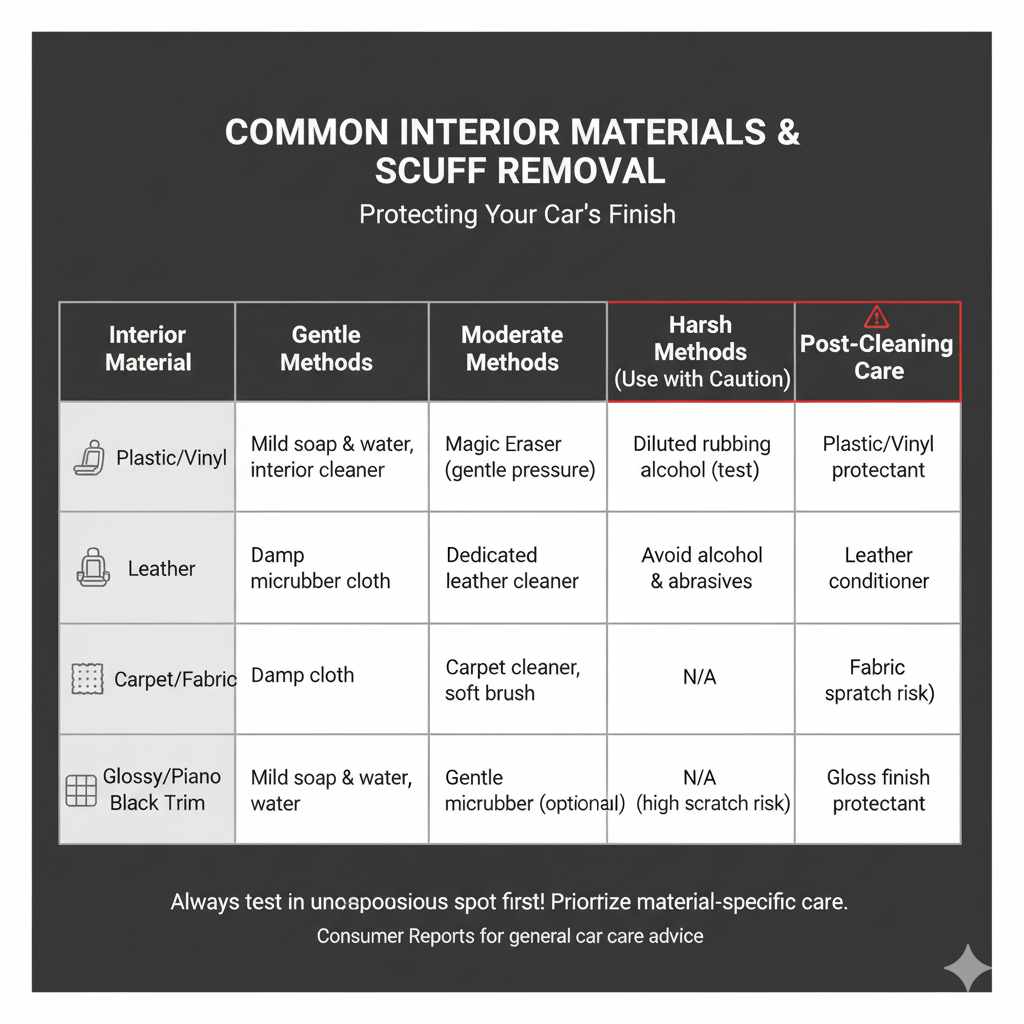
Common Interior Materials and Scuff Removal Comparison
Here’s a handy table that summarizes how to approach scuff marks on different interior materials. Remember, always test cleaning methods in an inconspicuous spot first!
| Interior Material | Gentle Methods | Moderate Methods | Harsh Methods (Use with extreme caution) | Post-Cleaning Care |
|---|---|---|---|---|
| Plastic/Vinyl | Mild soap & water, interior cleaner | Magic Eraser (gentle pressure) | Diluted rubbing alcohol (tested) | Interior plastic/vinyl protectant |
| Leather | Damp microfiber cloth | Dedicated leather cleaner (applied to cloth) | Avoid alcohol & abrasives | Leather conditioner |
| Carpet/Fabric | Damp cloth (for light transfer) | Automotive carpet cleaner, soft brush | N/A (focus on blotting, not harsh scrubbing) | Fabric protector (optional) |
| Glossy/Piano Black Trim | Mild soap & water, interior cleaner | Very gentle microfiber wipe, avoid Magic Eraser | N/A (high risk of scratching) | Gloss finish protectant or detail spray |
This table provides a quick reference, but always prioritize the material’s specific care instructions. For instance, some modern car interiors might feature soft-touch plastics or unique finishes that require specialized care. Websites like Consumer Reports often offer general advice on car care that can be helpful.
Frequently Asked Questions (FAQ)
Q1: Are scuff marks permanent damage to my car’s interior?
A1: Most scuff marks are not permanent damage. They are usually residue transferred from another object. With the right cleaning methods, they can typically be removed. Only deep scratches or gouges would be considered permanent damage.
Q2: Can I use household cleaners like Windex or all-purpose cleaners?
A2: It’s best to avoid general household cleaners like Windex or harsh all-purpose cleaners. They can contain chemicals that might dry out, discolor, or damage automotive interior materials like plastic, vinyl, or leather. Stick to dedicated automotive interior cleaners or the mild soap and water method.
Q3: How often should I clean my car’s interior to prevent scuffs?
A3: A quick wipe-down with a microfiber cloth regularly can catch dirt before it becomes a stubborn scuff. A more thorough cleaning every 1-3 months, depending on your usage, is a good recommendation. This helps maintain the interior’s appearance and longevity.
Q4: My car has piano black trim, and I’m worried about scratching it. What’s the safest way to clean scuffs?
A4: Piano black trim is very prone to micro-scratches. For scuffs on this surface, use only a clean, damp microfiber cloth with a tiny bit of water. Avoid any abrasive cleaners, sponges, or vigorous rubbing. If a scuff mark persists, it might be best to leave it rather than risk scratching the finish. Some find a quick detailer spray applied to the cloth can help lift light marks safely.
Q5: What is the best way to clean scuff marks off a leather steering wheel?
A5: For a leather steering wheel, use a cleaner specifically designed for automotive leather. Apply a small amount to a microfiber cloth and gently wipe the scuff. Avoid excessive moisture or harsh chemicals. Follow up with a leather conditioner to keep the leather on your wheel supple and protected, as it’s one of the most frequently touched surfaces in your car.
Q6: Can I use the same method for scuff marks on my car doors and dashboard?
A6: Generally, yes, for plastic and vinyl parts. The methods described – starting with mild soap and water, moving to interior cleaner, and then cautiously to a Magic Eraser or diluted alcohol – are applicable to most plastic and vinyl door panels and dashboard surfaces. Always test first, as different parts might have slightly different finishes.
Q7: What’s the difference between a scuff mark and a scratch?
A7: A scuff mark is typically a surface mark where material from something else has been transferred onto your car’s interior. It usually sits on top of the original surface. A scratch, on the other hand, is a physical removal or disruption of the material itself, creating a groove or line. Scuffs are generally easier to remove than scratches.
Conclusion
As you can see, getting rid of those pesky scuff marks on your car’s interior doesn’t have to be a chore. With a few common household items and a bit of patience, you can restore your car’s interior to a much cleaner, more appealing state. Remember to always start with the gentlest cleaning methods and test any new product or technique in an inconspicuous area before tackling the main surface. By following these steps and taking a mindful approach to your car’s interior care, you’ll not only keep it looking great but also help preserve its materials for years to come. Happy cleaning, and enjoy that refreshed car interior!