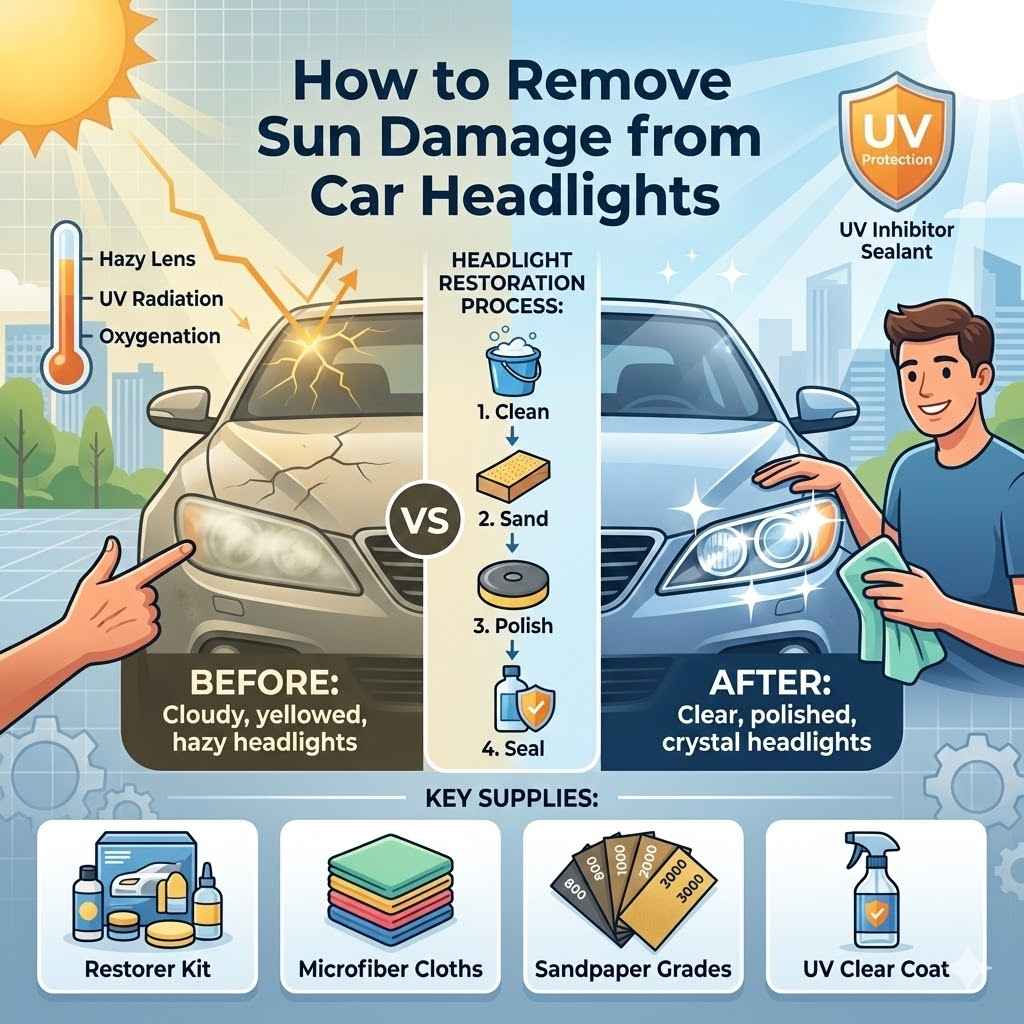
How to Remove Sun Damage from Car Headlights
Headlights can get cloudy and yellow over time because of the sun’s rays. This happens to many cars and makes it hard to see at night. If you’ve noticed your headlights looking a bit hazy or yellow, you’re not alone.
It might seem like a tough job to fix, but it’s actually quite simple, even for beginners. This guide will walk you through exactly how to remove sun damage from car headlights step by step. We’ll make your headlights clear again so you can drive safely.
Restore Your Car Headlights From Sun Damage
This section focuses on bringing back the clear look to your car’s headlights. Sun damage is a common issue that makes them look foggy and yellow, which reduces their brightness and can be a safety problem. We will go over why this happens and the different ways you can fix it yourself.
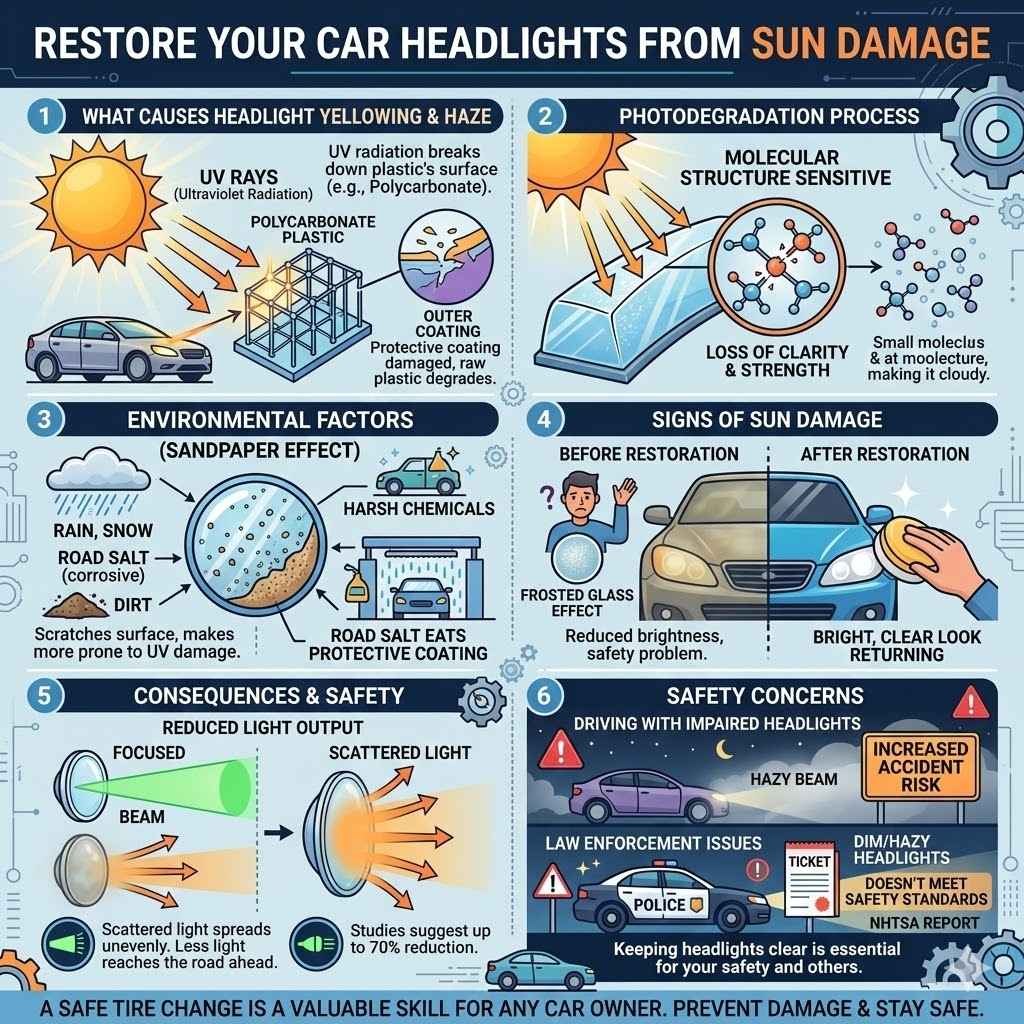
What Causes Headlight Yellowing and Haze
The plastic that headlights are made of, usually polycarbonate, is strong. However, it’s not immune to the sun’s ultraviolet (UV) rays. Over many years, UV radiation breaks down the plastic’s surface.
This breakdown causes a chemical reaction that turns the clear plastic cloudy or yellowish.
Think of it like sunburn for your headlights. The outer protective coating on the headlights gets damaged first. Once this layer is gone, the raw plastic underneath starts to degrade.
This is why even newer cars can start to show signs of this damage if they are parked outside a lot.
UV Rays and Plastic Degradation
Ultraviolet rays are a part of sunlight. They carry a lot of energy. When these rays hit the polycarbonate plastic of your headlights, they can break the chemical bonds within the material.
This process is called photodegradation.
Polycarbonate is chosen for headlights because it is tough and can be molded into different shapes. It also lets light through very well. But its molecular structure is sensitive to UV light.
This leads to a loss of clarity and strength over time.
Environmental Factors
Besides the sun, other things can speed up headlight damage. Rain, snow, road salt, and even dirt can act like tiny sandpaper. They can scratch the surface of the headlights, making them more prone to UV damage.
Road salt, especially in winter, is very corrosive. It can eat away at the protective coatings on the headlights. This leaves the plastic exposed.
Car washes with harsh chemicals can also contribute to the problem over time.
Signs of Sun Damage on Headlights
The most common sign of sun damage is a dull, hazy, or yellow appearance. It’s like looking through frosted glass. This is not just a cosmetic issue.
It seriously affects how well your headlights work.
You might notice that your headlights don’t light up the road as far or as brightly as they used to. This can be dangerous, especially when driving at night or in bad weather conditions like fog or heavy rain.
Reduced Light Output
When headlights become hazy, the light they produce gets scattered. Instead of a focused beam of light going down the road, it spreads out unevenly. This means less light reaches where you need it most, which is the road ahead of your car.
This reduction in effective light output can be significant. Some studies suggest that heavily oxidized headlights can reduce light output by up to 70%. This makes it much harder to see obstacles, road signs, and other vehicles.
Safety Concerns
Driving with impaired headlights is a major safety risk. It increases your chances of getting into an accident. Law enforcement officers can also issue tickets for headlights that are too dim or hazy because they don’t meet safety standards.
The National Highway Traffic Safety Administration (NHTSA) reports that inadequate illumination is a factor in many nighttime crashes. Keeping your headlights clear is essential for your safety and the safety of others on the road.
Simple Steps How to Remove Sun Damage from Car Headlights
Fixing your headlights is surprisingly easy. You don’t need special tools or a lot of experience. We’ll cover different methods, from DIY kits to using common household items.
The goal is to remove the damaged layer and bring back the shine.
DIY Headlight Restoration Kits
These kits are designed specifically for restoring headlights. They usually contain everything you need in one package. This makes them a popular choice for people who want a reliable fix.
Most kits include abrasive pads for sanding, polishing compounds, and a sealant to protect the headlights afterward. The process generally involves cleaning, sanding, polishing, and sealing. It’s straightforward and effective.
Contents of a Typical Kit
A good headlight restoration kit typically includes:
- Cleaning solution or wipes
- Sandpaper of various grits (e.g., 1000, 2000, 3000 grit)
- Polishing compound (often a liquid or paste)
- Protective sealant or UV coating
- Applicator pads or cloths
The sandpaper is used to gently remove the damaged, oxidized outer layer of the plastic. Higher grits are used for finer polishing. The polishing compound then smooths out the surface left by the sandpaper.
Finally, the sealant provides a new protective layer.
Step-by-Step Process Using a Kit
Here’s a common approach with a kit:
- Clean the Headlights: Wash the headlights thoroughly with soap and water. Make sure they are completely dry. You might want to mask off the surrounding paint with painter’s tape to prevent accidental scratches.
- Sand the Surface: Start with the coarsest grit sandpaper provided in the kit. Wet sanding is usually recommended, meaning you dip the sandpaper in water. Sand the headlight evenly in a back-and-forth motion. You will see the haze start to disappear.
- Progress to Finer Grits: After sanding with the first grit, wipe the headlight clean. Then, move to the next finer grit sandpaper. Repeat the wet sanding process. Continue this until you’ve used the finest grit. The headlight should look much clearer but may still be a bit dull.
- Apply Polishing Compound: Use a clean cloth or applicator pad to apply the polishing compound. Rub it onto the headlight surface in a circular motion. Buff until the haziness is gone and the plastic is clear and glossy.
- Seal the Headlights: Apply the protective sealant according to the kit’s instructions. This is a critical step to prevent the damage from returning quickly. Let it cure as directed.
Using Household Items for Headlight Restoration
You can achieve great results using items you likely already have at home. These methods are budget-friendly and effective for mild to moderate damage.
Toothpaste Method
Yes, toothpaste can work! Many toothpastes contain mild abrasives, similar to polishing compounds. These can help buff away the oxidation.
You’ll need regular white toothpaste (not gel). Apply a generous amount to a soft cloth or sponge. Rub it onto the headlight in a circular motion.
You’ll need to put some elbow grease into it. After a few minutes of scrubbing, wipe away the toothpaste with a damp cloth. Rinse and dry.
You might need to repeat this a few times for best results.
Baking Soda Paste
Baking soda is another common household item with mild abrasive properties. Mix baking soda with a little bit of water to create a thick paste.
Apply the paste to the headlight using a soft cloth. Scrub in a circular motion, applying gentle pressure. As you scrub, you’ll feel the gritty paste working on the oxidized layer.
After scrubbing for a few minutes, wipe off the paste with a damp cloth. Rinse the headlight and dry it completely. Like toothpaste, this may require multiple applications.
Vinegar and Baking Soda Combination
This is a popular DIY cleaning solution. The baking soda acts as a scrub, and the vinegar helps to lift the grime and oxidation.
First, sprinkle baking soda generously over the headlight. Then, spray or drizzle white vinegar over the baking soda. It will fizz.
Let it sit for about 5-10 minutes. After the fizzing stops, use a soft cloth to scrub the mixture into the headlight. Rinse thoroughly and dry.
This can be quite effective for removing yellowing.
Advanced Techniques and Sealants
For more severe damage, or for longer-lasting results, there are advanced options. These include using power tools or applying professional-grade sealants.
Using a Power Drill and Polishing Pads
If you have a power drill with a polishing attachment, you can speed up the sanding and polishing process. This requires more care to avoid overheating or damaging the plastic.
Attach a foam polishing pad to your drill. You’ll use the same sanding grits as in the DIY kit method, but the drill does the work. Start with the coarsest grit, keeping the drill moving constantly and at a low speed.
After sanding, switch to a polishing pad and use a headlight polish. This method can give a very professional finish.
Applying UV Protective Sealants
After restoring your headlights, it’s crucial to protect them from future sun damage. This is where UV sealants come in. Some restoration kits include them, but you can also buy them separately.
These sealants form a clear, protective barrier that blocks harmful UV rays. They are often liquid or spray-on applications. It’s vital to apply them to a perfectly clean and dry surface.
A good sealant can keep your headlights clear for a year or more.
Ceramic Coatings for Headlights
For the ultimate in protection and shine, consider a ceramic coating. These coatings are the same type used on car paint. They create a very hard, durable layer that repels water, dirt, and UV rays.
Applying a ceramic coating can be more involved and might be best left to professionals if you’re unsure. However, DIY ceramic coating kits for headlights are available. They offer superior longevity and protection compared to standard sealants.
How to Maintain Clear Headlights
Once you’ve restored your headlights, keeping them clear is important. Regular maintenance will extend their life and keep your car looking good.
Regular Washing and Cleaning
Wash your car regularly. This helps remove dirt, grime, and road debris that can scratch or dull the headlight lenses. Use a soft cloth or sponge and a car wash soap that is pH-neutral.
Avoid using harsh chemicals or abrasive cleaners. These can strip away protective coatings and accelerate degradation. After washing, dry the headlights with a clean microfiber towel to prevent water spots.
Applying Protective Waxes or Sealants
After washing, consider applying a car wax or a dedicated headlight sealant. Many car waxes offer some UV protection. This adds an extra layer of defense against the sun.
Headlight sealants are specifically formulated to protect plastic from UV damage. Apply them every few months, or as recommended by the product. This simple step can make a big difference in preventing yellowing from returning.
Parking in Shade or Garages
The simplest way to prevent sun damage is to limit your headlights’ exposure to direct sunlight. Whenever possible, park your car in a shaded area or in a garage.
This might not always be practical, but even reducing exposure by a few hours a day can help. Over the long term, this will significantly slow down the process of headlight yellowing and hazing.
Understanding the Science Behind Headlight Restoration
Headlight restoration is essentially a form of surface treatment. It involves removing damaged material and then protecting the newly exposed surface. The science behind it is simple but effective.
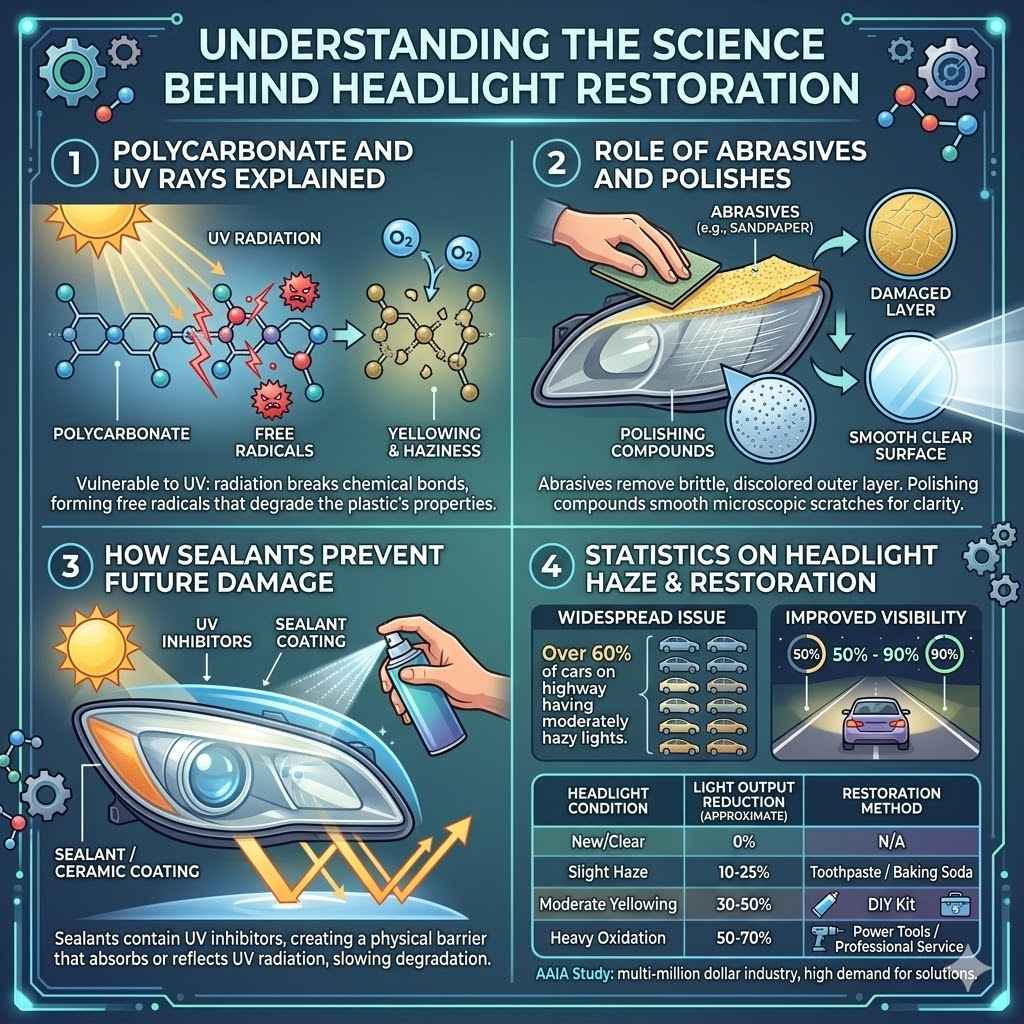
Polycarbonate and UV Rays Explained
Polycarbonate is a type of thermoplastic polymer. It is known for its strength, impact resistance, and clarity. It’s used in many applications, including safety glasses, CDs, and car headlights.
However, its chemical structure makes it vulnerable to UV radiation.
UV rays have enough energy to break the chemical bonds within the polycarbonate molecules. This process creates free radicals, which are unstable molecules. These free radicals then react with oxygen, leading to a degradation of the plastic’s properties.
The visible result is yellowing and haziness.
The Role of Abrasives and Polishes
Abrasives, like the sandpaper in restoration kits or the mild abrasives in toothpaste, work by physically removing the damaged outer layer of the plastic. This layer is often brittle and discolored.
Polishing compounds contain finer abrasives. They smooth out the microscopic scratches left by the coarser abrasives. This creates a smooth, clear surface that can reflect light properly.
The goal is to make the plastic as clear as it was when it was new.
How Sealants Prevent Future Damage
Sealants and ceramic coatings provide a physical barrier between the polycarbonate plastic and the environment. Specifically, they block UV rays.
Most sealants contain UV inhibitors. These chemicals absorb or reflect UV radiation before it can reach the plastic. This significantly slows down the photodegradation process.
A good sealant can protect the headlights for months or even years, depending on the product and environmental conditions.
Statistics on Headlight Haze and Restoration
The problem of hazy headlights is widespread. A survey found that over 60% of cars on the road have headlights that are at least moderately hazy. This highlights the need for restoration.
Restoring headlights can improve visibility by an average of 50%. In some cases, with a professional restoration, the improvement can be as high as 90%. This directly translates to safer driving at night.
A study by the Automotive Aftermarket Industry Association (AAIA) indicated that headlight restoration services are a multi-million dollar industry. This shows how common the issue is and the demand for solutions.
| Headlight Condition | Light Output Reduction (Approximate) | Restoration Method |
|---|---|---|
| New/Clear | 0% | N/A |
| Slight Haze | 10-25% | Toothpaste or Baking Soda |
| Moderate Yellowing | 30-50% | DIY Restoration Kit |
| Heavy Oxidation | 50-70% | Power Tool Restoration or Professional Service |
Frequently Asked Questions
Question: How long does a headlight restoration typically last
Answer: The longevity of headlight restoration depends heavily on the method used and the quality of the sealant applied. DIY kits with basic sealants might last 6-12 months. Professional ceramic coatings can last 2-5 years or even longer with proper care.
Question: Can I use a buffer instead of sandpaper for restoration
Answer: A buffer can be used for the polishing stage of restoration, but it’s not a replacement for sanding. Sanding is necessary to remove the damaged layer of plastic. Buffing alone will not fix the oxidation.
Question: Will clear coat spray work for headlight restoration
Answer: While some clear coat sprays offer UV protection, they are not specifically designed for the harsh environment headlights endure. Dedicated headlight sealants or UV coatings are much more effective and durable for this purpose.
Question: Is it safe to drive with yellow headlights
Answer: No, it is not safe to drive with yellow or hazy headlights. They significantly reduce visibility, especially at night, increasing the risk of accidents. They can also lead to tickets from law enforcement.
Question: Can I paint my headlights instead of restoring them
Answer: You can paint the interior of headlight housings for aesthetic purposes, but the outer lens must remain clear to allow light to pass through. Painting the exterior lens would block light and be illegal for road use.
Summary
Fixing sun-damaged car headlights is a manageable DIY task. You can use kits or common household items like toothpaste and baking soda to remove haze and yellowing. Remember to always seal the headlights afterward to protect your work and ensure long-lasting clarity.
With a little effort, you can restore your headlights for better visibility and a cleaner car appearance.