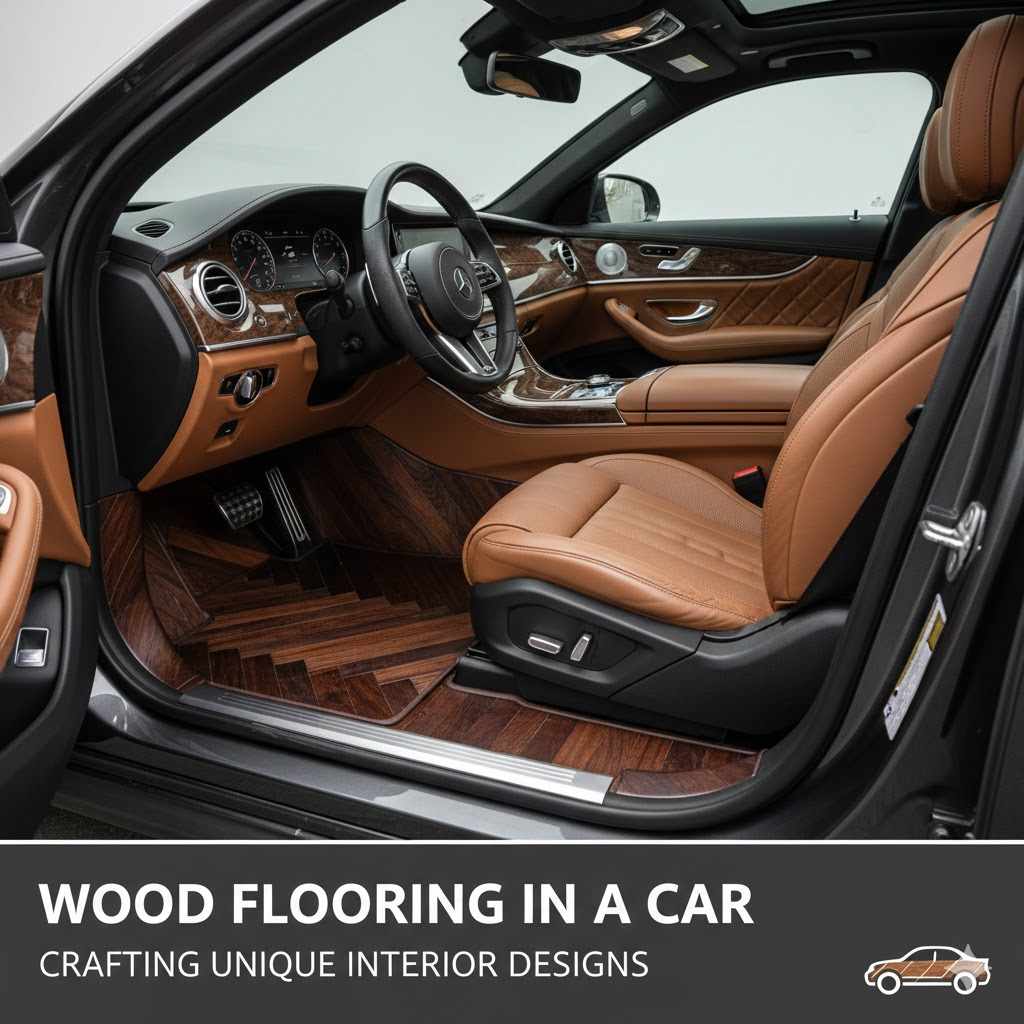
Wood Flooring in a Car: Crafting Unique Interior Designs
Thinking about adding Wood Flooring in a Car: Custom Interior Ideas might seem tricky at first. It’s a project that sounds like it could be difficult, but really, it’s totally doable! You might wonder where to even begin. Don’t worry, though. This guide will walk you through the process step-by-step. We will explore ways to make your car’s interior stand out. Ready to get started and give your car a cool new look?
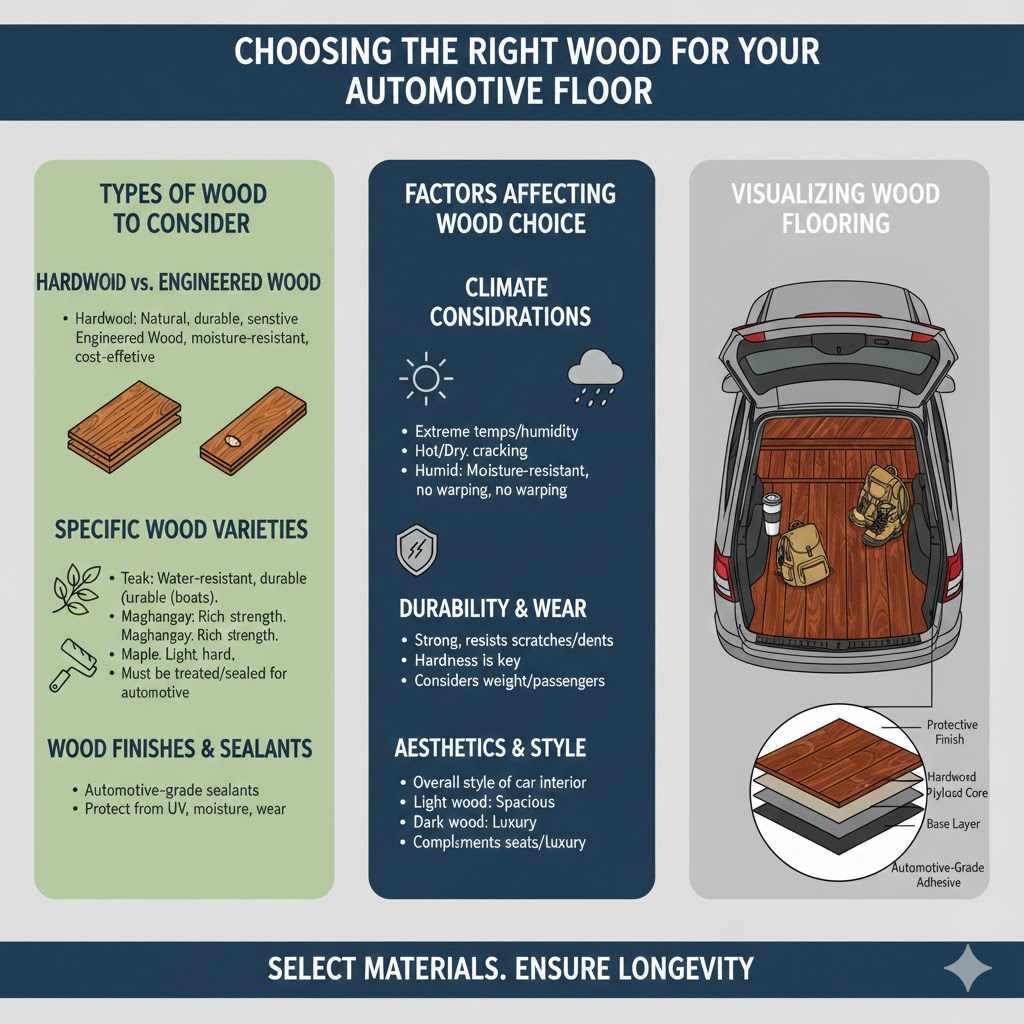
Choosing the Right Wood for Your Automotive Floor
Selecting the best wood for your vehicle’s flooring is more than just picking a color or style. You have to consider how the wood handles moisture, how it wears, and how it holds up against scratches and changes in temperature. Remember, a car’s interior endures a lot. The right wood should keep its look and functionality over a long time. It also needs to be compatible with car-specific adhesives and sealants. Think about how the wood interacts with sun, water, and everything else.
Types of Wood to Consider
- Hardwood vs. Engineered Wood:Hardwood is a solid piece of natural wood, known for its beauty and durability. However, hardwood can be more susceptible to changes in humidity and temperature, possibly causing it to warp or expand. Engineered wood has a core made of plywood or other materials, with a thin layer of hardwood on top. This makes it more stable and resistant to moisture. Engineered wood is a good choice for cars. It is also often more cost-effective than solid hardwood.
- Specific Wood Varieties:Certain types of wood are better suited for car interiors. Teak is a popular choice because it is naturally water-resistant and durable. It’s often used on boats and withstands tough conditions. Other options include mahogany, known for its rich color and strength, and maple, which provides a light, clean look and is very hard. However, make sure you choose woods that have been properly treated and sealed for automotive use. Woods will need protective coatings.
- Wood Finishes and Sealants:The finish you choose is just as important as the wood itself. Automotive-grade sealants are designed to protect the wood from UV damage, moisture, and wear. These sealants create a barrier that helps the wood last longer and maintain its appearance. Consider finishes that offer both protection and a beautiful look. This is critical for making your car’s wood flooring last. Choose sealants appropriate for your car’s environment.
Factors Affecting Wood Choice
- Climate Considerations:If you live in an area with extreme temperatures or humidity, choose wood that can handle these conditions. In hot, dry climates, look for wood that doesn’t crack or dry out easily. In humid areas, you’ll need moisture-resistant wood that won’t warp or swell. Consider the typical environment your car will be in when making your decision. Make sure the wood you pick is right for your area’s weather.
- Durability and Wear:Car flooring gets a lot of use. Consider wood that is strong enough to resist scratches, dents, and wear. The hardness of the wood is a key factor. Softer woods may show damage more easily than harder ones. Consider the weight of objects placed on the floor and the number of people who will be using the car. Choose a wood that will keep its good looks for years. Durability will save you time and money.
- Aesthetics and Style:The look of the wood is also important. Think about the overall style of your car’s interior. Do you want a classic look, or something more modern? Light-colored woods can make a car feel more spacious, while darker woods give a sense of luxury. Consider the other colors and materials in your car, such as the seats and dashboard. Make sure the wood flooring complements your design vision. What look are you hoping to create?
Preparing Your Car’s Interior for Wood Flooring
Getting your car ready for wood flooring involves more than just measurements. It requires removing the old flooring, cleaning the surface, and making sure everything is level and smooth. This is important to ensure that the wood flooring sits properly and lasts for many years. Proper preparation will help avoid problems, such as water damage or an uneven look. This work is a step that makes the whole job much easier.
Removing Old Flooring and Surface Preparation
- Removing Existing Flooring:Start by removing the old carpet or flooring. This often involves unscrewing seats and removing trim pieces. You might have to disconnect any electrical connections, such as seat heaters. Once everything is out of the way, you can remove the old flooring. Take your time to avoid damaging the car’s interior. Use a utility knife to cut through the old flooring. Carefully lift it out in sections.
- Cleaning and Leveling:After removing the old flooring, thoroughly clean the floor pan. Remove any dirt, adhesive, or residue. Use solvents or cleaning products designed for automotive use. Make sure the floor is completely dry before proceeding. Check the floor for any unevenness or damage. You might need to use a self-leveling compound or fill any holes. A level surface will prevent the wood flooring from rocking. Clean and level your car’s flooring.
- Measurements and Templates:Accurate measurements are critical. Measure the floor pan carefully, taking into account all curves, angles, and any features like seat mounts or wheel wells. You can create templates from cardboard or paper to help you cut the wood flooring. This allows you to fit the wood perfectly. Mark the templates with any cutouts needed for seat bolts or other items. This step will make your work much easier. Precise measurements are key.
Tools and Materials Needed
- Essential Tools:You’ll need a variety of tools. These include a saw (circular saw, jigsaw, or table saw), measuring tape, pencil, safety glasses, gloves, and a dust mask. You’ll also need adhesive, sealant, and any necessary fasteners. Consider a router to shape the edges of the wood. A good set of tools will make the job easier and improve the final result. Gather everything you need beforehand.
- Adhesives and Fasteners:Choose an adhesive that is designed for automotive use. It must be strong and resistant to heat, moisture, and vibration. Apply the adhesive evenly to the floor pan or the back of the wood flooring. You might also use fasteners, such as screws or clips, to secure the flooring. Follow the adhesive manufacturer’s instructions. Allow it to fully cure before the car is used. The right adhesive will make the flooring last.
- Safety Gear:Safety is key. Wear safety glasses and a dust mask to protect yourself from wood dust and fumes. Use gloves to protect your hands. Always work in a well-ventilated area. This will help you avoid breathing in harmful chemicals or dust. Proper safety gear will help keep you safe. Ensure you have the right equipment.
Installation of Wood Flooring: Techniques and Methods
The installation of wood flooring in a car is a project that calls for careful planning and precision. The goal is a professional, durable finish. This section covers the best methods to ensure your new wood flooring looks great and lasts for years. By following these techniques, you’ll be well on your way to adding beauty and value to your car’s interior. Careful planning is essential to success.
Cutting and Fitting the Wood
- Using Templates:Templates are key for ensuring the wood flooring fits perfectly. After preparing your car’s interior and getting the right measurements, use the templates. Place them onto your wood and trace around them. This lets you cut the wood accurately, accounting for any curves, corners, or features. Templates help you avoid mistakes. They ensure a custom fit. This makes the job much easier.
- Cutting the Wood:Use the templates to guide your cuts. A circular saw or jigsaw is ideal for cutting the wood to the right shape. Make sure your blade is sharp. This helps to prevent chipping or splintering. If you’re working with intricate shapes, take your time and make slow, precise cuts. It’s often better to cut slightly larger than needed and trim down the edges. Always wear eye protection when cutting wood.
- Edge Finishing:The edges of the wood should be neat and finished. You can use a router to create rounded edges or bevels. This gives your flooring a professional look and feel. Use sandpaper to smooth any rough edges. This step is important for both appearance and comfort. It also prevents the wood from splintering. Smooth edges will make the flooring look complete.
Adhering and Securing the Flooring
- Applying Adhesive:Use an automotive-grade adhesive. It must be suited for wood and the car’s interior materials. Apply the adhesive evenly to the prepared floor pan or the back of the wood flooring. Following the manufacturer’s directions is important. This ensures a strong bond. Make sure to apply the adhesive only in a well-ventilated area. Properly applied adhesive will give you the best results.
- Placement and Alignment:Carefully place the wood flooring into the car. Use your templates to ensure a perfect fit. Once the flooring is positioned, press it firmly onto the adhesive. This ensures a solid connection. Be ready with clamps or weights to hold the flooring in place while the adhesive dries. Check the alignment often. This step will guarantee a smooth and even surface.
- Fastening and Additional Support:You can use fasteners, such as screws or clips, to provide extra support. This will give more stability to the flooring. Choose fasteners that don’t pierce through the wood. Make sure they are hidden under trim pieces or other covers. Additional support will ensure your flooring is secure. Use the best fasteners for the job.
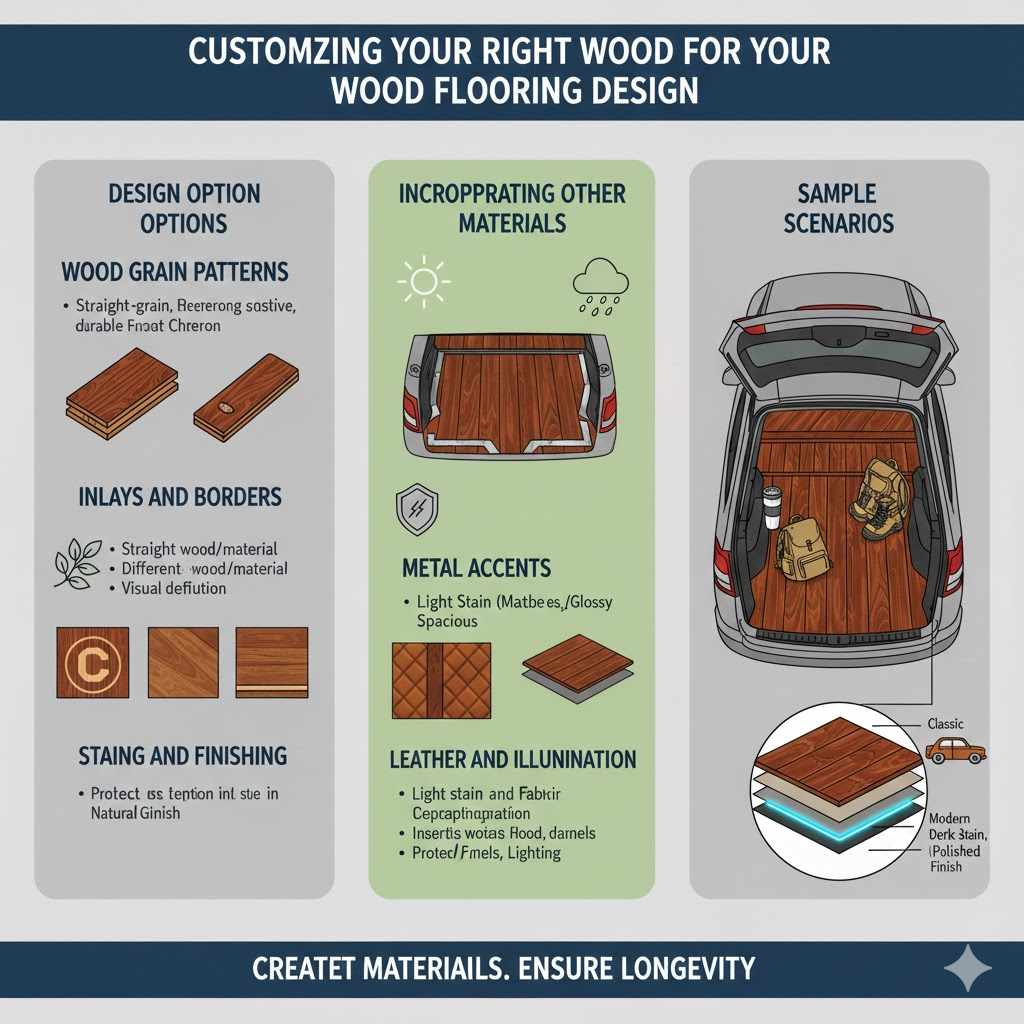
Customizing Your Wood Flooring Design
Personalizing your car’s wood flooring is an opportunity to express your creativity. Consider what kind of style you want. Do you want something subtle or eye-catching? The goal is to make the car’s interior a reflection of your individual tastes. This section offers ideas on how to achieve a one-of-a-kind design. It helps you explore different techniques and materials. Take your time to plan your custom design.
Design Options
- Wood Grain Patterns:How the wood grain appears can change the look of your flooring. You can choose different patterns to create the look you like. For a classic look, consider a straight-grain pattern. For something more modern, try a herringbone or chevron pattern. The direction and orientation of the wood grain can create visual interest. This element can also impact how the light plays on your flooring. Choose patterns that work with your overall design.
- Inlays and Borders:Inlays and borders add sophistication to your wood flooring. Inlays involve adding a different type of wood or material to the surface of the flooring. This can create a unique design or logo. Borders can add visual definition to the flooring. They can be a different wood species or a decorative material. These features can take your design to the next level. Think about what you would like to include.
- Staining and Finishing:Staining and finishing offer even more ways to customize the look of your flooring. Staining the wood lets you change its color. This lets you match the interior or create a contrast. Applying a finish will protect the wood from wear and tear. It also enhances its natural beauty. You can choose from various finishes, like matte or glossy. The right stain and finish will help the wood flooring. They will bring out the best in the wood.
Incorporating Other Materials
- Metal Accents:Adding metal accents can add a modern edge to your wood flooring. You can use metal strips as borders. These can highlight specific areas or features. They can also create contrast. Metal accents can give your interior a more luxurious look. Consider adding metal accents for visual interest.
- Leather and Fabric Integration:Integrating leather or fabric can add softness and texture to your flooring design. You can use leather inserts or fabric panels to break up the wood. This also creates a cohesive look. When done right, it can give your interior a unique feel. Experiment with different colors and textures to find the look you want.
- Lighting and Illumination:Lighting can transform your car’s interior. You can install LED strips under the wood flooring. This can create a subtle, ambient glow. You can also incorporate small, recessed lights to highlight specific areas. Lighting adds a sense of luxury and sophistication. It will make your car look elegant. Proper lighting helps highlight the wood flooring’s beauty.
Real-Life Examples of Wood Flooring in a Car
Here are some examples of how people have successfully used wood flooring to improve their car’s interior:
- Case Study 1: Classic Car Restoration. A classic car owner used teak wood flooring. This added to the car’s original design. The teak was a good choice because it is durable and beautiful. The owner spent time preparing the car’s interior. They used the right adhesive and finish. The project enhanced the car’s value.
- Case Study 2: Modern SUV Customization. An owner of a modern SUV picked engineered wood flooring. They wanted a modern style. They selected a light-colored wood to make the space feel bigger. The installation was done by professionals. The customer got a luxurious and stylish upgrade.
- Case Study 3: Custom Van Build. A van builder created a custom interior with wood flooring. The wood helped provide a warm and inviting look. The builder installed inlays and integrated lighting. This created a functional and beautiful living space. The wood helped create a unique atmosphere.
Sample Scenarios
- Scenario 1: You have a vintage car. You like a classic style and want to use natural wood to match the original look. You may select mahogany flooring, with a dark stain. You would integrate a polished finish to protect the wood.
- Scenario 2: You want to update a modern SUV. You want a contemporary look and a spacious interior. You might pick a light-colored engineered wood. You will then add metal accents for a sleek appearance.
Frequently Asked Questions
Question: How do I measure my car’s floor for wood flooring?
Answer: Measure the length and width of the floor pan. Take into account any curves, angles, and obstacles like seat mounts. Make templates out of cardboard or paper to trace and cut the wood accurately.
Question: What type of wood is best for car flooring?
Answer: The best wood depends on your needs. Teak is water-resistant. Mahogany is strong. Maple provides a clean look. Choose wood that is treated and sealed for automotive use. It should handle moisture and wear well.
Question: What tools do I need for installing wood flooring in my car?
Answer: You will need a saw (circular saw, jigsaw, or table saw), measuring tape, pencil, safety glasses, gloves, dust mask, adhesive, sealant, and fasteners.
Question: How do I secure the wood flooring to the car’s floor?
Answer: Use an automotive-grade adhesive designed for wood and car interiors. You can add screws or clips for extra support. Follow the adhesive’s instructions and ensure the flooring is well-bonded.
Question: How can I customize the wood flooring design?
Answer: You can use different wood grain patterns, add inlays and borders, and stain the wood. Metal accents, leather, and fabric integration, and lighting are also options to create a custom design.
Final Thoughts
Crafting Wood Flooring in a Car: Custom Interior Ideas opens up a world of design. It allows you to create a personalized space. From choosing the right wood to the final installation, each step is an opportunity to express your style. Preparing the interior properly and taking accurate measurements are important for a perfect fit.
Remember that the right wood, adhesive, and finishes will ensure your flooring lasts for years. By exploring different design options and personalizing the look, you can achieve an interior that is unique and beautiful. Take your time, do your research, and enjoy the process. Transform your car into something truly special!