Your Essential Guide to a Flawless 454 Internals Swap
Swapping internals from a 1993 Gen V 454 into a 1989 Mark IV 454 is possible, but not a direct drop-in. Key differences in the crankshaft rear main seal (one-piece vs. two-piece), cylinder head coolant passages, and camshaft design (roller vs. flat tappet) require careful part selection and potential machine work for a successful, reliable build.
Thinking about giving your classic Chevy 454 big-block a refresh? You’re not alone. Many drivers look to newer engines for stronger, updated parts. A common question I hear is whether you can take the guts from a newer 1993 Gen V 454 and put them into an older 1989 Mark IV block. It’s a great idea for building a strong engine on a budget!
The good news is, yes, it can be done. But it’s not as simple as swapping LEGO bricks. These two engines have some important differences. Don’t worry, though. This guide will walk you through everything, step by step. We’ll cover what parts fit, what to watch out for, and how to do it right. Let’s get your engine running better than ever!
Understanding the Engines: Mark IV vs. Gen V 454
Before you pick up a single wrench, it’s crucial to understand what makes these two generations of the Chevy 454 different. They look similar on the outside, but the small changes on the inside can make or break your project. Think of them as cousins, not identical twins.
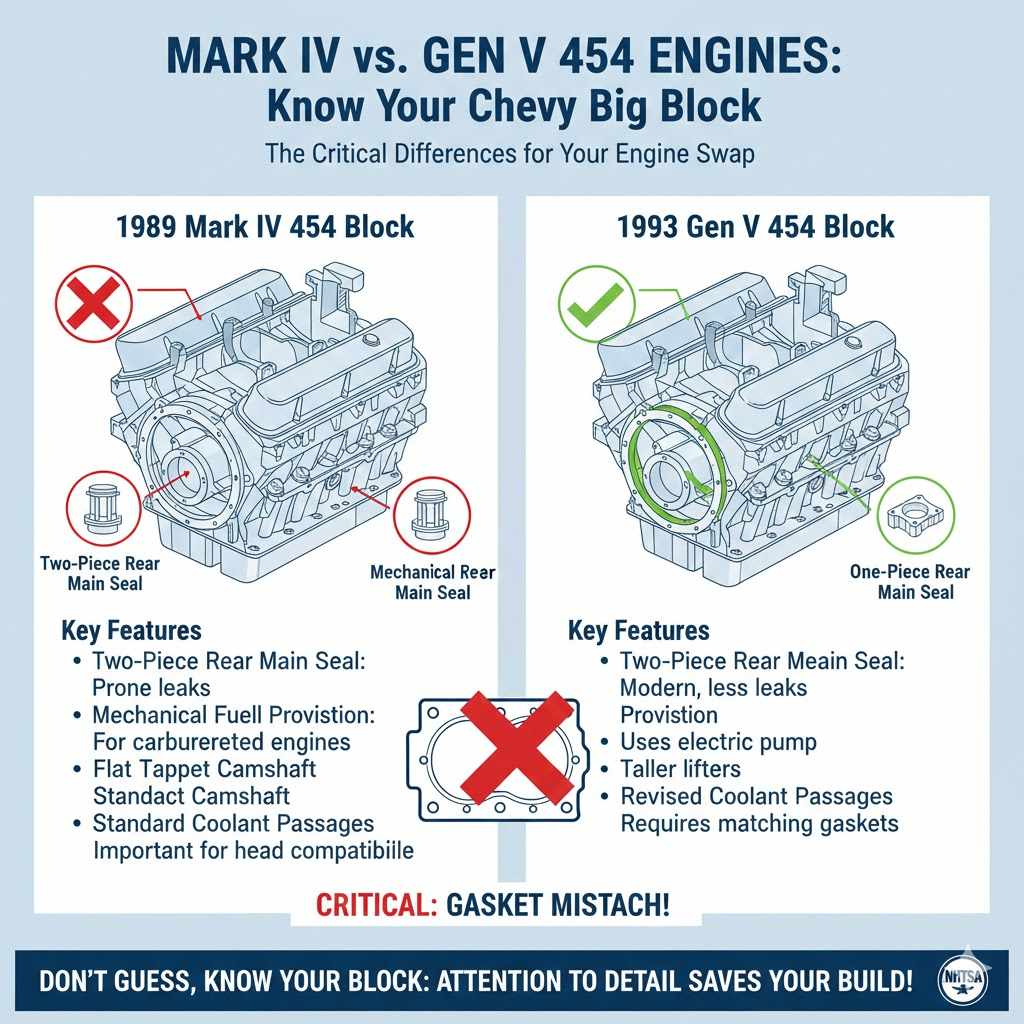
The 1989 Mark IV 454 Block
This is the classic big-block many of us know and love. It was the workhorse of its time, found in trucks and performance cars. Here are its key features:
- Two-Piece Rear Main Seal: The crankshaft seal is made of two separate halves. This is an older design that is more prone to leaks if not installed perfectly.
- Mechanical Fuel Pump Provision: The block has a mounting boss and a pushrod hole for a mechanical fuel pump, a common feature of carbureted engines.
- Flat Tappet Camshaft: Most Mark IV blocks were designed for a flat tappet camshaft, which uses flat-faced lifters to open and close the valves.
- Standard Coolant Passages: The cylinder heads and block have coolant passages that were standard for decades. This is an important point we’ll come back to.
The 1993 Gen V 454 Block
The Gen V was Chevrolet’s update to the big-block for the 1990s, designed for better reliability and emissions, mainly for trucks. It introduced some significant changes:
- One-Piece Rear Main Seal: This is a more modern, superior design that uses a single, round seal. It’s much less likely to leak. The crankshaft is machined differently to accommodate this.
- No Mechanical Fuel Pump Provision: By this era, most vehicles used in-tank electric fuel pumps, so Chevy removed the boss for the old mechanical pump.
- Hydraulic Roller Camshaft Ready: Gen V blocks were designed for hydraulic roller camshafts. They have taller lifter bores and bosses in the lifter valley for a “spider” plate that holds the roller lifters in place.
- Revised Coolant Passages: This is a big one. Chevy changed the path coolant takes through the block and heads to improve cooling. This means Gen V heads and gaskets don’t always play nice with older blocks.
What Parts Can You Swap? (And What You Can’t)
Now for the main event: which parts from your 1993 donor engine will fit into your 1989 block? Some parts are a direct fit, while others need attention. Here’s a simple breakdown to help you plan your build.
| Engine Component | Can It Be Swapped? | Important Notes & Things to Watch For |
|---|---|---|
| Crankshaft | No (Not Directly) | This is the biggest hurdle. The Gen V crank is for a one-piece rear main seal, and the Mark IV block is for a two-piece. Adapters exist, but they can be unreliable. It’s best to use a crankshaft that matches your block’s seal type. |
| Connecting Rods | Yes | The connecting rods from both generations are generally interchangeable. They are a great, strong upgrade for a Mark IV. Always have them checked for straightness at a machine shop. |
| Pistons | Yes, with caution | Gen V pistons will fit on Mark IV rods. However, be mindful of compression ratio. Gen V truck engines often had lower compression pistons. Also, ensure the valve reliefs on the piston tops match the heads you plan to use. |
| Camshaft | Yes, with supporting parts | You can install a Gen V roller cam into a Mark IV block, but you’ll need a “retrofit” kit. This includes special roller lifters, a cam button to control end play, and a timing chain cover designed for this swap. It’s a fantastic upgrade for performance and reliability. |
| Cylinder Heads | No (Not without modification) | Gen V heads have different coolant passages. Bolting them directly to a Mark IV block will cause overheating issues. While it’s possible for a machine shop to drill the block to match, it’s often easier and safer to use proper Mark IV heads. |
| Timing Chain & Gears | Yes | The timing set is interchangeable. This is a good opportunity to install a new, high-quality double roller timing set for improved accuracy and durability. |
| Oil Pan & Pump | Yes | The oil pan, oil pump, and pickup tube will swap over. Just make sure the oil pan fits your vehicle’s chassis and the pickup is matched to the pan’s depth. |
Essential Tools and Supplies for the Job
Having the right tools makes any job easier and safer. You don’t need a professional workshop, but a solid set of tools is a must. Here’s a list of what you’ll need to get started:
- Safety Gear: Safety glasses, gloves, and sturdy shoes are non-negotiable.
- Engine Stand: This is essential for working on an engine safely and comfortably.
- Engine Hoist (Cherry Picker): To lift the engine out of the vehicle and place it on the stand.
- Comprehensive Socket and Wrench Set: You’ll need both metric and standard (SAE) sizes. A good set of deep sockets is also very helpful.
- Torque Wrench: Absolutely critical for reassembly. Engine parts must be tightened to specific values to work correctly and avoid damage. A good quality click-type or digital torque wrench is a great investment.
- Piston Ring Compressor: To safely squeeze the piston rings so you can slide the pistons back into the cylinders.
- Harmonic Balancer Puller/Installer: For removing and installing the main pulley on the crankshaft.
- Engine Assembly Lube: A special, thick lubricant used on bearings and moving parts during reassembly to prevent damage on the first startup.
- Gasket Scraper and Cleaning Supplies: Plastic scrapers, wire brushes, brake cleaner, and shop towels for cleaning all the old gasket material off of parts.
- Feeler Gauges and Plastigage: For checking critical clearances, like bearing clearances and piston ring end gaps.
Step-by-Step Guide to Your 454 Internals Swap
Ready to get your hands dirty? Follow these steps carefully for a smooth and successful engine build. Remember, patience is your best tool. Rushing leads to mistakes.
Step 1: Safety First and Engine Removal
Before you begin, safety is your top priority. Disconnect the negative terminal of the battery. If you’re working inside a garage, ensure there is plenty of ventilation. When removing the engine from the vehicle, use a quality engine hoist and follow proper procedures. According to the National Highway Traffic Safety Administration (NHTSA), securing your vehicle on level ground is a critical first step for any repair. Once the engine is out, securely mount it to your engine stand.
Step 2: Disassemble Both Engines
Start with your donor Gen V engine. Carefully disassemble it, keeping all the parts organized. Use plastic bags and a marker to label everything—bolts, brackets, and small components. This will save you a huge headache later. Pay close attention to the order and orientation of parts like main caps and connecting rod caps. They must go back in the same place and facing the same direction. Once the Gen V is apart, do the same for your Mark IV engine, which you’ll be rebuilding.
Step 3: Clean and Inspect Everything
This is the most time-consuming but most important step. Every single part you plan to reuse must be spotlessly clean. Old oil, sludge, and gasket material can ruin a new engine. Use degreaser, brushes, and a scraper to clean the block, heads, pistons, and all other components.
Once clean, inspect everything for damage:
- Block: Check for cracks in the cylinder walls, main bearing webs, and lifter valley. Check the deck surface (where the heads bolt on) to make sure it’s perfectly flat with a straight edge.
- Crankshaft: Look for scoring or damage on the bearing journals.
- Connecting Rods: Check for any signs of bending or damage.
- Pistons: Inspect for cracks, especially around the skirt and pin boss area.
If you’re unsure about anything, take the parts to a professional machine shop. They have the tools to properly clean (hot tank) and inspect (magnaflux) your parts for hidden cracks.
Step 4: Machine Shop Work (If Necessary)
Even if your parts look good, a trip to the machine shop is highly recommended for a professional build. At a minimum, you should have them:
- Clean and inspect the block.
- Check the cylinders for wear. They may need to be bored to the next oversize and honed for the new piston rings to seal properly.
- Polish the crankshaft journals.
- Resize the connecting rods to ensure they are perfectly round.
Step 5: Assemble the Mark IV Block with New Internals
This is where your careful planning pays off. You’ll be assembling your 1989 Mark IV block using the upgraded parts. Always follow a good repair manual for detailed instructions and torque specifications. You can often find specs from reputable parts suppliers like Summit Racing Equipment in their part descriptions or tech articles.
- Install Crankshaft Bearings: Clean the main bearing saddles in the block and install the new bearings. Apply a generous amount of assembly lube.
- Install the Crankshaft: Carefully lay your Mark IV-compatible crankshaft in place. Install the main caps in their original order and orientation. Torque the main cap bolts in stages, following the specified sequence and torque values.
- Check Bearing Clearance: Use Plastigage to verify that your main bearing clearance is within spec. This is a crucial step to ensure proper oil pressure and engine longevity.
- Install Pistons and Rods: After filing your piston rings to the correct end gap, install them on the pistons. Use a ring compressor to gently tap the piston and rod assemblies into their correct cylinders. Remember to use assembly lube on the rod bearings and torque the rod caps to spec.
- Install the Camshaft and Timing Set: Liberally coat the camshaft lobes and bearings with assembly lube. Carefully slide it into the block. Install your new timing chain and gears, making sure to align the timing marks perfectly.
- Button Up the Bottom End: Install the oil pump and pickup, and then bolt on the oil pan with a new gasket.
Step 6: Install Cylinder Heads and Valvetrain
Using your Mark IV-compatible heads (either the originals or a new set), place the head gaskets on the clean block deck. Carefully set the heads in place and torque the head bolts in the correct sequence and to the proper specification. This is critical for ensuring the head gasket seals correctly. Once the heads are on, you can install the lifters, pushrods, and rocker arms to complete the valvetrain.
Step 7: Final Assembly and Installation
With the core engine assembled, you can now install the intake manifold, water pump, harmonic balancer, and all the other external accessories. Once it’s fully dressed, it’s time to carefully hoist it back into your vehicle. Reconnect all the fuel lines, electrical wiring, coolant hoses, and exhaust. Double-check every single connection before attempting to start the engine.
Common Mistakes to Avoid
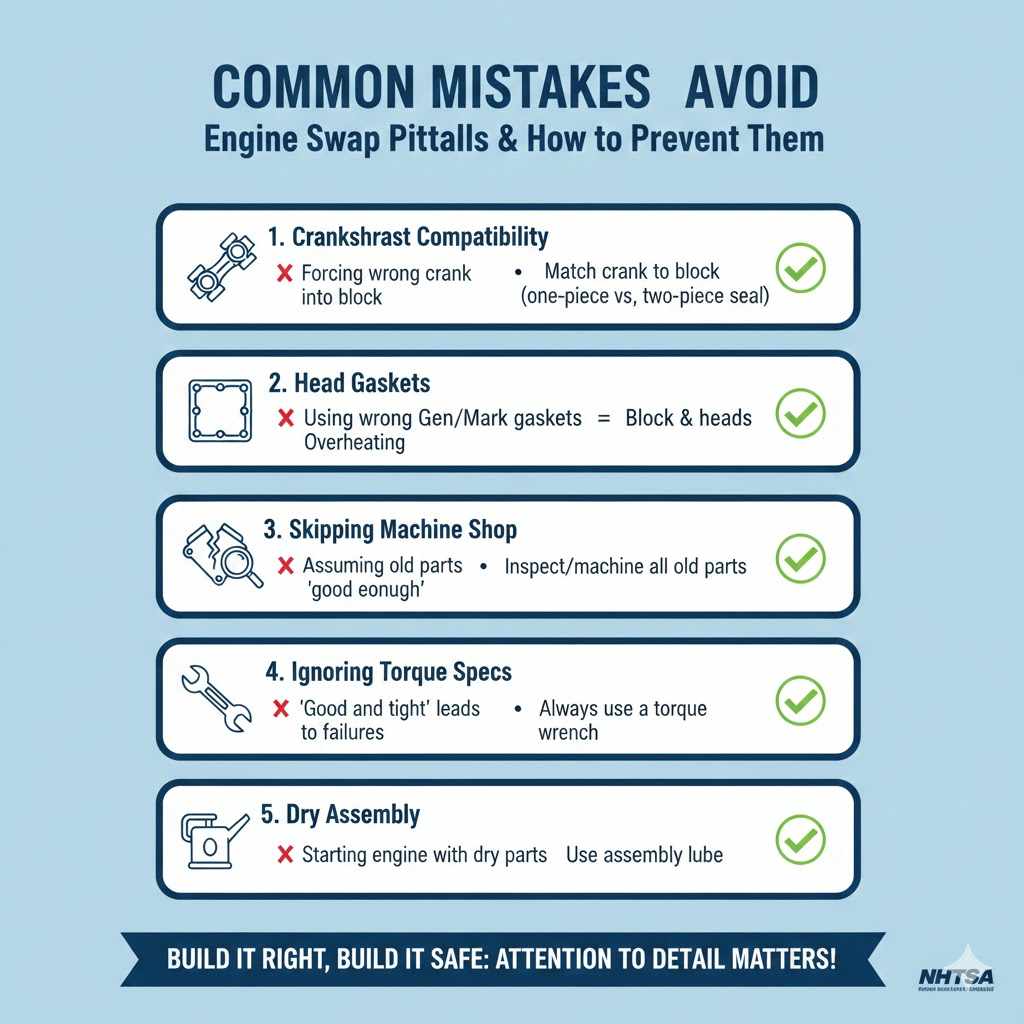
Even experienced builders can make mistakes. Here are a few common pitfalls to watch out for on this specific swap:
- Ignoring Crankshaft Compatibility: Trying to force a one-piece seal crank into a two-piece seal block (or vice-versa) is the number one mistake. Always use the correct crank for your block.
- Mixing Up Head Gaskets: Using Gen V head gaskets on a Mark IV assembly (or vice-versa) will block coolant passages and lead to immediate overheating. Use gaskets that match your block and heads.
- Skipping the Machine Shop: Assuming old parts are “good enough” is a recipe for disaster. A small, unseen crack or a slightly out-of-round cylinder can destroy your new engine in minutes.
- Not Using a Torque wrench: “Good and tight” is not a torque spec. Incorrectly tightened bolts can lead to gasket failures, spun bearings, or broken parts.
- Forgetting Assembly Lube: Starting a fresh engine with dry parts will cause instant, severe damage to bearings and other moving surfaces.
Frequently Asked Questions (FAQ)
What is the biggest difference between a Mark IV and Gen V 454?
The single biggest difference is the rear main seal. The older Mark IV uses a two-piece seal, while the newer Gen V uses a more reliable one-piece seal. This also means their crankshafts are not interchangeable without significant modification.
Do I have to take my engine parts to a machine shop?
While you can assemble the engine yourself, it is highly recommended to have a professional machine shop clean and inspect your block, crank, and rods. They can detect issues like cracks or warping that you can’t see with the naked eye, ensuring your engine foundation is solid.
Can I use the Gen V cylinder heads on my Mark IV block?
Not without major modifications. The coolant passages are different and will not line up correctly, which will cause your engine to overheat very quickly. It’s much safer and more reliable to use cylinder heads designed for a Mark IV block.
What does “one-piece vs. two-piece rear main seal” mean?
It refers to the seal at the back of the engine that prevents oil from leaking out around the crankshaft. A two-piece seal is an older design made of two halves that clamp around the crank. A one-piece is a modern, single circular seal that is pressed into the block and is much less prone to leaks.
Is this 454 internals swap a good project for a first-time engine builder?
This can be a challenging project for a first-timer due to the compatibility issues between generations. If it’s your very first engine build, a simpler rebuild using only Mark IV-compatible parts might be a better starting point. However, with careful research and patience, it is achievable.
Will I gain more power by using Gen V internals?
Not necessarily just from the internals alone. The Gen V connecting rods are strong, but power gains come from combinations of parts. The biggest potential for a power increase in this swap comes from upgrading to a hydraulic roller camshaft, which allows for more aggressive performance profiles and is more reliable than an old flat tappet cam.
Where can I find the correct torque specs for my engine?
The best sources for torque specifications are a factory service manual for your specific year (1989 for the block) or a reputable engine rebuilding manual like those from Haynes or Chilton. The manufacturers of your new parts (like head bolts or rod bolts) will also provide the correct specs for their products.
Conclusion: Your Rebuilt Big-Block Awaits
Swapping the stronger internals from a Gen V 454 into a classic Mark IV block is a fantastic way to build a powerful and durable engine without breaking the bank. While it requires more than just a simple parts exchange, the project is well within reach for a determined DIY mechanic.
The keys to success are understanding the critical differences—especially the crankshaft seal and cylinder heads—and being meticulous during every step of the process.
Take your time, keep your workspace clean, and don’t be afraid to ask for help from a professional machine shop. By following this guide and paying close attention to the details, you can build a reliable Chevy 454 that will deliver tire-shredding power and pride for years to come. Now, go make some noise!