
3 Best Car Soundproofing Kits for Quieter Drives
The 3 best car soundproofing kits in 2026 are the ones matched to your noise source: butyl CLD for panel vibration, CCF/MLV for tire and road drone, and a mixed-layer kit for full-cabin work. Pick the wrong layer, and you spend money, add weight, and still hear the same buzz, hiss, or boom. This guide ranks the best kits by use case, coverage, and install difficulty, then shows you which material to buy for each noise problem.
Top pick and quick verdict
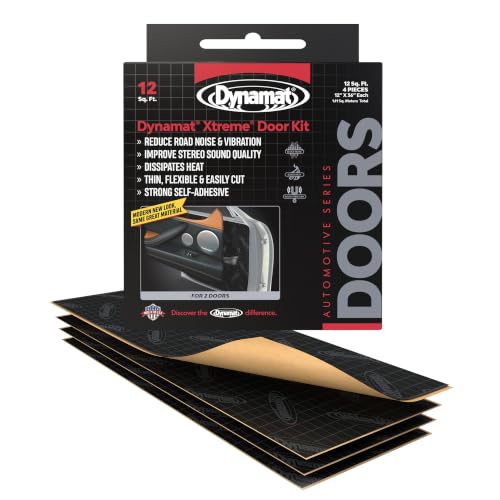

The best overall choice for most drivers is Dynamat Xtreme Door Kit 10435 because it pairs proven butyl CLD with an aluminum constraining layer, comes in a 67 mil build, and is the benchmark most buyers can trust for door resonance control. For budget door and trunk work, Noico 80 mil is the cleaner value play. For mixed cabin noise, SoundSkins Pro Plus is the better layered shortcut.
Quick picks by use case
- Best for door resonance: Dynamat Xtreme Door Kit 10435.
- Best for highway drone: A layered build with CLD, closed-cell foam, and MLV; SoundSkins Pro Plus is the easiest starting point.
- Best for full-vehicle coverage: Siless Max 120 mil sound deadener for broad CLD coverage, then add foam or MLV where needed.
- Best for a tight budget: Noico 80 mil.
Which kit fits your noise problem?
Start with the noise source first, then match the mat. Door buzz and trim rattle need CLD first. Tire roar and low-frequency drone usually need CLD plus a decoupling layer, and sometimes MLV. A foam-only sheet can trim some panel contact noise and light airborne sound, but it will not stop panel resonance on its own.
Door buzz and panel resonance
Use a butyl CLD mat when the door card, outer door skin, or trunk lid rings like a drum. The goal is damping, not padding. A CLD sheet with an aluminum constraining layer changes panel vibration into heat and cuts the metal’s tendency to resonate.
Trunk rattle and rear cabin noise
Start with CLD on the trunk floor, spare-tire well, and lid, then add closed-cell foam where trim panels touch each other. Rear-seat and hatch noise often comes from loose panels and broad sheet metal, so you need both damping and decoupling to quiet the area well.
Highway drone and low-frequency hum
Low-frequency road drone is the hardest problem. CLD helps by controlling resonance, but MLV is the layer that adds mass and blocks more of the transmission path. If the noise sounds like a steady boom at speed, a layered build matters more than a thicker single mat.
Mixed noise in daily drivers
Daily drivers with tire roar, mirror whistle, door buzz, and dash trim noise usually need a mixed build. CLD goes down first, closed-cell foam goes above it, and MLV comes in when you need better blocking from road and tire noise. That stack solves more than one symptom at once.
Best car soundproofing kits for 2026
The best car soundproofing kit for most buyers is Dynamat Xtreme Door Kit 10435 because it is the strongest all-around door-focused benchmark, with a 67 mil butyl CLD build and an aluminum constraining layer. If your noise is broader than door buzz, SoundSkins Pro Plus gives you a built-in second layer. Budget buyers should start with Noico 80 mil.
Dynamat Xtreme door Kit 10435
Dynamat Xtreme Door Kit 10435 is the premium benchmark in this group. CarAudioNow ranks it best overall, and it uses butyl CLD with an aluminum constraining layer at 67 mil. That makes it a strong first pick when you want reliable door treatment and predictable vibration control.
Its strength is simple: it targets panel resonance directly. It is the cleaner choice when the main complaint is a hollow door sound, speaker buzz, or trim vibration. It is not the cheapest route, but it is the most straightforward door solution for buyers who want a premium baseline.
SoundSkins Pro Plus door kit
SoundSkins Pro Plus Door Kit is the layered option. It combines CLD and foam in one package and is listed at 5.6mm total thickness, with 1.6mm butyl and 4mm CCF. That makes it a practical choice when a single-layer mat is not enough.
This kit works best when the cabin has both vibration and some airborne noise. It is easier than building a stack from separate sheets, and that matters for first-time installers who want a cleaner path to a quieter door, rear quarter, or hatch area.
Noico 80 mil
Noico 80 mil is the budget pick in CarAudioNow’s guide. It uses butyl CLD with embossed aluminum foil, and the 80 mil build gives you a solid entry point for doors and trunk panels without paying premium-brand pricing. It is a sensible buy when the goal is basic resonance control.
Choose it when you want the most coverage per dollar and do not need a layered acoustic build. It is still a CLD mat, so it addresses vibration first. For road drone, you may still need foam or MLV later.
Siless Max 120 mil sound deadener
Siless Max 120 mil sound deadener is another strong value option. WheelerZone names it best overall, and it is described as 120 mil thick, about 3mm, with 30 sqft coverage. That makes it attractive for larger coverage jobs where you want a thick CLD layer without moving to a premium price tier.
It fits well for fuller coverage on doors, floors, or trunk panels when the installer wants more material to spread around. The trade-off is simple: more bulk can mean more trimming and more wasted scraps if the cuts are careless.
Car soundproofing decision matrix
Use this matrix to match the noise problem to the material stack. CLD handles resonance. Closed-cell foam separates panels and helps with airborne noise. MLV adds mass for low-frequency blocking. The right stack depends on the area, not on the brand name on the box.
| Noise problem | Vehicle area | Minimum practical coverage | Recommended stack | When a budget kit is enough |
|---|---|---|---|---|
| Door buzz and speaker rattle | Front doors | 10-12 sq ft per door | CLD only, then foam if trim contact is noisy | Yes, if the goal is only resonance control |
| Trunk rattle and hatch buzz | Trunk floor, lid, spare-tire well | About one roll of CLD for the main metal surfaces | CLD + foam | Yes, if the rattle is the main complaint |
| Highway drone | Floor, rear wheel tubs, cargo area | 36-60 sq ft CLD for a full vehicle often; add coverage where drone enters | CLD + foam + MLV | No, a foam-only or CLD-only kit usually leaves drone behind |
| Mixed cabin noise | Doors, floor, trunk, rear quarters | Full-panel priority areas first, then expand | CLD + foam, with MLV in the loudest zones | Only for a partial fix |
CarAudioNow says doors typically need about 10-12 sq ft of CLD per door, a full vehicle often needs 36-60 sq ft, and 25-60% coverage can be enough on a flat panel. That last number matters. You do not need to carpet every square inch to get a useful result.
How much sound deadening do you need?
Coverage is the part most buyers misjudge. A door can be quiet with 10-12 sq ft of CLD, while a full car can take 36-60 sq ft before the major panels are handled. Flat panels often respond well before full coverage, but the right amount depends on the noise source and how much of the vehicle you are treating.
Per-door square footage
Plan on 10-12 sq ft per door when you want a serious door treatment. That amount usually covers the outer skin and enough inner structure to reduce buzz around speakers and latch areas. A front pair can therefore take a meaningful chunk of a kit very quickly.
Trunk and hatch coverage
Trunk work can use less than a full cabin job, but it is easy to underbuy. The lid, floor, and spare-tire well often need enough coverage to calm rattles and ringing metal. If the rear cargo area is the loudest part of the car, do not stop at the lid alone.
Full-car coverage ranges
A full vehicle often needs 36-60 sq ft of CLD, and that is before foam or MLV enters the plan. SUVs and vans usually sit toward the higher end because they have more sheet metal and more trim surfaces. If the goal is broad quiet, buy for the whole job, not one panel.
Waste factor and trim overlap
Expect some waste from cutouts, curves, and seam overlap. A practical buying margin matters because imperfect cuts and small voids can shrink usable coverage. Suppose a front door has a large inner opening and wiring clips in the way; you may lose several square inches to trimming before the last panel is covered.
Which material should you buy?
Buy the material that matches the symptom. CLD is for vibration. Closed-cell foam is for decoupling and some airborne noise control. MLV is for mass and low-frequency blocking. If you buy only one layer for a vibration problem, choose butyl CLD. If you need real road-noise reduction, plan a stack.
Butyl CLD mat
Butyl CLD sound deadening mat is the first layer for doors, floors, trunks, and roofs when your problem is resonance. Most versions use an aluminum constraining layer and are commonly said to fall in the 65-120 mil range. The job is to stop metal panels from acting like speakers.
It is the right first buy for speaker mounts, outer door skins, and trunk lids. It is also the best choice when you want to quiet rattles without adding much complexity. This is the layer that changes the panel itself.
Closed-cell foam decoupler
Closed-cell foam decoupler goes after CLD. It separates panels, reduces contact noise, and helps block some airborne sound. Most closed-cell foam options are commonly about 4mm to 7mm thick. It does not replace CLD, because it does not stop the panel from vibrating in the first place.
Use it where trim touches metal, where a door card can buzz against the shell, or where you want a second layer under carpet and trim. Foam-only kits often disappoint on road drone because the frequency problem is lower and stronger than the foam can handle by itself.
Mass-loaded vinyl
Mass-loaded vinyl is the low-frequency blocking layer. It goes after CLD and foam, and it adds mass for road noise reduction. It is the most relevant layer for steady hum, tire roar, and the deeper parts of highway drone that a thin pad cannot fully stop.
MLV is heavier and more demanding to install than CLD or foam. Use it where the noise path is strongest, such as floors, rear cargo areas, and wheel tubs. If you are only fighting door buzz, MLV is usually more than you need.
All-in-one layered kits
All-in-one kits make sense when you want a simpler install path and your cabin has mixed noise. SoundSkins Pro Plus is the clearest example here because it combines CLD and foam in one package. That does not replace MLV for severe road drone, but it covers more than a single-layer mat.
Picture a compact SUV with door buzz, a bit of hatch rattle, and a constant tire hum on coarse asphalt. A CLD-only kit may fix the buzz and leave the hum. A layered kit gets closer to the whole problem with fewer separate purchases.
Clean metal first, then apply the right layer in the right order. Use isopropyl alcohol to remove oils and dust, press the mat down with a roller, and focus on flat, resonant areas before chasing every small corner. Good adhesion matters more than guessing at maximum thickness.
- Remove trim, wipe the panel with isopropyl alcohol, and let it dry fully.
- Cut CLD into manageable sections and apply it to the largest flat metal areas first.
- Roll each piece firmly so the adhesive bonds across the whole sheet.
- Add closed-cell foam over the CLD where trim or panels can touch.
- Install MLV only where low-frequency road noise is still coming through.
- Recheck clips and fasteners before the trim goes back on.
A common first-timer mistake is rushing the prep work in a cold garage. If the panel is dirty or the adhesive is chilled, the mat can lift at the edges later. That failure leaves you with dead spots, loose corners, and less noise control than the box promised.
Frequently asked questions
What is the best car soundproofing kit for road noise?
For road noise, the best result usually comes from a layered build, not a single thick mat. Start with butyl CLD, add closed-cell foam, and use MLV where the floor and cargo area carry the most low-frequency hum. SoundSkins Pro Plus is a good shortcut when you want one package.
Which sound deadening material works best for car doors?
Butyl CLD works best for car doors because doors ring, flex, and vibrate. That material damps the panel itself, which is the main issue behind speaker buzz and hollow door noise. Foam can help after that, but it should not be the first layer for resonance control.
How much sound deadening do I need for doors and trunk?
Use 10-12 sq ft per door as the practical planning number, then budget extra for trunk panels, the lid, and the spare-tire well. If you want a larger chunk of the cabin treated, a full vehicle often needs 36-60 sq ft of CLD before foam or MLV is added.
Should I use butyl mat, foam, or mass-loaded vinyl?
Use butyl mat for vibration, foam for decoupling and some airborne noise, and MLV for low-frequency blocking. If you are fixing a buzzing panel, buy CLD first. If the complaint is tire roar or highway drone, a layered stack is the better answer.
Is a cheap soundproofing mat worth it for a car?
A cheap mat can be worth it when the goal is basic panel damping on doors or a trunk lid. It is less convincing when the noise is mostly low-frequency drone, because coverage and layer design matter more there. Cheap is fine for simple jobs, not for every problem.
What are the most common mistakes when installing car soundproofing?
The biggest mistakes are poor surface prep, weak roller pressure, underbuying coverage, and using foam where CLD or MLV is actually needed. Dirty metal can cause adhesive lift. Cold-weather installs can also bond poorly. Wrong material choice wastes money even if the install looks neat.
Products related to this article
Sponsored / affiliate links. As an Amazon Associate I earn from qualifying purchases. I may earn additional commission from eligible campaigns.