Ford 4.6 Belt Diagram Without AC: Routing, Tensioner, and Step-by-Step Swap
You pop the hood on your Ford F-150 or Explorer with the 4.6L V8, and the serpentine belt is shredded or squealing. The old belt came off before you thought to sketch the routing. Now you’re staring at a maze of pulleys and no AC compressor to anchor the path. That’s a common spot to be in, especially if someone before you deleted the AC or the compressor is seized and you’re bypassing it temporarily.
This guide gives you the exact belt routing for a Ford 4.6 without AC, plus the tensioner release procedure and the torque specs that matter. You’ll also see the common mistakes that cost people an afternoon. By the end, you’ll have the belt back on and the engine running without throwing a code or a belt across the shop floor.
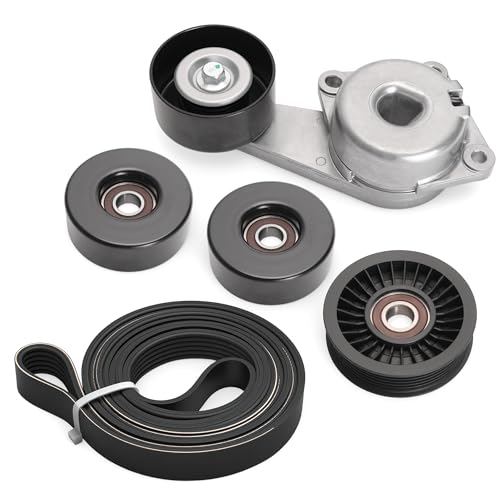
JAVOUKA
Belt Tensioner Serpentine Belt Idler Pulley Kit…
- ▶Compatible Model--- Compatible with Ford Expedition V8 5.4L Flex Fuel 2009-2014, Compatible with Ford Explorer V8 4.6L 2006-2010,…
- ▶Compatible Model--- Compatible with Ford F150 Truck V8 5.4L 2005, Compatible with Ford F150 Truck V8 5.4L with Air Conditioning 2…
- ▶Interchange OE Part Number--- Drive Belt Component Kit replace# 38274, 1L2Z6B209AA, 1L2E6B209CB, 1L2E6B209CC, 1L2Z6B209AA, 191118…
Let’s get the routing straight first, then we’ll talk about doing the swap the right way.
Before you start, check the pulleys for wear. A worn idler or tensioner will kill a new belt fast. If any pulley feels rough or noisy when spun by hand, replace it while you’re in there. A kit like the JAVOUKA Belt Tensioner and Idler Pulley Kit covers the tensioner and idler in one shot, which saves you from doing this job twice. It’s built to match the factory parts for the 4.6L and 5.4L Ford engines, so you get a clean replacement without hunting down separate pieces.
Why the Routing Is Different Without AC
The 4.6L modular V8 uses a single serpentine belt to drive the alternator, water pump, power steering pump, and (when equipped) the AC compressor. The factory belt routing assumes the AC compressor is present and takes a specific path around it. When the AC is removed or bypassed, the belt has to skip that pulley entirely, which changes the wrap angle on the other pulleys.
On most 4.6L applications, the AC compressor sits on the passenger side, low on the engine. Without it, the belt runs straight from the crankshaft pulley to the idler pulley, then up to the alternator. This shorter path means the belt length changes. You can’t just take the old belt and stretch it over fewer pulleys; the belt will be too long and won’t have enough tension.
Ford never shipped a factory 4.6 without AC in most trucks and SUVs, so there’s no official dealership diagram for a no-AC setup. The routing below comes from real-world experience and matches what you’ll find on forums and in repair manuals for bypassed systems.
Exact Belt Routing for Ford 4.6 Without AC
Here’s the step-by-step path the belt takes on a 4.6L V8 with the AC compressor removed or bypassed. This applies to the 2-valve and 3-valve versions found in F-150 (2026-2026), Explorer (2026-2026), and Expedition (up to 2026). The routing is the same for all of them.
- Crankshaft pulley – the main drive pulley at the bottom center of the engine.
- Water pump pulley – sits above the crankshaft, slightly to the driver’s side.
- Idler pulley – located near the top, driver’s side, between the water pump and the alternator.
- Alternator pulley – top, driver’s side, the largest of the accessory pulleys.
- Power steering pump pulley – on the passenger side, just below the alternator.
- Tensioner pulley – the spring-loaded pulley on the passenger side, down low. This is the last pulley the belt wraps before returning to the crankshaft.
The belt path is: crankshaft → water pump → idler → alternator → power steering → tensioner → back to crankshaft. No AC compressor in the loop.
Belt length: you’ll need a belt about 1.5 to 2 inches shorter than the original AC-equipped belt. For the 4.6L, a common replacement is a 6-rib belt with a length around 80 to 82 inches. Check the old belt’s part number or measure the path with a string to be precise.
How to Release the Tensioner and Install the Belt
The tensioner on the 4.6L is a spring-loaded arm with a 3/8-inch square hole for a ratchet or breaker bar. Here’s the process:
- Locate the tensioner – it’s on the passenger side, down low, with a pulley that rides against the belt.
- Insert a 3/8-inch ratchet or a breaker bar into the square hole on the tensioner arm.
- Rotate the tensioner clockwise (toward the front of the engine) to release tension on the belt. This compresses the spring and moves the pulley out of the way.
- Slide the old belt off the pulleys. Let the tensioner back slowly, not letting it snap.
- Route the new belt following the diagram above, but leave the tensioner for last.
- Pull the tensioner again with the ratchet, slip the belt over the tensioner pulley, and release the arm slowly.
- Double-check that the belt is seated in every groove on every pulley. A misaligned belt will chirp or flip off within minutes.
Pro tip: use a paint pen or chalk to mark the back of the belt with an arrow showing the direction of rotation. That makes it obvious if you accidentally route it backwards (though the belt is symmetrical, so it doesn’t matter, but it helps you confirm the path).
Torque for the tensioner bolt is 35 ft-lb if you’re replacing the tensioner itself. The idler pulley bolt is 18 ft-lb. Don’t over-tighten; the aluminum bracket threads strip easily.
Belt Length and Tensioner Travel
When you bypass the AC, the belt length changes, and the tensioner arm has to be within its travel range to maintain proper tension. If the belt is too long, the tensioner will bottom out and the belt will slip. If it’s too short, the tensioner will be at its maximum extension and the bearings will be under extra load.
Measure the belt path with a piece of string or a tape measure after you’ve removed the AC compressor. Add about 1 inch to that measurement to account for the tensioner’s range. A belt that’s too tight will cause a whine, especially at cold start.
For most 4.6L applications, a belt with a length of 80.5 inches works when the AC is removed. But always measure your specific setup. The year and model can shift the accessory layout slightly.
Comparing Replacement Options: Full Kit vs. Individual Parts
When you’re doing this job, you have two main approaches: buy just the belt, or buy a kit that includes the tensioner and idler pulley. Here’s a breakdown of how they compare.
| Approach | What’s Included | Pros | Cons |
|---|---|---|---|
| Belt only | One serpentine belt | Cheapest option; quick fix if pulleys are fine | Won’t fix a failing tensioner or noisy idler; risk of repeat failure |
| Tensioner + idler kit | Tensioner assembly, idler pulley, sometimes bolts | Replaces the two most common wear items; eliminates squeaks and wobble; you’re already in there | Costs more upfront; may require extra time to swap parts |
| Full accessory kit | Belt, tensioner, idler, sometimes power steering pulley | Everything at once; no future surprises | Higher cost; some parts may be unnecessary if they’re still good |
My opinion: if the engine has over 100,000 miles and you don’t know when the tensioner was last replaced, buy the kit. The tensioner spring weakens with heat and time, and a weak tensioner lets the belt slip, which overheats the belt and causes it to crack. The JAVOUKA kit covers the tensioner and idler, which are the two parts that actually fail. Pair that with a new belt and you’re set for another 60,000 miles.
Common Mistakes and How to Avoid Them
1. Reusing the Old Belt
If the belt is cracked, glazed, or has missing ribs, don’t put it back on. A belt that’s been run on a misaligned pulley will fail again quickly. New belts are cheap insurance.
2. Routing the Belt Wrong on the Idler
The idler pulley on the 4.6L is smooth (no grooves) and the belt rides on the back side of it. If you route the belt with the grooved side against the idler, it will squeal and wear unevenly. Double-check the diagram before you tension.
3. Forgetting to Check the Tensioner Travel
After you install the belt, the tensioner arm should sit roughly in the middle of its travel. If it’s at the extreme end, the belt length is wrong. This is the number one cause of belt noise after a bypass job.
Frequently Asked Questions
What belt length do I need for a Ford 4.6 without AC?
Measure the actual belt path with a string. For most 4.6L trucks and SUVs with the AC removed, a belt around 80.5 inches works. Confirm with your local parts store using your VIN and noting the AC delete.
Can I just bypass the AC compressor without removing it?
Yes, but you need a shorter belt that skips the compressor pulley. The compressor pulley still spins freely if the clutch is engaged, but if it’s seized, you’ll need to remove the compressor or at least the pulley to avoid belt damage.
How tight should the serpentine belt be on a 4.6?
The tensioner sets the tension automatically. You shouldn’t have to adjust anything manually. If the belt squeals, the tensioner is likely weak or the belt is too long. Check that the belt is seated in all grooves before blaming the tensioner.
What tools do I need to replace the belt on a 4.6?
You’ll need a 3/8-inch drive ratchet or breaker bar for the tensioner, a socket set for the pulleys if you’re replacing them, and a new belt. That’s it. No special serpentine belt tool required.
Why does my new belt squeal after a no-AC routing?
Most likely the belt is misaligned on one of the pulleys, or the tensioner is weak. Check that the belt is in every groove, then check the tensioner arm for play. If the arm moves more than a quarter-inch when you push on it, replace the tensioner.
What to Do Now
- Verify the routing: crankshaft → water pump → idler → alternator → power steering → tensioner.
- Measure the belt path with a string before buying a belt. Don’t guess.
- Inspect all pulleys for wobble or roughness. Replace the tensioner and idler if they show wear.
- Use a 3/8-inch ratchet on the tensioner, rotate clockwise, and never let it snap back.
- Torque the tensioner bolt to 35 ft-lb and the idler bolt to 18 ft-lb.
- After installation, start the engine and check for squeaks. If it squeals, re-check alignment and tensioner travel.
- Keep the old belt as a spare if it’s still in decent shape. It can get you home in a pinch.
If you’re working on a different Ford model, the routing may differ slightly. Check the 2026 Ford Fusion serpentine belt diagram for that platform, or the F-150 undercarriage diagram to see how the accessories sit. The 4.6L and 5.4L share the same belt layout on most trucks, so this guide applies to both. And if you’re dealing with a different engine entirely, the Ford 302 engine diagram might be more relevant.
Getting the belt routed right is a 20-minute job once you’ve done it once. Take your time, measure twice, and you’ll be back on the road without the screech.
Products related to this article
Sponsored / affiliate links. As an Amazon Associate I earn from qualifying purchases. I may earn additional commission from eligible campaigns.