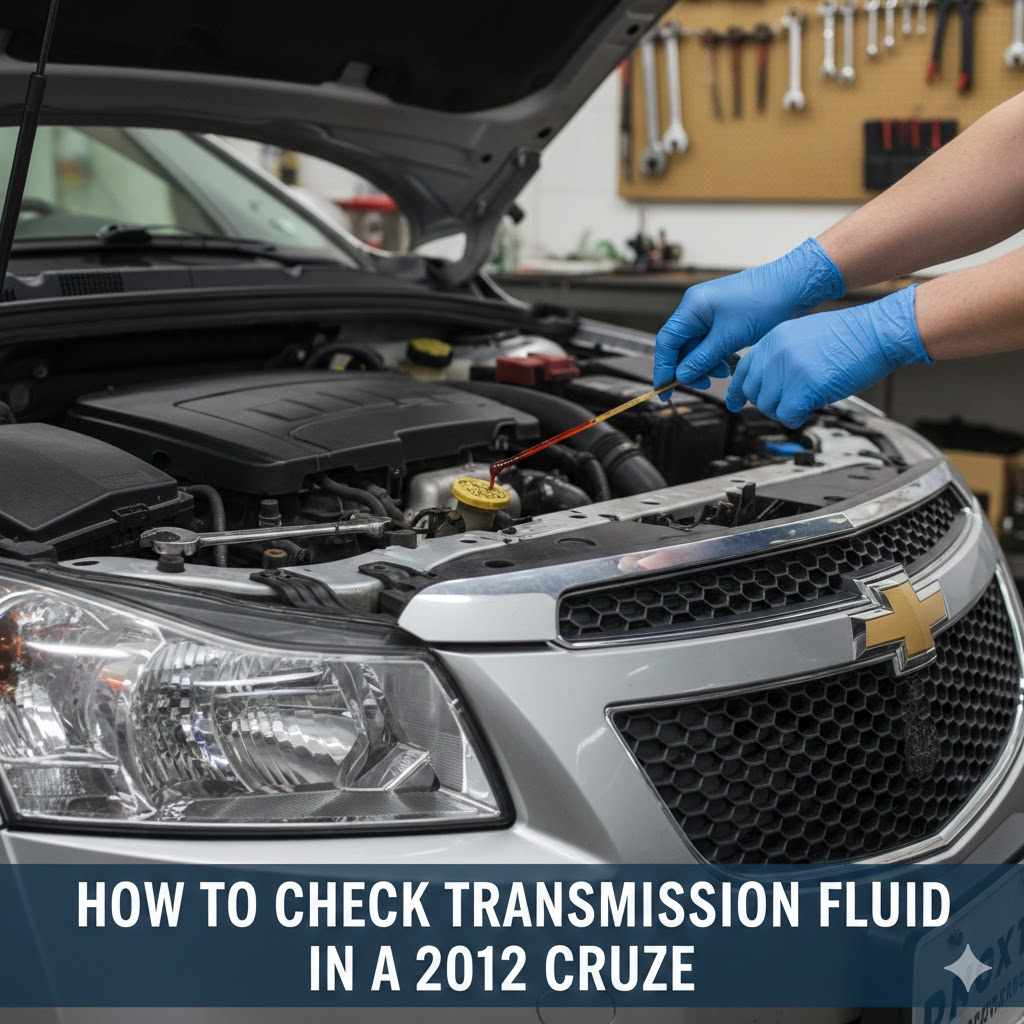
How to Check Transmission Fluid in a 2012 Cruze
Many car owners wonder How to Check Transmission Fluid in 2012 Cruze. It might seem like a big job, especially if you’re new to car care. Some people find it tricky because they’re not sure where to look or what to do.
But don’t worry! We’ll walk you through it step by step. This guide makes checking your transmission fluid easy to do yourself.
Get ready to learn how to keep your car running smoothly.
Checking Your 2012 Cruze Transmission Fluid
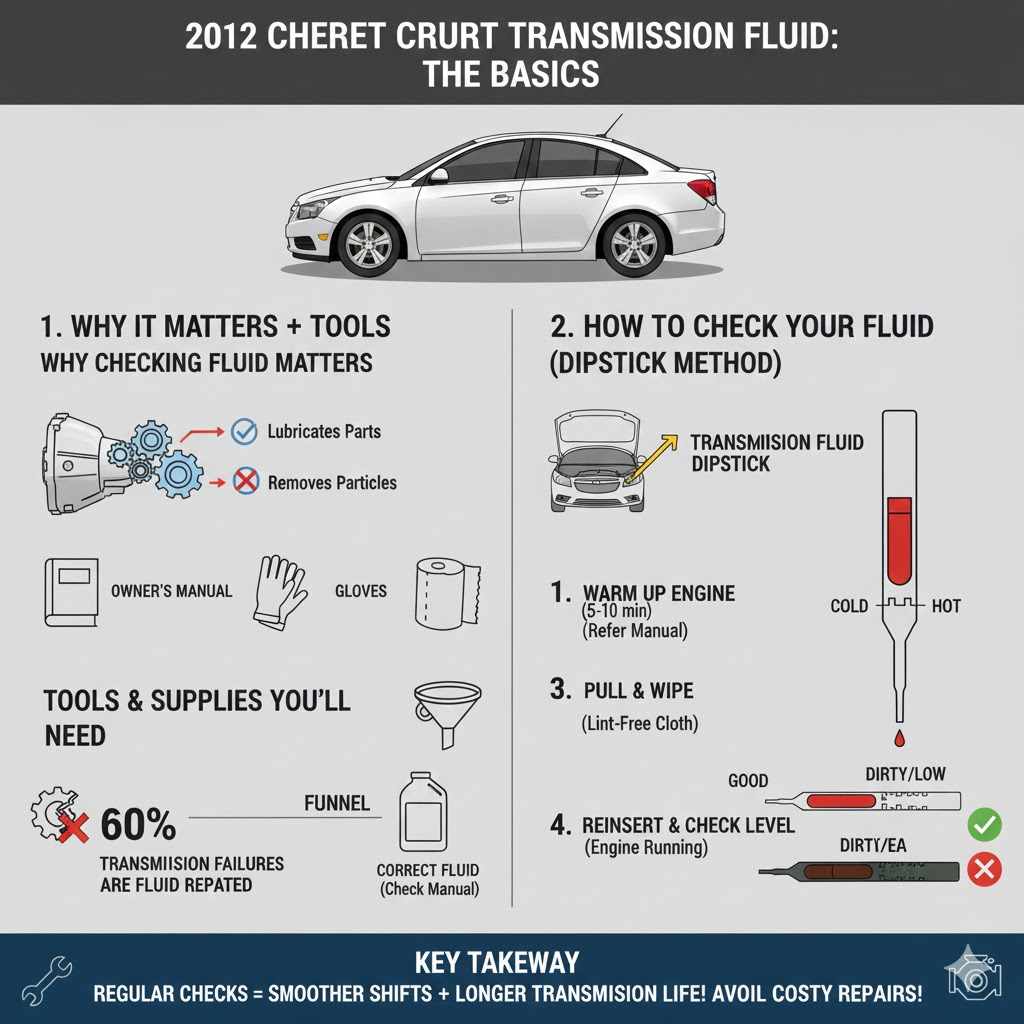
Knowing how to check your transmission fluid is important for keeping your 2012 Chevrolet Cruze running well. Transmission fluid helps your gears shift smoothly and keeps the transmission from overheating. If the fluid is low or dirty, it can cause problems.
This section will cover why this check is vital, what you’ll need, and the basic steps involved. It’s a simple maintenance task that can save you from bigger repair bills down the road. We will break down the process into easy-to-follow parts.
Why Checking Transmission Fluid Matters
Transmission fluid acts like the blood of your car’s transmission system. It lubricates moving parts, which reduces wear and tear. It also helps to cool the transmission, preventing it from getting too hot.
Furthermore, fluid carries away small metal particles that can build up over time. Keeping the fluid at the right level and in good condition is key to a long-lasting transmission. Low fluid can lead to slipping gears, rough shifting, and costly damage.
Dirty fluid can mean worn-out parts are circulating, damaging other components.
A transmission rebuild can cost thousands of dollars. Regular checks can help prevent this. For instance, one study showed that over 60% of automatic transmission failures were due to fluid-related issues like low levels or contamination.
By simply checking your fluid, you can catch problems early.
Tools and Supplies You’ll Need
You won’t need many specialized tools for this task. Most of what you need is readily available at an auto parts store or even your home. Having the right items makes the job smoother and less messy.
It ensures you can get an accurate reading.
- Owner’s Manual
Your car’s owner’s manual is the best source for specific information about your 2012 Cruze. It will tell you the type of transmission fluid recommended and the exact location of the dipstick, if your model has one accessible. It also provides important safety warnings and procedures.
Always refer to this first.
- Gloves
Working on a car can be messy. Gloves will protect your hands from grease and grime. Nitrile gloves are a good choice because they are durable and offer good grip.
They also prevent skin contact with any chemicals in the fluid.
- Clean Rags or Paper Towels
You’ll need these to wipe the dipstick clean and to clean up any spills. Make sure they are lint-free to avoid leaving debris on the dipstick. Lint can give a false reading or contaminate the fluid.
- Funnel (if adding fluid)
If you find your fluid is low, you’ll need a funnel to add more. Make sure it’s clean and fits the transmission fluid reservoir opening. Using a dirty funnel can introduce contaminants into your transmission.
This is crucial. Your owner’s manual will specify the exact type of transmission fluid your 2012 Cruze needs. Using the wrong type can cause serious damage.
Common types include Dexron VI or equivalent fluids for many GM vehicles. Always verify what your manual recommends.
General Steps for Checking Transmission Fluid
Before you start, remember that not all cars have an easily accessible transmission fluid dipstick. Some modern vehicles have sealed transmissions or require a specific procedure. However, many 2012 models do.
The general process involves warming up the engine, locating the dipstick, checking the level, and inspecting the fluid’s condition. We’ll cover the common accessible dipstick method here.
It’s important to follow the steps precisely. This ensures you get an accurate reading. An inaccurate reading can lead to overfilling or underfilling.
Both can harm your transmission.
Detailed Guide How to Check Transmission Fluid in 2012 Cruze
This section provides a detailed, step-by-step walkthrough for checking the transmission fluid in your 2012 Chevrolet Cruze. We’ll cover preparation, the actual checking process, and what to do if the fluid is low or appears dirty. This guide assumes your 2012 Cruze has an accessible transmission fluid dipstick, which is common for this model year.
If you’re unsure, consult your owner’s manual or a professional mechanic.
Step 1 Prepare Your Vehicle
Proper preparation is key to getting an accurate reading. This involves warming up the engine and ensuring the car is on a level surface. These conditions help the transmission fluid circulate properly and settle to give a true measurement.
Warm Up the Engine
Transmission fluid levels are typically checked when the transmission is hot. This is because fluid expands when it heats up. Start your 2012 Cruze and let it run for about 10-15 minutes.
You can drive it around the block. This will bring the transmission fluid up to its normal operating temperature. A transmission that is too cold or too hot will give an inaccurate reading.
So, this step is quite important.
Park on a Level Surface
The car must be on a perfectly flat surface. If the car is on a slope, the fluid will pool unevenly. This will lead to a false reading on the dipstick.
Make sure the parking brake is engaged for safety. Having a level surface is as critical as having the engine warm.
Step 2 Locate the Transmission Fluid Dipstick
Finding the transmission fluid dipstick is the next crucial step. Its location can vary slightly, but it’s usually near the engine. It’s often a different color from the engine oil dipstick.
Identifying the Transmission Dipstick
The transmission dipstick is typically longer than the engine oil dipstick. It often has a red or yellow handle. The engine oil dipstick is usually black or orange.
Look for markings on the handle that might say “Transmission” or have a gear symbol. If you can’t find it, your owner’s manual is the best resource. It will have diagrams showing its exact location.
Some vehicles have a fill plug instead of a dipstick. If your 2012 Cruze doesn’t have a visible dipstick, you might have a sealed transmission. In this case, checking the fluid requires a different procedure, often involving a specific fill plug and level checking port.
Always verify with your manual.
Step 3 Check the Transmission Fluid Level
Once you’ve located the dipstick, you can proceed with checking the fluid level. This is a straightforward process but requires careful attention to detail.
Remove and Wipe the Dipstick
Gently pull the transmission fluid dipstick straight out. Be prepared for a small amount of fluid to come with it. Use a clean rag or paper towel to wipe the dipstick completely clean.
Ensure all fluid and any debris are removed from both sides of the dipstick.
Wiping it clean ensures you get a precise mark of the fluid level. Any residual fluid from previous checks can mislead you about the current level. This step is simple but vital for accuracy.
Reinsert and Remove the Dipstick
Carefully push the clean dipstick all the way back into its tube. Make sure it seats completely. Then, pull it out again slowly.
Hold it horizontally so you can see the fluid level markings.
The dipstick will have markings for “Cold,” “Hot,” “Full,” or specific lines indicating the correct range. Examine where the fluid level falls on these markings. This is the most important part of the check.
Read the Fluid Level
Look at the end of the dipstick. You will see two sets of marks, usually one for a cold engine and one for a hot engine. Since you warmed up the engine, you should be looking at the “Hot” markings.
The fluid level should be between the two “Hot” marks. If it’s below the lower mark, your fluid is low. If it’s above the upper mark, it’s overfilled.
An accurate reading means the fluid should be right in the acceptable range. Neither too high nor too low. This range ensures proper operation without excess pressure or insufficient lubrication.
Step 4 Inspect the Transmission Fluid Condition
Beyond just the level, the color and smell of the transmission fluid tell you a lot about its health. This inspection is as important as checking the level.
Color of the Fluid
Healthy transmission fluid for most automatic transmissions is usually a bright red or pinkish color. It should also appear somewhat translucent. If the fluid looks dark brown or black, it might be old and needs to be changed.
Dark fluid often means it has broken down or is contaminated.
The color change is an indicator that the fluid is degrading. This degradation reduces its ability to lubricate and cool effectively. Therefore, a dark color is a warning sign.
Smell of the Fluid
Give the fluid a gentle sniff. Fresh transmission fluid has a slightly sweet smell. If it smells burnt, like burnt toast, it’s a strong indication that the transmission is overheating or has internal problems.
Burnt fluid means the fluid has broken down due to excessive heat, and this can damage transmission components.
A burnt smell is a critical warning. It means immediate attention is needed. It could signal that parts are rubbing together and causing friction heat.
Step 5 What to Do If Fluid is Low or Dirty
If you discover that your transmission fluid is low or dirty, it’s time to take action. Addressing these issues promptly can prevent more serious and expensive problems later on.
Adding Transmission Fluid
If the fluid level is low, you’ll need to add more. Ensure you have the correct type of transmission fluid specified in your owner’s manual. Never guess or use a generic fluid if a specific type is recommended.
Add the fluid slowly and in small increments, about a quarter of a quart at a time. Recheck the level after each addition.
Overfilling is just as bad, if not worse, than underfilling. Too much fluid can cause the transmission to aerate, creating bubbles. This reduces its lubricating properties and can lead to foaming, which may cause slipping and overheating.
The process for adding fluid typically involves locating the transmission fluid fill port. This might be near the dipstick tube or require access from under the vehicle. Consult your manual for its exact location and the correct procedure for your 2012 Cruze.
When to Consider a Transmission Flush or Change
If the fluid is dark brown, black, or smells burnt, it’s likely time for a transmission fluid change or flush. A fluid change involves draining the old fluid and replacing it with new fluid. A flush is a more thorough process that cleans out the transmission system.
Consult a professional mechanic to decide the best course of action for your vehicle.
Many manufacturers recommend changing transmission fluid at specific mileage intervals. Check your owner’s manual for these recommendations. Ignoring old, dirty fluid is a common cause of transmission failure.
A proactive fluid service can extend the life of your transmission significantly.
Understanding Transmission Fluid Issues for Your 2012 Cruze
Beyond the basic check, understanding common transmission fluid issues can help you spot potential problems early. Knowing what to look for and what it means is empowering for any car owner. This section explores some of these common concerns specific to automatic transmission systems in vehicles like the 2012 Cruze.
Common Transmission Fluid Problems
Several things can go wrong with transmission fluid. These issues range from simple low levels to more complex internal damage indicated by the fluid’s condition. Being aware of these problems helps you react appropriately.
- Low Fluid Level
This is perhaps the most common issue. It can be caused by leaks from seals or gaskets, or simply due to evaporation over a very long period. A low fluid level means the transmission isn’t getting enough lubrication.
This leads to increased friction, overheating, and premature wear on gears and clutch packs. Signs include slipping gears, delayed engagement when shifting from park to drive, or a whining noise from the transmission.
- Dirty or Contaminated Fluid
Transmission fluid can become dirty from the normal wear and tear of transmission components. Small metal particles from gears, bearings, and clutches can break off and mix with the fluid. Over time, this debris can clog transmission passages, wear down surfaces, and damage seals.
Contamination can also come from external sources if the system isn’t properly sealed, like water or dirt getting in.
- Burnt Fluid
This is a serious sign. Burnt transmission fluid indicates excessive heat. This heat can be caused by slipping gears, a malfunctioning torque converter, or a clogged transmission cooler.
When fluid burns, its lubricating properties degrade rapidly, and it can become corrosive to transmission parts. A burnt smell is a strong signal that internal damage is likely occurring.
Transmission Fluid Leaks
Leaks are a primary reason for low transmission fluid. Pinpointing a leak is essential for fixing the problem. Leaks can occur from various parts of the transmission system.
Identifying Potential Leak Sources
Leaks often happen around seals and gaskets. These are rubber or composite rings that prevent fluid from escaping where different parts of the transmission connect. Common leak points include the transmission pan gasket, where the transmission connects to the engine (bell housing), or around the axle seals.
You might notice red or brownish fluid spots under your car after it has been parked. The location of these spots can give clues. For example, fluid directly under the transmission pan suggests a pan gasket leak.
A leak at the front of the transmission might point to an input shaft seal issue.
What to Do About Leaks
If you suspect a transmission fluid leak, it’s best to have it checked by a qualified mechanic. While some leaks might be simple fixes like tightening a bolt or replacing a gasket, others can be more complex. Driving with a transmission fluid leak can quickly lead to severe damage and costly repairs.
It’s important to address leaks promptly.
A mechanic can perform a pressure test or use specialized tools to find the exact source of the leak. They will then recommend the appropriate repair. Ignoring a leak is a gamble that can cost you dearly in the long run.
Transmission Fluid Additives
The automotive market offers various transmission fluid additives. These are products that claim to improve fluid performance or fix minor issues. However, their use can be controversial and may not always be beneficial.
Pros and Cons of Additives
Some additives claim to stop leaks, reduce friction, or condition seals. For minor issues, some drivers report positive results. For example, a seal conditioner might help if a minor leak is due to a dried-out seal.
On the other hand, many mechanics advise against using additives. They can sometimes disrupt the delicate balance of the transmission fluid’s chemical makeup. This could lead to new problems or worsen existing ones.
Using the wrong additive can cause damage that outweighs any potential benefit. It’s generally safer to use the manufacturer-recommended fluid and address problems with proper repair.
Statistics on the effectiveness of additives are mixed. Some surveys suggest that less than 10% of mechanics regularly recommend transmission fluid additives for standard maintenance. This points to a general preference for manufacturer-specified fluids and professional repairs for issues.
When to Use Additives (Caution Advised)
If you consider using an additive, do thorough research. Consult your owner’s manual and consider seeking advice from a trusted mechanic. Some additives are designed to work with specific fluid types.
Using an incompatible additive could cause significant damage. For instance, some additives might alter the friction modifiers in the fluid, which are critical for smooth gear changes.
For a 2012 Cruze, it’s usually best to stick to the manufacturer-approved transmission fluid. If you’re experiencing symptoms like rough shifting or minor leaks, it’s often better to have the fluid changed or have the specific part repaired rather than introducing an additive.
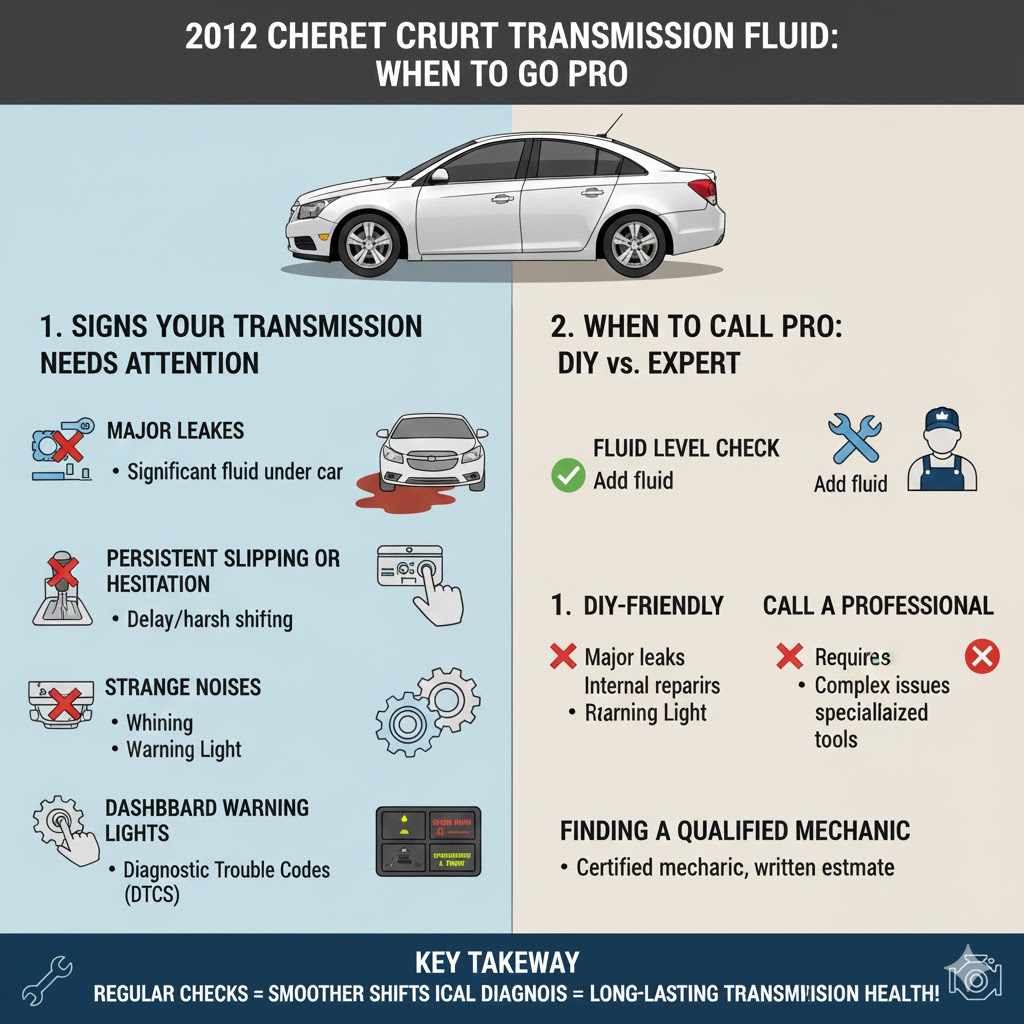
When to Seek Professional Help for Your 2012 Cruze Transmission
While checking transmission fluid is a DIY-friendly task, there are times when professional help is absolutely necessary. Knowing your limits and when to call in an expert can save you a lot of trouble and money.
Signs Your Transmission Needs Professional Attention
Some transmission problems are beyond the scope of basic maintenance. Recognizing these signs is crucial for getting timely repairs and preventing further damage.
- Major Leaks
If you notice a significant amount of fluid leaking under your car, or if the fluid level drops rapidly, it’s a serious issue. Large leaks can drain the transmission’s fluid supply quickly, leading to immediate damage if not addressed. A mechanic can pressure-test the system and pinpoint the source of a substantial leak.
- Persistent Slipping or Hesitation
If your gears slip, or if there’s a noticeable delay or harshness when shifting between gears, it’s a sign of a potential internal problem. This could be due to worn clutch packs, low fluid pressure, or issues with the valve body. These are not issues that additives can fix; they require expert diagnosis and repair.
- Strange Noises
Unusual sounds coming from the transmission, such as grinding, whining, or clunking, are red flags. These noises often indicate that internal components are not functioning correctly. Grinding could mean worn gears, while whining might suggest pump issues or low fluid pressure.
These require a mechanic’s inspection.
- Dashboard Warning Lights
If your transmission warning light or check engine light comes on, don’t ignore it. These lights indicate that the car’s computer has detected a problem within the transmission system. A mechanic can scan the car’s computer for diagnostic trouble codes (DTCs) that point to the specific issue.
DIY vs. Professional Repair
Deciding whether to tackle a transmission issue yourself or take it to a professional depends on the problem’s complexity and your comfort level. Simple fluid level checks and top-offs are usually fine for most owners. However, more complex repairs should be left to experts.
For example, replacing a transmission pan gasket might be a manageable DIY project for some. However, rebuilding or replacing an entire transmission is a highly specialized task. It requires specific tools, knowledge, and experience.
Attempting such a repair without the proper expertise can lead to further damage and increased costs.
Consider the risks involved. If a DIY repair goes wrong, you could end up with a more expensive problem than if you had sought professional help initially. For peace of mind and proper repair, complex transmission issues are best handled by a certified mechanic.
Finding a Qualified Mechanic
If you need professional help, choosing the right mechanic is important. Look for someone who specializes in transmission repair or has a good reputation for working on GM vehicles.
Recommendations from friends or family can be valuable. Online reviews can also offer insights into a shop’s quality of service and customer satisfaction. Always ask for a written estimate before authorizing any work.
A qualified mechanic will explain the problem clearly, discuss repair options, and provide an honest estimate.
Frequently Asked Questions
Question: How often should I check my transmission fluid?
Answer: It’s a good idea to check your transmission fluid every few months or at least twice a year. You should also check it if you notice any changes in how your car shifts or if you hear unusual noises.
Question: What kind of transmission fluid does a 2012 Cruze need?
Answer: Your 2012 Chevrolet Cruze likely requires a specific type of automatic transmission fluid, often Dexron VI or an equivalent. Always confirm the exact specification in your vehicle’s owner’s manual to avoid damage.
Question: Can I use engine oil instead of transmission fluid?
Answer: No, you should never use engine oil in your transmission. Transmission fluid has different properties required for the transmission’s operation, including lubrication and cooling. Using the wrong fluid can cause severe damage.
Question: What if my 2012 Cruze doesn’t have a transmission dipstick?
Answer: Some newer cars have sealed transmissions and do not have a dipstick. If your Cruze lacks one, checking the fluid level is a more involved process that typically requires special tools and procedures. It’s best to have a qualified mechanic handle this for you.
Question: How much transmission fluid should I add if it’s low?
Answer: Add transmission fluid slowly and in small amounts, typically no more than a quarter of a quart at a time. Recheck the fluid level after each addition to avoid overfilling. Always use the recommended fluid type.
Summary
Regularly checking your 2012 Cruze transmission fluid is a key maintenance task. By following these simple steps, you can ensure your car’s transmission stays healthy. Keep an eye on the fluid level and condition.
Address any low levels or signs of damage promptly. This proactive care helps prevent costly repairs and keeps your vehicle running smoothly for years to come.