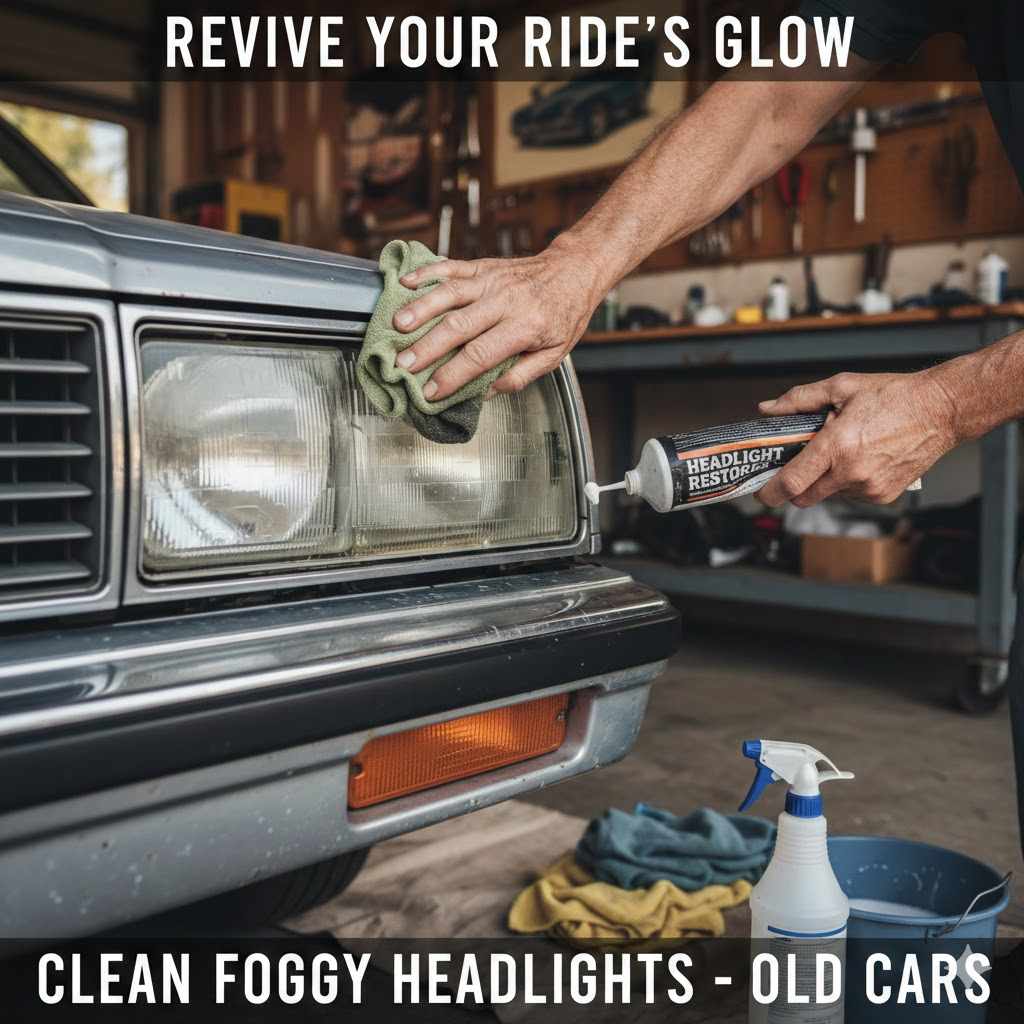
How to Clean Foggy Headlights on Old Cars
Old cars often get foggy headlights, and it can be a real problem. It makes your car look old and, more importantly, makes it harder to see at night. If you’re new to car care, figuring out how to clean foggy headlights on old cars might seem tricky.
But don’t worry! It’s actually a simple fix you can do yourself. This guide will walk you through it step-by-step, so your headlights will be clear and bright again in no time.
Why Your Old Car Headlights Get Foggy
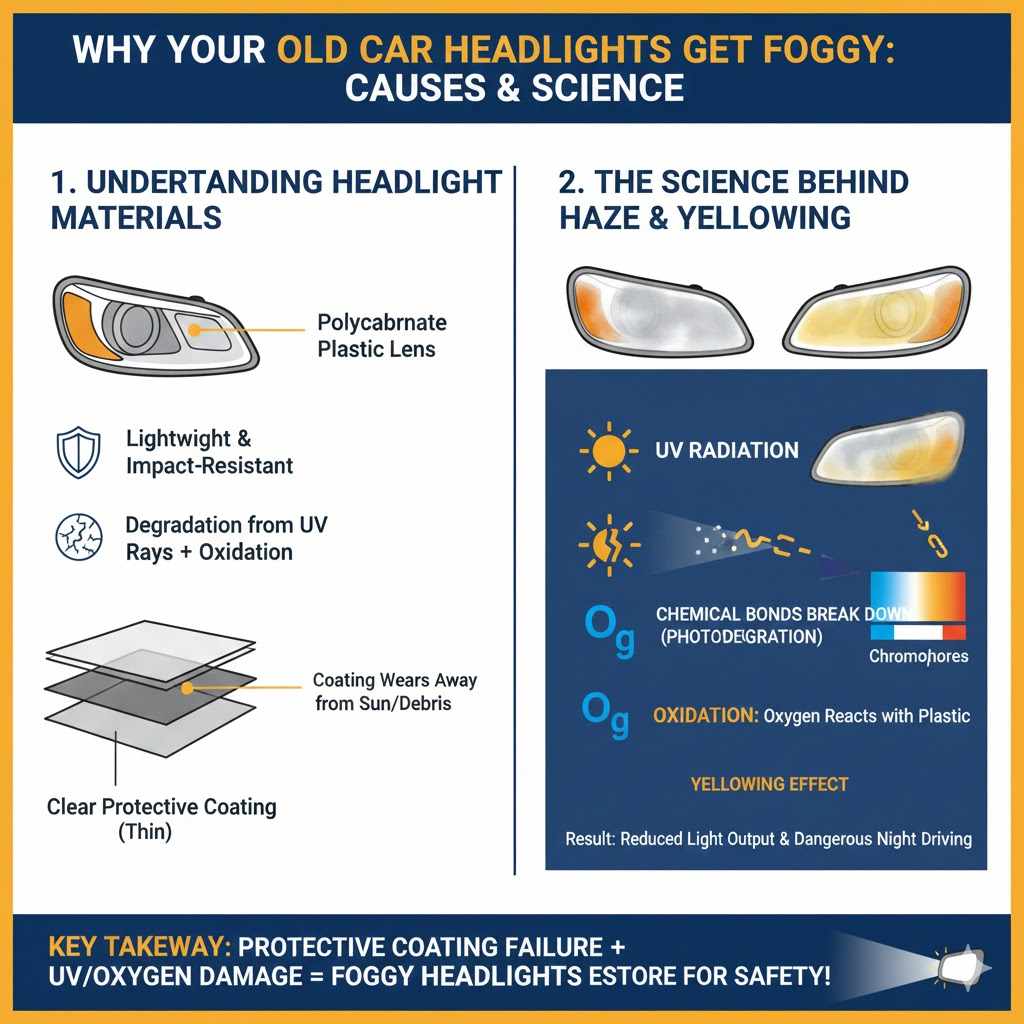
Headlight fogging is a common issue, especially for older vehicles. Over time, the plastic lenses that cover your headlights can become dull and cloudy. This happens because of exposure to sunlight, road grime, and even harsh weather conditions.
The protective coating on the plastic wears away. This leaves the plastic vulnerable to oxidation and yellowing. It’s a natural process that affects almost all cars eventually.
The main reason this is challenging for beginners is the perception that it requires special tools or expertise. Many people think they need to replace the entire headlight assembly, which is expensive. They might also worry about damaging the plastic further.
This guide shows you it’s a manageable DIY project.
Understanding Headlight Materials
Headlight lenses used to be made of glass. However, for decades now, car manufacturers have used polycarbonate plastic. This material is lightweight, impact-resistant, and easier to mold into complex shapes.
These are all good things for car design and safety. But polycarbonate plastic is also more susceptible to degradation from ultraviolet (UV) rays in sunlight. Think of it like your skin getting sunburned.
The UV rays break down the plastic molecules. This causes yellowing and cloudiness. This degradation is what makes the headlights appear foggy or hazy.
The clear outer coating applied by the manufacturer is designed to block these UV rays. It also provides a smooth, shiny surface. However, this coating is thin and can be scratched by car washes, road debris, or even just general wear and tear.
Once the coating is compromised, the polycarbonate underneath starts to break down much faster. This is why older cars, especially those that have spent years exposed to the elements, are prone to this problem.
The fogging isn’t just an aesthetic issue. It significantly reduces the amount of light that can pass through the lens. This means your headlights won’t illuminate the road as effectively.
This can be dangerous for nighttime driving. It can also lead to your car failing safety inspections in some areas. The good news is that this damage is often reversible.
You can restore the clarity of your polycarbonate lenses with some effort.
The Science Behind Haze and Yellowing
The haze and yellowing you see on foggy headlights are a result of chemical changes in the polycarbonate plastic. Ultraviolet (UV) radiation from the sun is a primary culprit. UV rays have enough energy to break the chemical bonds within the polymer chains of the polycarbonate.
This process is called photodegradation. As these bonds break, the plastic’s structure changes. It becomes less transparent and more diffused.
Additionally, the thin, clear coat applied to the headlights is a UV-resistant layer. When this layer gets scratched or wears away, the underlying polycarbonate is directly exposed to the sun. Oxidation also plays a role.
Exposure to oxygen in the air can further contribute to the breakdown of the plastic. Think of it like rust forming on metal, but on a molecular level for plastic. This oxidation creates new chemical compounds on the surface.
These compounds absorb and scatter light differently, leading to that opaque, foggy appearance.
The yellowing effect is often due to the formation of chromophores. These are chemical groups that absorb certain wavelengths of light. When they absorb light, they reflect other wavelengths, which our eyes perceive as color.
In the case of headlights, the breakdown products of polycarbonate can form chromophores that absorb blue and violet light. This leaves the reflected light appearing more yellow or orange. Restoring headlights involves removing the damaged outer layer and then applying a new protective coating to prevent future degradation.
Essential Supplies for Cleaning Foggy Headlights
Before you start, gathering the right supplies is key. You don’t need a mechanic’s garage. Most of these items are readily available at auto parts stores or even your local supermarket.
Having everything ready means you can work efficiently. This prevents the headlights from drying out between steps. It also makes the whole process smoother and less frustrating.
This section will guide you through what you’ll need.
Cleaning Agents and Solvents
You’ll need some basic cleaning agents to start. A good car wash soap or even mild dish soap will work for the initial cleaning. This removes dirt and grime.
For tougher oxidation, you might need a dedicated headlight cleaner. These products are formulated to break down the oxidation layers. Some kits include a cleaner that works in conjunction with the abrasive pads.
Rubbing alcohol (isopropyl alcohol) is also a very useful solvent. It helps to degrease the surface and remove any residue from previous polishes or waxes. It evaporates quickly and leaves a clean surface.
Some people also use WD-40 as a temporary fix or as a cleaner, but it’s not a long-term solution. It can attract dust and dirt, making the problem worse over time. Always opt for products specifically designed for headlight restoration or common household cleaners like alcohol.
A spray bottle filled with a mixture of water and a little bit of soap can be helpful. You can use this to keep the headlight surface wet during sanding. This prevents the sandpaper from clogging and making deep scratches.
It also helps to flush away the plastic dust generated during sanding.
Abrasives for Restoration
This is where the magic happens. You’ll need a range of sandpaper grits. The idea is to start with a coarser grit to remove the damaged layer and then move to finer grits to smooth the surface.
A common progression is to start around 800-grit, then move to 1500-grit, 2000-grit, and sometimes even 3000-grit for a super-fine finish.
Wet/dry sandpaper is best. You’ll be using it with water. This lubricates the surface and reduces the amount of dust created.
It also prevents the sandpaper from clogging up too quickly. You can buy sandpaper sheets or sometimes find them as part of a headlight restoration kit. If you’re buying separate sheets, make sure they are intended for use on plastic or automotive surfaces.
In addition to sandpaper, some kits come with small foam or felt polishing pads. These are used with a polishing compound. They help to achieve a crystal-clear finish.
If you’re not using a kit, a clean microfiber cloth can be used for applying polishes or waxes later.
Protective Sealants and Applicators
Once you’ve sanded the headlight to a clear state, it’s crucial to protect it. Without a protective layer, the plastic will quickly become foggy again, often even faster than before. This is because the UV coating is gone, and the raw plastic is exposed.
Most headlight restoration kits come with a sealant or UV-protective coating. This is often a liquid that you apply and let cure. It forms a new barrier against the sun’s damaging rays.
Some are a one-part application, while others might require multiple steps. Follow the product instructions carefully. Some people use clear coats designed for automotive paint, but these can be tricky to apply evenly and may yellow over time if not UV-stabilized.
For application, you’ll typically need clean microfiber cloths or foam applicators. These should be lint-free. Any dust or debris left on the surface before sealing can get trapped under the coating, ruining the finish.
Ensure you have plenty of clean cloths. You might need different ones for applying the sealant and for wiping away excess. Read the sealant instructions to know if it needs to air dry, cure with UV light (sunlight), or be wiped off after a certain period.
Step-by-Step Guide: How to Clean Foggy Headlights on Old Cars
This is the core of the process. Following these steps carefully will yield the best results. It involves a combination of cleaning, abrasion, and protection.
Take your time with each step. Rushing can lead to less-than-ideal outcomes. This comprehensive method addresses the issue thoroughly, ensuring your headlights look and function better.
Step 1 Preparation and Initial Cleaning
First, park your car in a shaded area. Direct sunlight can cause cleaning solutions and water to dry too quickly. It can also make the plastic too hot to work with.
If you can’t find shade, try to do this early in the morning or late in the afternoon. Clean the area around the headlights. You don’t want dirt and debris getting into your fresh work.
Use masking tape to protect the paint around the headlights. This is very important. You don’t want to accidentally sand or polish your car’s body panels.
Apply the tape carefully, ensuring it covers the edges of the headlight housing.
Next, wash the headlights thoroughly. Use car wash soap and water. You can use a soft sponge or cloth.
Rinse them well. Then, use rubbing alcohol on a clean cloth. Wipe down the entire surface of the headlight lens.
This removes any wax, grease, or contaminants. This ensures that the sanding and polishing steps work effectively. A clean surface is the foundation for good results.
Any remaining dirt could get ground into the plastic. This would make the fogging worse.
You should feel the plastic lens surface with your finger. It will likely feel rough and dull. This is the oxidized layer you need to remove.
Once you’ve taped off the surrounding paint and cleaned the lens, you’re ready for the next stage. This preparation makes all the difference. It’s a small effort for a big payoff in the final look.
Step 2 Wet Sanding the Lenses
Now it’s time to start sanding. Begin with the coarsest grit of sandpaper, usually around 800-grit or 1000-grit. Dip the sandpaper and the headlight lens in water.
You want to keep both wet throughout this process. Start sanding the headlight in a consistent pattern. Go back and forth or in a circular motion.
Apply moderate pressure. Don’t press too hard, or you could damage the plastic. The goal is to remove the yellow, hazy outer layer.
As you sand, you’ll see a white, cloudy residue forming. This is the plastic dust and oxidized material being removed. Keep rinsing the sandpaper and the lens frequently.
This prevents the sandpaper from clogging and removes the residue. After a few minutes of sanding with the coarsest grit, rinse the headlight thoroughly. Wipe it with a clean cloth to see the progress.
The lens should look much clearer, but likely still dull and maybe a bit rough. It will not be perfectly clear yet.
Now, move to the next finer grit of sandpaper, like 1500-grit. Repeat the wet sanding process. Again, keep everything wet and sand in a consistent pattern.
You might notice that the scratches from the previous grit are starting to disappear. After sanding with 1500-grit, rinse and dry the lens. Then, continue with even finer grits, such as 2000-grit and then 3000-grit if you have them.
Each subsequent grit should remove the scratches left by the previous one. The lens will become progressively smoother and clearer.
A key principle here is that each finer grit removes the scratches left by the coarser grit. So, 1500-grit removes the 800-grit scratches. 2000-grit removes the 1500-grit scratches, and so on.
This layered approach is essential for achieving a smooth, optically clear finish. If you skip a grit or don’t sand thoroughly with each one, you’ll be left with visible scratches later. Patience is vital during this stage.
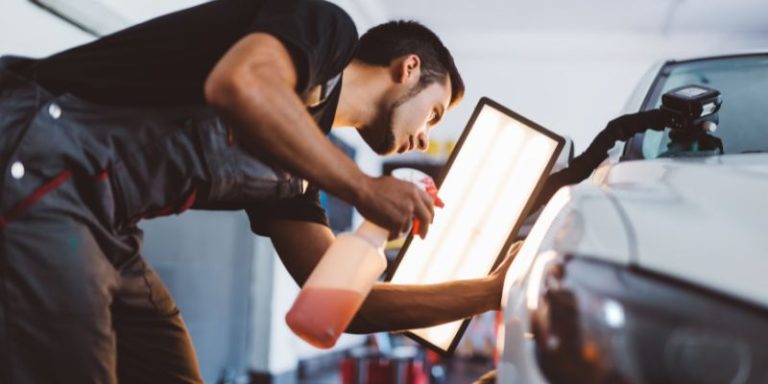
Step 3 Polishing for Clarity
After you’ve finished sanding with your finest grit, the headlight lens will be smooth but likely still a bit hazy. This is where polishing comes in. If you are using a headlight restoration kit, it will likely include a polishing compound.
Apply a small amount of this compound to a clean microfiber cloth or a foam applicator pad. If you don’t have a kit, a plastic polish or even a fine automotive polish can work. Some people have success with toothpaste (non-gel type) as a mild abrasive polish.
Rub the polishing compound onto the headlight lens. Use firm, circular motions. Work the polish over the entire surface.
You’ll start to see the clarity improve significantly. Buff the lens until the haze disappears and the plastic looks clear and shiny. You may need to apply more polish as you go.
Keep buffing until you achieve a smooth, glossy finish. This step fills in any microscopic imperfections left by the fine sanding.
Make sure to buff out any excess polish. A clean microfiber cloth is ideal for this. You want the surface to be perfectly smooth and free of residue.
The difference after polishing should be dramatic. The lens should look almost like new. This clarity is temporary if you don’t seal it, so don’t delay the next step.
This polishing step is crucial for achieving that like-new shine. It smooths out the microscopic abrasions left by the finest sandpaper.
If you’re using a kit, the polish might be designed to work in conjunction with the sealant. In some cases, the polish itself contains some UV protection. Always refer to the specific instructions provided with your chosen product.
The goal here is to create a surface that reflects light cleanly, rather than scattering it diffusely. A well-polished surface is a prerequisite for effective sealing.
Step 4 Applying the UV Protectant Sealant
This is arguably the most important step for longevity. Without a UV protectant, your headlights will turn foggy again very quickly, sometimes within weeks or months. If your kit includes a sealant, apply it exactly as instructed.
Many sealants are liquid or gel and are applied with a lint-free cloth or applicator pad. Some require curing in direct sunlight for a specific period.
Apply a thin, even coat of the sealant over the entire headlight lens. Ensure complete coverage. Avoid getting any on the surrounding trim or paint, as it can be difficult to remove once dried.
Some sealants require multiple coats. If so, wait for the recommended drying time between coats. Read the instructions carefully.
Some are a one-step process, while others might have a wipe-off stage after a few minutes.
The sealant forms a new protective barrier. This barrier will shield the polycarbonate from UV rays and other environmental damage. It will also give the headlight that glossy, crystal-clear look.
After applying the sealant and allowing it to cure according to the product’s directions, you’re done. The difference should be striking. You’ve successfully restored your headlights.
The sealant acts as a sacrificial layer. UV rays will degrade this sealant first, protecting the underlying plastic. This is why regular maintenance and reapplication of sealant might be necessary over time.
Some sealants last longer than others. The lifespan depends on the product quality and environmental exposure. It’s a crucial step to prevent your hard work from being undone by the elements.
Alternative Methods and Tips
While the sanding and polishing method is the most effective, there are some other approaches and helpful tips. These can be useful if you don’t have all the supplies or for minor clouding. However, remember that the comprehensive restoration is usually the most durable solution.
Using Toothpaste as a Mild Abrasive
Toothpaste can sometimes work for very light hazing. Use a non-gel, white toothpaste. Apply a generous amount to a soft cloth.
Rub it onto the foggy headlight in a circular motion. Toothpaste contains very fine abrasives that can buff away minor oxidation. After scrubbing for a few minutes, wipe it clean with a damp cloth.
Then, dry and buff with a clean, dry cloth. This method is best for minor cloudiness and is not as effective as wet sanding for moderate to severe fogging.
It’s a quick fix that many people have tried. The effectiveness depends heavily on the specific toothpaste formulation. Some contain baking soda, which is a mild abrasive.
Others might have pumice. The results are usually temporary. You’ll likely need to reapply it periodically.
It’s a good option if you’re in a pinch and can’t get to an auto parts store immediately.
However, toothpaste does not provide any UV protection. So, even if it clears up the haze temporarily, the underlying plastic is still exposed to the sun. For a lasting solution, you still need to seal the headlights afterwards.
If you use toothpaste, consider applying a dedicated UV sealant after cleaning to protect your work.
The Headlight Restoration Kit Advantage
Headlight restoration kits are designed to be user-friendly. They typically contain all the necessary items, including different grit sandpaper, polishing compound, and a UV sealant. This makes them a convenient choice for beginners.
The instructions are usually clear and easy to follow.
A good kit will guide you through the entire process, from initial cleaning to final protection. The sandpaper grits are pre-selected to work together. The polishing compound and sealant are formulated to be compatible.
This often leads to more consistent and predictable results than trying to piece together supplies from different sources.
While they might cost a bit more than buying individual items, the convenience and guaranteed compatibility can be worth it. Many kits offer excellent results, making your old car’s headlights look brand new. When choosing a kit, read reviews to find one with a good reputation for durability and ease of use.
Preventative Measures
Once your headlights are clean, preventing them from getting foggy again is key. Parking in a garage or under a car cover whenever possible helps. This reduces exposure to direct sunlight and its damaging UV rays.
Washing your car regularly can also help. Keep them clean from dirt and grime.
Applying a spray-on wax or sealant designed for plastic can offer some protection. These products might not last as long as a dedicated headlight sealant, but they can add an extra layer of defense. Reapply these periodically.
Some ceramic spray coatings also offer UV protection for plastic surfaces.
The most effective preventative measure is a high-quality UV sealant applied after restoration. Reapplying this sealant annually or bi-annually, depending on your climate and exposure, will keep your headlights clear for years. Think of it like sunscreen for your headlights.
Regular inspection is also a good idea. Check your headlights periodically for any signs of new hazing or yellowing. Catching it early makes it much easier to address.
A quick touch-up polish or reapplication of sealant might be all that’s needed if you spot issues early on. This proactive approach saves you from having to do a full restoration again.
Real-Life Examples and Scenarios
Seeing how this process works in practice can be very helpful. Here are a few examples of how cleaning foggy headlights can transform a vehicle.
Example 1 A Daily Driver
Sarah drives a 15-year-old sedan. Its headlights were so foggy that driving at night felt unsafe. She bought a popular headlight restoration kit online.
She spent about two hours on a Saturday morning. She followed the instructions carefully: taped off the area, wet sanded with the provided grits, polished, and then applied the UV sealant. The results were amazing.
Her headlights looked brand new, and her night vision improved dramatically. She reported that the clarity lasted for over a year before she reapplied the sealant.
Example 2 A Classic Car Owner
John owns a beloved classic car. The yellowed headlights detracted from its appearance. He was hesitant to use harsh abrasives.
He opted for a slightly more aggressive kit with finer grit papers. After sanding and polishing, he applied a high-end automotive UV coating designed for plastics. The headlights were restored to a crystal-clear finish.
This significantly enhanced the car’s overall look. He found that the superior sealant provided excellent protection, lasting even longer than in Sarah’s case.
Scenario 1 Budget Restoration
You have a budget and want to try the simplest method first. You decide to use toothpaste. You find an old tube of white paste.
You rub it onto your foggy headlights with a cloth. After scrubbing and wiping, you see a slight improvement. Your headlights are a little less foggy, but still not clear.
You realize this is only a temporary fix. You decide to buy a proper restoration kit for a more permanent solution.
Scenario 2 Quick Fix Needed
You have a car inspection tomorrow. Your headlights are quite foggy. You don’t have time for a full restoration.
You remember hearing about using baking soda paste. You mix baking soda with a little water to form a paste. You apply it to the headlights and rub with a damp cloth.
You rinse and dry. The fog is reduced somewhat, enough to pass the inspection. You know you’ll need to do a proper job soon, but for now, it’s enough.
Common Mistakes to Avoid
Even with a good guide, some common mistakes can lead to disappointing results. Being aware of these can help you avoid them and achieve the best possible outcome.
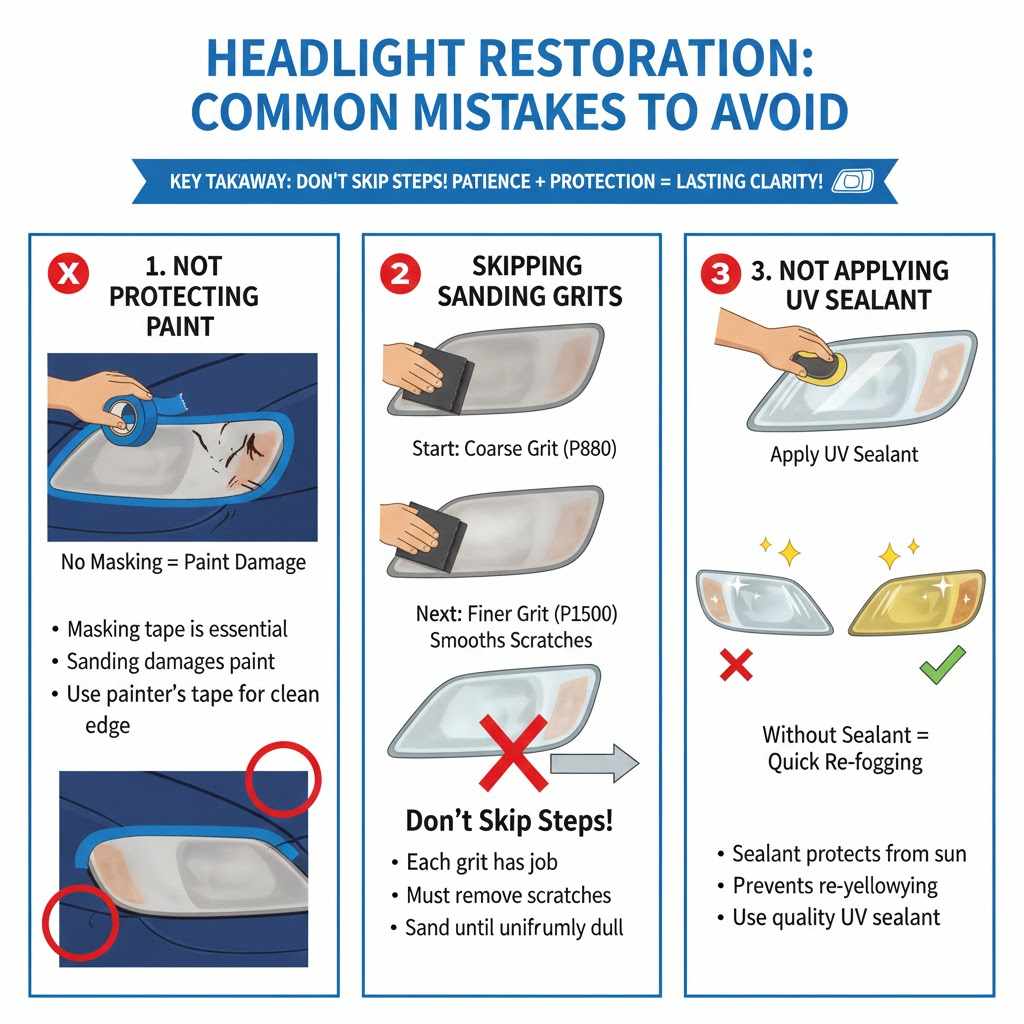
- Not protecting the surrounding paint.Masking tape is essential. If you sand or polish the paint, you can cause permanent damage. Always use painter’s tape to create a clean, defined edge between the headlight and the car’s body.
- Skipping sanding grits or not sanding long enough.Each grit of sandpaper has a job. The coarser grits remove the bulk of the oxidation. The finer grits smooth out the scratches left by the coarser ones.
Skipping a grit means you’ll have visible scratches from the previous step. Ensure you sand until the surface is uniformly dull with each grit before moving to the next.
- Not applying a UV sealant.This is the most common mistake leading to quick re-fogging. The sealant protects the plastic from sun damage. Without it, your efforts will be short-lived.
Always use a quality UV sealant and apply it according to the product instructions.
Frequently Asked Questions
Question: How long does it take to clean foggy headlights?
Answer: It typically takes about 1 to 2 hours to complete the entire process, depending on the severity of the fogging and your experience level.
Question: Can I use a power drill for sanding?
Answer: Yes, many headlight restoration kits come with attachments for a power drill, which can speed up the sanding process. However, use caution and follow the kit’s instructions carefully to avoid overheating or damaging the plastic.
Question: Will cleaning foggy headlights improve my car’s appearance?
Answer: Absolutely. Clear headlights can significantly improve the overall look of your car, making it appear newer and better maintained.
Question: How often should I reapply the UV sealant?
Answer: This can vary, but reapplying the sealant every 6 to 12 months is generally recommended to maintain optimal protection and clarity.
Question: Can I paint over foggy headlights?
Answer: No, painting over foggy headlights is not recommended. Paint will not adhere properly to the degraded plastic, and it will not address the underlying issue, leading to peeling and poor results.
Summary
Restoring foggy headlights on old cars is a doable DIY project. By following a step-by-step process of cleaning, wet sanding with progressively finer grits, polishing, and sealing, you can achieve clear, bright headlights. This not only improves your car’s appearance but also enhances safety.
With the right supplies and a bit of patience, your old car’s headlights can look like new again.