How to Fix Car Hood Latch: Proven Solution
Having trouble opening or closing your car hood? Learn how to fix a car hood latch with this easy, step-by-step guide. We break down common issues and provide you with a proven solution to get your hood latch working smoothly again, saving you time and money on repairs.
It can be really frustrating when your car’s hood won’t open or close properly. You might feel stuck, worried about an inspection, or just annoyed by that stuck latch. But don’t worry! Many hood latch problems are simpler to fix than you think. This guide will walk you through exactly what to do, using clear steps and everyday language. By the end, you’ll have the confidence and knowledge to tackle this common car issue yourself.
Understanding Your Car Hood Latch System
Before we dive into fixing things, it’s helpful to know a bit about how your hood latch works. It’s a pretty clever system designed for safety and convenience. The main job of the hood latch is to keep your hood securely closed while you’re driving, preventing it from flying open unexpectedly. It also has a secondary catch, like a safety belt, to give you an extra layer of security.
When you pull the interior release lever (usually found under the dashboard, near the driver’s side kick panel), a cable runs from that lever to the latch mechanism at the front of your car’s hood. This cable pulls a lever on the latch assembly, releasing the primary catch. You then usually need to activate a secondary release, often a small lever found under the front edge of the hood, to fully pop the hood open. Re-closing the hood simply involves pushing it down until the latch clicks shut.
Key Components of the Hood Latch System:
- Interior Release Lever: The handle inside the car that you pull.
- Release Cable: Connects the interior lever to the hood latch mechanism.
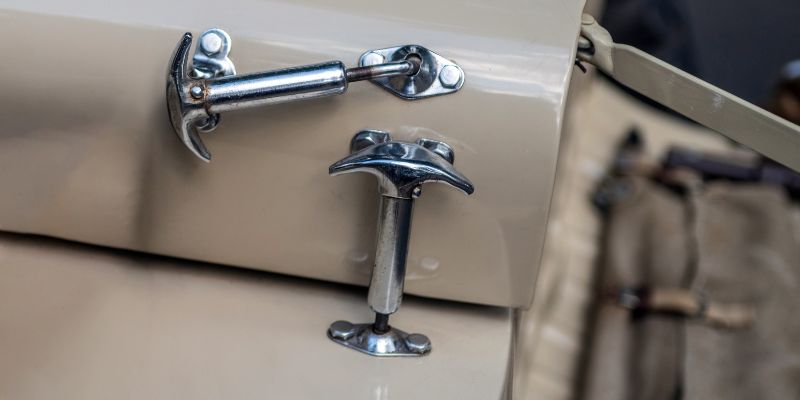
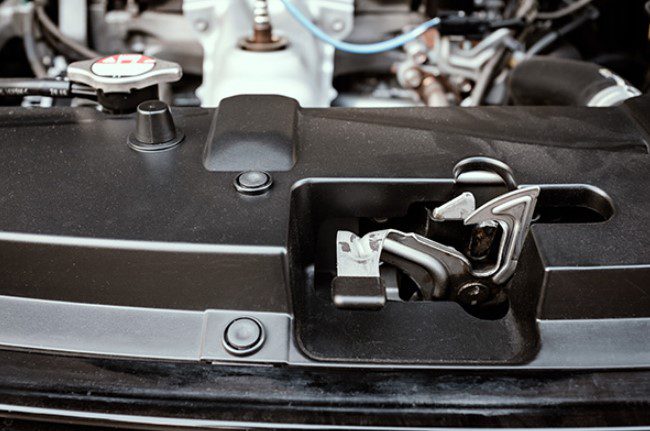
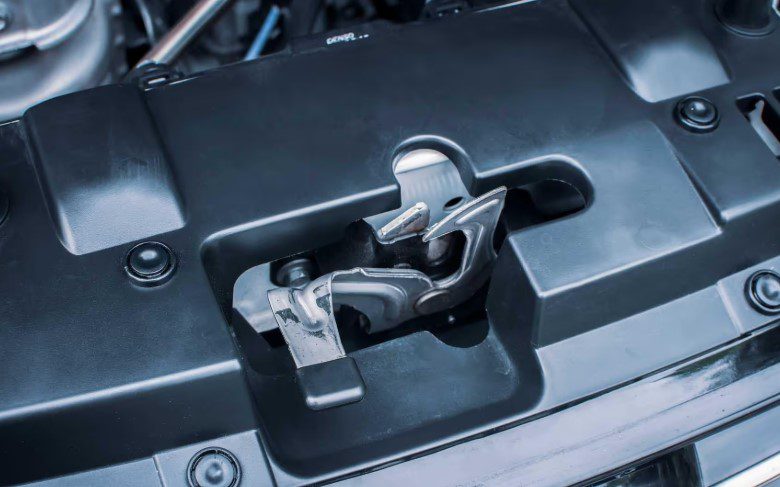
- Hood Latch Mechanism: The part located on the car’s frame (under the front grille or bumper area) that physically holds the hood closed.
- Secondary Release Lever: The safety catch located on the underside of the hood.
- Hood Prop or Gas Struts: These hold the hood open once it’s released.
Most of the time, when a hood latch seems “broken,” it’s usually due to a cable issue, a buildup of dirt and grime, or a slight misalignment. We’ll cover how to address these common culprits.
Common Car Hood Latch Problems and Why They Happen
Let’s talk about the specific issues you might be experiencing. Knowing the symptom can often point us towards the solution.
The most frequent complaints are:
- The hood won’t open when I pull the interior lever.
- The hood opens, but it’s difficult to release or requires excessive force.
- The hood doesn’t latch securely when I close it.
- The interior release lever feels loose or doesn’t have any tension.
Why Do These Problems Occur?
- Corrosion and Grime: Over time, dirt, road salt, and moisture can get into the cables and latch mechanism. This leads to rust and stiffness, making it hard for parts to move freely.
- Stretched or Damaged Cables: The release cable can stretch over time or become frayed due to constant use or damage. If the cable isn’t taut enough or has a kink, it won’t pull the latch effectively.
- Misalignment: If the hood has been damaged or repaired, the latch mechanism might be slightly out of position, making it difficult for it to engage or release properly.
- Lack of Lubrication: Just like any moving part, the hood latch mechanism needs lubrication to work smoothly.
- Broken Components: In rarer cases, the interior lever, the cable itself, or parts of the latch mechanism can break.
The good news is that most of these issues are fixable without needing a trip to the mechanic.
Tools and Supplies You’ll Need
Gathering the right tools before you start makes the process much smoother and safer. You don’t need a mechanic’s workshop for this. Here’s a basic list of what you’ll likely need:
Essential Tools:
- Safety Glasses: Protect your eyes from dirt and debris.
- Gloves: Keep your hands clean and protected.
- Work Light or Flashlight: To see clearly in darker areas under the hood or dashboard.
- Basic Socket or Wrench Set: You might need these if a latch bolt is loose. Check your car’s manual or look up common fastener sizes for your vehicle.
- Pliers (Needle-nose and standard): Useful for gripping and manipulating cables.
- Penetrating Lubricant (like WD-40 or PB Blaster): Crucial for freeing up seized parts.
- White Lithium Grease or Silicone Spray: For lubricating moving parts after cleaning.
- Wire Brush: To clean off rust and grime.
- Car Jack and Jack Stands: If you need to access the underside of the front of the car. Never work under a car supported only by a jack. Always use jack stands. For safety information on lifting vehicles, consult resources from the National Highway Traffic Safety Administration (NHTSA).
- New Hood Latch Cable (Optional): If the cable is severely damaged or stretched, you might need a replacement.
- Screwdrivers (Phillips and Flathead): For removing any trim panels.
Always double-check what your specific vehicle might require. A quick search for “[Your Car Model] hood latch repair” can sometimes reveal specific tool needs.
Diagnosing the Hood Latch Problem: Step-by-Step
Let’s figure out what’s wrong. It’s like being a detective for your car!
Step 1: Check the Interior Release Lever and Cable
Start by checking the lever inside your car.
- Operate the Lever: Pull the release lever. Does it feel normal, loose, or completely stuck?
- Inspect the Cable: Gently try to trace the cable from the lever towards the firewall (the metal wall between the engine and the cabin). Look for any obvious kinks, breaks, or damage.
- Check Cable Tension: With the hood closed, try to move the lever back and forth. If there’s no resistance, the cable might have detached from the lever or the latch.
Step 2: Access the Hood Latch Mechanism
This is where having a helper can be useful. One person can try to operate the interior lever while the other works near the hood latch at the front of the car.
- Open the Hood (If Possible): If the hood is even slightly ajar, try to get a flathead screwdriver or pry tool into the gap to gently work the secondary latch release while someone pulls the interior lever.
-
Access from Below: If the hood is completely stuck, you might need to access the latch area from underneath the front of the car.
- Carefully jack up the front of your vehicle.
- Securely place jack stands under the vehicle’s frame.
- Look for the hood latch mechanism, usually located behind the grille or bumper. You might need to remove a splash shield or undertray for better access (typically held by clips or a few bolts).
- Access from Above (Less Common): Sometimes, you can gain access by removing the grille itself. This will vary greatly by car model.
Step 3: Examine the Hood Latch Itself
Once you can see the latch mechanism:
- Locate the Cable End: Find where the release cable connects to the latch. See if it’s still attached.
- Inspect for Damage: Look for any signs of rust, debris, or bending on the latch.
- Try Manual Release: Some latches have a small lever you can push or pull directly with pliers or a screwdriver to release the latch. If you can manually release it, the cable or lever might be the issue.
Step 4: Test the Secondary Latch
If the hood opens, but not fully:
- Locate the Secondary Latch: Feel around the underside of the front edge of the hood. You’ll find a lever.
- Operate While Releasing: Have someone pull the interior lever while you push or wiggle the secondary latch. It should pop open easily. If it’s stiff, it needs lubrication.
Proven Solutions for a Stuck or Faulty Hood Latch
Now that we’ve identified the likely culprit, let’s get it fixed!
Solution 1: Lubrication and Cleaning (Most Common Fix)
Often, the problem is simply a lack of lubrication and some accumulated dirt.
- Apply Penetrating Lubricant: With the hood still closed (if possible, or accessible), spray a generous amount of penetrating lubricant directly onto the hood latch mechanism and the secondary latch lever. Let it sit for 10-15 minutes to work its way into the moving parts.
- Work the Mechanism: If you can access the latch directly, try to work the lever or any moving parts with pliers or a screwdriver. Try pulling the interior release lever multiple times.
- Clean and Re-lubricate: Once the latch is open and accessible, use a wire brush to clean off any rust or stubborn grime from the latch mechanism. Wipe it down with a rag. Then, apply a more durable lubricant like white lithium grease or silicone spray to all moving parts of the latch. This will protect it from future corrosion and ensure smooth operation.
- Lubricate the Cable Sheath: If you can access the cable where it enters the latch, try spraying lubricant into the end of the sheath.
- Test: Close the hood (it should latch easily now) and then try opening it again.
Solution 2: Fixing a Loose or Detached Cable at the Latch End
If you found the cable has popped off the latch mechanism:
- Re-attach the Cable: The end of the cable usually has a small metal loop or ball that fits into a corresponding slot or hook on the latch lever.
- Use Pliers: Carefully use needle-nose pliers to guide the cable end into its socket on the latch mechanism. You might need to gently bend the bracket holding the cable slightly to get better access, but be careful not to break it.
- Secure if Necessary: Some cables have a small clip or retainer. Ensure this is back in place.
- Test: Operate the interior lever to ensure the cable is now pulling the latch correctly.
Solution 3: Adjusting or Replacing the Hood Latch Cable
If the cable is stretched or the connection is too loose, you might need to adjust the tension or replace the cable.
Adjusting Cable Tension:
Some vehicles have a provision for adjusting cable tension, often at the interior lever or sometimes at the latch itself. This is less common but worth checking your vehicle’s service manual if you suspect this.
Replacing the Hood Latch Cable:
If the cable is frayed, kinked, or visibly stretched and can’t be re-tensioned:
- Purchase the Correct Cable: Get a replacement cable specifically for your car’s make, model, and year. Auto parts stores or online retailers are good sources.
-
Remove the Old Cable:
- Interior End: You’ll likely need to remove trim panels around the interior release lever to detach the old cable end.
- Engine Bay End: You’ll need to unhook the cable from the latch mechanism. It might be held in place by a spring clip or a bracket.
- Firewall Grommet: The tricky part is often pulling the main length of the cable through the firewall. There’s usually a rubber grommet where the cable passes from the cabin to the engine bay. You might need to detach it from the cabin side and pull it through.
-
Install the New Cable:
- Feed the new cable through the firewall grommet from the engine bay into the cabin (or vice-versa, depending on the car).
- Connect the interior end to the release lever assembly.
- Connect the engine bay end to the hood latch mechanism, ensuring it’s securely seated.
- Test: Before closing the hood fully, test the new cable by operating the lever. It should feel taut and release the latch smoothly.
- Reassemble: Reattach any trim panels you removed.
Replacing a cable can be a bit involved, especially getting it routed correctly through the firewall. If you’re not comfortable with this step, it’s a good time to consider a professional.
Solution 4: Aligning the Hood Latch Mechanism
Sometimes, the problem isn’t the cable, but the latch isn’t positioned correctly to meet the striker (the loop on the hood that the latch grabs onto).
- Locate Mounting Bolts: The hood latch assembly is usually bolted to the car’s frame.
- Loosen Bolts: Loosen the bolts holding the latch assembly.
- Adjust and Test Latching: Gently nudge the latch assembly sideways or up/down. Close the hood and see if it latches correctly, and then try to open it. You may need to repeat this several times, making small adjustments to find the sweet spot where the hood latches securely and releases easily.
- Tighten Bolts: Once the alignment is correct, securely tighten the mounting bolts.
Important Tip: When adjusting the latch, it’s helpful to have a partner watch how the hood closes and sits. The goal is to have the hood sit flush with the surrounding body panels when closed.
Tips for Maintaining Your Hood Latch
Preventing problems is always better than fixing them. A little regular maintenance goes a long way.
- Regular Lubrication: Every few months, or at least twice a year, spray a bit of white lithium grease or silicone lubricant onto the hood latch mechanism and the secondary release lever.
- Keep it Clean: Especially after driving in winter conditions with road salt, rinse out the latch area with a hose (avoid high-pressure washing directly at the mechanism) to remove corrosive elements.
- Check Cable Tension: Occasionally, feel the tension on your interior release lever. If it starts feeling loose, it might be time to inspect the cable.
- Listen for the Click: Always ensure you hear a solid “click” when closing the hood, indicating it’s securely latched.
Troubleshooting Table
Here’s a quick reference to help you diagnose.
| Symptom | Likely Cause | Primary Solution |
|---|---|---|
| Interior lever feels loose or floppy. | Cable detached at the latch or lever, or cable stretched. | Re-attach cable, inspect/replace cable, or adjust tension. |
| Interior lever is stiff, won’t pull. | Cable binding due to corrosion/dirt, or latch mechanism seized. | Lubricate cable sheath and latch mechanism. Clean and lubricate latch. |
| Hood won’t fully open (secondary latch still engaged). | Secondary latch is stiff/stuck. | Lubricate secondary latch mechanism. |
| Hood latches, but feels loose and rattles. | Latch mechanism alignment issue or worn striker/latch. | Adjust latch alignment or inspect mounting bolts. |
| Visible damage to interior lever or cable seen. | Component failure. | Replace the affected component (lever or cable). |
This table covers some of the most common scenarios. Remember that specific automotive repair often benefits from consulting your vehicle’s specific repair manual, which you can find online through resources like Edmunds or by checking your local library’s automotive section. These often provide detailed diagrams and procedures.
Frequently Asked Questions (FAQ)
Q1: How much does it typically cost to fix a car hood latch?
A: If you can fix it yourself with lubrication and simple adjustments, it can cost as little as the price of a can of lubricant (around $5-$15). If a new cable needs to be installed professionally, it can range from $10