How to Fix Car Jumped Time: Proven Solution
Don’t panic if your car jumped time! This guide offers a proven, step-by-step solution to get your engine running smoothly again, explained simply for beginners. We’ll cover what this means, common causes, and how to address it safely and effectively.
Ever had that sinking feeling when your car just doesn’t sound right, or worse, refuses to start after a strange noise? It can be incredibly worrying, especially if you’re not a car expert. One issue that can cause these symptoms is your car “jumping time.” This phrase might sound technical, but it essentially means the timing belt or chain that synchronizes your engine’s parts has slipped. When this happens, your engine’s internal components aren’t working together perfectly, leading to poor performance or a no-start situation. Understanding how to fix a car that jumped time can save you a lot of stress and money. This guide will walk you through it, step-by-step, making it easy to understand and tackle.
What Does It Mean for a Car to “Jump Time”?
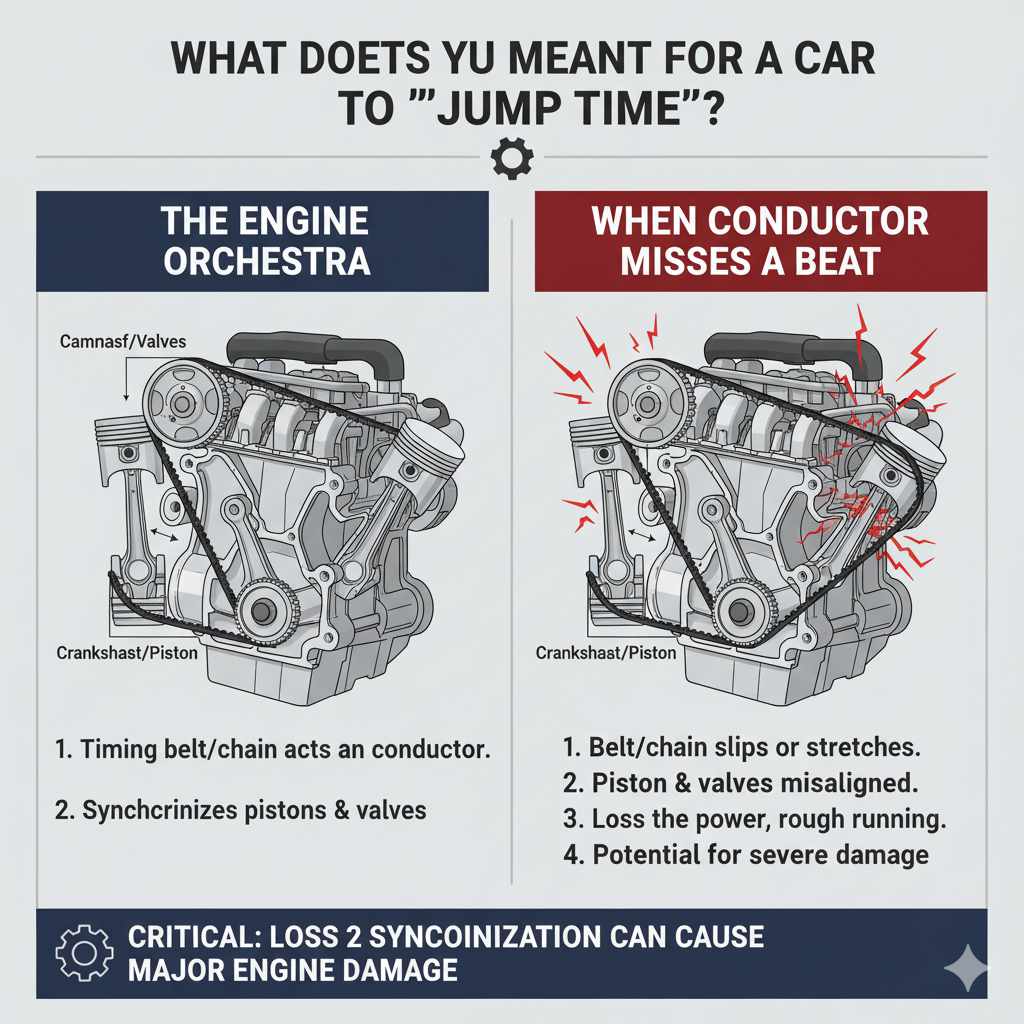
Imagine your car’s engine as a finely tuned orchestra. The timing belt (or chain) is like the conductor, ensuring every instrument—the pistons, valves—plays its part at precisely the right moment. When a car “jumps time,” it means this conductor has missed a beat, or even skipped several. The timing belt or chain has likely stretched, slipped on a pulley, or a tensioner has failed, causing it to be out of sync with the crankshaft and camshaft. This misalignment means the engine’s pistons and valves are no longer opening and closing in the correct sequence. It’s like trying to play a song with notes coming in way too early or too late – it just won’t sound right, and in an engine’s case, it can cause serious damage.
Why Does a Car Jump Time? Common Causes
Several things can lead to your engine jumping time. Understanding these common causes can help you prevent future issues:
- Worn Timing Belt or Chain: Over time, the rubber of a timing belt can degrade, crack, or stretch. Metal timing chains can wear down or stretch. This wear makes them less able to grip the sprockets, allowing them to slip.
- Faulty Tensioner or Idler Pulley: These components keep the timing belt or chain taut. If a tensioner fails or an idler pulley seizes, the belt or chain will lose its proper tension and can skip teeth easily.
- Water Pump Failure: On many cars, the timing belt also drives the water pump. If the water pump bearing seizes, it can abruptly stop the timing belt, causing it to jump or even break.
- Incorrect Installation: If the timing belt or chain was recently replaced and not installed correctly, with the timing marks misaligned, it will jump time or run poorly from the start.
- Age and Mileage: Like any part, timing components have a lifespan. Driving beyond their recommended replacement interval significantly increases the risk of failure. Your car’s owner’s manual or a trusted mechanic can tell you when these parts are typically due for service. For example, many manufacturers recommend replacing a timing belt between 60,000 and 100,000 miles.
Symptoms of a Car That Jumped Time
How do you know if your car has jumped time? Here are some tell-tale signs:
- Engine Misfires or Rough Idling: The most common symptom. The engine runs unevenly, shakes, or feels like it’s sputtering.
- Loss of Power: You’ll notice a significant decrease in acceleration and overall engine performance.
- Check Engine Light: Modern cars have sensors that can detect incorrect engine timing, triggering the “Check Engine” light. The fault codes can often point to camshaft or crankshaft position sensor issues, which are related to timing.
- Popping or Backfiring Sounds: Incorrect combustion can sometimes lead to fuel igniting at the wrong time, causing these unusual noises.
- Engine Won’t Start: In severe cases, if the timing is drastically off, the engine may crank but refuse to fire up.
- Unusual Noises: While not always present, you might hear slapping or rattling noises from the front of the engine where the timing belt or chain is located.
Is Your Engine an “Interference” or “Non-Interference” Type? This is Crucial!
Before we dive into solutions, it’s vital to understand the difference between interference and non-interference engines. This distinction is critical because it determines the potential damage if the timing belt or chain breaks or skips significantly.
- Non-Interference Engine: In these engines, the pistons will not collide with the valves even if the timing belt/chain fails. If the timing belt breaks, the engine will simply stop running, and usually, no internal engine damage occurs.
- Interference Engine: This is where things get serious. In an interference engine, the path of the piston and the valves overlap at certain points in their cycle. If the timing belt breaks or jumps time severely, a piston can slam into an open valve. This collision can bend or break valves, damage pistons, or even damage the cylinder head. This is a much more expensive repair.
How to Find Out: The best way to know if your car has an interference or non-interference engine is to consult your owner’s manual or search online for your specific vehicle’s make, model, and year. Reputable automotive sites like Edmunds or repair manuals will often provide this information.
Tools and Materials You Might Need
To tackle this job, you’ll need a good set of tools and potentially some specialized items. It’s always better to be prepared!
| Tool/Material | Description/Purpose |
|---|---|
| Socket Set & Ratchet | For removing engine covers, bolts, and various components. Metric and SAE sizes. |
| Wrench Set | Similar to sockets, but for bolts with heads that sockets can’t access. |
| Screwdrivers | Various sizes, flathead and Phillips, for clips and smaller fasteners. |
| Pliers | For hoses, clips, and stubborn components. |
| Torque Wrench | Essential for tightening bolts to the manufacturer’s specifications, preventing over or under-tightening. Crucial for timing component installation. |
| Timing Belt/Chain Kit | Includes the new belt or chain, tensioners, idler pulleys, and sometimes a new water pump. A quality kit is vital for engine longevity. Consider brands like Gates, Dayco, or OEM (Original Equipment Manufacturer). |
| Factory Service Manual (FSM) | Specific to your car’s make and model. Provides precise timing marks, torque specs, and procedure details. Obtainable from sources like Helm Inc. or Haynes. |
| Jack and Jack Stands | For safely lifting the vehicle to access the bottom or front components. Never work under a car supported only by a jack. |
| Drain Pan | If replacing a water pump driven by the timing belt, you’ll need to drain coolant. |
| Gloves and Safety Glasses | Protect your hands and eyes. |
| Marking Pen or Chalk | For marking timing positions before disassembly, though relying on factory marks is best. |
How to Fix a Car That Jumped Time: Step-by-Step Solution
Here’s a detailed guide on how to address a car that has jumped time. Remember, if you’re uncomfortable at any point, it’s best to stop and consult a professional mechanic. Safety first!
Step 1: Safety First & Initial Assessment
- Park on a Level Surface: Ensure the car is on a flat, stable area.
- Engage Parking Brake: Make sure the parking brake is firmly set.
- Disconnect Battery: For safety, disconnect the negative terminal of the battery.
- Visual Inspection: Pop the hood and locate the timing belt or chain cover. Look for any obvious signs of damage, such as a torn belt, leaks, or loose components.
Step 2: Accessing the Timing Belt/Chain
This is often the most labor-intensive part. You’ll need to remove engine covers, accessory belts (like the serpentine belt), and sometimes engine mounts or other components to get clear access to the timing belt or chain covers.
- Remove Accessory Belts: Use a wrench or breaker bar to relieve tension on the serpentine belt and remove it.
- Remove Covers: Carefully remove the plastic or metal covers that protect the timing belt/chain. These are usually held on by several bolts or clips.
- Consult Your Service Manual: Your Factory Service Manual (FSM) is indispensable here. It will show you the exact location of all bolts and how to reassemble everything correctly.
Step 3: Setting the Engine to Top Dead Center (TDC)
This is a critical step to ensure you can correctly align the new timing belt or chain. You need to get the crankshaft and camshaft(s) to their specific timing positions.
- Locate Crankshaft and Camshaft Sprockets: These are the toothed wheels that the timing belt/chain engage with.
- Rotate Crankshaft: Using a socket on the crankshaft pulley bolt, slowly rotate the engine in its normal direction of rotation (usually clockwise). Rotate it until the timing marks on the crankshaft pulley and the engine block align. This usually positions the #1 piston at Top Dead Center (TDC) on its compression stroke.
- Verify Camshaft Timing: Now, check the timing marks on the camshaft sprocket(s) against the cylinder head or a reference point indicated in your FSM. They should align perfectly with the crank’s TDC position. If they don’t, you’ll need to rotate the crankshaft one full revolution (360 degrees) and re-check the marks. The FSM will show you the precise marks for your vehicle. For example, many inline-4 cylinder engines will have specific marks on the camshaft pulley that line up horizontally with the edge of the cylinder head when cylinder #1 is at TDC.
| Engine Type | Common TDC Indicator |
|---|---|
| Inline 4-Cylinder | Crankshaft pulley mark at 0 degrees, camshaft timing marks aligned horizontally with the cylinder head. |
| V6 / V8 | Crankshaft pulley mark aligned, and each bank of camshafts will have its own set of timing marks specific to that bank’s #1 cylinder at TDC. |
Step 4: Remove the Old Timing Belt/Chain
Once the engine is at TDC and timed correctly, you can proceed with removing the old belt or chain.
- Release Tensioner: Loosen or remove the timing belt tensioner. This allows the belt to become slack enough to remove.
- Slide Off Belt: Carefully slide the old timing belt off the sprockets.
- Remove Chain Guides/Tensioner (if applicable): If you have a timing chain, you’ll likely need to remove the chain tensioner and possibly guides. This can be more complex than a belt.
- Inspect Components: Before installing new parts, check the water pump, idler pulleys, and tensioner for any signs of wear, play, or leaks. It’s highly recommended to replace these at the same time as the timing belt/chain, as they are subjected to the same wear and tear.
Step 5: Install the New Timing Belt/Chain
This is the moment of truth. Precision is paramount here.
- Install New Components: Install any new idler pulleys, tensioners, and the water pump if you’re replacing it, ensuring they are torqued to spec.
- Route the New Belt/Chain: Carefully route the new timing belt or chain over the sprockets, making sure it follows the path indicated in your service manual. Start at the crankshaft, then go to the camshaft sprocket(s), and any idler pulleys.
- Align Marks Precisely: Crucially, ensure the new belt or chain’s directional arrows (if any) are correct and that all timing marks on the sprockets remain perfectly aligned with their reference points on the engine. This is where a mistake can be very costly.
- Apply Tension: Install the new tensioner. For hydraulic tensioners, follow the manual’s procedure for activation. For spring-loaded tensioners, you might need to pull a pin or bolt. Ensure the belt has the correct tension as specified in your FSM.
Step 6: Double-Check and Reassemble
Before you put everything back together, take these vital steps.
- Manually Rotate Engine: With the new belt/chain installed and tensioner in place, slowly rotate the engine by hand (using the crankshaft pulley bolt) for at least two full revolutions. Listen for any unusual noises and feel for any binding or resistance.
- Re-verify Timing Marks: After rotating, meticulously check that all timing marks on the crankshaft and camshafts are still aligned precisely as they were before you started. If they are off even by a tooth, you must release the tensioner, reposition the belt, and re-tension. This is your last chance to catch an error without starting the engine.
- Reinstall Covers and Belts: Reinstall the timing belt covers, accessory belts, and any other components you removed.
- Torque Everything: Use your torque wrench to tighten all bolts to the specifications in your service manual. This includes the crankshaft pulley bolt, which is often torqued to a very high specification.
Step 7: Start the Engine and Test
The moment of truth!
- Reconnect Battery: Reconnect the negative battery terminal.
- Start the Engine: Turn the ignition key and start the car. It should start smoothly and idle evenly.
- Listen and Observe: Let the engine run for a few minutes, listening for any strange noises. Watch for the “Check Engine” light to stay off.
- Test Drive: Take the vehicle for a short, gentle test drive, paying attention to acceleration, power, and any unusual sounds.
When to Call a Professional
While this guide aims to empower you, there are times when calling a professional mechanic is the wisest choice:
- If you have an Interference Engine and suspect valve damage. The risk of further damage is too high for a beginner.
- If you lack the necessary tools, especially a torque wrench and a reliable FSM.
- If you’re not confident in your mechanical abilities or understanding of engine timing.
- If the job seems too complex for your comfort level (e.g., complex engine designs, multiple timing chains).
- If the engine still doesn’t run correctly after attempting the repair.
Professional mechanics have specialized tools and experience that can make this job quicker and more reliable. Websites like Reliable Shop can help you find certified technicians in your area.

Frequently Asked Questions (FAQ)
Q1: How much does it cost to fix a car that jumped time?
A1: The cost varies significantly. For a non-interference engine where only the belt skipped a tooth and no internal damage occurred, it might be a few hundred dollars for parts and labor for a “re-time” service. However, for interference engines where valves or pistons are damaged due to the jump, repairs can range from $1,500 to $5,000 or more, as it could require cylinder head work or even engine replacement.
Q2: Can a car jump time from hitting something?
A2: While rare, hitting something hard that impacts the front of the car could potentially jolt the timing belt or chain enough to cause it to skip a tooth, especially if the components are already worn. However, it’s more commonly due to component wear.
Q3: How long does it take to fix a car that jumped time?
A3: For a DIYer, it can take anywhere from 4 to 10 hours, or even longer, depending on your experience and vehicle complexity. A professional mechanic can often complete the job in 3 to 6 hours.