How To Polish Car Headlight Lenses To Like-New Condition
You can restore cloudy car headlight lenses to a like-new condition with a simple polishing process. This involves cleaning, sanding with progressively finer grits, and then using a polishing compound to bring back clarity and shine, often in just a few hours.
Understanding Cloudy Headlights
So, why do headlights turn cloudy? It’s a common problem. Most cars today have plastic headlight covers.
This plastic is called polycarbonate. It’s strong and light. It lets light shine through well.
But, it has a special coating on it. This coating is called a UV protectant. It stops the sun’s rays from damaging the plastic.
Over years of sun exposure, this coating breaks down. Tiny cracks form. Dirt, rain, and road grime get into these cracks.
This makes the plastic look yellow or hazy. It’s like a sunburn for your headlights.
This cloudiness isn’t just ugly. It stops light from shining through properly. Less light reaches the road.
This means you can’t see as well at night. It also means other drivers might not see you as well. This can be a safety risk.
It’s important to fix this. It keeps you safe and makes your car look much better. Many people think they need to buy new headlights.
That’s often not true. A good cleaning and polish can save you a lot of money.
The Power of Polishing
Polishing is the key. It’s like giving your headlights a good scrub. But it’s more than just scrubbing.
Polishing removes the damaged, cloudy outer layer of the plastic. It reveals the clear plastic underneath. Think of it like exfoliating skin.
You remove the dead skin cells. You get to the fresh skin below. With headlights, we use special tools and materials.
These gently wear away the haze. Then, we bring back the shine.
Many people wonder if polishing is hard. It can seem tricky. But most kits are made for DIY use.
They have clear instructions. The process uses sanding. This might sound scary.
But it’s done with very fine sandpaper. It’s wet sanding, usually. This means you use water.
Water helps wash away the plastic dust. It also stops the sandpaper from getting clogged. This makes the sanding smooth.
It’s not like rough sandpaper you might imagine. It’s all about taking off thin layers.
My Own Headlight Struggle
I remember one time, my old sedan’s headlights looked terrible. They were so yellow and foggy. It was late summer.
The sun had been beating down for months. Driving at night felt like I was using a flashlight. I kept thinking I needed new headlights.
The quote from the mechanic was high. I felt a bit stuck. Then, I saw a car with super clear headlights.
I asked the owner how. They told me about DIY kits. I was skeptical.
Could I really do this? It sounded too easy.
So, I bought a popular headlight restoration kit. It came with different grit sandpapers and a polishing compound. I set aside a Saturday afternoon.
I washed the car first. Then, I masked off the headlights with tape. This protects the car paint.
The first few sanding steps felt weird. Water everywhere. The plastic looked worse before it looked better.
I started to worry. Was I ruining them? But the instructions said this was normal.
I kept going. I used the finest sandpaper. Then I applied the polish.
I buffed it with a soft cloth. Slowly, the haze started to disappear. I couldn’t believe my eyes.
They looked almost new! That feeling of accomplishment was huge. And I saved hundreds of dollars.
Essential Supplies for Headlight Polishing
Before you start, gather your tools. Having everything ready makes the job smooth. Most kits have these, but it’s good to know:
- Headlight Restoration Kit: This is your main tool. Look for one with multiple sandpaper grits and a good polish.
- Masking Tape: Use painter’s tape. It’s gentle on your car’s paint.
- Spray Bottle with Water: For wet sanding.
- Microfiber Towels: Several clean ones for drying and buffing.
- Gloves: To keep your hands clean.
- Bucket of Water: For rinsing sandpaper.
The Step-by-Step Polishing Process
Let’s break down how to do it. Follow these steps carefully. Your headlights will thank you.
1. Clean the Headlights
Start with a clean slate. Wash your headlights thoroughly. Use car wash soap and water.
Get rid of all dirt, bugs, and road grime. Dry them well with a clean microfiber towel. This step is simple.
But it stops dirt from scratching the plastic more during sanding. A clean surface is key for the next steps.
2. Tape Off the Area
Protect your car’s paint. Use masking tape. Put it around the edges of the headlights.
Stick it onto the body panels. Make sure there’s a good seal. This tape will prevent accidental scratches on the paint.
It also gives you a clean line. This makes the finished job look professional. Take your time here.
A good tape job is worth it.
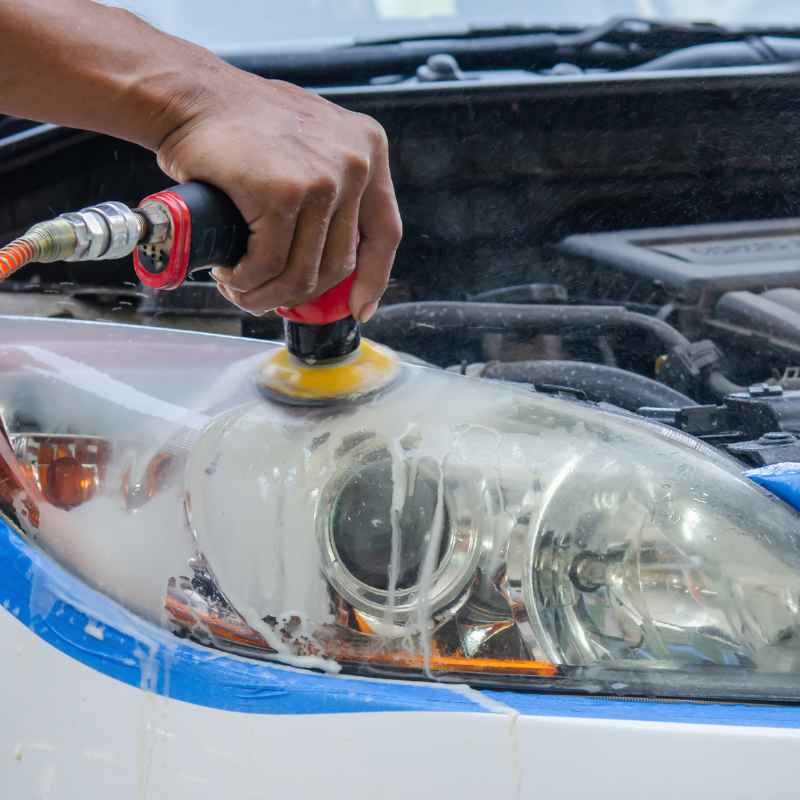
3. Sanding the Haze Away
This is the core of the process. You will use different grits of sandpaper. Start with the coarsest grit.
This removes the heavy oxidation. You’ll usually use a 600 or 800 grit paper first. Wet the headlight surface.
Wet the sandpaper too. Gently sand the entire headlight. Use back-and-forth strokes.
Try to cover the whole area evenly. You will see a cloudy residue. This is normal.
It means the sandpaper is working.
After sanding with the first grit, rinse the headlight. Rinse the sandpaper. Now, move to a finer grit.
Often, this is a 1000 or 1500 grit paper. Wet the area again. Sand in a different direction.
For example, if you sanded left to right before, now sand up and down. This ensures you remove the scratches from the previous step. The headlight will start to look smoother.
But it might still look a bit dull or milky. Keep going. Each step refines the surface.
Then, you’ll use an even finer grit. Think 2000 or 3000 grit. This step is crucial for a smooth finish.
Wet sanding with these fine grits removes the tiny scratches left by coarser papers. The headlight will look much clearer now. It might appear somewhat hazy still.
But it’s a different kind of haze. It’s the haze of very fine sanding marks. They are almost invisible.
This is where the magic starts to happen. Don’t rush this part. Patience here pays off later.
Understanding Sandpaper Grits
Sandpaper is measured by grit number. Higher numbers mean finer grit.
- Coarse Grit (e.g., 600-800): Removes heavy damage and oxidation.
- Medium Grit (e.g., 1000-1500): Smooths out scratches from coarse grit.
- Fine Grit (e.g., 2000-3000): Creates a very smooth surface for polishing.
Always use wet sanding. It lubricates the surface. It washes away debris.
It prevents deep scratches.
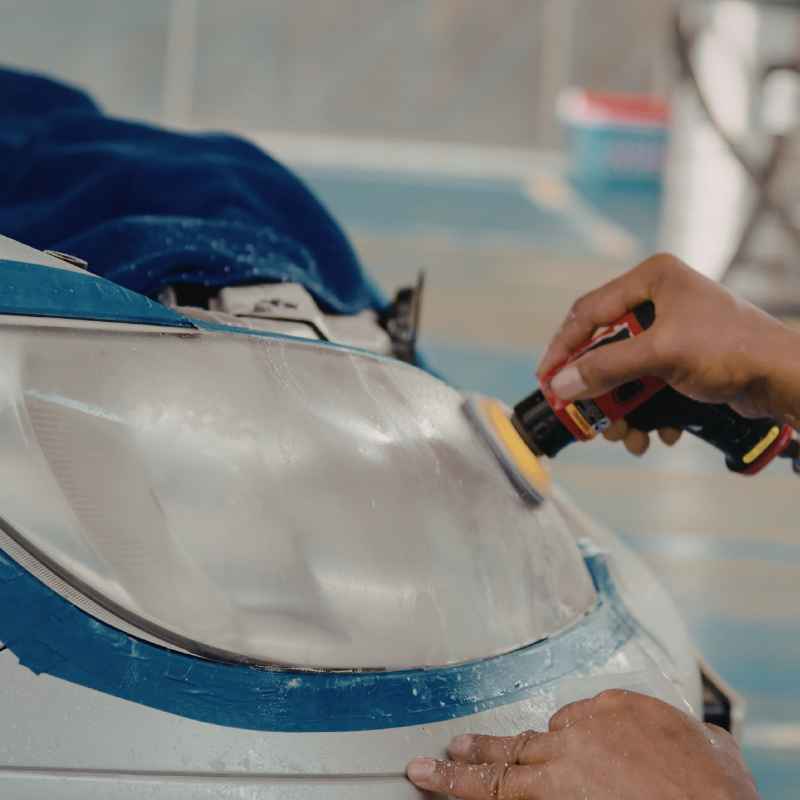
4. Apply Polishing Compound
Now it’s time to bring back the shine. You’ll use a plastic polishing compound. This is often a paste or a cream.
It contains very fine abrasives. These abrasives buff out the microscopic sanding marks. They smooth the surface even more.
Apply a small amount of compound to a clean microfiber towel or applicator pad. Rub it onto the headlight surface. Use firm, circular motions.
Work it into the plastic. You should see the haze start to disappear. The plastic will begin to look clearer and shinier.
Keep buffing. You’ll need to apply more compound as needed. Continue until the headlight looks clear.
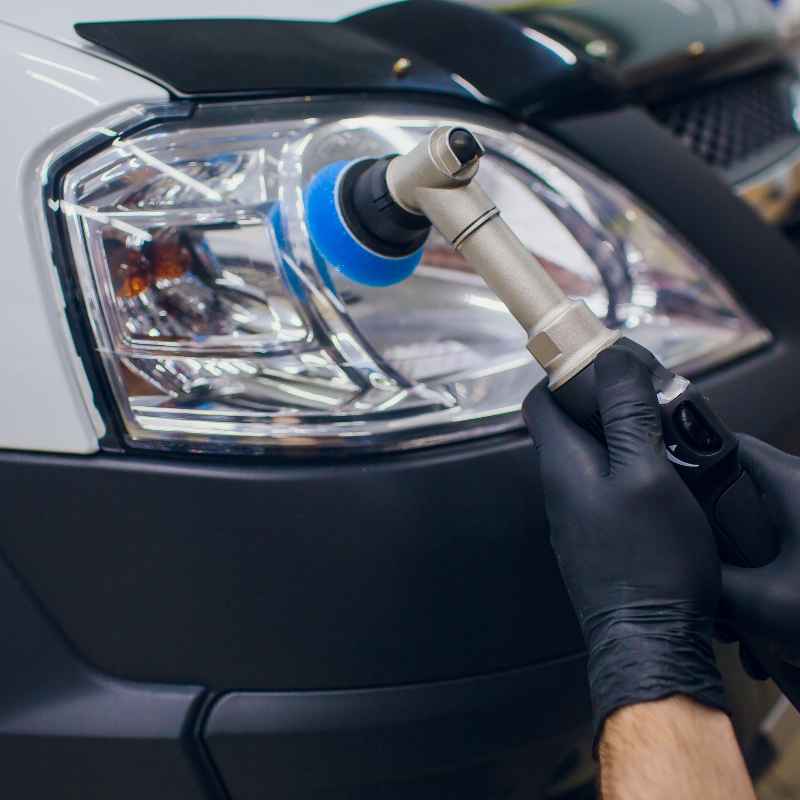
You want a high-gloss finish. Some kits might suggest using a drill with a polishing pad. If you use a drill, be gentle.
Too much speed or pressure can overheat the plastic. It can even melt it. For most people, hand buffing is safer and just as effective.
It also gives you more control. Make sure to buff the entire headlight evenly.
5. Final Clean and Seal
Once you’re happy with the shine, wipe off any excess compound. Use a clean, dry microfiber towel. Give the headlight a final polish.
This removes any streaks. Your headlights should now look bright and clear. It’s amazing how much better they look.
Many kits include a UV sealant. This is very important. It protects your newly polished headlights.
Without it, the haze will return faster. Apply the sealant according to the kit’s instructions. It’s usually a liquid.
You apply it with a cloth. Let it dry completely. This seal is what keeps them looking good longer.
It’s the final protective layer. It shields the plastic from the sun.
Quick Scan: Polishing Steps
Clean: Wash headlights. Dry them.
Tape: Protect paint with masking tape.
Sand (Wet): Use fine grits (e.g., 800 -> 1500 -> 3000).
Polish: Apply compound. Buff until clear.
Seal: Apply UV protectant. Let it dry.
Common Mistakes to Avoid
Even with a good guide, people make mistakes. Knowing them helps you avoid them. This saves time and frustration.
It ensures you get the best results. Let’s look at a few.
Mistake 1: Not Taping Off Properly
Skipping the tape is a big error. Sandpaper can scratch paint easily. Polishing compound can leave white residue on dark trim.
This makes extra work for you. Always take the time to mask well. Use good quality painter’s tape.
It sticks well but peels off cleanly.
Mistake 2: Using the Wrong Sandpaper Grit
Starting with too fine a grit won’t remove the haze. Starting too coarse can create deep scratches. If your kit doesn’t have clear instructions, aim for the grits mentioned earlier.
The progression from coarse to fine is key. Don’t skip any grits. Each step builds on the last.
Mistake 3: Not Using Enough Water
Wet sanding is vital. It keeps the sandpaper from clogging. It keeps the plastic cool.
It creates a smooth sanding action. If the area dries out, you’re not sanding effectively. You might even damage the plastic.
Always keep the headlight and sandpaper wet. Have a spray bottle handy.
Mistake 4: Not Sanding Evenly
Uneven sanding leads to a patchy finish. Some areas might be clear, others still hazy. Make sure you cover the entire headlight surface with each grit.
Use consistent pressure. Work in a pattern. This ensures all the damaged plastic is removed.
Uniformity is the goal.
Mistake 5: Skipping the Sealant
This is a huge mistake. The UV sealant is like sunscreen for your headlights. Without it, the cloudiness will creep back much faster.
The sun’s UV rays will attack the plastic again. Always apply the sealant. It’s a critical step for long-term results.
Myth vs. Reality: Headlight Restoration
| Myth | Reality |
|---|---|
| You need to buy new headlights. | Most cloudy headlights can be restored. |
| Polishing will damage the plastic. | Done correctly, it removes only damaged layers. |
| It’s a temporary fix. | With sealant, it lasts a long time. |
| It’s too difficult for beginners. | Kits are designed for DIY use. |
Alternative Methods and When to Use Them
Kits are great. But sometimes you might not have one handy. Or maybe your headlights are only slightly hazy.
Here are other options.
Toothpaste Method
Yes, toothpaste! It has mild abrasives. It can work for very light haze.
Clean the headlight first. Apply a dab of white, non-gel toothpaste. Use a soft cloth.
Rub in circles for a few minutes. Rinse and wipe dry. Repeat if needed.
This is a gentle, DIY approach. It won’t work for severe cloudiness, though.
Baking Soda Paste
Similar to toothpaste, baking soda is a mild abrasive. Mix baking soda with a little water to make a paste. Apply it to the headlight.
Rub with a cloth. Rinse and dry. Again, this is for light haze only.
It’s a good quick fix for minor issues.
Rubbing Compound
Automotive rubbing compound is stronger than toothpaste. You can buy it at auto parts stores. It’s like a heavier version of the polishing compound in kits.
You still need to sand first, usually. Apply it with a cloth and buff. Follow with a finer polish if needed.
This method requires more care. It can scratch if used too aggressively.
When to Consider New Headlights
Sometimes, headlights are beyond repair. If the plastic is deeply cracked. Or if the internal reflector is damaged.
If the haze is from inside the lens and not outside. In these cases, new headlights are the only real solution. Also, if the restoration doesn’t improve things much after a thorough attempt.
But for most common hazing, restoration kits are the way to go.
Real-World Factors Affecting Headlights
The environment plays a big role. Where you live matters. The sun’s intensity varies.
In sunny places like Florida or Arizona, headlights fade faster. Exposure to salt from road treatments in winter can also cause damage. Parking your car outside all the time means constant sun exposure.
Garaging it helps protect the plastic. The materials used in headlights also matter. Newer cars use better plastics.
But even they will eventually show wear.
Your driving habits also contribute. If you drive a lot at night, clear headlights are more important. You’ll notice haze sooner.
If you drive on dirt roads, dust and grime can affect the lenses. The way you wash your car matters too. Using harsh chemicals or abrasive sponges can damage the UV coating faster.
Gentle washing with car soap is best.
Headlight Care: Do’s and Don’ts
- DO: Wash your car regularly.
- DO: Use a good quality car shampoo.
- DO: Apply a UV sealant after polishing.
- DON’T: Use abrasive cleaners or brushes on headlights.
- DON’T: Use harsh chemicals like bleach or ammonia.
- DON’T: Ignore early signs of hazing.
What This Means for You
Cloudy headlights are normal with age. It happens to almost every car. It’s not a sign of a major car problem.
It’s just wear and tear. The good news is, it’s usually fixable. You don’t need to be a car expert.
Most DIY kits are straightforward. You can do it in your driveway on a weekend afternoon.
Knowing when to worry is important. If your headlights are dim and restoration doesn’t help, check the bulbs. If the plastic is cracked or peeling badly, it might be time for replacement.
But for typical yellowing or hazing, try polishing first. The visual difference is amazing. The safety benefits are even better.
You’ll be able to see better at night. You’ll feel more confident driving.
Simple Checks You Can Do
After polishing, or if you’re just checking, here’s what to look for:
- Clarity: Are they clear like glass? Or still hazy?
- Shine: Do they have a nice gloss? Or look dull?
- Cracks: Is the plastic itself broken?
- Internal Issues: Is there moisture or dirt inside the lens? (This needs new headlights.)
If your headlights pass these checks, you’re in good shape. They should be working well.
Tips for Long-Lasting Shine
To keep your headlights looking good after you polish them:
- Reapply Sealant: Check your sealant’s lifespan. Reapply it yearly or as needed.
- Wash Gently: Avoid harsh car washes or abrasive sponges.
- Park Smart: If possible, park in a garage or shaded area.
- Inspect Regularly: Look at your headlights every few months. Catch problems early.
These simple habits help maintain the clarity. They extend the life of your hard work.
Frequently Asked Questions About Headlight Polishing
How long does it take to polish car headlights?
Most headlight polishing jobs take about 1 to 2 hours. This includes cleaning, taping, sanding, polishing, and sealing. The time can vary based on how bad the headlights are.
And also how fast you work.
Will polishing damage my headlights?
No, if done correctly, polishing will not damage your headlights. The process removes the damaged outer layer of plastic. It uses fine abrasives.
When done with care and following instructions, it’s safe. Overly aggressive sanding or using the wrong tools can cause issues.
How often should I polish my headlights?
This depends on your climate and sun exposure. In very sunny areas, you might need to re-polish or re-seal every 6-12 months. In milder climates, it could last 1-2 years.
Regular inspection helps you know when it’s time.
Can I use a power tool for headlight polishing?
Yes, you can use a power drill with a buffing pad. Many kits suggest this. But you must be very careful.
Use low speed. Use light pressure. Too much heat can melt or damage the plastic.
Hand buffing is safer for beginners.
What’s the difference between polishing and waxing headlights?
Waxing is a temporary fix. It adds a shiny layer but doesn’t remove damage. Polishing actually removes the hazy, oxidized plastic.
It restores the original clarity. Polishing is a restoration. Waxing is just a cosmetic cover.
My headlights are yellow inside, not outside. Can I fix this?
If the yellowing or cloudiness is on the inside of the headlight lens, polishing won’t help. This usually means the seal has broken. Moisture or dirt has gotten inside.
In this case, you likely need to replace the entire headlight assembly.
Conclusion: See Clearly Again
Restoring your car’s headlights is a rewarding DIY project. It improves your car’s look and your safety. Don’t let cloudy headlights dim your drive.
With a little effort and the right steps, you can achieve that like-new shine. Enjoy the clearer view and the satisfaction of a job well done!