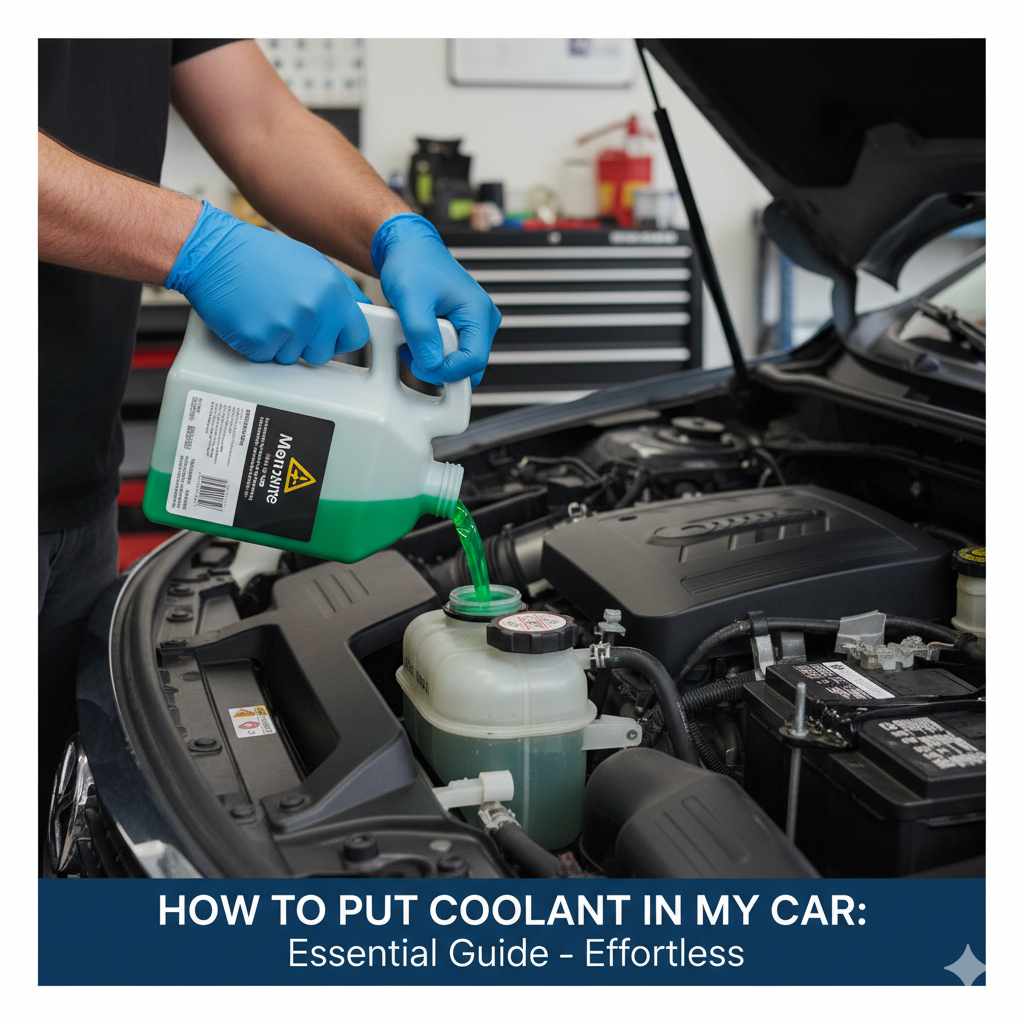
How to Put Coolant in My Car: Essential Guide Effortless
Adding coolant to your car is a straightforward process that ensures your engine stays cool and prevents overheating. This guide provides easy, step-by-step instructions for safely checking and refilling your car’s coolant, making essential maintenance accessible for everyone.
Is your car’s temperature gauge creeping up? Do you hear strange noises coming from under the hood when it’s hot outside? Overheating can be a serious issue, leading to expensive repairs. The good news is that checking and adding coolant, also known as antifreeze, is a basic maintenance task that most car owners can handle themselves. You don’t need to be a mechanic to keep your car’s cooling system in top shape. This guide will walk you through everything you need to know, making it simple and safe.
Why Your Car Needs Coolant
Coolant is the lifeblood of your car’s cooling system. Its primary job is to regulate your engine’s temperature, preventing it from overheating in the summer and freezing in the winter. Think of it as a super-powered fluid that absorbs excess heat from the engine and dissipates it through the radiator. Without enough coolant, or if it’s the wrong type, your engine components can become damaged, leading to costly repairs. Regular checks and proper maintenance are key to a healthy, long-lasting engine.
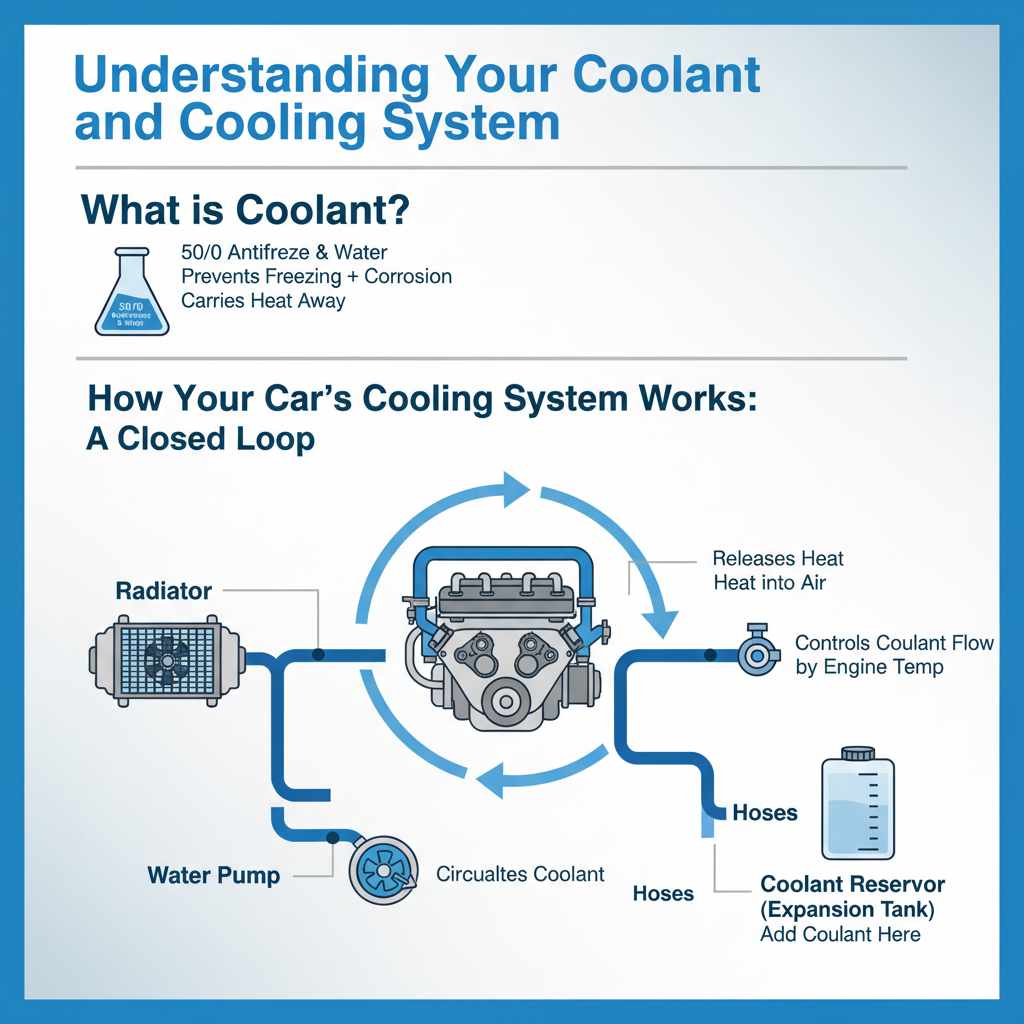
Understanding Your Coolant and Cooling System
Before you can add coolant, it’s important to understand what it is and how your car’s cooling system works. Coolant is a mixture of antifreeze and water. The antifreeze contains additives that prevent freezing and corrosion, while the water helps to carry the heat away. Modern cars typically use a 50/50 mix of antifreeze and distilled water.
Your car’s cooling system is a closed loop. Here’s a simplified look at how it functions:
- Radiator: This is where the hot coolant flows to release heat into the air.
- Thermostat: This acts like a valve, opening and closing to control the flow of coolant to the radiator based on the engine temperature.
- Water Pump: This circulates the coolant throughout the engine and cooling system.
- Hoses: These flexible tubes carry the coolant between different parts of the system.
- Coolant Reservoir (or Expansion Tank): This is a plastic tank, usually translucent, connected to the radiator. It stores excess coolant and allows for expansion when the engine is hot. This is typically where you’ll add coolant.
When to Check Your Coolant Level
It’s a good idea to check your coolant level regularly, just like you check your oil. A good rule of thumb is to check it:
- At least once a month.
- Before long road trips.
- If your car’s temperature gauge is higher than normal.
- Anytime you notice a sweet smell near the front of your car (a sign of a leak).
Important Note: Always check your coolant level when the engine is COLD. The cooling system is pressurized when hot, and opening the cap can cause hot coolant to spray out, leading to severe burns.
What You’ll Need: Essential Tools and Supplies
Gathering the right supplies before you start makes the process much smoother. Here’s what you’ll need:
- New Coolant/Antifreeze: Check your car’s owner’s manual for the specific type and color recommended. Using the wrong type can damage your cooling system. Common types include Green, Orange, Pink, and Blue.
- Distilled Water: If you’re mixing your own coolant from concentrate, you’ll need distilled water. Never use tap water as its minerals can clog your system.
- Protective Gloves: Coolant can be harmful to skin.
- Safety Glasses: To protect your eyes from splashes.
- Funnel: A clean funnel makes pouring easier and prevents spills.
- Rags or Paper Towels: For wiping up any drips.
- Owner’s Manual: Your best friend for specific vehicle information.
Coolant Types Explained:
| Color | Common Type/Use | Notes |
|---|---|---|
| Green | Traditional IAT (Inorganic Additive Technology) | Older vehicles. Avoid mixing with other types. |
| Orange/Yellow | HOAT (Hybrid Organic Additive Technology) | Common in many GM, Chrysler, and some European vehicles. |
| Pink/Red | OAT (Organic Acid Technology) or P-HOAT | Common in many newer Asian and some European vehicles (e.g., Honda, Nissan, Ford). Often long-life. |
| Blue | P-HOAT | Often associated with European vehicles (e.g., VW, BMW). |
Consult your owner’s manual to confirm the correct coolant for your vehicle. Mixing coolant types can cause gelling, reduced cooling efficiency, and damage to your system. If in doubt, a plain water-based coolant conditioner might be an option for a very temporary top-off, but the correct antifreeze is always best.
Step-by-Step: How to Put Coolant in Your Car
Adding coolant is a simple process, but it requires careful attention to detail. Always prioritize safety. Remember to check your engine when it’s completely cold.
Step 1: Locate the Coolant Reservoir
Open your car’s hood and locate the coolant reservoir. It’s usually a translucent plastic tank connected to the radiator, often with “MIN” and “MAX” or “LOW” and “FULL” lines marked on the side. It might also have a pressure cap with symbols indicating caution or heat.
Step 2: Check the Coolant Level
Visually inspect the coolant level in the reservoir. If the level is at or above the “MIN” or “LOW” line, you don’t need to add coolant at this moment. If it’s below the “MIN” line, or if you can’t see any liquid, it’s time to add more.
Step 3: Prepare the Coolant Mixture (If Necessary)
Most coolants come in two forms:
- Pre-mixed (50/50): This is the easiest to use. It’s already mixed with distilled water and ready to pour.
- Concentrate: This needs to be mixed with distilled water, usually in a 50/50 ratio, before adding it to your car. Check the instructions on the coolant container. Use clean, separate containers for mixing.
Never use straight antifreeze; it’s too concentrated and won’t transfer heat as effectively, and can even freeze at lower temperatures than a 50/50 mix. For instance, a 50/50 mixture of ethylene glycol and water offers freeze protection down to about -34°F (-37°C). You can find detailed charts on freeze protection levels if you search for “antifreeze freeze protection chart.”
Step 4: Open the Reservoir Cap
Ensure your engine is cold. Even a slightly warm engine can build pressure. Slowly turn the cap counter-clockwise. If you feel resistance or hear a hiss, stop. Wait for the engine to cool down completely. Once it’s cool, you can remove the cap.
Safety First: If your car has a radiator cap (in addition to or instead of a reservoir cap, though less common in modern cars), use a rag to cover the cap before opening to prevent any residual steam from burning you. Turn it slowly to release any built-up pressure.
Step 5: Add the Coolant
Using a clean funnel, carefully pour the pre-mixed coolant (or your prepared 50/50 mixture) into the reservoir. Add it slowly, just enough to bring the level up to the “MAX” or “FULL” line. Do not overfill.
Step 6: Close the Reservoir Cap
Once the coolant is at the correct level, securely screw the reservoir cap back on. Ensure it’s tight to prevent leaks and maintain system pressure. If you opened a radiator cap, re-secure that as well following the same safety precautions.
Step 7: Clean Up and Dispose Properly
Wipe away any spilled coolant from the engine bay and the reservoir. Coolant is toxic and harmful to the environment if not disposed of properly. Do not pour it down the drain or on the ground. Many auto parts stores and local waste disposal centers accept used coolant for recycling.
Step 8: Start the Engine and Check for Leaks
Start your car’s engine and let it run for a few minutes. Turn on your car’s heater to its highest setting. This helps to circulate the new coolant through the entire system, including the heater core. Keep an eye on the temperature gauge to ensure it stays in the normal range. Also, look for any obvious leaks around the reservoir, cap, or hoses.
Step 9: Re-check Coolant Level After Engine Cools
After the engine has completely cooled down (this can take several hours), re-check the coolant level in the reservoir. The level might drop slightly as the coolant circulates and air pockets are purged. If the level is low again, repeat steps 4-6 to top it off. You might need to do this a couple of times until the level stabilizes.
A Note on Purging Air: Some vehicles are more prone to air pockets in the cooling system after adding coolant. If your car’s heater isn’t blowing hot air or the temperature gauge remains high after several checks, it might mean there’s an air pocket. Consult your owner’s manual for specific instructions on how to purge air from your cooling system, or consider having a mechanic do it. Bleeding the system often involves opening specific bleed valves or running the engine with the radiator cap off (again, only when cold and with extreme caution).
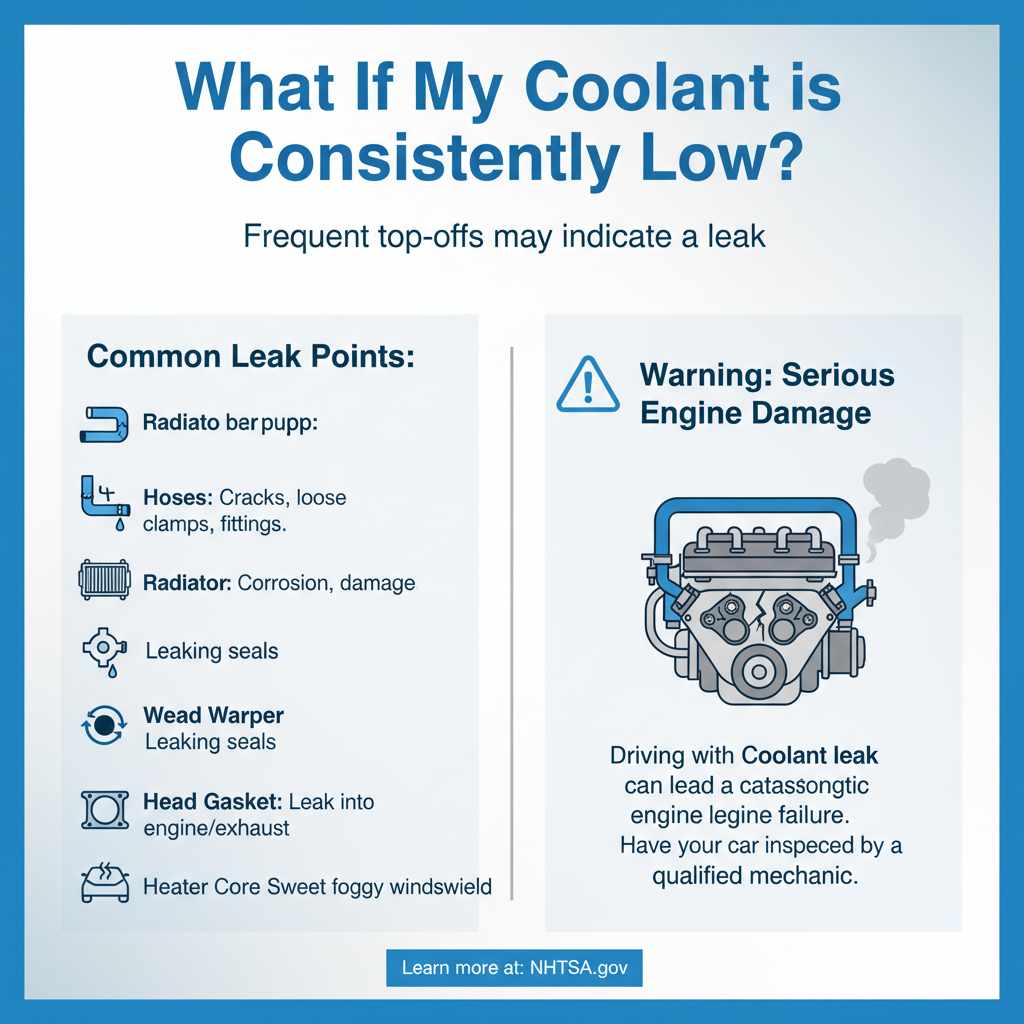
What If My Coolant is Consistently Low?
If you find yourself frequently needing to add coolant, it’s a sign that your car may have a leak. Leaks can occur in various places:
- Hoses: Cracks or loose clamps can cause fittings to leak.
- Radiator: The radiator itself can develop leaks due to corrosion or damage.
- Water Pump: A failing water pump often leaks coolant from its seals.
- Head Gasket: A blown head gasket can allow coolant to leak into the engine or exhaust system.
- Heater Core: A leak here can sometimes be detected by a sweet smell inside the car or fogging on the windshield.
If you suspect a leak, it’s best to have your car inspected by a qualified mechanic. Driving with a coolant leak can lead to serious engine damage, including catastrophic failure. You can learn more about common car leaks and how to identify them at reputable sources like the National Highway Traffic Safety Administration (NHTSA) website.
Common Mistakes to Avoid
Even with simple tasks, it’s easy to make a mistake. Here are some common pitfalls to sidestep when adding coolant:
- Checking Coolant When the Engine is Hot: This is the most dangerous mistake. It can lead to severe burns from pressurized hot coolant. Always wait for the engine to cool down completely.
- Using the Wrong Type of Coolant: Mixing coolant types is a recipe for disaster. Always use the type specified in your owner’s manual.
- Using Tap Water: Tap water contains minerals that can build up in your cooling system, leading to clogs and reduced efficiency. Always opt for distilled water for mixing or ensure you’re using pre-mixed coolant.
- Not Closing the Cap Tightly: A loose cap can lead to coolant evaporation and loss, and can put the cooling system under less pressure, reducing its effectiveness.
- Overfilling the Reservoir: Filling beyond the “MAX” line can lead to overflow and waste of coolant. The system needs space for expansion.
- Ignoring Low Coolant Levels: Consistently low coolant levels indicate a problem that needs attention. Don’t just keep topping it off if there’s a leak.
Frequently Asked Questions (FAQ)
Q1: How often should I check my car’s coolant?
It’s a good practice to check your coolant level at least once a month and before any long journeys. If your car’s temperature gauge starts to climb higher than usual, it’s also a good time to check.
Q2: Can I just add water if I’m out of coolant?
In an emergency, adding plain water (preferably distilled) can temporarily prevent overheating, but it’s not a long-term solution. Water alone doesn’t offer freeze protection or corrosion resistance. You should ideally use the correct coolant mix as soon as possible and have your system checked.
Q3: My car has green coolant. Can I add orange coolant to top it off?
No, it’s generally not recommended to mix different types or colors of coolant. This can cause chemical reactions leading to sludge, reduced cooling performance, and potential damage to your cooling system components. Always stick to the type specified in your owner’s manual.
Q4: What does it mean if my car smells sweet under the hood?
A sweet smell often indicates a coolant leak. Coolant contains ethylene glycol, which has a sweet odor. If you notice this smell, check your coolant level and look for any visible leaks or drips.
Q5: How much coolant do I need to add?
Only add coolant until the level reaches the “MAX” or “FULL” line on the reservoir. Avoid overfilling, as the system needs space for expansion when the engine is hot. If you’re adding a significant amount, it might be worth checking your owner’s manual for the system’s capacity.
Q6: Is it safe to open the radiator cap to add coolant?
Only open the radiator cap when the engine is completely cold. Even then, cover the cap with a thick rag before slowly turning it to release any residual pressure. Most modern cars have a coolant reservoir for refilling, which is safer to access. Your owner’s manual will show you the correct procedure for your specific vehicle.
Conclusion
By following these simple steps, you can confidently check and add coolant to your car, ensuring your engine stays at its optimal operating temperature. This basic maintenance task not only helps prevent costly damage but also gives you peace of mind on the road. Remember to always prioritize safety by working on a cold engine and using the correct type of coolant. If you ever feel unsure or notice persistent issues like frequent coolant loss, don’t hesitate to consult a trusted mechanic. Keeping up with these essentials will help your car run smoothly and reliably for years to come.