How to Remove Dust From Your Car Interior (9-Step Guide)
Dust in a car comes mostly from open windows, foot traffic, and the AC and heater pulling in outside air, and the fastest way to clear it out is a top-down clean: headliner first, then hard surfaces and seats, then carpets and mats last, so loosened dust does not resettle on a surface you already wiped.
A full pass takes about an hour with a vacuum, a few microfiber cloths, a soft-bristle brush for vents and seams, and a can of compressed air. Below is the exact order that keeps dust from just moving around the cabin, plus what actually causes the buildup and how to slow it down between cleanings.
Why Dust Builds Up Fast in a Car
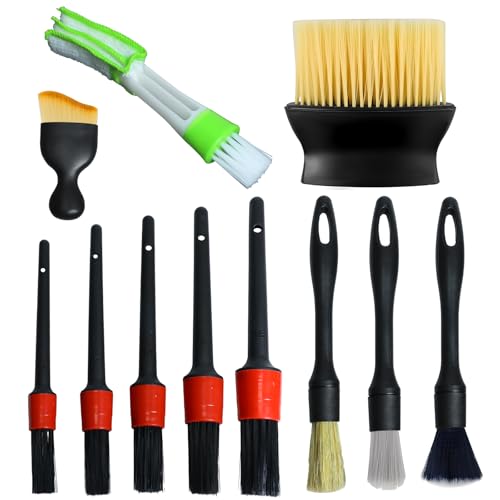
BEST FOR VENTS, CREVICES & DASH DUST
 |
4-Piece Car Detailing Brush Set – $7.99 These four brush heads reach the vent slats, seams, and buttons a microfiber cloth cannot, exactly the trouble spots covered in the vent and crevice steps below.
|
Dust collects in a car faster than in most rooms of a house because a cabin is a small, sealed box that gets opened and re-sealed dozens of times a day, and every opening lets in a fresh load of road grit, pollen, and skin cells. It settles on the dashboard, the seats, and inside the air vents before you notice it. The main sources are:
- Open windows: driving with the windows down pulls in dust, pollen, and dirt kicked up from the road surface.
- Foot traffic: shoes carry in fine grit every time someone gets in, and it settles into the floor mats and seat seams.
- Air vents: the AC and heater draw in outside air continuously, which is why the vent slats are usually the dustiest spot in the whole cabin.
- Skipped cleanings: dust is cumulative, so a car left uncleaned for a month or more builds a visible layer far faster than the same car cleaned weekly.
Knowing where dust actually comes from is what makes prevention possible, not just repeated cleaning.
The Health Risks of a Dusty Car
Dust in a car is not just a cosmetic problem. It carries pollen, pet dander, and fine particulate matter that gets stirred up every time the AC kicks on, and in an enclosed cabin that means a more concentrated dose than an open room. The main effects are:
- Allergy flare-ups: dust carries pollen and pet dander, and allergy symptoms often ease noticeably after a thorough interior clean.
- Respiratory irritation: breathing dusty cabin air can irritate the throat and lungs, especially on longer drives.
- Mold growth: in humid climates, dust mixed with trapped moisture can support mold growth, which often shows up first as a musty smell rather than visible spots.
- Worse air quality: dust-caked vents push dirtier air through the cabin every time the fan runs, which a vent cleaning and filter swap fixes directly.
Tools and Supplies You Will Need
Gathering everything before starting keeps the job to about an hour instead of turning into multiple trips to the garage. A basic dust-removal kit includes:
- Microfiber cloths: lift dust without scratching plastic, glass, or leather. Keep a stack of at least four so you always have a clean one.
- Soft-bristle detailing brush: reaches vent slats and tight crevices that a cloth cannot.
- Handheld vacuum with attachments: a crevice tool and a brush head cover seats, mats, and carpet edges.
- Compressed air can: blasts dust out of tight spots like dashboard buttons and cupholder ridges.
- All-purpose interior cleaner: a gentle, pH-balanced cleaner for hard surfaces (a diluted vinegar-water mix also works on glass).
- Dashboard protectant: a matte, non-greasy protectant applied after cleaning helps repel new dust between washes.
- Bucket and water: for diluting cleaner and rinsing cloths as they get dirty.
Keeping these together in one caddy in the trunk means the whole job starts in seconds instead of a supply hunt.
Step-by-Step Guide to Removing Dust
This sequence follows the top-down order detailers use: clean the highest surfaces first so nothing you dislodge falls onto a section you already finished.
Step 1: Prep the Car
Park in the shade so cleaner does not dry into streaks before you can wipe it off. Open all the doors and windows for ventilation, then pull out trash, loose items, and the floor mats. Shake the mats out separately to knock loose the bulk of the grit before it gets vacuumed twice.
Step 2: Dust the Headliner First
The headliner and upper dash get skipped in most quick cleans, but doing them first matters: dust and debris knocked loose from the roof and upper trim falls down onto the seats and carpet, so cleaning it after you have already vacuumed just undoes that work. Use a low-suction vacuum setting with a soft brush attachment to lift loose dust and hair, working in the direction of the fabric grain. Never spray cleaner directly onto the headliner fabric, since saturating it can weaken the glue holding it up and cause sagging. If a spot needs more than dry suction, lightly mist a microfiber cloth (not the headliner itself) and blot gently.
Step 3: Vacuum the Interior
With the ceiling done, move to the seats, mats, carpet, and trunk, which is where most of the loose dust actually lives:
- Seats: vacuum cloth seats thoroughly, working into the seams. Go lightly on leather to avoid scratching it.
- Floor mats: vacuum both sides, since dust and grit settle underneath as well as on top.
- Carpet: get under the seats and into the corners; a narrow crevice tool reaches spots a standard nozzle misses.
- Trunk: it is easy to skip, but the trunk collects just as much dust as the cabin.
A thorough vacuum pass takes about 15 minutes. Empty the canister or bag partway through if it fills up, since a full canister loses suction fast.
Step 4: Dust Hard Surfaces
Next, wipe the dashboard, console, and door panels with a dry microfiber cloth, which lifts dust instead of just pushing it around. For caked-on dust, dampen the cloth slightly with water or an all-purpose cleaner and wipe in one direction to avoid streaking.
Step 5: Clean the Air Vents
Vents are usually the single dustiest spot in the cabin because the AC and heater pull outside air through them constantly. Loosen the buildup on the slats with a soft-bristle brush, then use compressed air to blow debris out while holding a microfiber cloth nearby to catch what comes loose. For a deeper clean, a narrow vacuum attachment reaches further into the duct. See our full guide to cleaning car air vents if the buildup is heavy or the AC smells musty.
Step 6: Wipe Down Crevices
Dust hides in seams and small gaps that a cloth alone cannot reach. Wrap a microfiber cloth around a flathead screwdriver to clean console seams, use a cotton swab dipped in cleaner for buttons and knobs, and finish tight spots like cupholders and around the gear shift with a blast of compressed air. This step is slow, but it is where most of the remaining visible dust actually lives.
Step 7: Clean Windows and Mirrors
Dusty glass makes the whole interior look grimy even after everything else is clean. Spray glass cleaner onto the cloth rather than directly onto the glass to avoid streaks running into the dash or door panels, then wipe the inside of every window and mirror. A 50/50 vinegar-water mix works on stubborn film. If streaking keeps coming back no matter what you use, our streak-free window cleaning guide covers the technique in more detail.
Step 8: Apply a Protectant
A matte, non-greasy protectant applied to the dashboard and plastic trim after cleaning slows how fast dust resettles by cutting down the static charge that makes it cling in the first place. Spray it onto a cloth rather than directly onto the surface and wipe evenly; over-applying leaves a greasy film that actually attracts more dust. If you want a product built specifically around that anti-static effect rather than a general protectant, see our comparison of dust repellent sprays for cars.
Step 9: Final Vacuum and Inspection
Run a quick second vacuum pass to catch dust stirred up during the earlier steps, then check every surface with a flashlight held at a low angle, which shows dust that direct overhead light hides. Wipe down anything you spot, then put the mats and other items back in.
How Often Should You Remove Dust?
A single monthly cleaning is not enough to keep dust from becoming visible, since it builds up faster than most people expect. A more realistic schedule is:
- Weekly quick clean: about 10 minutes vacuuming the floor and wiping the dashboard with a microfiber cloth keeps dust from ever becoming obvious.
- Monthly deep clean: the full process above, vents, crevices, and windows included, takes roughly 1-2 hours and resets the whole cabin.
- Seasonal deep clean: every 3-4 months, clean the AC system and shampoo the carpets for a genuine fresh start.
Drivers in dry, dusty climates like Arizona or Nevada usually need to clean more often than this baseline.
Preventing Dust Buildup in Your Car
Cleaning solves the problem after the fact; these habits cut down how much dust gets in to begin with:
- Keep windows up when parked: a simple habit that blocks a large share of incoming dust and pollen.
- Use heavy-duty floor mats: rubber mats trap more dust than carpet and shake clean in seconds.
- Wipe shoes before getting in: cuts down significantly on dust tracked in from the soles.
- Replace the cabin air filter yearly: a clogged filter pushes dust through the vents instead of catching it.
- Use a small cabin air purifier: reduces airborne dust on longer drives.
- Park in a garage when possible: garage-parked cars stay noticeably cleaner than ones left on the street.
Cleaning Different Car Surfaces
Not every surface in a car should be cleaned the same way. A quick reference by material:
- Dashboard and plastic trim: a microfiber cloth with an all-purpose cleaner, followed by a protectant spray to slow dust from resettling.
- Cloth seats: a thorough vacuum plus spot-cleaning stains with a dedicated upholstery cleaner.
- Leather seats: light vacuuming and a leather-specific cleaner; harsh all-purpose cleaners can dry out and crack leather over time.
- Carpets and mats: regular vacuuming with an occasional shampoo for a deeper reset every few months.
- Windows: glass cleaner sprayed onto a microfiber cloth, both sides of the glass, for a streak-free finish.
When in doubt about a specific surface, check the owner’s manual, since some manufacturers call out materials that need a gentler approach.
Common Mistakes to Avoid
- Using paper towels: they shed lint and can scratch plastic and glass; microfiber cloths do not.
- Overusing cleaner: too much spray leaves surfaces sticky, which actually attracts more dust. A light mist wiped dry works better.
- Skipping the vents: dust left in the vents just gets blown back into the cabin the next time the AC or heater runs.
- Cleaning in direct sunlight: heat dries cleaner into streaks faster than you can wipe it off; park in the shade instead.
- Ignoring the cabin air filter: a clogged filter is one of the most common reasons dust keeps coming back no matter how often the cabin is cleaned.
When to Call a Professional
Most dust removal is a DIY job, but a few situations are worth paying for:
- Deep AC system cleaning: a musty smell or heavy vent buildup often needs professional equipment to flush the evaporator and ductwork properly.
- Stubborn stains: set-in carpet or upholstery stains sometimes need extraction equipment a detailer has and a home vacuum does not.
- Time constraints: a full professional detail saves hours when the schedule does not allow for a proper DIY pass.
- Suspected mold: mold in the HVAC system or upholstery is a job for a professional with the right containment and cleaning agents.
A full interior detail typically runs somewhere in the $100-$200 range depending on the shop and vehicle size; our interior detailing cost guide breaks that down by service level.
Typical Costs of Dust Removal
- DIY supplies: microfiber cloths, all-purpose cleaner, a handheld vacuum, and a compressed air can typically run $60-$80 upfront, with $15-$20 a year in refills.
- Cabin air filter: $15-$30 a year for the part, less if you install it yourself.
- Professional detail: $100-$200 for a full interior clean, usually worth budgeting for once a year even for a mostly-DIY routine.
- Car wash membership: roughly $20 a month for regular exterior washes, which indirectly cuts down how much dust and grime tracks inside.
DIY cleaning is the cheapest way to keep dust under control day to day, with an occasional professional detail handling the deeper reset.
Dust Removal in Different Climates
- Dry climates (Arizona, Nevada): dust accumulates constantly; weekly cleaning and a protectant spray help keep it in check.
- Humid climates (Florida, Georgia): trapped moisture combines with dust to encourage mold, so vents need monthly attention and an air purifier helps.
- Cold climates (Minnesota, Colorado): road salt and snow track in extra grit; vacuum mats often and keep windows clear for visibility.
- Urban areas (New York, Los Angeles): pollution adds grime on top of ordinary dust, so wiping surfaces twice a week and changing filters on schedule matters more.
Why a Dust-Free Car Matters
A clean interior is not just about appearance. Less dust in the cabin means fewer allergy symptoms, easier breathing on long drives, and a more pleasant ride overall. It also affects resale value: a well-maintained, dust-free interior signals to a buyer that the rest of the car has probably been cared for too, which is one of the details appraisers and used-car buyers actually notice.

Conclusion
Removing dust from a car comes down to working top-down (headliner, then hard surfaces, then carpets), reaching the vents and crevices most cloths miss, and applying a protectant to slow how fast it comes back. A weekly 10-minute pass plus a monthly deeper clean keeps most cars from ever reaching the point where dust is visible from across the parking lot.
FAQs
How do I remove dust from my car’s interior?
Vacuum from the top down starting with the headliner, wipe hard surfaces with a microfiber cloth, clean the vents with a soft brush and compressed air, and finish the glass with a glass cleaner sprayed onto a cloth rather than the window.
Why should I clean the headliner before vacuuming the seats?
Dust and debris knocked loose from the headliner and upper dash falls down onto the seats and carpet as you work. Cleaning it first means that dust gets vacuumed up in the later steps instead of resettling on a surface you already finished.
How often should I clean the dust from my car?
A quick 10-minute vacuum and wipe-down weekly, plus a full deep clean once a month, keeps dust from building up. Dry or dusty climates usually need cleaning more often than that.
What tools do I need to remove dust from my car?
Microfiber cloths, a soft-bristle detailing brush, a handheld vacuum with attachments, a can of compressed air, and an all-purpose cleaner cover almost every surface in the cabin.
Can dust in my car make me sick?
Yes. Car dust carries pollen, dander, and fine particulate matter that can trigger allergy symptoms and respiratory irritation, and it can support mold growth in humid climates.
How do I prevent dust buildup in my car?
Keep windows up when parked, use heavy-duty floor mats, wipe shoes before getting in, replace the cabin air filter yearly, and park in a garage when possible.
Why does my car get so dusty inside?
Open windows, foot traffic, and the AC or heater pulling in outside air are the main sources. A car left uncleaned for a month or more will show a visible dust layer far faster than one cleaned weekly.
Should I hire a professional to remove dust from my car?
For deep AC system cleaning, set-in stains, or suspected mold, yes. Routine dust removal is a DIY job that does not need professional tools.
How much does it cost to remove dust from a car?
DIY supplies run about $60-$80 upfront plus $15-$30 a year for a cabin air filter. A professional interior detail typically costs $100-$200.
Products related to this article
Sponsored / affiliate links. As an Amazon Associate I earn from qualifying purchases. I may earn additional commission from eligible campaigns.