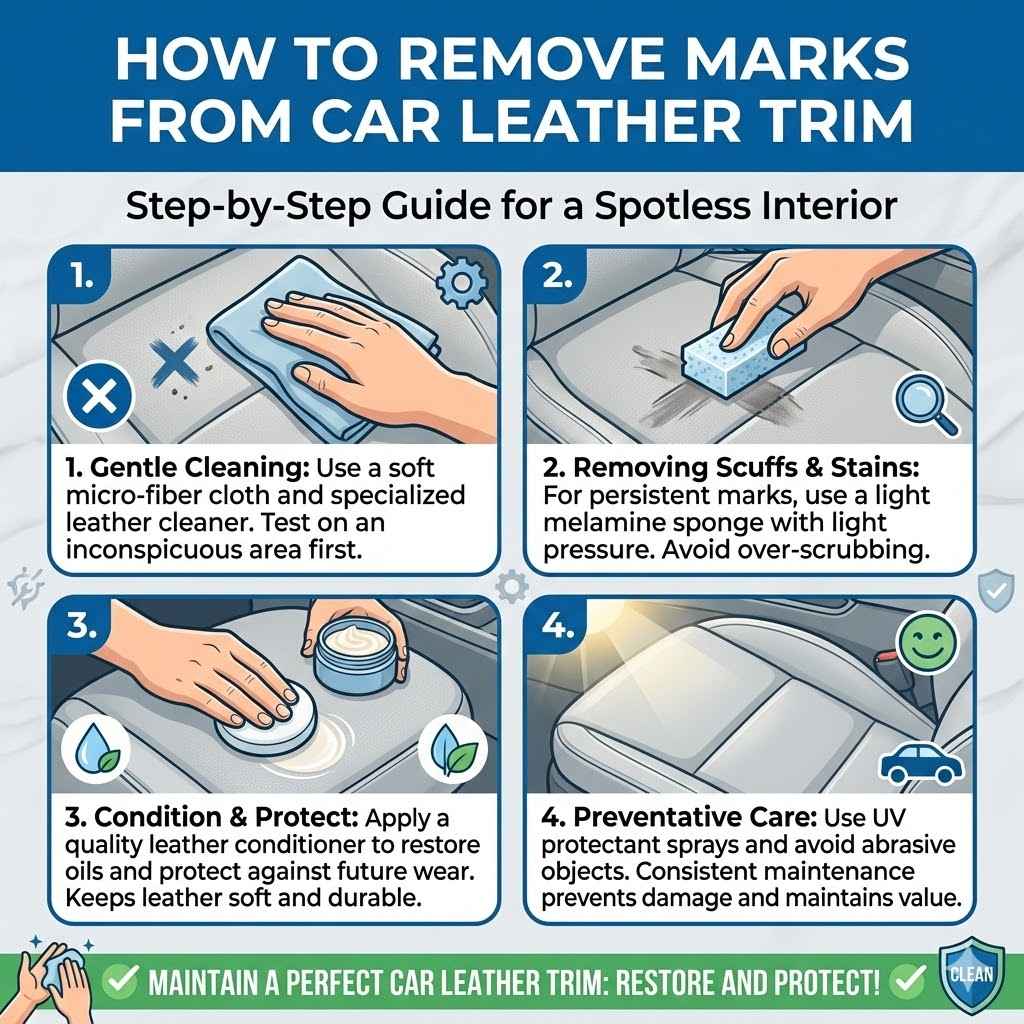
How to Remove Marks from Car Leather Trim
Keeping your car’s interior looking its best can be a challenge, especially when it comes to the leather trim. For many car owners, figuring out How to Remove Marks from Car Leather Trim can seem like a big task, leaving them unsure where to start. Little scuffs, scratches, or even ink stains can appear, and you want to fix them without causing more harm.
Don’t worry; it’s easier than you might think! This guide will show you a simple way to clean and restore your car’s leather. We’ll cover what you need and the exact steps to make those marks disappear.
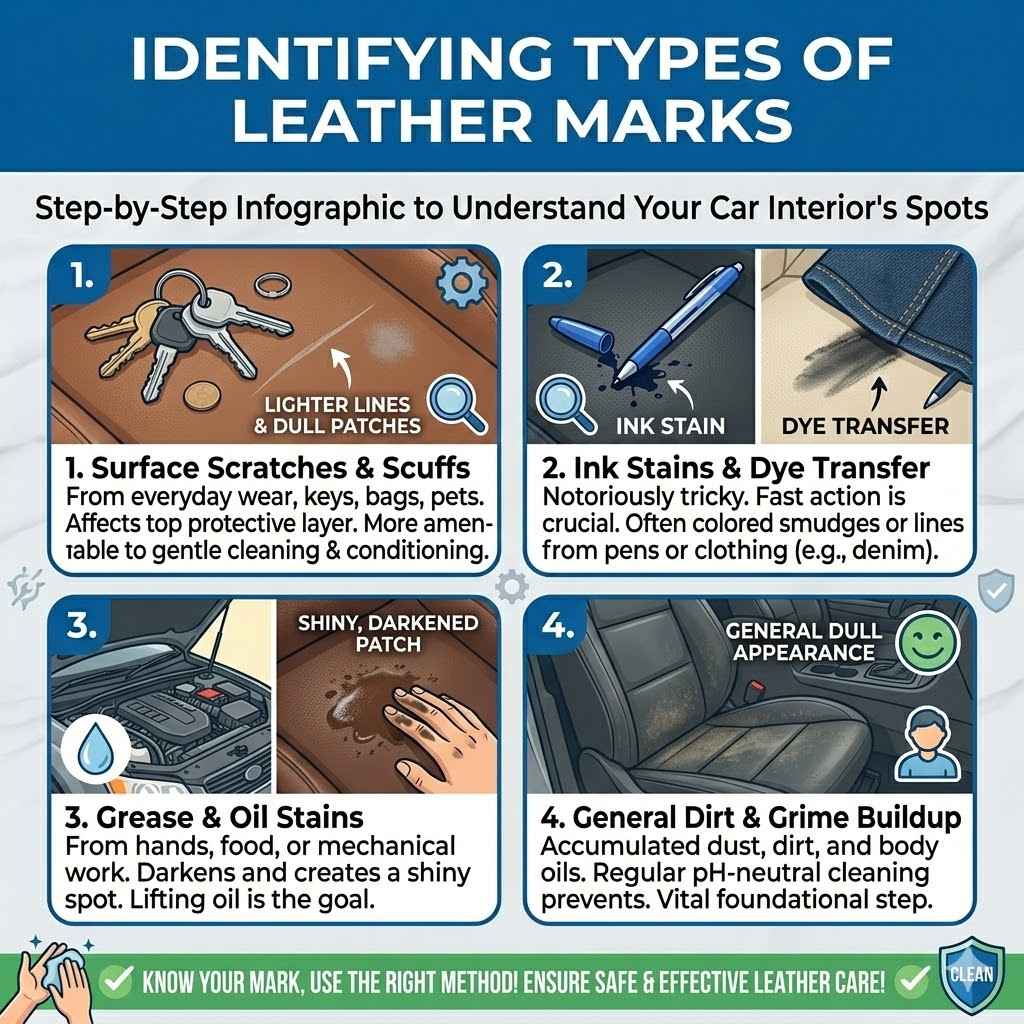
Identifying Types of Leather Marks
Before you can effectively remove marks from your car’s leather trim, it’s important to understand what kind of mark you’re dealing with. Different types of marks require different approaches, and using the wrong method can sometimes make the problem worse. Knowing the common culprits will help you choose the right cleaning agent and technique, ensuring a safe and effective clean for your car’s interior.
This section breaks down the most frequent offenders found on car leather and offers clues on how to spot them.
Surface Scratches and Scuffs
These are perhaps the most common types of marks you’ll find on car leather. Surface scratches and scuffs typically result from everyday wear and tear. Think of keys brushing against the door panel, bags being placed on seats, or even a pet’s claws.
They often appear as lighter lines or dull patches on the leather’s surface.
Unlike deeper gouges, surface scratches usually don’t go through the top layer of the leather’s protective coating. This makes them more amenable to gentle cleaning and conditioning. Sometimes, a good leather cleaner and conditioner can even make minor scuffs disappear by restoring the natural oils and color to the affected area.
The key here is gentle action to avoid making the scratch more prominent or spreading any damage.
Ink Stains and Dye Transfer
Ink stains are notoriously tricky. They often come from pens leaking in pockets or being handled near the leather. Dye transfer, on the other hand, happens when colored materials like denim jeans or certain seat covers rub against your leather, leaving behind their color.
These marks can look like colored smudges or lines.
Ink and dye transfer often require specialized cleaning solutions designed to break down the pigment without damaging the leather itself. It’s crucial to act fast with these types of stains, as the longer they sit, the harder they are to remove. Some cleaning products might be too harsh, stripping the leather’s finish or altering its color.
Always test any cleaner in an inconspicuous spot first.
Grease and Oil Stains
Hands that have been working on engines or handling greasy food can transfer oils and grease onto your car’s leather. These stains can darken the leather and create a shiny, unpleasant patch. Over time, grease can also break down the leather’s natural structure.
Dealing with grease and oil often involves using an absorbent material to draw out the stain. Poultices or specialized degreasers can be effective. The goal is to lift the oil from the pores of the leather.
Gentle blotting is usually recommended, as aggressive rubbing can spread the stain or push it deeper into the leather.
General Dirt and Grime Buildup
Over time, all leather interiors accumulate a layer of dust, dirt, and body oils. This buildup can dull the leather’s appearance and make it look worn. While not a specific “mark,” this general grime can make minor imperfections stand out more and diminish the overall look of your car’s interior.
Regular cleaning with a pH-neutral leather cleaner is the best way to prevent and remove this type of buildup. A good cleaning routine will not only keep your leather looking fresh but also prepare it for any spot treatments if specific marks appear. This foundational cleaning is a vital step in maintaining the leather’s health and appearance.
Gathering Your Cleaning Supplies
Having the right tools and cleaning products is essential for safely and effectively removing marks from car leather trim. Using common household cleaners not designed for leather can lead to discoloration, drying, or even permanent damage. This section guides you through the essential items you’ll need, ensuring you’re prepared for the cleaning task ahead and can tackle those stubborn marks with confidence.
Essential Cleaning Products
Your primary weapon against leather marks will be a good quality, pH-neutral leather cleaner. This type of cleaner is formulated to lift dirt and grime without stripping the natural oils from the leather, which is vital for maintaining its suppleness and preventing cracking.
-
pH-Neutral Leather Cleaner
This is your go-to for general cleaning and for lifting many types of light marks. It’s designed to break down oils and dirt without harming the leather’s finish. Always choose one specifically made for automotive leather. -
Leather Conditioner
After cleaning, conditioning is crucial. It replenishes the oils that have been removed during cleaning and protects the leather from drying out and cracking. It also helps to restore the leather’s natural sheen and can sometimes blend minor surface imperfections. -
Microfiber Cloths
You’ll need several soft, lint-free microfiber cloths. They are excellent for applying cleaners and conditioners, as well as for gently wiping away dirt and stains. Using different cloths for different stages of the cleaning process prevents cross-contamination. -
Soft Bristle Brush
A soft-bristled brush, like a detailing brush or an old, soft toothbrush, can be helpful for gently working the cleaner into textured areas or around stitching where dirt tends to accumulate. Be very gentle to avoid scratching the leather. -
Rubbing Alcohol (Isopropyl Alcohol 70%)
This is your tool for tougher stains like ink or dye transfer, but it must be used with extreme caution and diluted. It’s a powerful solvent and can dry out leather quickly, so it should only be applied sparingly to the stain itself and followed immediately by conditioning. -
Specialized Stain Removers (Optional)
For very specific or stubborn stains like grease or ink, you might consider a specialized automotive leather stain remover. These are formulated to target particular types of marks. Always follow the product’s instructions carefully.
Tools for Application and Protection
Beyond the cleaning solutions, a few simple tools make the job much easier and safer for your car’s leather.
-
Cotton Swabs (Q-tips)
These are invaluable for precise application of cleaning agents or rubbing alcohol directly onto small stains, minimizing contact with surrounding leather. -
Small Bowl or Bucket
For diluting cleaners if instructed, or for rinsing cloths. -
Gloves
To protect your hands from cleaning chemicals and prevent transferring oils from your hands to the leather during the cleaning process. -
Paper Towels (for Ink Stains)
For immediately blotting up excess ink or cleaning solution when dealing with ink marks.
Step-by-Step Guide: How to Remove Marks from Car Leather Trim
Now that you have your supplies, it’s time to tackle those marks. This step-by-step process breaks down how to effectively remove common marks from your car’s leather trim. Remember to always work gently and test products in an inconspicuous area first to ensure they don’t damage your leather.
Step 1 Cleaning the Area
Start by cleaning the entire section of leather where the mark is located. This removes surface dirt and allows you to see the mark more clearly.
- Spray a small amount of your pH-neutral leather cleaner onto a clean microfiber cloth. Do not spray directly onto the leather, as this can cause oversaturation.
- Gently wipe the leather in a circular motion. Work in small sections, covering the entire panel or seat where the mark is present.
- Use a separate, dry microfiber cloth to buff away any excess cleaner and dry the surface.
This initial cleaning step is crucial. It removes loose dirt and grime that could otherwise be rubbed into the leather during the stain removal process, potentially causing more scratches or dullness. It also helps to reveal the true nature of the mark, allowing for a more targeted approach in the next steps.
Step 2 Addressing Surface Scratches and Scuffs
For minor surface scratches and scuffs, a good cleaner and conditioner are often all you need.
- After cleaning, apply a small amount of leather conditioner to a clean microfiber cloth.
- Gently rub the conditioner into the scratched or scuffed area using a circular motion. Focus on working it into the mark.
- Allow the conditioner to penetrate for a few minutes. Then, use another clean, dry microfiber cloth to buff the area gently. The oils in the conditioner can help to plump up the leather fibers and make minor scratches less visible.
This process helps to restore moisture and flexibility to the leather. When the leather is well-conditioned, its surface appears smoother, and minor abrasions often blend away. For slightly deeper scuffs, repeat the conditioning process.
If the mark is still visible, it might be a deeper scratch requiring a specialized leather repair kit, but for most daily marks, this gentle conditioning is highly effective.
Step 3 Tackling Ink Stains and Dye Transfer
Ink and dye transfer require a more aggressive approach, but still one that is careful.
- Dampen a cotton swab (Q-tip) very lightly with 70% isopropyl alcohol. Do not soak it.
- Gently dab the ink or dye transfer mark with the alcohol-dampened swab. Work from the outside of the stain inward to avoid spreading it.
- Immediately follow by blotting the area with a clean, dry paper towel to absorb the loosened ink and alcohol.
- Repeat steps 7-9 sparingly, using a fresh part of the swab each time, until the stain is gone or significantly lightened.
- Once the stain is removed, immediately apply a generous amount of leather conditioner to the treated area with a microfiber cloth. This is crucial to rehydrate the leather, which alcohol can dry out very quickly.
It is extremely important to use the alcohol sparingly and to condition immediately afterward. Alcohol is a solvent and can strip the leather’s protective coating and natural oils, leading to drying and cracking. If the stain is large or deeply set, you might need to seek professional help.
Always test the alcohol on an unseen spot first to ensure it doesn’t discolor your specific leather type.
Step 4 Removing Grease and Oil Stains
Grease and oil stains need to be absorbed from the leather.
- For fresh grease stains, gently blot up as much excess grease as possible with a clean microfiber cloth or paper towel. Avoid rubbing.
- If the stain persists, you can try applying a small amount of cornstarch or baking soda directly onto the stain. Let it sit for several hours or overnight. These powders will absorb the oil from the leather.
- Gently brush off the powder with a soft brush or a clean microfiber cloth.
- If the stain remains, you can try a specialized leather degreaser, following the product instructions carefully. Apply it to a cloth, not directly to the leather, and blot the stain.
- After attempting to remove the grease, apply leather conditioner to the area to restore moisture.
The absorbent powders work by drawing the oil out of the leather’s pores. This method is gentle and can be very effective for recent grease marks. For older, set-in grease stains, professional cleaning might be the best option to avoid damaging the leather.
Always ensure good ventilation when using degreasers.
Step 5 Final Conditioning and Protection
The final step is to ensure the leather is well-protected and looks its best.
- Once you have addressed all the marks and the leather is clean and dry, apply a good quality leather conditioner to all the trim you have worked on, and ideally the entire panel or seat.
- Use a clean microfiber cloth to gently rub the conditioner into the leather in a circular motion.
- Allow the conditioner to soak in for 10-15 minutes.
- Buff off any excess conditioner with another clean, dry microfiber cloth. This leaves the leather supple, protected, and with a natural sheen.
Regular conditioning is the best way to prevent future marks and keep your car’s leather trim looking new for years. It replenishes essential oils, prevents drying and cracking, and makes the leather more resistant to stains and wear. Aim to condition your car’s leather at least every three to six months, or more often if the car is frequently exposed to harsh sun or extreme temperatures.
This proactive care is far easier than trying to fix damage later.
Preventative Measures for Leather Care
The best way to deal with marks on car leather trim is to prevent them from happening in the first place. A proactive approach to leather care can save you time and effort in the long run. Understanding common causes of damage and implementing simple habits can keep your car’s interior looking pristine.
This section offers practical tips to guard your leather against everyday wear and tear.
Regular Cleaning Habits
Consistent cleaning is your first line of defense. Dust and dirt particles act like fine sandpaper against leather, causing microscopic scratches that dull its finish over time. Body oils and sweat can also build up, attracting more dirt and potentially degrading the leather’s protective coating.
-
Weekly Wipe-Downs
A quick wipe with a slightly damp microfiber cloth can remove surface dust before it builds up. This takes just minutes and can prevent a lot of potential damage. -
Monthly Deep Clean
At least once a month, use a pH-neutral leather cleaner applied to a microfiber cloth. This will remove accumulated grime and oils. Follow up with a leather conditioner.
These regular cleaning sessions not only keep your leather looking good but also allow you to spot any developing issues, like small tears or stains, early on when they are easiest to fix.
Protecting from Environmental Factors
Sunlight and extreme temperatures are harsh enemies of leather. UV rays from the sun can fade and dry out leather, making it brittle and prone to cracking. High heat can accelerate this process, while extreme cold can make it stiff.
-
Use Sunshades
When parking your car in direct sunlight for extended periods, use a windshield sunshade. This significantly reduces the amount of UV radiation and heat that penetrates your car’s interior. -
Park in Shade When Possible
Whenever feasible, choose shaded parking spots. This simple act of parking strategically can make a big difference in preserving your leather’s condition. -
Window Tinting
High-quality window tinting can block a significant portion of harmful UV rays, offering continuous protection for your leather even when you’re driving.
These measures help to maintain the leather’s integrity and color, preventing premature aging and damage that can lead to marks and degradation.
Careful Use and Handling
How you and your passengers interact with the car’s interior plays a huge role in its condition.
-
Be Mindful of Keys and Sharp Objects
Avoid placing keys, tools, or other sharp objects directly on leather surfaces. Use a console organizer or tray to keep such items contained. -
Watch for Color Transfer
Be aware that dark clothing, especially new denim jeans, can transfer dye onto light-colored leather. If you notice any dye transfer, clean it promptly before it sets. -
Pet Care
If you transport pets, use protective seat covers or blankets to shield the leather from claws, dirt, and hair. Trim your pet’s nails regularly. -
Food and Drink Spills
Clean up any spills immediately. Blot liquids with a clean cloth and treat any stain that remains with the appropriate leather cleaner. Avoid eating or drinking in the car if possible.
These small habits, when consistently practiced, create a protective shield around your car’s leather, minimizing the chances of accidental scratches, stains, and other damage.
When to Seek Professional Help
While this guide covers many common marks, there are situations where professional help is the best course of action.
-
Deep Scratches or Tears
If the leather is deeply cut, torn, or punctured, DIY repair might not be sufficient and could worsen the damage. Professional leather repair services can often mend these issues seamlessly. -
Large or Stubborn Stains
Extensive ink stains, dye transfer, or oil marks that don’t respond to home treatments may require specialized equipment and chemicals only available to professionals. -
Color Restoration
If your leather has faded significantly or has uneven discoloration from sun exposure or past damage, a professional detailer can perform color restoration to match and re-dye the affected areas. -
Concerns about Leather Type
If you are unsure about the type of leather in your car or are hesitant about using certain cleaning agents, consulting a professional can provide peace of mind and prevent costly mistakes.
Professionals have access to advanced techniques and products, ensuring the best possible outcome for your car’s leather, especially for significant damage or sensitive materials.
Frequently Asked Questions
Question: Can I use baby wipes to clean car leather?
Answer: It is generally not recommended to use baby wipes on car leather. While they may seem gentle, many baby wipes contain chemicals, perfumes, or alcohol that can dry out or damage the leather’s finish over time. It’s best to stick to cleaners specifically designed for automotive leather.
Question: How often should I condition my car leather?
Answer: You should condition your car leather every three to six months. If your car is exposed to harsh sun or extreme temperatures, or if you notice the leather feeling dry, you may need to condition it more frequently. Regular conditioning keeps the leather supple and prevents cracking.
Question: Will a leather repair kit fix deep scratches?
Answer: Some leather repair kits are designed for minor to moderate scratches and can provide good results. However, very deep scratches or tears might be beyond the scope of a DIY kit and may require professional attention for a truly seamless repair.
Question: Is it safe to use saddle soap on car leather?
Answer: Saddle soap is typically formulated for equestrian leather and can be too harsh for automotive leather. It might strip the protective finishes and oils, leading to drying and damage. It is safer to use cleaners and conditioners specifically made for car leather interiors.
Question: What should I do if I accidentally spill something on my car leather?
Answer: Act quickly. Blot up any liquid spill immediately with a clean, absorbent cloth to prevent it from soaking into the leather. If a stain remains, use a dedicated leather cleaner and follow the steps outlined in this guide to treat it.
Prompt action minimizes the chance of a permanent mark.
Summary
Mastering How to Remove Marks from Car Leather Trim is achievable with the right knowledge and supplies. This guide showed you how to identify different types of marks, gather your tools, and follow a step-by-step cleaning process. By gently cleaning, conditioning, and using targeted methods for specific stains, you can restore your car’s leather.
Remember that preventative care, like regular cleaning and protection from the elements, is key to keeping your leather looking its best for years to come.