Which Battery Terminal to Connect First Safely
When working with car batteries, connecting the terminals in the right order might seem tricky. Many people wonder about Which Battery Terminal to Connect First Safely, especially if they are new to car maintenance. It’s easy to feel a bit unsure.
But don’t worry! This guide will show you a simple, safe way to do it, step by step. We’ll cover why it matters and how to get it done right every time.
Understanding Battery Terminal Connections
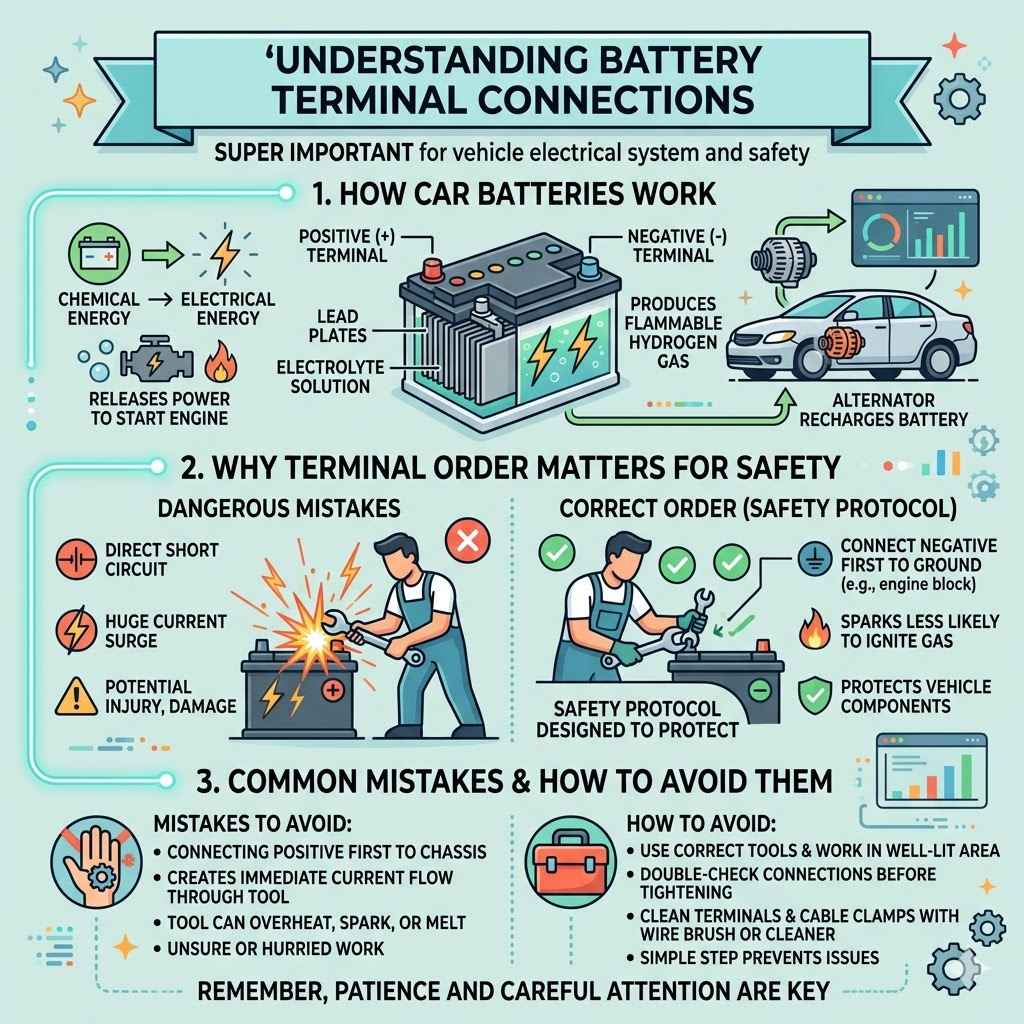
Correctly connecting battery terminals is super important for your vehicle’s electrical system and for your safety. When you need to jump-start a car or replace a battery, knowing the proper sequence prevents sparks, protects sensitive electronics, and avoids damage. Getting this wrong can lead to a blown fuse, damage to the car’s computer, or even a battery explosion if sparks occur near flammable gases.
This section breaks down the basics of how batteries work and why terminal order is key.
How Car Batteries Work
A car battery is essentially a lead-acid battery. It stores electrical energy in a chemical form and releases it when needed to start the engine and power the car’s systems when the engine is off. It contains lead plates submerged in an electrolyte solution, typically sulfuric acid and water.
When the engine starts, the chemical reaction within the battery produces electricity. Over time, this chemical reaction can produce hydrogen gas. This gas is flammable, which is why preventing sparks is so vital.
The battery has two terminals: a positive (+) and a negative (-). The positive terminal is usually marked with a plus sign and is often red. The negative terminal is marked with a minus sign and is usually black.
The flow of electricity is from the positive terminal, through the car’s electrical system, and back to the negative terminal. The car’s alternator recharges the battery when the engine is running.
Why Terminal Order Matters for Safety
Connecting the battery terminals incorrectly can create a direct short circuit if the wrench or tool touches the car’s metal body while connected to the positive terminal. This can cause a huge surge of electricity, leading to sparks, potential injury, and damage to the car’s electrical components. Specifically, connecting the negative terminal first to the chassis or engine block creates a ground connection.
When the positive cable is then connected, any sparks that might occur are less likely to ignite any stray hydrogen gas that could be near the battery.
On the other hand, if you connect the positive terminal first and then touch the negative terminal to the car’s metal frame, you are creating a circuit. This spark can ignite hydrogen gas. So, the order is not just a suggestion; it’s a safety protocol designed to protect both you and your vehicle from serious damage.
This guide will make sure you always know which battery terminal to connect first safely.
Common Mistakes and How to Avoid Them
One common mistake is connecting the positive terminal first to the car’s chassis. This is dangerous because it creates an immediate path for current to flow through the tool you are using, potentially causing it to overheat, spark, or even melt. Another error is not ensuring a clean connection.
Corroded terminals can prevent a good flow of electricity, making it harder for the car to start or the battery to charge properly.
To avoid these, always use the correct tools and work in a well-lit area. Double-check your connections before you fully tighten them. Cleaning the battery terminals and the cable clamps with a wire brush or a battery terminal cleaner is also a good practice to ensure a solid connection.
This simple step can prevent many issues. Remember, patience and careful attention are key when working with car batteries.
The Safe Sequence for Connecting Battery Terminals
Knowing the correct order to connect battery terminals is a fundamental skill for any car owner or DIY mechanic. This sequence is specifically designed to minimize the risk of electrical sparks, protecting both the user and the vehicle’s sensitive electronics. Following these steps will ensure you know Which Battery Terminal to Connect First Safely, making the process straightforward and secure.
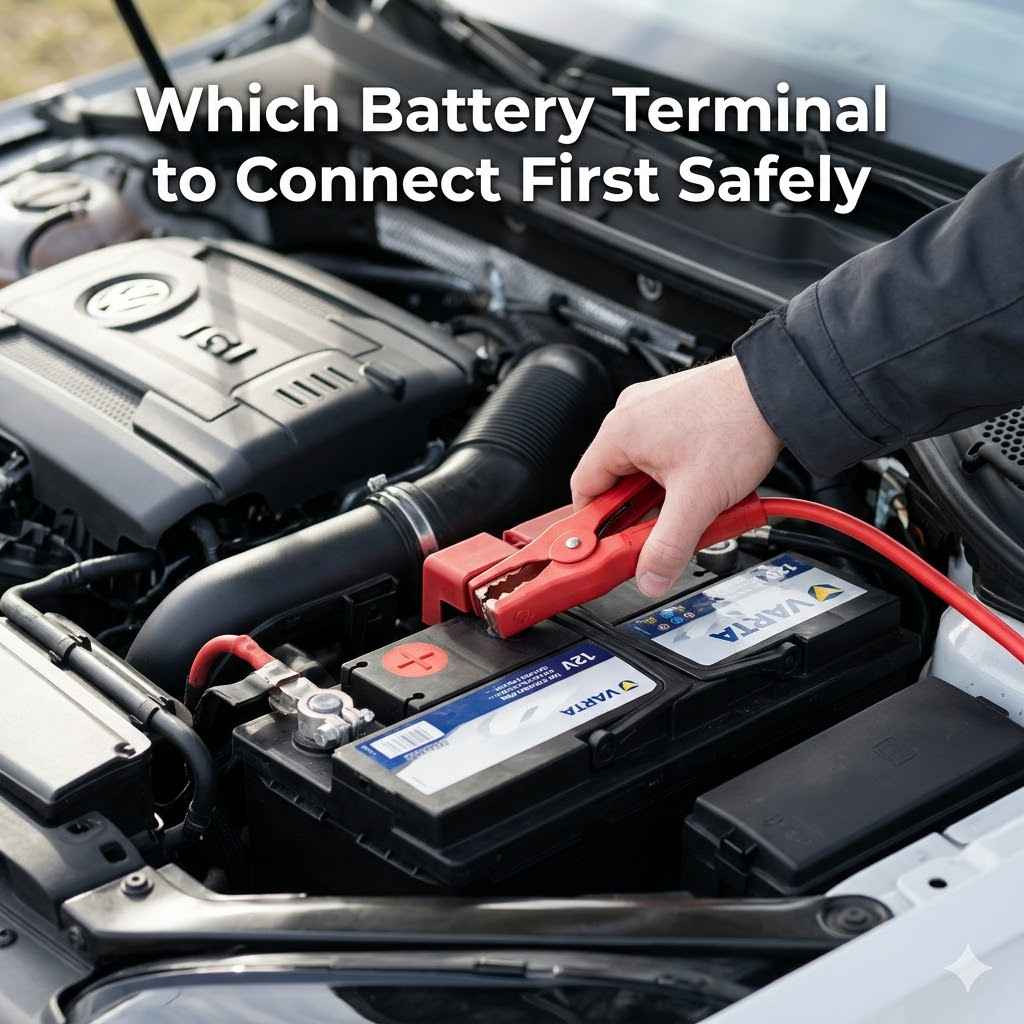
Step 1 Connecting the Positive Terminal
First, locate the positive terminal on your car battery. It is usually marked with a plus sign (+) and may have a red cover or cable. Ensure the battery clamp on the positive jumper cable is clean and free of corrosion.
Carefully attach this clamp firmly to the positive (+) terminal of the battery. Make sure it’s a snug fit so there’s good electrical contact.
This step is crucial. Attaching the positive cable first establishes the primary connection for power distribution throughout the vehicle. It’s important that this connection is secure before proceeding to the next step.
If you are jump-starting, ensure the other end of this cable is connected to the positive terminal of the good battery. If you are installing a new battery, this is the first cable you’ll reconnect.
Step 2 Connecting the Negative Terminal
Next, locate the negative terminal on the battery. It is usually marked with a minus sign (-) and may have a black cover or cable. Take the negative jumper cable clamp and attach it firmly to the negative (-) terminal of the battery.
Again, ensure a tight connection for optimal electrical flow.
This is the critical part for safety. By connecting the negative terminal last, any minor sparks that might occur when you attach the clamp are less likely to ignite hydrogen gas that could be escaping the battery. This minimizes the risk of explosion.
If you are jump-starting, the other end of this negative cable should be connected to an unpainted metal surface on the engine block or chassis of the dead car, away from the battery itself. This creates a “ground” connection.
Step 3 Securing and Checking Connections
Once both terminals are connected, give the clamps a gentle tug to ensure they are secure and have not slipped off. Check that the cables are not touching any moving parts of the engine, like belts or fans, or any hot surfaces like the exhaust manifold. Proper seating of the clamps is essential for a strong electrical connection and to prevent shorts.
A loose connection can lead to intermittent power, difficulty starting, or a dead battery even after a jump. It’s also wise to inspect the battery itself for any signs of damage, such as cracks or leaks. If the battery looks damaged, do not proceed and seek professional help.
Ensuring these connections are solid is the final step in safely connecting your battery.
Example: Jump-Starting Safely
Let’s say your car won’t start, and you need a jump-start from a friend.
- Connect the red (+) clamp of the jumper cables to the positive (+) terminal of the dead battery.
- Connect the other red (+) clamp to the positive (+) terminal of the good battery.
- Connect the black (-) clamp of the jumper cables to the negative (-) terminal of the good battery.
- Connect the other black (-) clamp to an unpainted metal surface on the engine block or chassis of the dead car, away from the battery.
- Start the working car and let it run for a few minutes. Then, try starting the dead car.
- Once the dead car starts, disconnect the cables in the reverse order: black from the chassis of the formerly dead car, black from the good battery, red from the good battery, and finally, red from the formerly dead car’s battery.
This order ensures that any sparks during the disconnection phase happen when the circuit is less complete, further reducing risk. This practical example illustrates Which Battery Terminal to Connect First Safely in a common scenario.
Understanding Electrical Safety Precautions
Working with car batteries involves significant electrical and chemical hazards. It’s not just about knowing which terminal to connect first; it’s about adopting a mindset of caution. This section covers essential safety gear and practices to keep you safe during any battery-related task.
Essential Safety Gear
Always wear safety glasses or goggles to protect your eyes from potential acid splashes or sparks. Gloves, preferably made of rubber or nitrile, are also recommended to protect your skin from battery acid and to provide a better grip. If you have long hair, tie it back to prevent it from getting caught in moving engine parts or near electrical connections.
Wearing old clothes is a good idea, as battery acid can damage fabrics. Avoid wearing jewelry, especially metal rings or necklaces, as these can conduct electricity and cause severe burns or short circuits if they accidentally contact battery terminals or other metal parts of the car.
Working Environment Considerations
Ensure you are working in a well-lit, well-ventilated area. Batteries can release flammable hydrogen gas, especially when charging or discharging. Good ventilation helps disperse this gas, reducing the risk of explosion.
Never smoke or use open flames near a battery.
Keep the work area clean and free of clutter. Remove any metal objects that could accidentally fall and create a short circuit between the battery terminals or between a terminal and the car’s body. If working in the rain, take extra precautions to stay dry and avoid electrical hazards.
Dealing with Battery Acid
Battery acid (sulfuric acid) is highly corrosive. If it comes into contact with your skin or eyes, rinse the affected area immediately with plenty of cool water for at least 15 minutes. If acid gets into your eyes, seek medical attention right away.
If you spill acid on your clothes, wash them thoroughly before wearing them again.
To neutralize battery acid spills, you can use a solution of baking soda and water. This will create a fizzing reaction as it neutralizes the acid. After the fizzing stops, rinse the area with clean water.
Keep a box of baking soda handy whenever you work with car batteries.
Troubleshooting Common Battery Connection Issues
Even when following the correct procedure, you might encounter problems. Understanding how to troubleshoot common issues can save you time and prevent further complications. This section addresses what to do if you face problems after connecting your battery.
No Power After Connecting
If you’ve connected the battery terminals correctly, but the car shows no signs of life (no dashboard lights, no starter sound), several things could be wrong. First, double-check that the battery terminals are clean and the clamps are tight. A loose connection is a very common reason for a complete lack of power.
Another possibility is that the battery itself is dead and cannot hold a charge. If you were jump-starting, the battery in the other car might have been too weak. Also, check the main fuse or circuit breaker for the car’s electrical system.
A blown fuse will prevent power from reaching the rest of the car, even with a good battery.
Sparks When Connecting
If you notice sparks when connecting the battery, it’s usually a sign that you are completing a circuit. This is why connecting the negative terminal last to a ground point is so important. If you are sparking when connecting the positive terminal, it likely means the tool you are using is touching both the positive terminal and a grounded metal part of the car simultaneously.
If sparks occur when connecting the negative terminal to the chassis, it could indicate a parasitic drain or a short in the vehicle’s electrical system. If the sparks are significant, disconnect immediately and try to identify the cause. It’s best to consult a mechanic if you are unsure about persistent sparking.
Vehicle Electronics Not Working Properly
Sometimes, after connecting a battery, certain electronic systems like the radio, clock, or power windows might not work correctly or may need to be reset. This is often because the car’s computer system lost power and needs to re-initialize.
For stereos, you might need to re-enter the radio code. For other systems, you might find instructions in your car’s owner’s manual on how to reset them. In some cases, a power surge during improper connection can damage electronic modules.
If problems persist after a reset, a diagnostic check at a service center may be necessary.
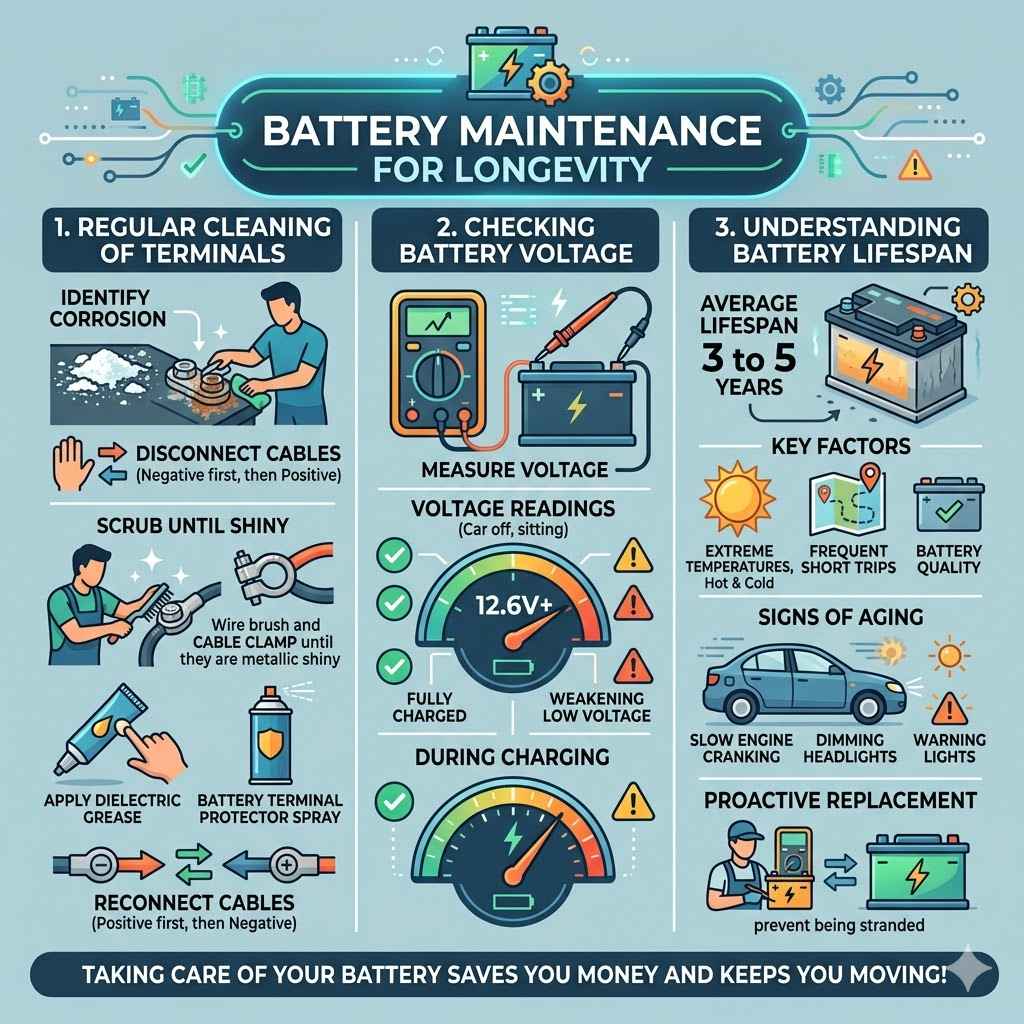
Battery Maintenance for Longevity
Taking care of your battery not only ensures it functions correctly but also extends its lifespan. Proper maintenance can prevent issues down the line and save you money. This section offers simple tips to keep your battery in good shape.
Regular Cleaning of Terminals
Corrosion on battery terminals can significantly hinder electrical flow. This white, powdery substance can build up over time. To clean them, disconnect the battery cables (negative first, then positive).
Use a wire brush or a dedicated battery terminal cleaning tool to scrub the terminals and the inside of the cable clamps until they are shiny.
After cleaning, you can apply a thin layer of dielectric grease or a battery terminal protector spray. This helps prevent future corrosion. Reconnect the cables, making sure to connect the positive (+) cable first, then the negative (-) cable.
Checking Battery Voltage
You can check your battery’s health by measuring its voltage using a multimeter. A fully charged 12-volt battery should read around 12.6 volts or higher when the car is off and has been sitting for a few hours. If the voltage drops significantly below this, it might indicate a weakening battery that needs attention or replacement.
During charging, the voltage should rise. For example, when jump-starting or using a charger, you might see readings around 13-14 volts. Consistent low voltage readings suggest the battery is no longer able to hold a sufficient charge, and it’s time to consider a new one.
Understanding Battery Lifespan
The average lifespan of a car battery is about 3 to 5 years. This can vary based on climate, driving habits, and battery quality. Extreme temperatures, both hot and cold, can reduce battery life.
Frequent short trips where the battery doesn’t get fully recharged can also shorten its life.
When your battery starts to age, you might notice symptoms like slower engine cranking, dimming headlights, or warning lights on the dashboard. Proactive replacement before a complete failure can prevent you from being stranded. Many auto parts stores can test your battery for free to give you an idea of its remaining life.
Frequently Asked Questions
Question: Which battery terminal should I connect first when installing a new battery
Answer: When installing a new battery, you should connect the positive (+) terminal first, followed by the negative (-) terminal.
Question: Is it safe to touch both battery terminals at the same time
Answer: No, it is not safe to touch both battery terminals at the same time, as this will create a short circuit and can cause sparks or injury.
Question: What happens if I connect the negative terminal first
Answer: If you connect the negative terminal first, and then connect the positive terminal and your tool touches the car’s metal body, you can create a dangerous spark. It’s safer to connect the positive terminal first, then the negative terminal to a ground point away from the battery when jump-starting.
Question: How do I know if my battery terminals are corroded
Answer: Corroded battery terminals usually have a white or bluish-green powdery substance on them. They might also appear dull or tarnished.
Question: Can I use a regular wrench to connect battery terminals
Answer: It is best to use an insulated wrench if possible, or to be very careful not to touch any metal parts of the car’s body or other electrical components while connecting the terminals.
Summary
Knowing Which Battery Terminal to Connect First Safely is about following a simple, proven method. Always connect the positive (+) terminal first, then the negative (-) terminal to a ground point when jump-starting or the negative terminal directly when installing. This sequence prevents dangerous sparks and protects your vehicle’s electronics.
Always wear safety gear and work in a well-ventilated area.