Car Wiring Diagnostics Battery Check Tool That Actually Works
Understanding Car Battery Wiring and Diagnostics
Your car battery is a key part. It starts the engine. It powers all electronics.
The battery has wires. These wires carry power. They connect the battery to the car.
If these wires have problems, nothing works right.
You might see strange signs. Lights could flicker. The engine might crank slowly.
Or it might not start at all. These can point to wiring issues. Or they could be battery problems.
Sometimes, it’s both. Figuring this out is important. We need to know how to check.
The goal is to find the cause. Is it the battery itself? Is it the cables connecting it?
Or is it the way the cables attach to the battery terminals? This guide helps you find out. It focuses on tools.
It shows you what tools are good. It explains how to use them.
Car battery wiring diagnostics involve checking connections and cables. Essential tools include a voltmeter, multimeter, battery terminal cleaner, and sometimes a load tester. Proper checks help identify issues like corrosion, loose terminals, or damaged wires causing starting problems or electrical faults.
My Own Battery Blunder: A Lesson Learned
I remember one cold morning. My car refused to start. I felt a pang of panic.
It was early. I had to get to work. I thought, “It’s the battery.” I grabbed a wrench.
I saw a bit of white stuff on the terminals. “Ah, corrosion!” I thought. I scraped it off.
I tightened the bolts a little. Still nothing. It felt like forever.
I felt frustrated. I tried again. The engine just whined sadly.
I stood there, shivering. I wondered if I had made things worse. I hadn’t really tested anything.
I just guessed. That day, I learned a big lesson. Guessing isn’t good enough.
You need to test. You need the right tools.
Battery Wiring Basics: What to Look For
Visual Check: Look at the battery terminals. See any white, blue, or greenish powder? That’s corrosion.
It stops power flow. Also, check the cables themselves. Are they frayed?
Are they stiff or cracked? This is bad.
Connection Tightness: Gently try to wiggle the cables on the battery posts. They should be very snug. If they move easily, they are too loose.
This is a common problem.
Cleanliness: Terminals and cable ends need to be clean. Dirt and grime can also block power. Cleaning them is a simple but vital step.
The Core Diagnostic Tools: Your Essential Kit
When you face car battery trouble, you need tools. These tools help you see what’s happening. They give you facts.
Not just guesses. Let’s talk about the best ones. The ones that actually work.
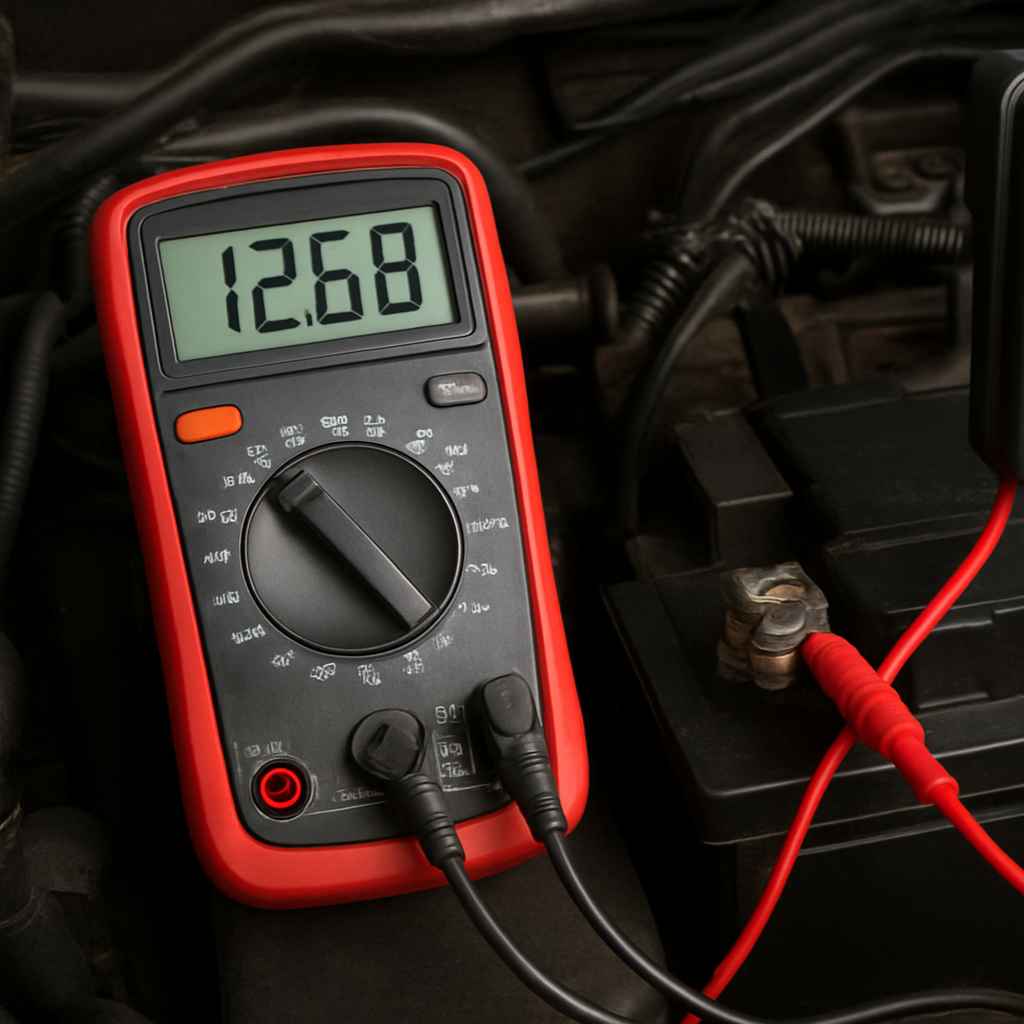
1. The Multimeter: Your Power Detective
A multimeter is a must-have. It measures voltage. It can also measure current.
And resistance. For battery wiring, voltage is key. You need to know the battery voltage.
This tells you how much power is there.
A good battery should read about 12.6 volts. When the engine is off, this is the resting voltage. If it’s lower, the battery might be weak.
Or it might not be charging right. A multimeter is simple to use. You set it to DC voltage.
Then touch the red probe to the positive battery cable. Touch the black probe to the negative battery cable.
You can also use it to check the cables. You can test for voltage drop. This happens when power is lost through a bad connection.
This is a bit more advanced. But it’s very useful. It tells you if the battery cables are faulty.
Many DIYers use a digital multimeter. They are easy to read. They are also pretty cheap.
You can find good ones for under $20. It’s an investment that pays off fast.
2. The Battery Terminal Cleaner: For a Clean Start
Corrosion is the enemy of good battery connections. It looks like powder. It can be white, blue, or green.
This stuff builds up on the terminals. It stops electricity from flowing freely. It’s like putting a blanket on the connection.
A battery terminal cleaner is simple. It’s often a wire brush tool. It has parts to clean the posts and the inside of the cable clamps.
You use it to scrub away the corrosion. It’s important to do this right. You want a shiny metal surface.
This allows for a strong, clean connection.
Some people use sandpaper. That can work. But a dedicated cleaner is better.
It’s shaped to fit the terminals. It gets into the nooks. Always clean both the battery posts and the cable ends.
Don’t forget either part.
Safety first! Wear gloves and eye protection. When you clean, the corrosion can get on your hands.
It’s not good for you. Also, battery acid can be present. So, be careful.
3. The Voltmeter (Simple): Quick Voltage Check
A basic voltmeter is simpler than a multimeter. It just shows voltage. It often has a needle or simple lights.
It’s for a quick check. You can see if the battery has power.
These are very cheap. Some are less than $10. They are good for a fast look.
But they don’t tell you as much as a multimeter. They can’t measure resistance. They can’t measure current.
They are limited.
For car battery wiring, you need more info. You need to know more than just “is there voltage.” You need to know “how much” voltage. And if it’s stable.
So, a multimeter is usually better.
Understanding Voltage Readings
12.6V+: Full charge. Your battery is likely good.
12.4V – 12.6V: Good charge. Battery is likely fine.
12.0V – 12.4V: Partially discharged. Battery may need charging.
Below 12.0V: Significantly discharged. Battery might be bad or not charging.
During Cranking: Voltage should not drop below 9.6V.
When Basic Tools Aren’t Enough: Advanced Diagnostics
Sometimes, even with a multimeter, it’s tricky. The battery shows good voltage. But the car still won’t start right.
This is where other tools come in. These help test the battery under load. Or test the cables more deeply.
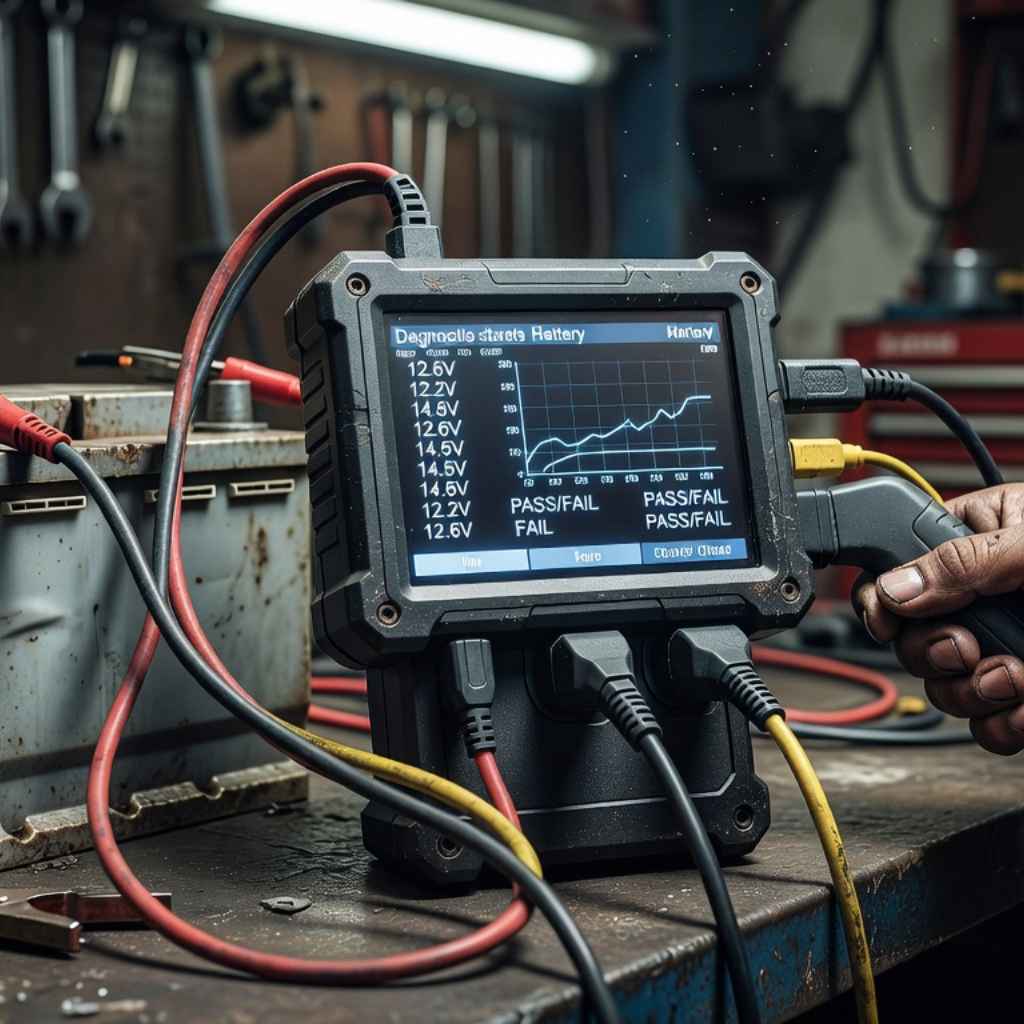
4. The Battery Load Tester: Simulating the Start
A battery load tester is important. It checks how the battery acts when it’s working hard. Like when you try to start the car.
It applies a controlled load. Then it measures the voltage. This is a real test of the battery’s health.
A good battery will keep its voltage up. Even under load. A weak battery will drop voltage fast.
This tool can tell you if the battery itself is failing. Even if it reads okay at rest. Many auto parts stores offer this test for free.
That’s a great option if you don’t want to buy one.
There are different types. Some are simple handheld devices. Others are more complex.
For home use, a simple, reliable one is good. Look for one that’s easy to connect. And easy to read.
5. The Circuit Tester or Power Probe: Tracing the Flow
A circuit tester is useful for finding breaks. Or bad grounds. It’s like a light.
Or a digital display. It tells you if power is getting to a point. And if that point is grounded.
A Power Probe is a more advanced version. It can test for voltage. It can test for ground.
It can even apply a small amount of power. This helps you see how a circuit reacts. It’s great for tracing wiring problems.
It helps you see where the power stops.
If your car has odd electrical issues, these tools are key. They help you follow the path of electricity. They can spot issues in the wiring harness.
Or bad connections beyond the battery.
6. Battery Terminal Pliers: For Stubborn Clamps
Sometimes, battery clamps are really stuck. Corrosion can fuse them to the posts. Or they might be very tight from age.
You need a special tool to help remove them.
Battery terminal pliers are designed for this. They have a hook. This hook fits under the clamp.
Then you turn a screw. This lifts the clamp off the post. It does this without damaging the battery post.
Or the clamp itself.
Using the wrong tools can bend the posts. Or break them. That’s a much bigger problem.
So, these pliers are a smart buy if you deal with car batteries often.
Myth vs. Reality: Battery Terminals
Myth: If the car starts, the battery connections are fine.
Reality: A loose or corroded connection can still allow enough power for a weak start. Or it can cause intermittent problems. Consistent testing is key.
Myth: Cleaning terminals once fixes the problem forever.
Reality: Corrosion can return. Regular checks are needed, especially in humid or salty air.
Myth: Any metal object can be used to clean terminals.
Reality: Using incorrect tools can damage terminals or create new problems. Use dedicated tools for best results.
The Process: How to Use Your Tools Effectively
Having the tools is one thing. Knowing how to use them is another. Here’s a simple process for checking your car battery wiring.
Step 1: Safety First
Always. Wear safety glasses. Wear gloves.
Make sure the car is off. The parking brake is on. If you’re unsure, get help from a pro.
Step 2: Visual Inspection
Look at the battery. Are there any cracks? Any leaks?
Check the battery cables. Are they intact? Do they look old and brittle?
Look at the terminals. See any corrosion? This is your first clue.
Step 3: Cleaning the Terminals
If you see corrosion, clean it. Use your battery terminal cleaner. Scrub the posts and the inside of the clamps.
Rinse with a little water if needed. Dry them well. Apply a thin coat of dielectric grease.
This helps prevent future corrosion.
Step 4: Check Cable Tightness
Gently try to move the cables. They should not budge. If they are loose, tighten them.
Be careful not to overtighten. You don’t want to crack the battery casing.
Step 5: Voltage Test with Multimeter
Set your multimeter to DC volts. Put the red probe on the positive terminal. Put the black probe on the negative terminal.
Note the reading. A healthy battery should be above 12.4V. Ideally around 12.6V.
Step 6: Load Test (Optional but Recommended)
If you have a load tester, use it. Connect it to the battery. Apply the load as directed.
Watch the voltage. It should stay above 9.6V. If it drops lower, the battery is weak.
Step 7: Voltage Drop Test (Advanced)
This tests the cables. With the engine off, connect the multimeter to the positive battery post and the positive cable clamp. Then connect another set from the negative battery post to the negative cable clamp.
You want to see a very low reading, ideally near zero. A high reading indicates resistance in the cable or connection.
Quick Scan Table: Tool Spotlight
| Tool | Primary Use | When to Use |
|---|---|---|
| Multimeter | Measure Voltage | Always for battery checks |
| Terminal Cleaner | Remove Corrosion | When you see white/blue powder |
| Load Tester | Test battery under strain | When battery voltage is low or starting is weak |
| Circuit Tester | Trace power/ground issues | When electrical parts don’t work |
Real-World Scenarios: When Things Go Wrong
Let’s look at common issues you might face. And how your tools help.
Scenario 1: No Crank, No Lights
You turn the key. Nothing happens. No lights on the dash.
No sound. This is a total power loss. Your first check is the battery.
Use your multimeter. Check the voltage at the battery posts. If it’s zero, there’s no power.
This could mean a totally dead battery. Or a complete break in the main power cable. Or a loose connection at the battery itself.
Check the clamps first. Are they on tight? Clean them.
Then check voltage again. If still zero, the battery might be bad. Or the cable is broken inside.
A load tester won’t help here. Because there’s no power to test.
Scenario 2: Slow Crank, Dim Lights
The engine turns over slowly. The headlights look dim. This means some power is getting through.
But not enough. The battery might be weak. Or the connections are poor.
First, clean and tighten the terminals. Then, use your multimeter. Check the voltage.
If it’s low, charge the battery. If the voltage is okay (12.4V+), try a load test. This will show if the battery fails under stress.
If the battery passes the load test, check for voltage drop in the cables. This points to a bad cable or connection.
Scenario 3: Intermittent Electrical Problems
Lights flicker. Radio cuts out. Sometimes the car starts, sometimes not.
This is frustrating. It’s often a loose connection. Or a bad ground.
Corrosion is a common culprit. Clean the terminals thoroughly. Ensure they are tight.
If the problem continues, a circuit tester can help. You can test power at different points. You can check for good grounds.
This helps find where the signal is getting lost. It might be a faulty ground strap. Or a corroded wire in the harness.
Scenario 4: Battery Drains Quickly
You charge the battery. It works fine for a day or two. Then it’s dead again.
This means there’s a parasitic drain. Something is using power when the car is off.
This is a more complex issue. You’ll need a multimeter set to measure current (amps). Disconnect the negative battery cable.
Connect the multimeter in series. It measures the amps flowing out. Then, you start pulling fuses one by one.
When the amp reading drops significantly, you’ve found the circuit causing the drain.
What This Means For You
When it’s normal: A clean, tight battery connection. Battery voltage between 12.4V and 12.7V when the car is off. The engine cranks briskly.
When to worry: Visible corrosion. Loose terminals. Low battery voltage (below 12.4V).
Slow engine crank. Dim lights. Intermittent electrical issues.
Battery draining too fast.
Simple checks: Look at your battery weekly. Ensure cables are snug. Clean any visible corrosion.
This simple care can prevent big headaches.
When to Call a Professional
While these tools are great for DIY checks, some problems are tough. If you’ve tried everything. And still can’t find the issue.
Or if you’re uncomfortable working on your car. It’s time to get help.
A trained mechanic has more advanced tools. They have experience. They can diagnose complex electrical systems.
They can also check the alternator. The alternator charges the battery while the car runs. A bad alternator can mimic battery problems.
Don’t risk damaging your car. Or yourself. If the problem is beyond your skill, call a pro.
They can get your car running safely and reliably.
Quick Fixes and Tips for Battery Wiring Health
Here are some practical tips to keep your battery wiring healthy.
- Regular Cleaning: Make it a habit. Clean battery terminals at least twice a year. More if you live in a humid or salty area.
- Dielectric Grease: Always apply a thin layer after cleaning. It protects against moisture and corrosion.
- Check Cable Condition: Look for signs of wear or damage on the cables themselves. Replace them if they look old or brittle.
- Proper Tightening: Don’t overtighten clamps. Just make them snug. Overtightening can crack the battery case.
- Secure Mounting: Make sure the battery is held firmly in its bracket. A loose battery can vibrate. This can damage connections.
- Understand Your Tools: Read the manuals for your multimeter and other testers. Know how to use them correctly.
- Don’t Jump Start Incorrectly: Always connect positive to positive and negative to a good ground. Incorrect jump starting can damage electronics.
Frequently Asked Questions About Car Battery Wiring
What is the most important tool for checking car battery wiring?
The most important tool is a digital multimeter. It lets you accurately check the battery’s voltage. It can also help diagnose other electrical issues by checking for voltage drop.
How often should I clean my car battery terminals?
It’s a good idea to clean your battery terminals at least twice a year. More often if you notice any signs of corrosion. Or if you live in a harsh climate.
Can a loose battery cable stop my car from starting?
Yes, absolutely. A loose battery cable is a very common cause of starting problems. It prevents a good flow of electricity from the battery to the starter motor.
What does corrosion on battery terminals look like?
Battery terminal corrosion typically looks like a white, blue, or greenish powdery substance. It forms around the battery posts and cable clamps.
Is it safe to use sandpaper to clean battery terminals?
While sandpaper can remove corrosion, it’s not ideal. Dedicated battery terminal cleaning tools are better. They are shaped to fit the posts and clamps.
They also help prevent damage.
What is a battery load test and why is it important?
A load test simulates the stress of starting your car. It checks how well the battery holds voltage when it’s under a heavy demand. This test is crucial because a battery might show good voltage at rest but fail under load.
Conclusion: Empowering Your Car Care
Dealing with car battery issues can be daunting. But with the right tools and knowledge, you can tackle many problems. Understanding how to use a multimeter and other basic testers empowers you.
It helps you diagnose issues correctly. This saves time and money. Always prioritize safety.
And don’t hesitate to seek professional help when needed. Keep those connections clean and tight for a healthy car.