Genius Way to Remove Pen Ink Off Leather Car Interior
Easily remove pen ink from your leather car interior using a simple, DIY method involving rubbing alcohol and a cotton swab. This gentle approach is effective and safe for most leather types, restoring your car’s clean look without harsh chemicals.
Oh no! That moment when you see a rogue pen mark marring your beautiful leather car seats can be incredibly frustrating. We’ve all been there, right? Whether it’s a quick scribble from a child or an accidental transfer from a pen in your pocket, ink stains on leather can feel like a permanent disaster. But don’t worry, it’s not! With a little know-how and a few common household items, you can tackle this problem effectively. This guide will walk you through a genius, beginner-friendly method to get that ink stain out, helping you save your car’s interior and your peace of mind. Let’s get your car looking its best again!
Understanding Leather and Ink
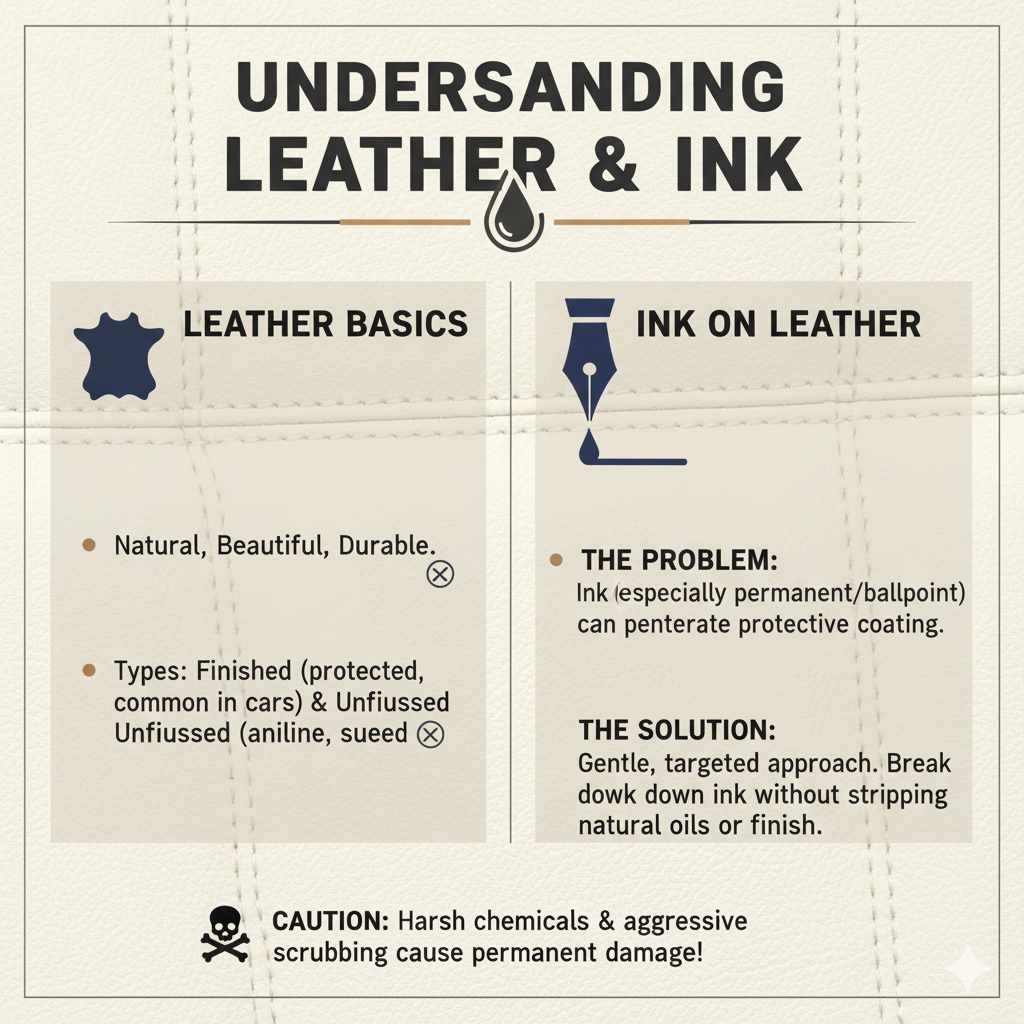
Before we dive into the solution, it’s helpful to understand what we’re dealing with. Leather is a natural material, beautiful and durable, but it can also be sensitive. Different types of leather, like finished (protected) or unfinished (aniline or suede), react differently to cleaning agents. Most car interiors are made of finished leather, which has a protective coating that makes it more resistant to spills and stains. However, ink, especially permanent marker or ballpoint pen ink, can penetrate this coating if not addressed quickly.
The key to removing ink from leather is to use a substance that can break down the ink without stripping the leather’s natural oils or its protective finish. Harsh chemicals or aggressive scrubbing can cause permanent damage, leading to discolored patches or weakened leather. That’s why a gentle, targeted approach is always best, especially for those who are new to car detailing.
Why Choose the Rubbing Alcohol Method?
There are many products on the market claiming to remove ink from leather, but some can be surprisingly harsh or expensive. The genius of using rubbing alcohol (isopropyl alcohol) is that it’s readily available, inexpensive, and, when used correctly, highly effective on ink stains. Rubbing alcohol acts as a solvent, dissolving the ink particles without being overly aggressive on the finished leather’s surface.
It’s crucial to test any cleaning solution in an inconspicuous area first. This ensures it won’t cause any adverse reactions with your specific car’s leather. This method is designed to be simple enough for anyone to follow, transforming what seems like a daunting stain into a manageable clean-up job. You’ll be amazed at how quickly you can restore the pristine look of your car’s interior! According to the Environmental Protection Agency (EPA), solvents like rubbing alcohol can be effective cleaners when used appropriately, emphasizing caution and proper ventilation.
What You’ll Need: Simple Tools for a Big Job
The beauty of this method lies in its simplicity. You likely already have most of these items at home:
- Rubbing Alcohol (Isopropyl Alcohol): Aim for a concentration of 70% or 90%. Higher concentrations can be stronger but also riskier, so start with 70% if you’re unsure.
- Cotton Swabs (Q-tips): These are perfect for targeted application and delicate work.
- Clean White Cloths or Microfiber Towels: You’ll need a few for applying, blotting, and buffing. White cloths are best so you can see the ink transferring and avoid spreading it.
- Gloves (Optional but Recommended): To protect your hands from the alcohol.
- Mild Leather Cleaner (Optional, for post-cleaning): To recondition the area.
- Leather Conditioner (Optional, but highly recommended): To restore moisture and protect the leather after cleaning.
Having a small container or bowl for the rubbing alcohol can also be helpful for dipping the cotton swabs. Remember to work in a well-ventilated area, as rubbing alcohol has a strong odor. This ensures a comfortable and safe cleaning experience.
Step-by-Step Guide: Erasing the Ink Stain
This process is designed to be straightforward and effective. Follow these steps closely for the best results:
Step 1: Test in an Inconspicuous Area
Before you tackle the visible stain, find a hidden spot on your leather interior – maybe under the seat or on the back of a seat. Dip a cotton swab in rubbing alcohol and gently dab it onto this test area. Wait a few minutes, then blot with a clean white cloth. Check for any color transfer from the leather or any damage to the finish. If it looks clear, you’re good to proceed!
Step 2: Prepare Your Workspace
Ensure good ventilation in your car. Open doors or windows. Have all your supplies within easy reach. Place a clean white cloth beneath the stained area if it’s on a vertical surface or where drips could occur to catch any excess alcohol or ink.
Step 3: Apply Rubbing Alcohol to the Stain
Dip a clean cotton swab into the rubbing alcohol. Don’t saturate it completely; you want it damp, not dripping wet. Gently dab the alcohol directly onto the ink mark. Work from the outside of the stain inward to prevent spreading the ink further.
As you dab, you should start seeing the ink transfer onto the cotton swab. You will need to switch to a fresh cotton swab frequently. This is essential to lift the ink away and not smear it around the area. Keep dabbing and replacing the swab as often as needed. Be patient; this might take several applications.
Step 4: Blot and Lift
After dabbing the ink with a fresh swab, immediately blot the area with a clean, dry white cloth. This lifts the dissolved ink from the leather surface. Continue this process of dabbing with alcohol and blotting with a dry cloth, always working from the outside of the stain inwards.
It’s important to use a light touch. Pressing too hard can push the ink deeper into the leather or damage the surface. The goal is to gently dissolve and lift the ink. You’ll notice the ink stain gradually fading with each repetition.
Step 5: Clean the Area (Optional)
Once the ink stain is completely gone, you might want to clean the area with a dedicated mild leather cleaner. This helps remove any residual alcohol and prepare the leather for conditioning. Follow the instructions on your leather cleaner product.
Step 6: Condition the Leather
Rubbing alcohol can be drying to leather. After cleaning, it’s crucial to apply a good quality leather conditioner. This replenishes the natural oils, keeping the leather soft, supple, and protected. Apply a small amount of conditioner to a clean cloth and gently rub it into the treated area using circular motions. Allow it to penetrate for a few minutes, then buff off any excess with another clean cloth.
This conditioning step is a lifesaver for your leather’s longevity and appearance. It prevents the area from becoming stiff or cracking over time. Think of it as giving your leather a nourishing drink after its spa treatment!
Alternative Methods and When to Use Them
While rubbing alcohol is a fantastic go-to for many ink stains on finished leather, other methods might be considered for different situations or if the alcohol method isn’t fully successful. It’s always a good idea to know your options.
Hairspray: A Quick Fix?
Some people swear by certain types of hairspray. The alcohol content in some hairsprays can act similarly to rubbing alcohol. However, hairspray also contains other ingredients (like polymers and lacquer) that aren’t specifically designed for leather and can leave a sticky residue or even damage the finish if not removed thoroughly. If you opt for this, test it extensively in a hidden spot first and be prepared to clean the area thoroughly afterward with a dedicated leather cleaner.
Specialized Leather Ink Removers
For more stubborn stains or on more delicate types of leather, specialized leather ink removers might be necessary. These products are formulated by leather care experts and are often the safest bet for expensive or vintage car interiors. Reputable brands offer solutions tailored to different leather types. Always follow the manufacturer’s instructions precisely.
Professional Detailing Services
If the stain is exceptionally large, old, or if you’re hesitant to try DIY methods on a high-value vehicle, seeking professional help is a wise decision. Professional auto detailers have access to advanced tools and professional-grade cleaning agents, and they have the experience to tackle almost any stain without damaging your car’s interior.
Comparing these methods can help you make the best choice for your situation:
| Method | Pros | Cons | Best For |
|---|---|---|---|
| Rubbing Alcohol | Inexpensive, readily available, effective on finished leather, simple. | Can dry out leather if not conditioned, requires testing, not for all leather types. | Most finished leather car interiors, fresh to moderately old ballpoint ink stains. |
| Hairspray | Sometimes effective due to alcohol content. | Can leave sticky residue, contains other chemicals potentially harmful to leather, requires thorough cleaning. | Very minor, fresh stains as a last resort, but not recommended as a primary method. |
| Specialized Leather Ink Removers | Formulated for leather, often safer for specific finishes, effective on tougher stains. | More expensive, requires purchasing a specific product, requires careful adherence to instructions. | Stubborn ink stains, delicate or unfinished leather types, when you want a dedicated solution. |
| Professional Detailing | Expertise, advanced tools and products, high success rate, peace of mind. | Most expensive option, requires scheduling an appointment. | Extensive or very old stains, high-value vehicles, when DIY is too risky. |
Tips for Preventing Future Ink Stains
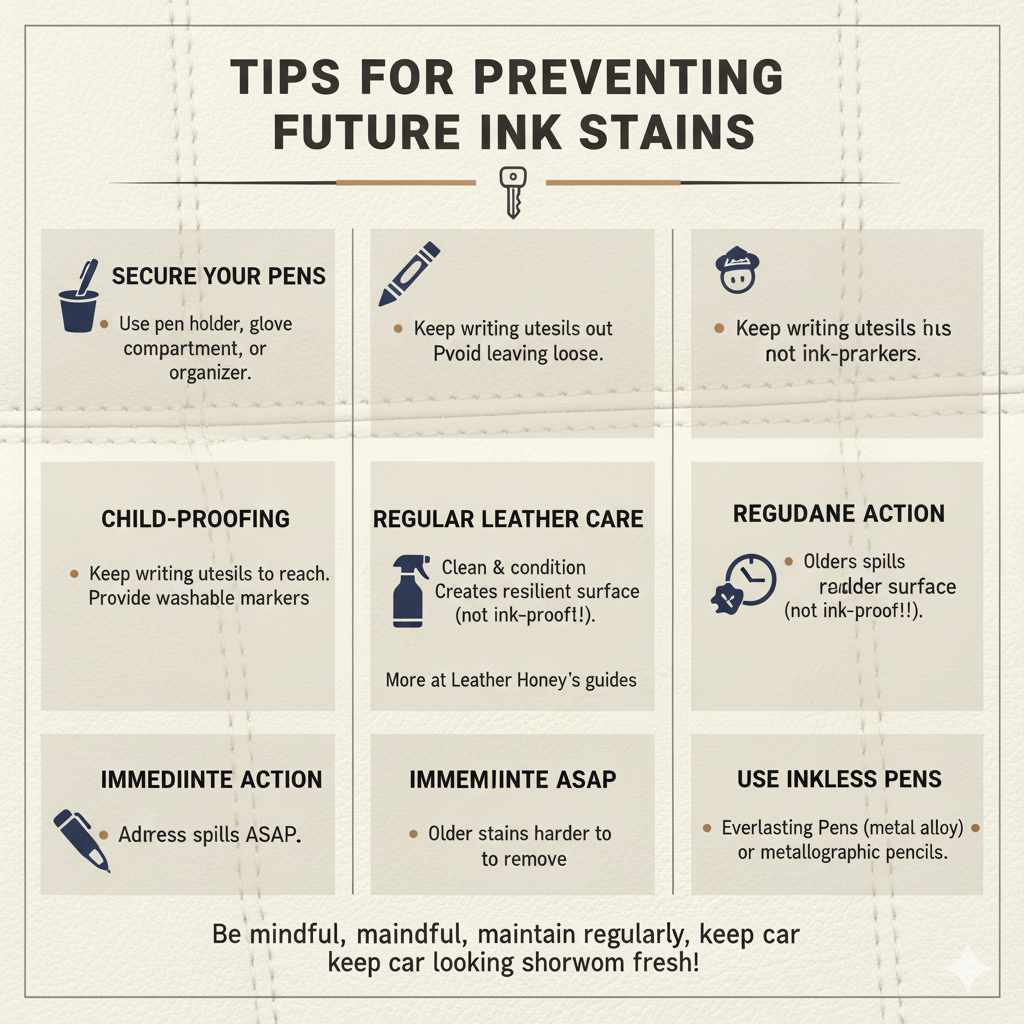
Prevention is always better than cure! Keeping your car’s leather interior spotless doesn’t have to be a constant battle. A few simple habits can make a big difference:
- Secure Your Pens: Always store pens securely. Use a pen holder, glove compartment, or a specialized car organizer. Avoid leaving them loose in pockets or trays where they can roll around and leak.
- Child-Proofing: If children are passengers, keep writing utensils out of their reach or provide washable markers.
- Regular Leather Care: Keep your leather clean and conditioned. Regularly using a good quality leather cleaner and conditioner can create a slightly more resilient surface, although it won’t make it ink-proof. Find more about leather maintenance on sites like Leather Honey’s comprehensive guides.
- Immediate Action: If a spill or mark does occur, address it as quickly as possible. The longer ink sits on leather, the harder it is to remove.
- Use Inkless Pens: Consider using pens designed to be inkless, like Everlasting Pens (or metallographic pencils) which write using a metal alloy that oxidizes the paper, leaving a mark without ink.
By being mindful of how you handle pens in the car and maintaining your leather regularly, you can significantly reduce the chances of dealing with ink stains in the future, keeping your car looking showroom fresh.
Frequently Asked Questions (FAQs)
Here are some common questions beginner car owners might have about removing pen ink from leather:
Q1: Is rubbing alcohol safe for all car leather?
A1: Rubbing alcohol is generally safe for finished or protected leather, which is most common in car interiors. However, it can damage unfinished, aniline, or suede leathers. Always test in a hidden area first to be sure.
Q2: How long should I leave the rubbing alcohol on the stain?
A2: You don’t leave it on. You should dab the alcohol onto the stain using a cotton swab, and then immediately blot it with a clean cloth. The alcohol’s job is to dissolve the ink so it can be lifted, not to soak into the leather.
Q3: My ink stain is old. Will this method still work?
A3: Older, set-in stains can be much harder to remove. The rubbing alcohol method might still work, but it will likely require more patience, repeated applications, and possibly a stronger concentration of alcohol (use with extra caution). If it doesn’t work, you may need a specialized leather ink remover or professional help.
Q4: What if I don’t have rubbing alcohol?
A4: For minor, fresh ink marks, some people have success with hand sanitizer (which contains alcohol) or even certain hairsprays. However, these can leave sticky residues or other chemicals on the leather, so proceed with extreme caution and always clean the area afterward. A dedicated leather ink remover is a safer alternative.
Q5: How do I know if my car has finished or unfinished leather?
A5: Finished leather typically has a consistent color and a slight sheen, and it feels smoother. It’s more durable and common in cars. Unfinished leather (like aniline, nubuck, or suede) looks more natural, is often softer, may have slight variations in color and texture, and usually requires specialized care. If you’re unsure, check your car’s manual or consult a professional detailer.
Q6: Can nail polish remover get ink off leather?
A6: Nail polish remover (acetone) is generally too harsh for leather. It can strip the color and finish, causing permanent damage. It’s best to avoid it for cleaning car interiors and stick to gentler methods like rubbing alcohol.
Q7: How often should I condition my car’s leather seats?
A7: It’s a good idea to condition your leather seats every 3-6 months, depending on climate and usage. In very dry or sunny climates, you might need to do it more often. Regular conditioning keeps the leather supple, prevents cracking, and maintains its rich appearance.
Conclusion
Seeing a pen ink stain on your car’s leather interior can be disheartening, but it’s not a cause for panic. You’ve learned a simple, genius method using readily available rubbing alcohol that’s effective for many common ink marks. Remember to always test in an inconspicuous spot first, work gently, and be patient. The key is to lift the ink gradually without damaging the delicate leather surface.
By following the step-by-step instructions, you can successfully remove those unsightly ink lines and restore the beauty of your car’s interior. Don’t forget the crucial final step: conditioning the leather to keep it soft and protected. Taking these simple measures can help you maintain your car’s appearance, avoid costly repairs, and give you the confidence to handle minor car care tasks like a pro. Keep these tips in mind, and your car will thank you with a consistently clean and comfortable ride!