How Much Does It Cost To Repair Leather Car Seats: Essential Guide
Repairing leather car seats can range from a DIY fix costing under $50 for minor issues like small tears or stains, to professional services for damaged panels or widespread wear costing anywhere from $200 to over $1,000. The final cost depends on the repair type, extent of damage, and whether you opt for DIY or professional help.
Leather car seats add a touch of luxury to any vehicle, but they can also be prone to wear and tear. Life happens – spills, scratches, tears, and general fading are common issues. If you’re wondering, “How much does it cost to repair leather car seats?” you’re not alone. It’s a common concern for car owners who want to keep their interiors looking their best. This guide will break down the costs involved, from simple DIY fixes to professional restorations, so you can make informed decisions about your car’s comfort and value.
We’ll explore the factors that influence repair costs and what you can expect to pay for different types of damage. Get ready to learn how to bring your leather seats back to life without breaking the bank!
Understanding the Factors That Influence Leather Seat Repair Costs
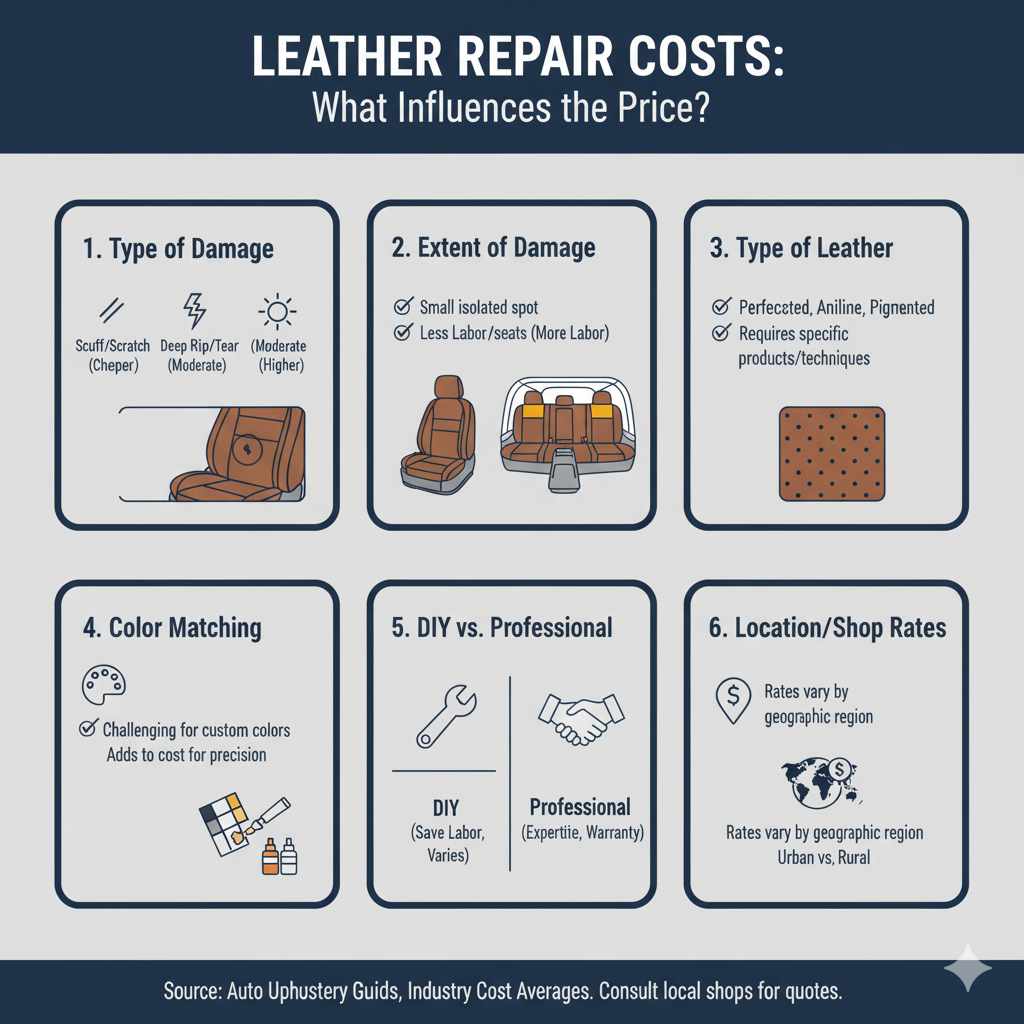
Before we dive into specific costs, it’s important to understand what makes one leather seat repair more expensive than another. Several key factors play a role:
- Type of Damage: A small scuff mark is much easier and cheaper to fix than a deep rip or a widespread fading issue.
- Extent of Damage: Is it just one small spot, or are multiple panels on several seats affected? More damage means more labor and materials.
- Type of Leather: Different types of leather (like perforated, aniline, or pigmented) might require specific repair products or techniques, affecting the cost.
- Color Matching: Precisely matching the original leather color can be challenging and might add to the cost, especially for custom colors.
- DIY vs. Professional Repair: Doing it yourself can save money on labor, but professional services offer expertise and sometimes warranties.
- Location/Shop Rates: Just like any service, repair shop labor rates can vary significantly based on your geographic location.
Common Leather Car Seat Issues and Their Repair Costs
Let’s look at the most common problems car owners face with their leather seats and what you can expect to pay for each.
1. Scratches and Scuffs
These are often surface-level issues caused by keys, bags, or everyday use. Minor scratches can sometimes be buffed out or covered with a mild leather conditioner, but deeper ones might need a touch-up compound or dye.
- DIY Cost: $15 – $50 for leather repair kits, cleaners, and conditioners.
- Professional Cost: $75 – $200 per panel or area for minor scuff and scratch repair, depending on the shop.
2. Small Tears and Rips
A small tear, perhaps a few inches long, is a common problem. These can often be repaired using a leather repair kit that includes fillers, adhesives, and color compounds. For larger or more complex tears, professional intervention is usually recommended.
- DIY Cost: $30 – $80 for specialized leather rip repair kits.
- Professional Cost: $150 – $400 for a small tear repair, as it requires careful patching and color matching.
3. Cracks and Deep Fading
Over time, the sun and constant use can dry out leather, leading to cracking and fading. This is more than just a surface issue and often requires cleaning, conditioning, and recoloring the affected areas. Professional services are generally best for this to ensure a uniform and lasting result.
- DIY Cost: $50 – $150 for quality leather cleaner, conditioner, and recoloring kits. It requires patience and skill for good results.
- Professional Cost: $250 – $700+ for recoloring and treating faded or cracked leather. This often involves cleaning, prepping, recoloring, and sealing multiple panels.
4. Stains (Ink, Dye Transfer, Food/Drink)
Stains can be tricky. Light-colored leather is particularly susceptible to dye transfer from jeans or other fabrics. Some stains require specialized cleaners, while others might need recoloring if the stain has permanently altered the leather’s color.
- DIY Cost: $20 – $60 for specific stain removers for leather or a good leather cleaner and conditioner.
- Professional Cost: $100 – $300 for stain removal, especially for ink or stubborn dye transfer. If recoloring is needed, costs increase.
5. Punctures and Holes
Punctures from sharp objects can create holes. These require filling and recoloring. While some dedicated DIY kits can handle minor punctures, larger holes are best left to professionals for a seamless repair.
- DIY Cost: $40 – $100 for a more advanced leather repair kit with fillers.
- Professional Cost: $200 – $500+ per hole, depending on size and location, as it involves filling, texturing, and precise color matching.
6. Widespread Wear and Tear / Restoration
If your leather seats are showing significant wear across all panels – think widespread cracking, deep discoloration, and numerous small issues – you might be looking at a full restoration. This is the most comprehensive and costly type of repair.
- DIY Cost: Not generally recommended for full restoration due to complexity and the need for professional-grade products and skills.
- Professional Cost: $500 – $2,500+ for a full interior leather restoration, potentially covering all seats. This involves deep cleaning, conditioning, repairing multiple sections, and recoloring the entire interior. The exact price depends heavily on the number of seats, the complexity of the job, and the condition of the leather.
DIY vs. Professional Repair: Which is Right for You?
Choosing between a DIY approach and hiring a professional depends on your budget, comfort level with repairs, and the severity of the damage.
DIY Leather Seat Repair
Pros:
- Cost Savings: Significantly cheaper than professional services, especially for minor issues.
- Convenience: You can do it on your own schedule.
- Learning Experience: Gain new skills in car care.
Cons:
- Skill Required: Requires patience, a steady hand, and attention to detail for good results.
- Risk of Error: Mistakes can sometimes worsen the damage or lead to an uneven finish.
- Limited Scope: Best suited for minor scratches, scuffs, small tears, and simple stains.
Professional Leather Seat Repair
Pros:
- Expertise: Trained technicians use specialized tools and products for optimal results.
- High-Quality Finish: Professionals achieve durable, seamless repairs that often look factory-new.
- Handles Complex Issues: Capable of fixing larger tears, extensive fading, and widespread damage.
- Time Savings: They do the work for you efficiently.
Cons:
- Higher Cost: The most significant drawback is the expense.
- Appointments Needed: You’ll need to schedule an appointment and potentially leave your car.
Estimating Your Leather Seat Repair Cost: A Table Guide
To give you a clearer picture, here’s a table estimating costs based on common repair types. These are general figures and can vary.
| Type of Repair | DIY Cost Range | Professional Cost Range (per incident/area) | Best For: |
|---|---|---|---|
| Minor Scratches & Scuffs | $15 – $50 | $75 – $200 | Surface damage, small marks. |
| Small Tears (up to 3 inches) | $30 – $80 | $150 – $400 | Clean, edge-to-edge tears with minimal fraying. |
| Cracks & Fading (Localized) | $50 – $150 | $250 – $500 | Drying and wear on specific panels. |
| Stain Removal (Specific) | $20 – $60 | $100 – $300 | Ink, dye transfer, food stains that haven’t permanently damaged color. |
| Punctures & Small Holes | $40 – $100 | $200 – $500+ | Clean-edged holes from sharp objects. |
| Widespread Wear/Restoration | Not Recommended | $500 – $2,500+ (full interior) | Extensive cracking, fading, and damage across multiple seats. |
How to Choose a Professional Auto Upholstery Service
If you decide to go the professional route, here’s what to look for:
- Experience: Look for shops with a proven track record specifically in automotive leather repair.
- Specialization: Some focus only on leather, while others are general auto upholstery shops. Both can be good, but specialization might mean more expertise.
- Reviews and Reputation: Check online reviews (Google, Yelp) and ask for recommendations from friends, family, or car clubs.
- Portfolio: Ask to see before-and-after photos of their work. This is crucial.
- Clear Estimates: Get detailed written quotes before any work begins. Ensure they outline the scope of work and materials used.
- Warranty: A good shop will offer a warranty on their repair work.
- Color Matching Ability: Inquire about their process for matching your leather’s color precisely. Some use custom mixing for accuracy. For more on vehicle maintenance, resources like those from the Federal Trade Commission offer consumer advice.
DIY Leather Seat Repair Kits: What to Look For
If you’re tackling a minor repair yourself, choose your kit wisely. A good DIY kit for leather car seats should typically include:
- Leather Cleaner: To prepare the surface.
- Leather Conditioner: To nourish and protect the leather.
- Filler/Compound: For repairing cracks, tears, or small holes.
- Colorant/Dye: For matching the original color.
- Applicators: Spatulas, sponges, or brushes.
- Grain Paper: To help recreate the leather texture.
- Instructions: Clear, step-by-step guidance.
Popular brands and types of kits can be found at automotive supply stores and online retailers. Always read product reviews and recommendations before purchasing.
Simple Steps for Minor DIY Leather Repair (Example: Small Scratch)
Here’s a simplified approach for a minor scratch:
- Clean the Area: Use a dedicated leather cleaner to remove any dirt or oils. Let it dry completely.
- Assess the Scratch: Is it just superficial, or has it cut into the leather?
- Apply Leather Conditioner: For very light scratches, a good quality leather conditioner might be enough to buff them out and rehydrate the leather. Apply with a soft cloth in a circular motion.
- For Deeper Scratches: You might need a leather repair compound or a color-matching dye. Follow the specific product instructions carefully. This often involves applying a thin layer of filler, letting it dry, lightly sanding if necessary, then applying colorant with a sponge or brush to blend it in.
- Seal and Protect: Once the repair is dry, apply a leather protectant to help prevent future damage and add a subtle sheen.
Always test any product on an inconspicuous area first (like the underside of a seat or a hidden corner) to ensure it doesn’t alter the color or damage the finish.
Preventative Measures: Saving Money in the Long Run
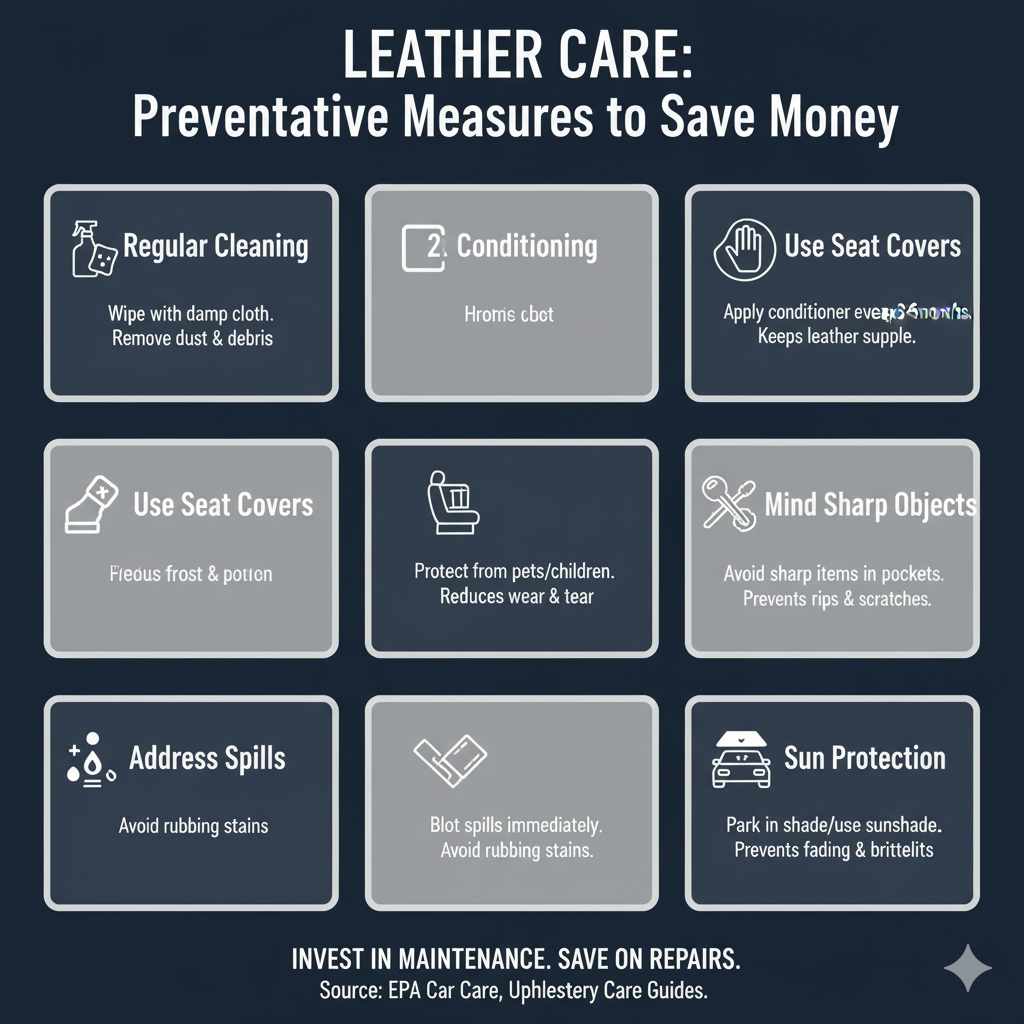
The best way to save on leather seat repairs is to prevent damage in the first place. Here are some tips:
- Regular Cleaning: Wipe down your seats regularly with a damp cloth to remove dust and debris.
- Conditioning: Use a quality leather conditioner every 3-6 months. This keeps the leather supple and prevents drying and cracking. It also helps to repel minor spills. Think of it like moisturizing your skin!
- Use Seat Covers: Especially if you have children or pets, consider using protective seat covers when transporting them.
- Be Mindful of Sharp Objects: Avoid placing sharp items directly on the leather seats. Remove keys or tools from pockets before sitting down.
- Address Spills Immediately: Blot up spills as soon as they happen with a clean, absorbent cloth. Avoid rubbing, which can spread the stain.
- Sun Protection: If possible, park in shaded areas or use a sunshade to reduce UV exposure, which causes fading and brittleness.
Investing a small amount of time and money in regular maintenance can save you a significant amount on repairs down the line. Resources like those from The Environmental Protection Agency (EPA) also offer insights into environmentally friendly car care practices that can contribute to vehicle longevity.
Frequently Asked Questions (FAQ)
Q1: How can I tell if my leather seats can be repaired at home?
For DIY repair, look for surface-level issues like light scratches, minor scuffs, small superficial stains that haven’t penetrated deeply, or tiny nicks. If you see deep rips, large holes, extensive cracking, or widespread discoloration that has gone through the color coat, it’s usually best to seek professional help.
Q2: What is the best DIY leather repair kit?
The “best” kit depends on the specific issue. For general conditioning and minor scratch buffing, a good leather cleaner and conditioner combo works well. For actual repairs like tears or fading, look for kits specifically designed for automotive leather, often including filler compounds and colorants. Read reviews and choose a reputable brand.
Q3: How long does a professional leather seat repair take?
A minor repair like a small tear or scratch might take a few hours. For more extensive work like recoloring multiple panels or full restoration, it could take anywhere from one to several days, depending on the complexity and the shop’s workload.
Q4: Will a DIY repair look as good as a professional one?
For very minor issues, a skilled DIYer can achieve good results. However, professional repairs usually offer a more seamless and durable finish, especially when dealing with color matching and texture recreation. DIY fixes might be noticeable up close.
Q5: Can I use regular dye to color my leather car seats?
No, it’s strongly advised not to use regular dyes not specifically formulated for automotive leather. Automotive leather dyes are flexible, UV-resistant, and designed to adhere properly without cracking or peeling. Using the wrong product can permanently damage your seats.
Q6: What if my car has perforated leather seats? Is that harder to repair?
Yes, perforated leather can be more challenging. Repairing tears or cracks in perforated areas requires careful application of fillers and colorants to avoid clogging the perforations. Professionals are typically better equipped to handle these delicate repairs to maintain the aesthetic.
Q7: How often should I condition my leather car seats?
It’s generally recommended to condition your leather car seats every 3 to 6 months. This frequency can vary based on your climate (dry climates require more frequent conditioning) and how much UV exposure your car gets. Regular conditioning prevents dryness, cracking, and premature wear.
Conclusion
Caring for your leather car seats is a valuable investment in your vehicle’s comfort and appearance. Understanding the costs involved, from simple DIY fixes for minor blemishes to professional restoration for severe damage, empowers you to make the right choices.
For small issues like scratches or scuffs, a DIY approach can be cost-effective, typically ranging from $15 to $80 for kits and supplies. However, when dealing with larger tears, significant fading, widespread cracks, or complex stains, professional services become the preferred option.