How To Change The Car Horn On Your Seat Car (Full Guide)
Changing your SEAT car horn involves locating the horn, disconnecting the battery, removing the old horn, installing the new one, and reconnecting the battery. This guide provides detailed steps and tips to ensure a safe and successful replacement.
Understanding Your Car Horn
Your car horn is a vital safety device. It lets other drivers and pedestrians know you are there. It’s usually an electric device.
It uses power from your car’s battery. When you press the horn button, it sends a signal. This signal tells the horn unit to make a loud sound.
SEAT cars, like most vehicles, have one or two horns.
These horns are often located behind the front bumper. Sometimes they are near the radiator. They need to be placed where their sound can travel.
A faint or missing horn is not just annoying. It’s a safety risk. You need your horn to be heard in emergencies.
Knowing how it works helps when it’s time to change it.
My Own Horn Trouble Story
I remember this one time, a few years back. I was driving my old SEAT Ibiza home late one evening. It was raining pretty hard.
I was on a road with not much light. Suddenly, a car pulled out right in front of me. My heart jumped into my throat!
I slammed on my brakes. Then, I instinctively hit my horn. Nothing.
Not a peep. Just dead air. My stomach dropped.
That’s when I realized my horn had been acting up for weeks, but I’d just ignored it. I managed to swerve just in time. But that scare really stuck with me.
It made me realize how important even small car parts are. After that, I vowed to fix car issues promptly. I learned to change that horn myself.
It wasn’t as hard as I first thought.
Horn Location Insights
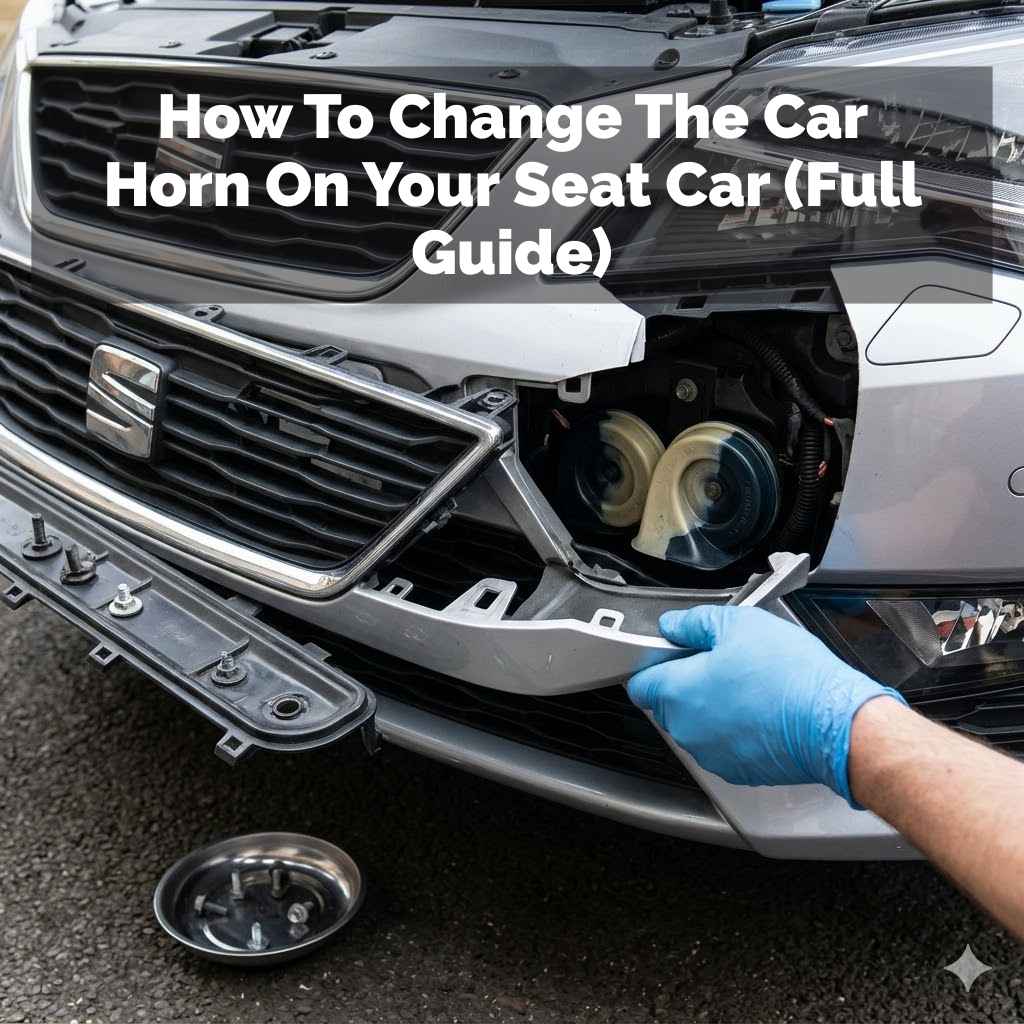
Where is it usually found? Most SEAT cars have their horns tucked away behind the front bumper. You might need to remove some plastic panels to get to them. Sometimes, they are mounted near the front grille or radiator.
It’s always best to check your car’s manual. It will show you the exact spot.
Gathering Your Tools and Parts
Before you start, having the right tools is key. This makes the job much easier. And safer too.
You’ll need a few basic things. First, a new car horn. Make sure it’s the correct one for your SEAT model.
You can find this online or at an auto parts store. Always check the compatibility.
You will also need a socket set. A wrench or ratchet might be necessary. Some cars use bolts, others use nuts.
A screwdriver set is good to have. You might need Phillips head and flathead types. Wire strippers and connectors are important.
You’ll use these to connect the new horn’s wires. A pair of pliers can also be helpful.
Safety gear is a must. Wear safety glasses. Gloves are a good idea too.
You’ll also need a way to disconnect your car’s battery. A wrench for the battery terminals is required. Having a flashlight or work light is useful.
Especially if you’re working in a dim garage. Having everything ready means less frustration later.
Essential Tools Checklist
- New Car Horn (specific to your SEAT model)
- Socket Set (various sizes)
- Ratchet Wrench
- Screwdriver Set (Phillips and Flathead)
- Wire Strippers
- Wire Connectors (butt connectors or similar)
- Pliers
- Safety Glasses
- Work Gloves
- Wrench for Battery Terminals
- Flashlight or Work Light
Step-by-Step Horn Replacement Guide
Now, let’s get to the main part. This process can take about an hour. If it’s your first time, it might take a bit longer.
That’s perfectly fine. The most important step is safety. Always start by disconnecting the battery.
This prevents any electrical shorts. Or accidental horn honking!
First, locate your car’s battery. It’s usually under the hood. Open the hood and find the battery.
You’ll see two terminals, positive (+) and negative (-). Use your wrench to loosen the nut on the negative terminal. Then, carefully remove the black cable.
Set it aside where it won’t touch the terminal. This cuts power to everything.
Next, you need to find the horn. As mentioned, it’s often behind the front bumper. You might need to get under your car or remove a plastic splash guard.
Look for a small, round or oval device. It will have wires connected to it. There might be one or two horns.
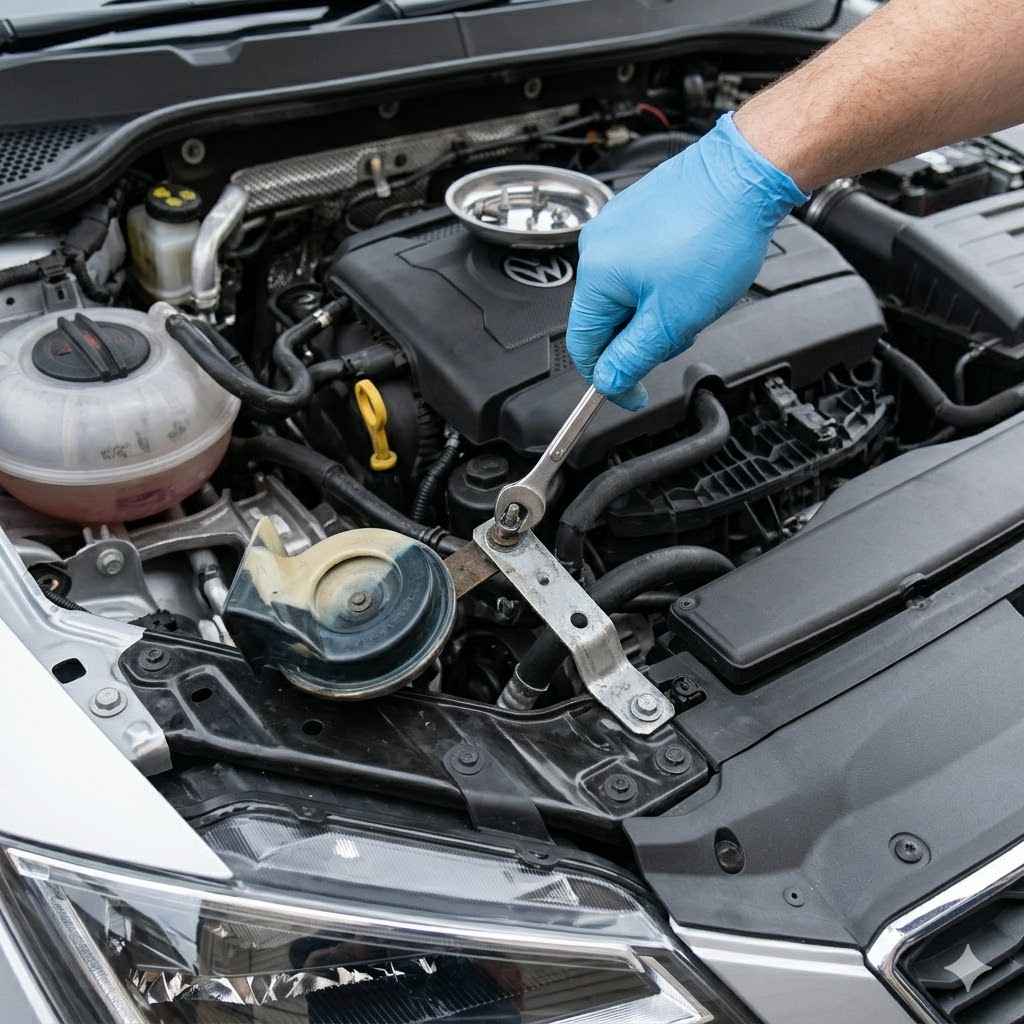
Once you’ve found the horn, you’ll see how it’s mounted. It’s usually held on by a bolt or nut. Loosen this bolt or nut with your socket set or wrench.
Be careful not to lose it. Some horns have two wires. Others might have just one.
There will be a connector. You need to unplug this connector. It might be a bit stiff.
Gently pull it. If it’s really stuck, a gentle wiggle can help.
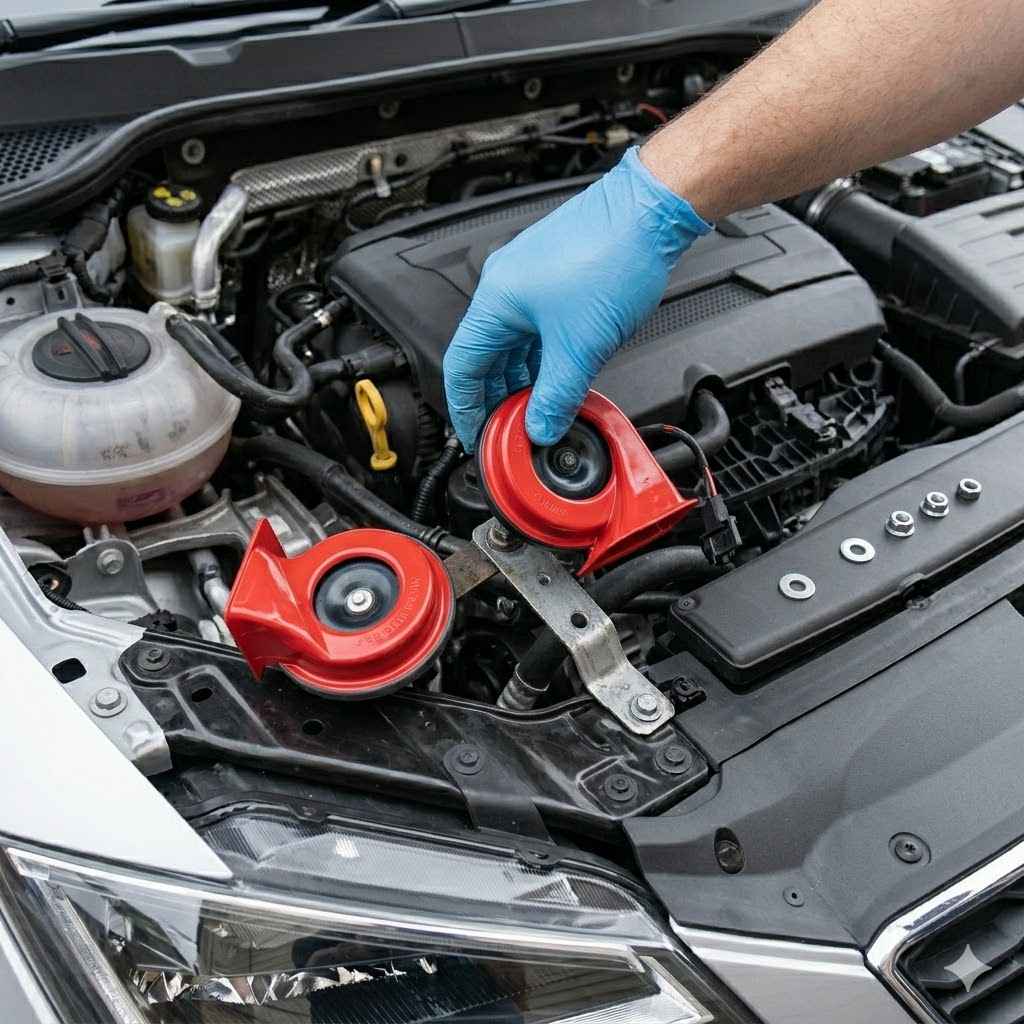
With the connector unplugged and the mount loosened, you can remove the old horn. Just pull it free. Now, take your new horn.
Compare it to the old one. Make sure it looks the same. It should fit in the same spot.
Attach the new horn to the mounting bracket. Tighten the bolt or nut. Don’t overtighten it.
Now for the wiring. The new horn will have wires. You need to connect these to your car’s wiring harness.
If the new horn has a plug, it might match your car’s connector. If not, you’ll need to do some simple wiring. Cut off the old connector if needed.
Strip a small amount of insulation from the ends of the wires. Use wire connectors to join the new horn’s wires to your car’s wires. Make sure the connections are secure.
Red wire to positive, black wire to negative is a common setup. If unsure, consult your new horn’s instructions.
After the new horn is wired up and mounted, it’s time to test it. Reconnect the battery. Tighten the negative terminal cable.
Now, get in your car. Turn the ignition to the ‘on’ position, but don’t start the engine. Press the horn button.
Hopefully, you’ll hear a nice, loud sound!
If it works, great! If not, double-check your wiring connections. Make sure the battery is reconnected properly.
Sometimes, the problem might be the horn button or the horn relay. But most of the time, a new horn solves the issue. Once you’re sure it’s working, you can reassemble any panels you removed.
You’ve successfully changed your car horn!
Wiring Tips
Connecting the new horn: Many new horns come with adapters or plugs. If yours doesn’t, you’ll likely need to use butt connectors. Make sure to strip enough wire insulation.
Then, insert the wires into the connector and crimp it firmly. Heat shrink tubing can add extra protection.
Common Problems and Troubleshooting
What if the new horn doesn’t work right away? Don’t panic. A few things could be wrong.
First, double-check the battery connection. Is it tight? Did you connect the negative terminal last?
Sometimes, the fuse for the horn might have blown. Your car’s fuse box usually has a diagram. Find the horn fuse and check if it’s intact.
If it’s blown,
Another possibility is the horn relay. This is a small electronic switch. It controls power to the horn.
If the relay is faulty, the horn won’t sound. Relays are usually found in the fuse box or under the dashboard. Your car’s manual can show you where.
Testing a relay can be a bit more complex. You might need a multimeter.
The horn button itself could be the issue. If the button is worn out or damaged, it won’t send the signal. This is less common than a faulty horn but possible.
If you suspect the button, it’s usually part of the steering wheel. Replacing this is a more involved job. It often requires removing the steering wheel airbag.
For this, it’s best to consult a professional mechanic.
Always ensure you bought the correct horn for your SEAT model. Different models or trims can have different horn types or voltage requirements. Using the wrong horn won’t work.
And it could even damage your car’s electrical system. It’s also important to ensure the mounting is secure. A loose horn can vibrate.
This can lead to poor sound quality or damage over time.
Troubleshooting Quick Scan
| Problem | Possible Cause | Solution |
|---|---|---|
| New horn not working | Loose battery connection | Tighten battery terminals. |
| Blown fuse | Check and replace horn fuse. | |
| Faulty horn relay | Test or replace horn relay. | |
| Wiring error | Recheck all wire connections. | |
| Weak or distorted sound | Loose mounting | Secure the horn bracket. |
| Incorrect horn type | Verify compatibility with SEAT model. |
Real-World Context: Why Horns Fail
Horns don’t usually fail for no reason. They are exposed to the elements. Water, dirt, and road salt can get into the horn unit.
This can cause corrosion. Corrosion damages the internal parts. It leads to weak sounds or complete failure.
Especially in areas with harsh winters or coastal climates, this is common.
Vibrations from driving can also take their toll. Over time, these vibrations can loosen connections. They can also damage the horn’s diaphragm.
The diaphragm is what makes the sound. If it’s damaged, the sound will be weak or distorted. Or it might stop working altogether.
This is why secure mounting is so important.
Electrical issues are another cause. A faulty horn relay or switch can prevent power from reaching the horn. Sometimes, the wiring itself can corrode or break.
This is more common in older cars. Or cars that have had previous electrical work done. Age and wear are natural factors.
Like any part, horns have a lifespan.
The environment your car lives in matters. Cars parked outside year-round in wet climates are more prone to horn issues. Exposure to extreme temperatures can also affect electrical components.
Even small impacts, like hitting a pothole hard, can jar the horn loose. This might not break it immediately but can lead to problems later.
Environmental Impact on Horns
Harsh Climates: Road salt, moisture, and extreme temperatures can accelerate corrosion. This affects both the horn unit and its wiring. Cars in snowy regions or near the coast face higher risks.
Road Conditions: Frequent driving on bumpy roads or hitting potholes can cause vibrations. These vibrations can loosen mounting hardware or damage internal horn components.
Age and Wear: Like all parts, horns have a limited lifespan. Over many years of use, electrical contacts can wear out, and internal mechanisms can fail.
What This Means for You
A working horn is not just about passing your car’s inspection. It’s about your safety. And the safety of others on the road.
A silent horn means you can’t warn other drivers of danger. This could lead to accidents. It’s a simple part, but its function is critical.
When is a faint horn normal? Honestly, a horn that’s slightly less loud than it used to be might just be a sign of age. But if it’s barely audible, or sounds “wrong” (like a weak squeak), it’s time to investigate.
Any sudden failure, especially if it happens during an emergency, is a clear sign to act immediately.
You can do a quick check yourself. Before you start thinking about replacement, try these simple steps. First, listen carefully.
Is it completely silent? Does it make any sound at all? Next, check your car’s manual.
Find out where the horn fuse and relay are located. Inspect the fuse. If it looks blown, replace it.
Then, try honking again.
If these basic checks don’t help, and you’re comfortable working with basic car parts, then changing the horn is a good next step. If you’re not, or if you suspect a more complex electrical issue (like with the steering wheel button or clock spring), it’s wise to take it to a qualified mechanic. Your safety is worth the professional assessment.
Your Horn’s Health: A Quick Check
Listen Carefully: Does it sound different? Is it much weaker? Or completely silent?
Check the Fuse: Locate the horn fuse in your car’s fuse box. Replace it if it looks blown.
Visual Inspection (If accessible): Look for obvious damage to the horn unit or loose wires. (Remember to disconnect the battery first!)
Quick Tips for a Smoother Replacement
If you decide to tackle this yourself, here are a few extra pointers. Take pictures as you go. This is especially helpful when removing panels or parts.
You can refer back to your photos to see how things were connected. Note which way panels were facing. It sounds simple, but it saves a lot of guesswork later.
Keep all removed screws and bolts organized. Use a small container or even a magnetic tray. Labeling them can be useful for complex jobs.
For the horn, it’s usually just one or two fasteners. But good habits are important for any DIY car work.
Don’t force anything. If a wire connector is stuck, or a bolt won’t turn, stop and assess. You might need a different tool.
Or you might be missing a step. Forcing parts can cause damage. This leads to more expensive repairs.
Gentle persuasion with the right tools is usually the best approach.
When connecting wires, make sure you have a good connection. Loose wires are a common cause of electrical problems. Use quality connectors.
And crimp them tightly. A secure connection ensures the horn gets the power it needs to sound loud and clear.
DIY Car Repair Habits
- Document Everything: Take photos of parts and connections before you remove them.
- Organize Hardware: Use small containers or labeled bags for screws and bolts.
- Be Gentle: Never force parts. Use the right tools and techniques.
- Ensure Solid Connections: Double-check all electrical connections for security.
Frequently Asked Questions
How long does it usually take to change a car horn?
For most people, changing a car horn takes about 30 minutes to an hour. If it’s your first time doing car repairs, it might take a little longer. Being prepared with all your tools beforehand helps speed things up.
Can I use any car horn for my SEAT car?
No, it’s important to use a horn that is compatible with your specific SEAT model. Check your car’s manual or consult an auto parts store. Using the wrong horn could cause electrical issues.
What if my car has two horns?
If your SEAT has two horns, they usually work together to produce a specific sound. You will likely need to replace both if one fails, or replace them in pairs. Follow the same steps for each horn.
Ensure both are securely mounted and wired correctly.
Where can I find the horn on my SEAT model?
The horn is typically located behind the front bumper. You might need to remove plastic covers or splash guards to access it. Your car’s owner’s manual should have a diagram showing its exact location.
What does it mean if my horn sounds weak or is intermittent?
A weak or intermittent horn can be caused by a loose connection, corrosion on the horn contacts, a failing horn unit, or a weak electrical connection. It’s a sign the horn is likely on its way out and should be checked soon.
Do I need to disconnect the battery when changing the horn?
Yes, absolutely. Always disconnect the negative terminal of the car battery before working on the horn. This prevents accidental horn activation and protects you from electrical shock or short circuits.
Final Thoughts
Changing your SEAT car horn might seem daunting at first. But with the right tools and a step-by-step approach, it’s a very achievable DIY task. Remember safety first.
Disconnect that battery! And take your time. Having a working horn is crucial for your safety on the road.
You’ve got this!