How To Check Car Radiator Coolant Level: A Proven, Safe Method
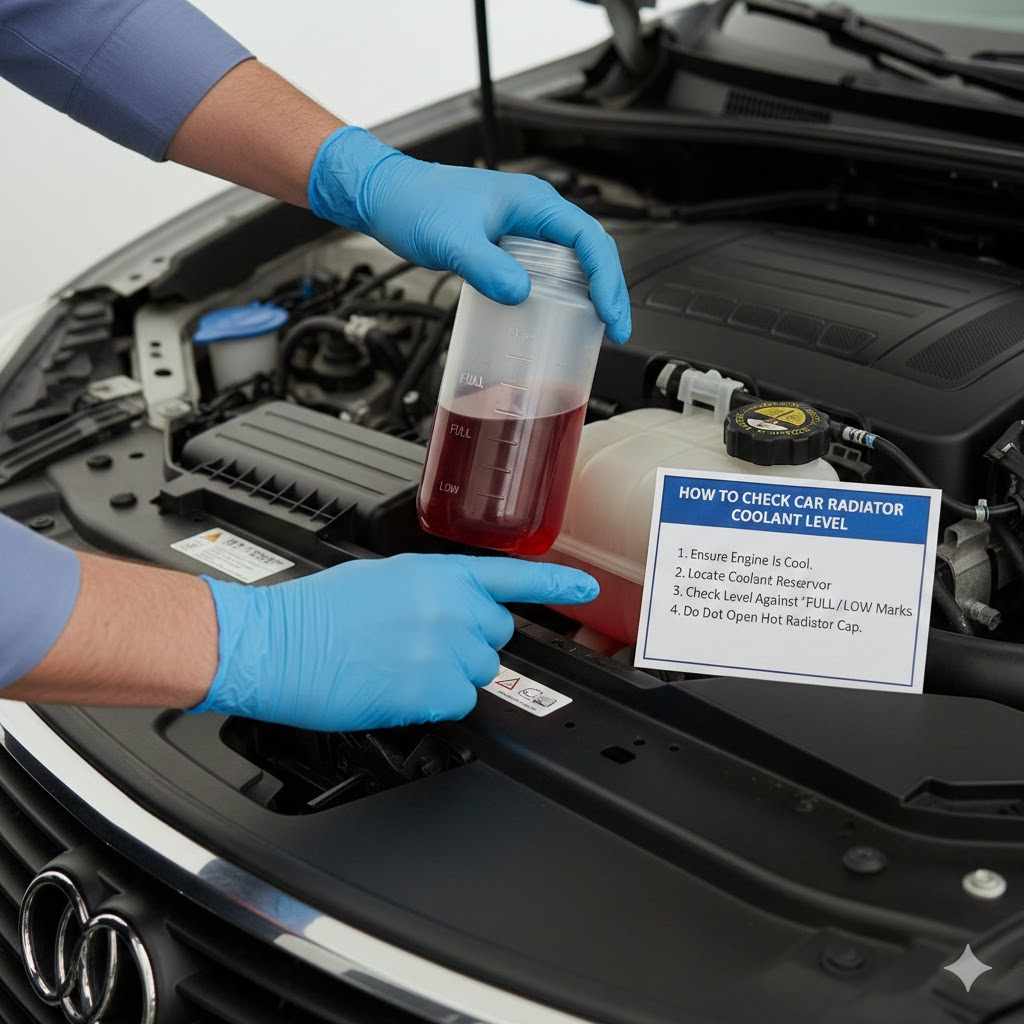
To check your car radiator coolant level, ensure the engine is completely cold. Locate the translucent plastic coolant reservoir under the hood—it has “Full” and “Low” markings. The coolant level should be between these two lines. If it’s near or below “Low,” you need to add the correct type of coolant. Never open the radiator cap on a hot engine.
Hello, I’m Md Meraj. Welcome! If you’ve ever felt a little intimidated popping the hood of your car, you’re not alone. Many drivers worry about touching the wrong thing. But today, we’re going to tackle one of the easiest and most important checks you can do yourself: checking your car’s coolant level.
Your car’s engine gets incredibly hot, and coolant is the magic liquid that keeps it from overheating. A low coolant level can lead to serious and expensive engine damage. Don’t worry, though! Checking it is simple, safe, and takes less than a minute. I’m here to walk you through every step, making it so easy you’ll wonder why you ever hesitated. Let’s get you feeling confident about your car care.
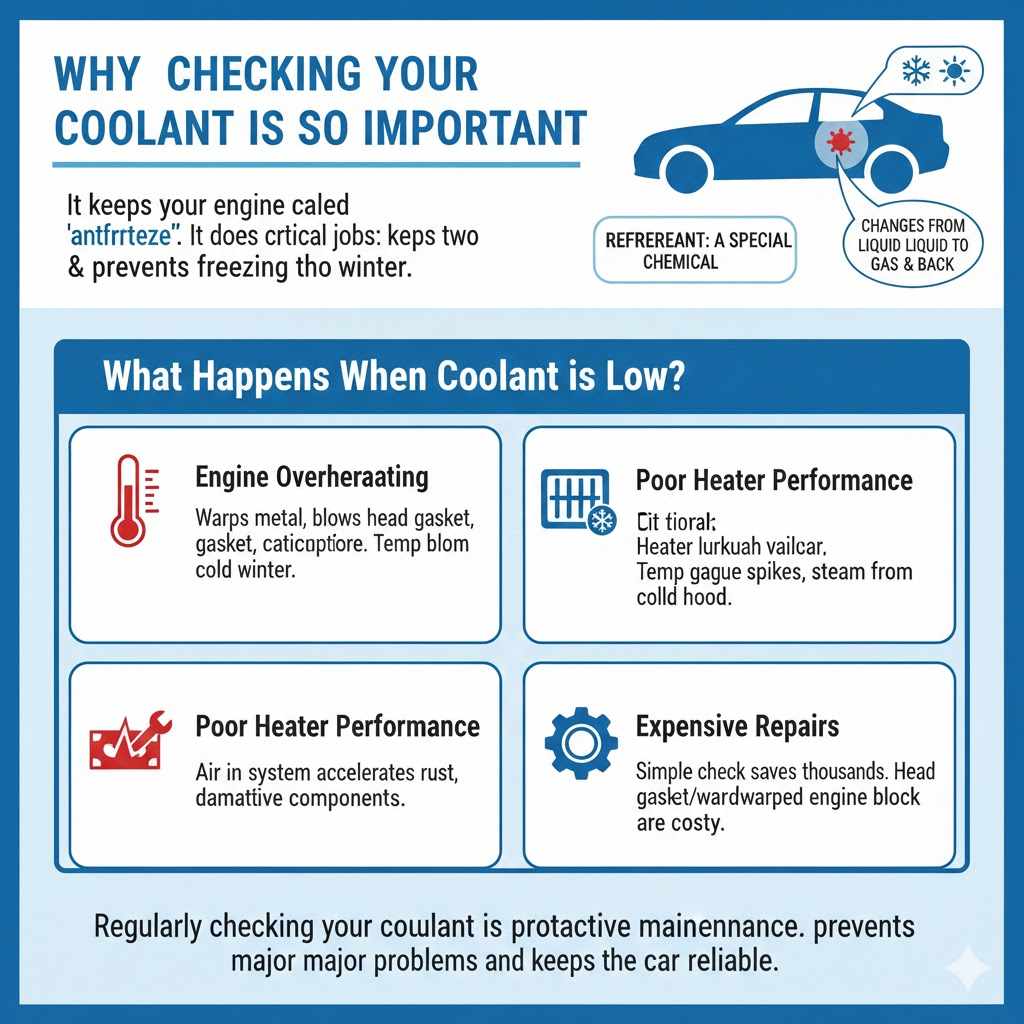
Why Checking Your Coolant is So Important
You might hear coolant called “antifreeze,” and that’s because it does two critical jobs. It keeps your engine cool in the summer and prevents the engine block from freezing and cracking in the winter. Think of it as your engine’s personal climate control system. When this system is low on its special fluid, things can go wrong fast.
What Happens When Coolant is Low?
- Engine Overheating: This is the most common and dangerous result. An overheating engine can warp metal parts, blow a head gasket, and lead to catastrophic failure. You might see the temperature gauge on your dashboard spike into the red zone or even see steam coming from under the hood.
- Poor Heater Performance: The same system that cools your engine also provides heat to the car’s cabin in the winter. If the coolant is low, your heater might only blow lukewarm or cold air.
- Internal Corrosion: Modern coolants contain special additives that prevent rust and corrosion inside your engine and radiator. When the level is too low, air gets into the system, which can accelerate rust and damage sensitive components.
- Expensive Repairs: A simple check that takes 60 seconds can save you thousands of dollars in repairs. Replacing a head gasket or a warped engine block is one of the most expensive jobs a mechanic can do.
Regularly checking your coolant is proactive maintenance. It’s like drinking enough water to stay healthy—it prevents major problems before they ever start. It gives you peace of mind and keeps your car running reliably, mile after mile.
Safety First! The Golden Rules of Checking Coolant
Before we even think about touching anything under the hood, we need to talk about safety. The cooling system is under high pressure when the engine is hot. Ignoring these rules can lead to serious burns. Please read and remember these points every single time.
- The Engine MUST Be Cold: This is the most important rule. Never, ever attempt to open the radiator cap or the coolant reservoir cap when the engine is hot or even warm. Hot, pressurized coolant can erupt like a volcano, causing severe burns. The best time to check is in the morning before you’ve driven the car, or after it has been parked for several hours.
- Park on Level Ground: To get an accurate reading, your car needs to be on a flat surface. If it’s parked on a hill, the coolant will tilt inside the reservoir, giving you a false reading.
- Wear Protective Gear (Optional but Smart): While not strictly necessary for a simple level check, wearing gloves and safety glasses is always a good habit when working on your car. Coolant can be irritating to the skin and eyes.
- Keep Kids and Pets Away: A running engine has many moving parts, and even a parked one can be a source of curiosity. Keep children and pets at a safe distance to prevent any accidents.
- Know Your Caps: There are two caps to be aware of—the radiator cap (usually metal, right on the radiator) and the coolant reservoir cap (usually plastic, on a separate tank). For a simple level check, you only need to look at the reservoir. You should rarely, if ever, need to open the main radiator cap.
Following these simple rules ensures your quick maintenance check stays safe and stress-free. Your safety is always priority number one.
The Simple Tools You’ll Need
The great news is that you probably already have everything you need. This isn’t a job that requires a fancy toolbox. Here’s the short list:
- Your Eyes: The most important tool for this job!
- A Clean Rag or Paper Towel: This is helpful for wiping off any dirt from the reservoir tank so you can see the level markings clearly.
- A Funnel (Only if Adding Coolant): If you find the level is low and need to top it off, a small, clean funnel will prevent messy spills.
- A Flashlight (Optional): If you’re in a poorly lit garage or checking at dusk, a flashlight can make it easier to see the markings on the reservoir.
That’s it! No wrenches, no screwdrivers, no complicated equipment. This is truly one of the most accessible DIY car tasks.
Step-by-Step: How to Check Your Coolant Level Safely
Alright, let’s get to it. Follow these steps exactly, and you’ll be done in no time. Remember, the engine must be cold!
Step 1: Park the Car and Let It Cool Down Completely
Find a flat, level spot to park. If you’ve just been driving, turn off the engine and wait. How long? A good rule of thumb is to wait at least 2-3 hours. If you can touch the engine block or the large radiator hoses without feeling any heat, you’re good to go. The safest bet is to check it first thing in the morning.
Step 2: Pop the Hood and Locate the Coolant Reservoir
Pull the hood release lever inside your car (usually near the driver’s side door or footwell). Then, find the secondary safety latch at the front of the hood and release it to open the hood fully. Prop it open securely.
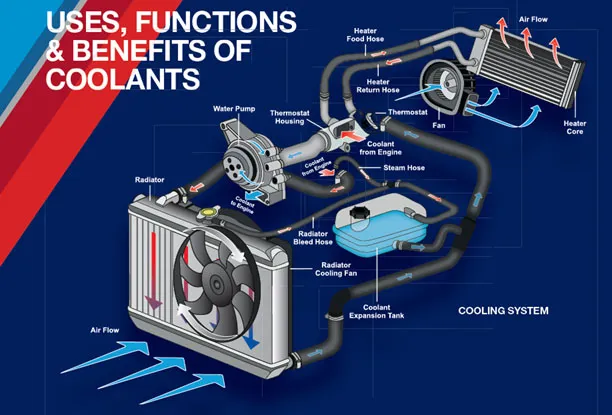
Now, scan the engine bay. You are looking for a plastic tank, which is usually white or translucent. This is the coolant overflow tank, or reservoir. It will have a plastic cap, often black or yellow, with a warning symbol on it that looks like steam or a person being sprayed. This symbol is a universal warning not to open it when hot.
The reservoir is connected to the radiator by a small rubber hose. If you have trouble finding it, your car’s owner’s manual will have a diagram of the engine bay showing its exact location.
Step 3: Check the Coolant Level Against the Markings
Look at the side of the plastic reservoir. You will see two lines etched or printed on it. They are typically labeled:
- “F” or “FULL” or “MAX”
- “L” or “LOW” or “MIN”
The level of the colorful liquid (coolant) inside should be somewhere between these two lines. If the plastic is dirty, use your rag to wipe it clean so you can see clearly. You may need to gently rock the car to see the liquid move, making the level easier to spot.
An ideal level is near the “FULL” mark when the engine is cold. As the engine warms up, the coolant expands, and the level will rise. This is why the reservoir is also called an “expansion tank.”
Step 4: Assess the Situation
- If the level is between “FULL” and “LOW”: Congratulations! Your coolant level is perfect. You don’t need to do anything else. Close the hood, and you’re done.
- If the level is on or below the “LOW” mark: Your coolant is low and needs to be topped off. This is a sign that you should add more coolant, but it could also indicate a slow leak in the system. We’ll cover how to add coolant in the next section.
- If the reservoir is completely empty: This is a more serious issue. While you should still add coolant to get it back to the proper level, an empty reservoir often points to a significant leak. You should fill it, but also plan to have your vehicle inspected by a trusted mechanic soon. For more information on vehicle safety and maintenance, resources like the National Highway Traffic Safety Administration (NHTSA) provide valuable guidance.
Understanding Coolant: Not All Liquids Are Created Equal
If you discover your coolant is low, you can’t just grab any jug off the shelf at the auto parts store. Using the wrong type can cause serious damage to your cooling system. Here’s a quick, beginner-friendly breakdown.
What is Coolant?
Coolant is a mixture of ethylene glycol or propylene glycol and water, plus a package of special additives. These additives are the secret sauce—they prevent corrosion, lubricate the water pump, and stop the liquid from foaming.
Types of Coolant by Color
Color is the easiest way to identify coolant, but it’s not a foolproof system. Manufacturers can use different colors for similar formulas. Your owner’s manual is the ultimate authority on what type of coolant your car needs. However, here’s a general guide:
| Coolant Type Technology | Common Colors | Typically Used In |
|---|---|---|
| IAT (Inorganic Additive Technology) | Bright Green | Older vehicles (typically pre-2000) |
| OAT (Organic Acid Technology) | Orange, Red, Dark Green | GM, VW, Audi, and some other European/Asian models |
| HOAT (Hybrid Organic Acid Technology) | Yellow, Gold, Pink, Turquoise | Ford, Chrysler, and many European models |
Mixing different types of coolant can cause a chemical reaction that turns the liquid into a thick, sludgy gel. This gel can clog your radiator and cooling passages, leading to severe overheating. Always stick to the type specified for your vehicle.
How to Add Coolant the Right Way
Found your coolant level is low? Topping it off is just as easy as checking it. Here’s how.
Step 1: Get the Right Coolant
First, check your owner’s manual to confirm the exact type of coolant your car requires. Then, head to an auto parts store. You’ll see two main options:
- Concentrate: This is pure antifreeze and must be mixed with distilled water, usually in a 50/50 ratio. Do not use tap water, as its minerals can cause scaling and corrosion.
- Pre-mixed (50/50): This is the most convenient option for beginners. It’s already perfectly mixed with distilled water and is ready to pour directly from the bottle. I highly recommend this for simple top-offs.
Step 2: Slowly Open the Reservoir Cap
Make one final check that the engine is cold. Place a rag over the plastic reservoir cap and twist it slowly. You might hear a slight hiss as any residual pressure is released. This is normal. Remove the cap and set it aside in a clean spot.
Step 3: Add the Coolant
Place a clean funnel into the opening of the reservoir to avoid spills. Slowly pour the pre-mixed coolant into the funnel. Keep an eye on the level markings on the side of the tank.
Step 4: Fill to the “FULL” Line
Add coolant until the level reaches the “FULL” or “MAX” line. Do not overfill it! The system needs extra space in the reservoir for the coolant to expand into when it gets hot. If you overfill it, the excess coolant will just be forced out through an overflow tube onto the ground when the engine heats up.
Step 5: Replace the Cap Securely
Remove the funnel and screw the reservoir cap back on until it’s tight. You should feel it click or stop firmly. Make sure it’s secure. Wipe up any spills with your rag, as coolant is toxic to animals who may be attracted to its sweet smell.
You’re done! It’s that simple.
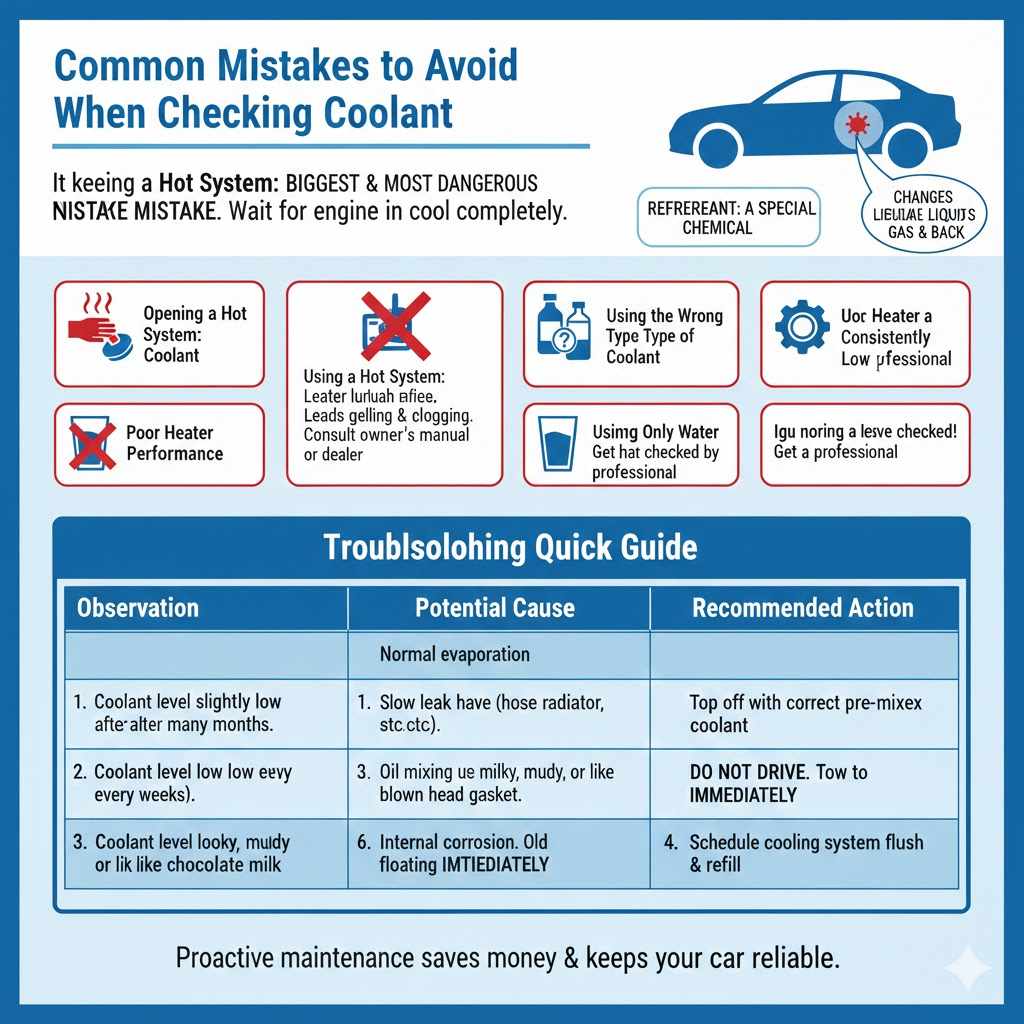
Common Mistakes to Avoid When Checking Coolant
Even simple jobs have a few common pitfalls. Here are the main things to watch out for:
- Opening a Hot System: I can’t say it enough. This is the biggest and most dangerous mistake. Always wait for the engine to cool completely.
- Using the Wrong Type of Coolant: This can lead to gelling and clogging. Always consult your owner’s manual. When in doubt, buy the coolant from your car’s dealership.
- Using Only Water: While plain water can be used in a dire emergency to get you to a safe location, it should be drained and replaced with proper coolant as soon as possible. Water boils at a lower temperature than coolant and has no anti-corrosion or anti-freeze properties.
- Ignoring a Consistently Low Level: If you find yourself having to add coolant every few weeks, you have a leak. It could be a small crack in a hose, a faulty water pump, or a radiator leak. Don’t ignore it—get it checked out by a professional.
Troubleshooting Quick Guide
Here’s a simple table to help diagnose what you might be seeing.
| Observation | Potential Cause | Recommended Action |
|---|---|---|
| Coolant level is slightly low after many months. | Normal evaporation. | Top it off with the correct pre-mixed coolant. |
| Coolant level is low every few weeks. | Slow leak in the cooling system (hose, radiator, etc.). | Top it off and have the system inspected by a mechanic. |
| Coolant looks milky, muddy, or like chocolate milk. | Oil is mixing with the coolant, often due to a blown head gasket. | Do not drive the car. Have it towed to a mechanic immediately. This is a serious issue. |
| Coolant looks rusty or has particles floating in it. | Internal corrosion. The coolant is old and needs to be replaced. | Schedule a cooling system flush and refill service. |
Frequently Asked Questions (FAQ)
1. Can I use water instead of coolant in an emergency?
Yes, in a true emergency where your engine is overheating and you have no other option, you can add water to get to a safe place or a service station. However, it should be drained and replaced with a proper 50/50 coolant mix as soon as possible. Water alone does not protect against boiling, freezing, or corrosion.
2. What happens if I drive with low coolant?
Driving with low coolant is very risky. It can quickly lead to your engine overheating, which can cause severe and permanent damage, such as a warped cylinder head or a blown head gasket. These are extremely expensive repairs.
3. How often should I check my car’s coolant level?
A good rule of thumb is to check it once a month. It’s also wise to check it before any long road trips. Making it part of a regular routine (like checking your oil and tire pressure) is the best way to stay on top of your car’s health.
4. Why is my coolant reservoir empty but the radiator seems full?
This usually indicates a leak somewhere in the system. The reservoir is designed to catch overflowing coolant as it expands and feed it back into the radiator as it cools. If the reservoir is empty, the radiator is likely not completely full either, and the system is pulling in air instead of fluid. You should top off the reservoir and have the system checked for leaks.
5. Can I mix different colors or types of coolant?
No, you should never mix different types of coolant. The chemical additives can react with each other, creating a thick gel-like substance that will clog your cooling system and cause major problems. Always use the specific type recommended in your owner’s manual.
6. What does it mean if my coolant is brown and rusty?
If your coolant looks like dirty, rusty water, it means the anti-corrosion additives have broken down and rust is forming inside your cooling system. This is a sign that the coolant is old and needs to be completely flushed and replaced with fresh fluid.
7. Should I ever open the metal radiator cap itself?
For a routine level check, no. The reservoir gives you all the information you need. The only time you or a mechanic might open the radiator cap is when the system is completely cold and you’re performing a service like a coolant flush. For everyday checks, leave the radiator cap alone.
Conclusion: You’ve Got This!
See? That wasn’t so bad! You now know how to safely and correctly check your car’s radiator coolant level. You understand why it’s so important, what to look for, and how to top it off if needed. This simple, two-minute check is one of the most powerful things you can do to protect your engine, save money, and ensure your car remains reliable for years to come.
By taking this small step, you’ve moved from being just a driver to being a smart, proactive car owner. Keep up this great habit, and you’ll build the confidence to handle even more basic maintenance tasks. Your car—and your wallet—will thank you for it. Happy driving!