How To Clay Bar a Car: Essential Guide
Clay barring a car is a crucial step in detailing that safely removes embedded contaminants, restoring a smooth, paint-fresh finish. It’s a thorough yet achievable process for any car owner wanting to protect their vehicle’s paint and prepare it for waxing or sealing.
Does your car’s paint feel a little rough, even after washing? You might notice it feels gritty or bumpy even when it looks clean. This is a common problem, and it’s caused by tiny particles that stick to your car’s surface. Think of industrial fallout, tree sap, bug splatters, and road grime. These things can’t always be washed away, leaving your paint feeling less than perfect. But don’t worry! Clay barring is your secret weapon to easily lift these stubborn bits and make your car’s paint feel silky smooth again. It’s a step that makes a huge difference, and you can totally do it yourself.
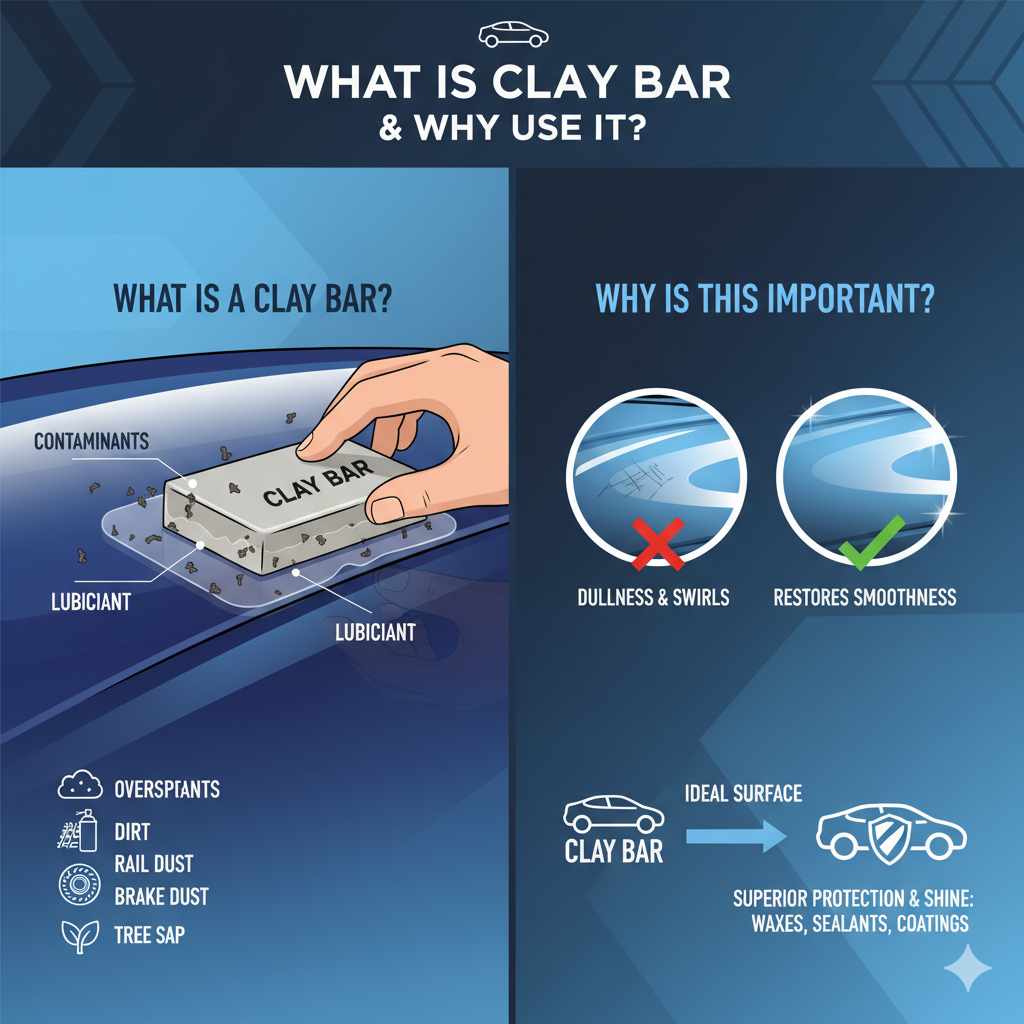
What is Clay Bar and Why Should You Use It?
Imagine your car’s paint as having tiny imperfections, like microscopic little bumps and dips. When you wash your car, you’re cleaning the surface, but many of these embedded contaminants get stuck in those tiny imperfections. A clay bar is a specially formulated putty, like a dense modeling clay, that acts like a magnet for these contaminants. When used with a lubricant, it glides over the paint and safely lifts and traps dirt, overspray, rail dust, brake dust, tree sap, and other gunk that washing alone can’t remove.
Why is this important? Contaminants left on your paint can etch into the clear coat over time, leading to dullness, swirl marks, and making the paint more susceptible to damage. Claying your car restores a perfectly smooth surface. This not only looks and feels amazing but also creates the ideal surface for applying waxes, sealants, or ceramic coatings. These protective layers will adhere better and last longer on a clean, smooth surface, giving you superior protection and shine.
The Benefits of Clay Barring Your Car
Clay barring your car offers several fantastic benefits:
- Incredible Smoothness: The most immediate benefit is the dramatically smooth finish. You’ll be amazed at how slick your paint feels after claying!
- Removes Stubborn Contaminants: It tackles bonded contaminants that washing and even polishing might miss.
- Enhances Shine: A smooth surface reflects light more uniformly, leading to a deeper, more brilliant shine when you apply protection.
- Prepares Paint for Protection: It’s an essential step before waxing or applying any sealant to ensure maximum adhesion and durability.
- Prevents Paint Damage: By removing corrosive contaminants, you prevent them from etching into your paint, preserving its condition.
- Cost-Effective: Doing it yourself saves money compared to professional detailing services.
When Should You Clay Bar Your Car?
You should consider clay barring your car in a few scenarios:
- Before Waxing or Sealing: This is the most common and highly recommended time. Claying ensures your protection layer bonds perfectly to a clean surface.
- When Paint Feels Rough: If your car’s paint feels gritty or bumpy to the touch, even after it’s clean, it’s time to clay. A simple test is to gently run your hand over the paint (with clean hands!) – if it’s not perfectly smooth, claying is in order.
- After Driving in Harsh Conditions: If you’ve recently driven through areas with heavy industrial fallout, near construction sites, or in environments prone to tree sap and bugs, claying is a good idea.
- When Buying a Used Car: A used car likely has bonded contaminants from previous owners or environmental exposure. Claying is a great way to reset the paint’s condition.
As a general guideline, many enthusiasts clay bar their vehicles twice a year, typically in spring and fall, or before applying a long-lasting sealant or ceramic coating.
What You’ll Need: Essential Clay Bar Tools
Gathering the right supplies makes the process smooth and effective. Here’s what you’ll need:
The Clay Bar Itself:
- Clay Bar: These come in different grades. For beginners, a medium-grade clay bar is usually the best choice, offering a good balance of cleaning power and gentleness. You can find them in auto detailing stores or online. Examples include popular consumer-grade clay bars from brands like Meguiar’s, Mothers, or Chemical Guys. For more stubborn contamination, you might consider a finer grade, but always start with a medium.
Lubricant:
- Clay Lubricant or Detail Spray: This is crucial! You never use a clay bar dry. A dedicated clay lubricant or a high-quality quick detailer spray provides the slip needed for the clay to glide over the paint without scratching. These contain polymers that encapsulate contaminants as they are lifted.
Washing Supplies:
- Two Buckets: One for soapy wash water, one for rinsing your wash mitt. This is the “two-bucket method” and is vital for preventing scratches during the wash.
- Car Wash Soap: A pH-neutral car shampoo is best.
- Wash Mitt: A soft microfiber or lambswool wash mitt.
- Drying Towels: Plush microfiber drying towels to dry the vehicle thoroughly.
Work Area and Protection:
- Clean Workspace: Work in a shaded area. Direct sunlight can dry out your lubricant, causing the clay to stick and potentially scratch the paint.
- Water Source: Access to a hose is helpful for rinsing.
Optional but Recommended:
- Clay Mitt or Sponge: Some people prefer a clay-infused mitt or sponge over a traditional bar. These can be easier to grip and cover larger areas faster.
- Gloves: Nitrile gloves help keep your hands clean and prevent transferring oils from your skin to the clay.
- Bucket for Clay Bar: A separate bucket with water to rinse your clay bar frequently is a good idea.
Safety Note: Always purchase your supplies from reputable auto detailing suppliers. For a deep dive into effective car washing practices, check out resources like this guide on the Federal Trade Commission’s advice on washing your car, which touches on safe practices.
Step-by-Step: How to Clay Bar a Car
Clay barring is a process that requires patience and attention to detail. Follow these steps carefully for a flawless finish:
Step 1: Wash and Dry Your Car Thoroughly
This is the most critical first step. Your car must be completely clean before you touch it with a clay bar. Any dirt or grit left on the surface can be dragged by the clay, causing scratches.
- Use the Two-Bucket Method: Fill one bucket with your car wash soap and water, and the other with clean water for rinsing your wash mitt.
- Wash from Top to Bottom: Start at the roof and work your way down, washing one panel at a time.
- Rinse Your Mitt Frequently: After washing a section, rinse your wash mitt thoroughly in the clean water bucket before dipping it back into the soapy water. This prevents transferring dirt back onto the paint.
- Rinse Away Soap: Rinse each section thoroughly as you go or rinse the entire car.
- Dry Completely: Using clean, plush microfiber drying towels, dry the entire vehicle. Ensure no water is left in crevices or seams, as this can drip later.
Step 2: Prepare the Clay Bar and Workspace
Now it’s time to get your clay ready.
- Choose Your Clay: Select your medium-grade clay bar.
- Knead the Clay: Take a small piece of clay, about the size of a golf ball or slightly smaller. Knead it in your hands until it’s pliable and soft. If your clay is stiff, you can briefly warm it in your hands.
- Prepare Lubricant: Have your clay lubricant or quick detailer readily accessible.
- Work in a Shaded Area: Ensure the car is out of direct sunlight and the surface is cool to the touch.
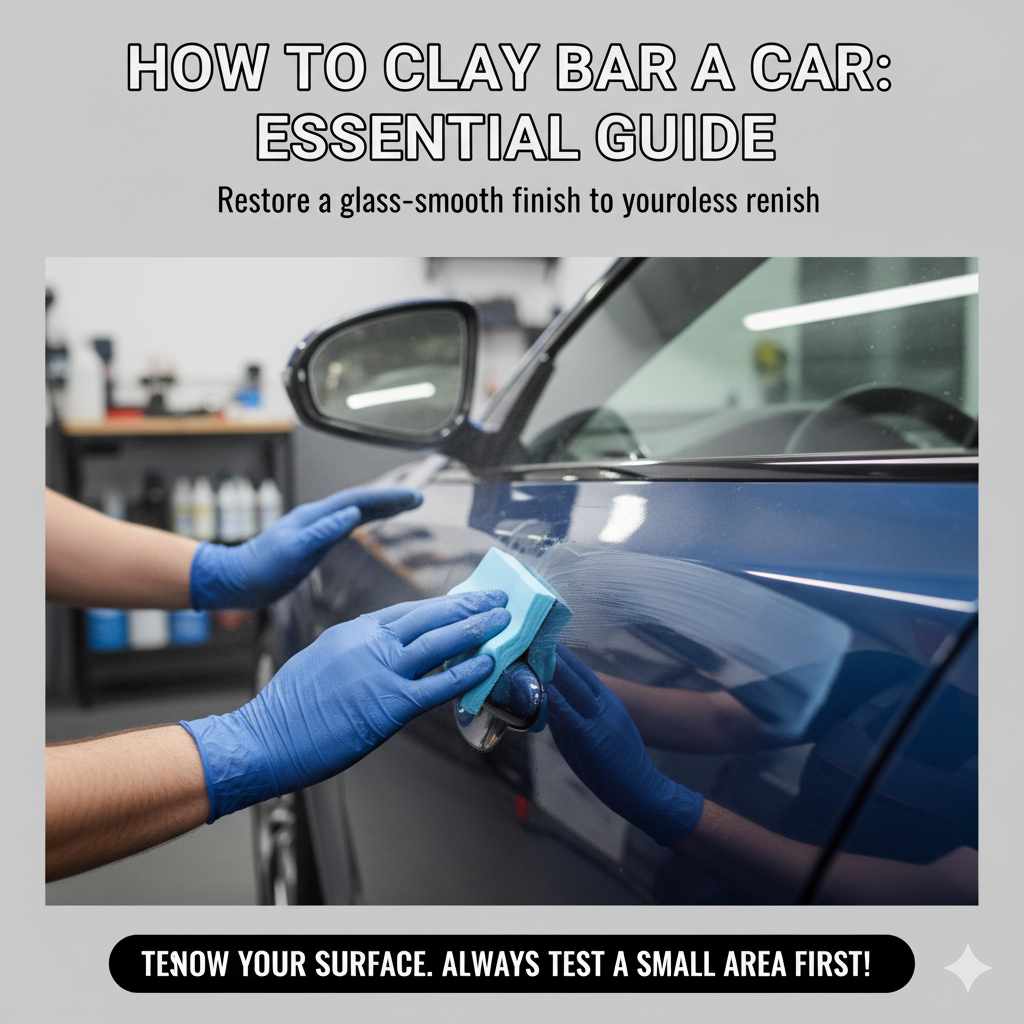
Step 3: Lubricate and Clay a Small Section
This is where the magic happens.
- Spray Generously: Generously spray the section of the car you’re about to work on with your clay lubricant. Don’t be shy with the spray; more lubricant means less risk of scratching.
- Apply Clay: Gently place the prepared clay bar onto the lubricated surface.
- Glide the Clay: Using very light pressure, glide the clay back and forth (or in straight lines) over the lubricated paint. You should feel the clay begin to grab at first as it lifts contaminants. As you work, the surface will start to feel smoother.
- Inspect the Clay: Periodically check the clay bar. If it looks dirty or you see contaminants embedded in it, fold the clean side of the clay over the dirty side and knead it to create a fresh surface.
Step 4: Check the Paint and Rinse
Keep an eye on what you’re doing.
- Feel the Difference: After a few passes, run your hand over the clayed section. You should feel a noticeable difference in smoothness.
- Rinse/Wipe: Once a section is smooth, you can either spray it again with lubricant and gently wipe with a clean microfiber towel, or if you have minimal overspray, you can simply proceed to the next section. For best results, especially for beginners, wiping gently with a clean microfiber after claying a section is recommended.
- Work in Small Sections: Continue this process, working on one small section at a time (e.g., a quarter of a hood, a door panel).
Step 5: Re-Knead and Prepare Clay as Needed
This is about maintaining your clay bar.
- When Clay Becomes Dirty: As you work over the car, the clay will collect dirt and grime. When you see a significant amount of dirt embedded in the clay, or if it no longer glides smoothly, it’s time to re-knead.
- Folding Technique: Take the dirty clay, fold the contaminated side over on itself, and then knead it again until you have a clean surface. This effectively buries the contaminants within the clay, where they can’t scratch your paint.
- Drop Zone: If you accidentally drop the clay bar on the ground, discard it immediately. Even if it looks clean, it will have picked up grit that can cause severe scratches on your paint.
- Rinse Clay Bar: You can also rinse your clay bar in your dedicated bucket of water periodically to keep it clean without necessarily needing to re-knead as often.
Step 6: Finish and Inspect
You’re almost done!
- Complete the Entire Vehicle: Work systematically over every painted surface of your car, including doors, fenders, roof, trunk, and bumpers. Don’t forget any areas that may feel rough.
- Final Rinse (Optional but Recommended): After you’ve clayed the entire car, you can give it a light rinse to remove any lubricant residue.
- Final Dry: Dry the vehicle entirely with clean microfiber towels.
- Inspect Your Work: Run your hand over the paint one last time. It should feel incredibly smooth and clean.
Step 7: Apply Protection (Wax, Sealant, or Coating)
This is the final, vital step.
- Protect the Paint: Your paint is now perfectly prepped. Apply your favorite wax, paint sealant, or ceramic coating according to the product’s instructions.
- Maximize Shine and Durability: This protective layer will now bond best to the smooth, decontaminated surface, giving you maximum gloss and protection.
Clay Bar vs. Clay Mitt vs. Clay Towel
While traditional clay bars are the original and most common, other tools have emerged. Each has its pros and cons:
| Tool | Pros | Cons | Best For |
|---|---|---|---|
| Traditional Clay Bar | Highly effective at removing bonded contaminants. Inexpensive. Can be reformed by kneading. | Can be messy and difficult to grip. Small surface area requires frequent re-kneading. Dropping it means it’s unusable. | Beginners learning the process, detailed work, targeting specific contaminants. |
| Clay Mitt/Sponge | Easier to hold and control. Covers larger areas faster. Less likely to be dropped. | Can be more expensive. May not be as effective at picking up fine contaminants as a traditional bar. Requires careful cleaning and inspection. | Experienced users, working on larger vehicles, faster detailing sessions. |
| Clay Towel | Very large surface area, covers extensive areas quickly. Can be used like a drying towel with lubricant. | Often the most expensive. Can be prone to marring if not used correctly or if contaminants are severe. Requires thorough cleaning. | Professional detailers, those seeking the absolute fastest decontamination process, experienced users. |
For beginners, starting with a traditional clay bar is highly recommended. It teaches you the feel for contamination and the proper technique. As you gain experience, you can explore clay mitts or towels for efficiency.
Common Mistakes to Avoid When Claying
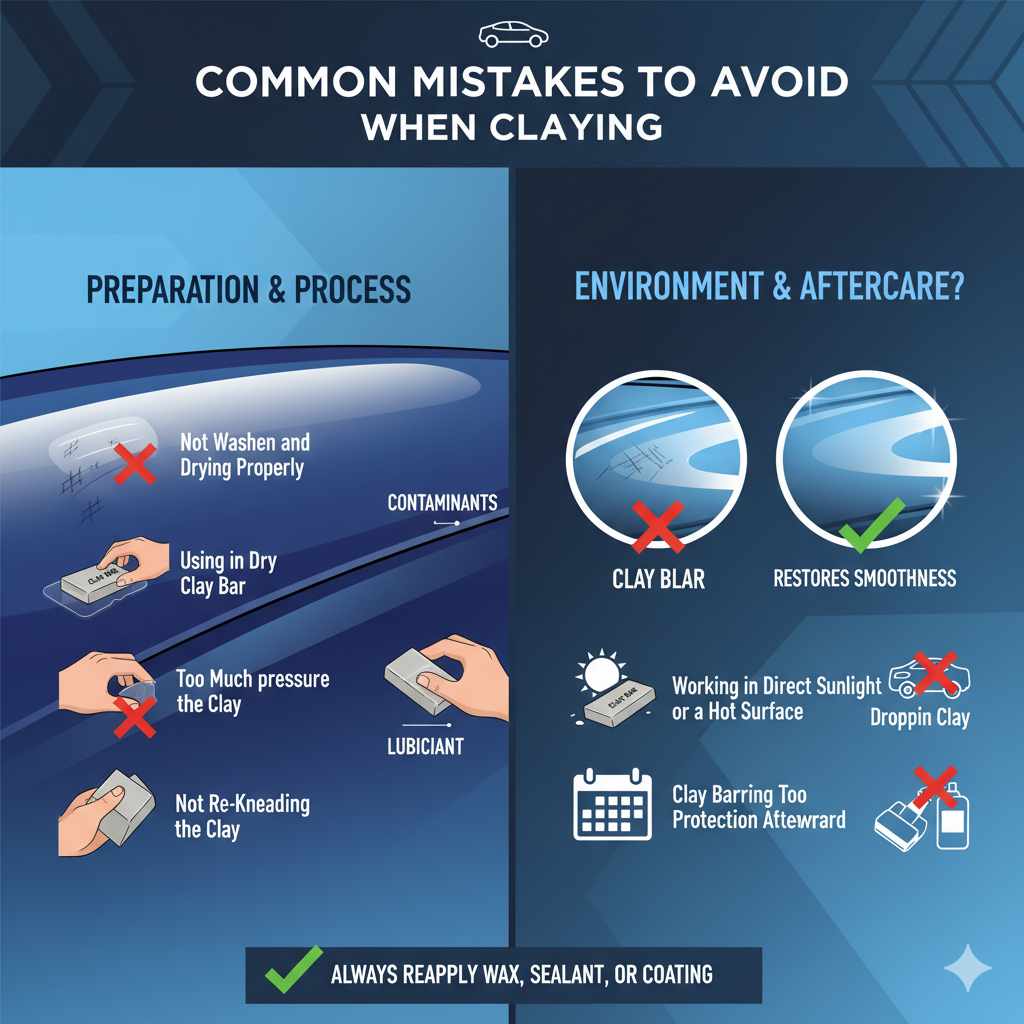
Even with the best intentions, some mistakes can happen. Being aware of them helps you avoid them:
- Not Washing and Drying Properly: As mentioned, this is the #1 cause of scratches. Always start with a spotless car.
- Using a Dry Clay Bar: A clay bar needs lubricant to glide. Never use it dry!
- Too Much Pressure: Let the clay bar and lubricant do the work. Excessive pressure can lead to marring or scratches.
- Not Re-Kneading the Clay: Continuing to use a dirty clay bar will drag contaminants across your paint. Fold and knead frequently.
- Dropping the Clay: A dropped clay bar is contaminated. Toss it! It’s not worth risking your paint’s finish.
- Working in Direct Sunlight or on a Hot Surface: The lubricant will dry too quickly, increasing the risk of marring.
- Clay Barring Too Often: While beneficial, excessive claying can potentially remove some of your clear coat or paint protection over time if done very aggressively or too frequently. Stick to when it’s needed.
- Not Applying Protection Afterward: Clay barring effectively strips away any old wax or sealant. You must reapply protection to keep your paint safe.
How to Clean and Store Your Clay Bar
Proper storage keeps your clay bar usable for future detailing sessions.
Cleaning:
- If your clay bar is relatively clean after use, you can often just fold it over on itself (to bury any light contamination) and store it.
- For a more thorough clean (if it picked up a lot of grime but wasn’t dropped), you might rinse it under clean water and then carefully knead it to redistribute the polymers. Be very careful not to introduce any grit.
Storage:
- Always store your clay bar in its original container or a sealed plastic container (like a small Tupperware or Ziploc bag).
- Ensure the clay bar is not exposed to dust, dirt, or direct sunlight.
- Keep it in a cool, dry place. Avoid extreme temperatures, which can degrade the clay.
- Crucially: If the clay bar has ever touched dirt or been dropped, it’s no longer safe to use on your paint and should be discarded.
A well-maintained clay bar can be reused multiple times, making it a cost-effective detailing tool.
Frequently Asked Questions About Clay Barring
Q1: How often should I clay bar my car?
You should clay bar your car whenever the paint feels rough or gritty to the touch, typically every 6-12 months. It’s an essential step before applying any long-lasting wax, sealant, or ceramic coating.
Q2: Can clay barring damage my car’s paint?
When done correctly with proper lubrication and technique, clay barring is safe for your car’s paint. The risk of damage comes from using it dry, on a dirty car, dropping it, or using excessive pressure. Always follow the steps carefully.
Q3: What’s the difference between a clay bar and a wash mitt?
A wash mitt cleans the surface of loose dirt and grime. A clay bar is designed to bind to and lift embedded contaminants that remain on the surface even after washing, making the paint drastically smoother.