How to Clean Tinted Car Windows: Essential Guide
Clean tinted car windows easily with a pH-neutral cleaner, microfiber towels, and a gentle touch. Avoid ammonia-based products to protect the tint and keep your windows streak-free for a clear view.
Hey everyone, Md Meraj here! Keeping your car’s tinted windows looking crystal clear can sometimes feel like a puzzle, especially when you want to avoid damaging that nice tint. Streaks, smudges, and grime are not only unsightly but can also make driving a bit hazard. But don’t worry! With the right approach, cleaning tinted windows is simple and something you can totally do yourself. This guide will walk you through everything you need to know, step-by-step, so you can achieve that showroom shine without any fuss. Get ready to see the road ahead with perfect clarity!
Why Proper Cleaning Matters for Tinted Windows
Tinted windows add a sleek look to your car and can help reduce heat and glare. However, the film applied to tint windows is delicate. Using the wrong cleaning products or tools can easily scratch the tint, cause it to peel, or even make it look cloudy. This is why a specific cleaning method is important. Think of it like caring for a special coat—you wouldn’t use harsh detergents, right? The same applies to your car’s tint. A gentle, correct cleaning routine will make your tint last longer and always look its best, ensuring safety and style.
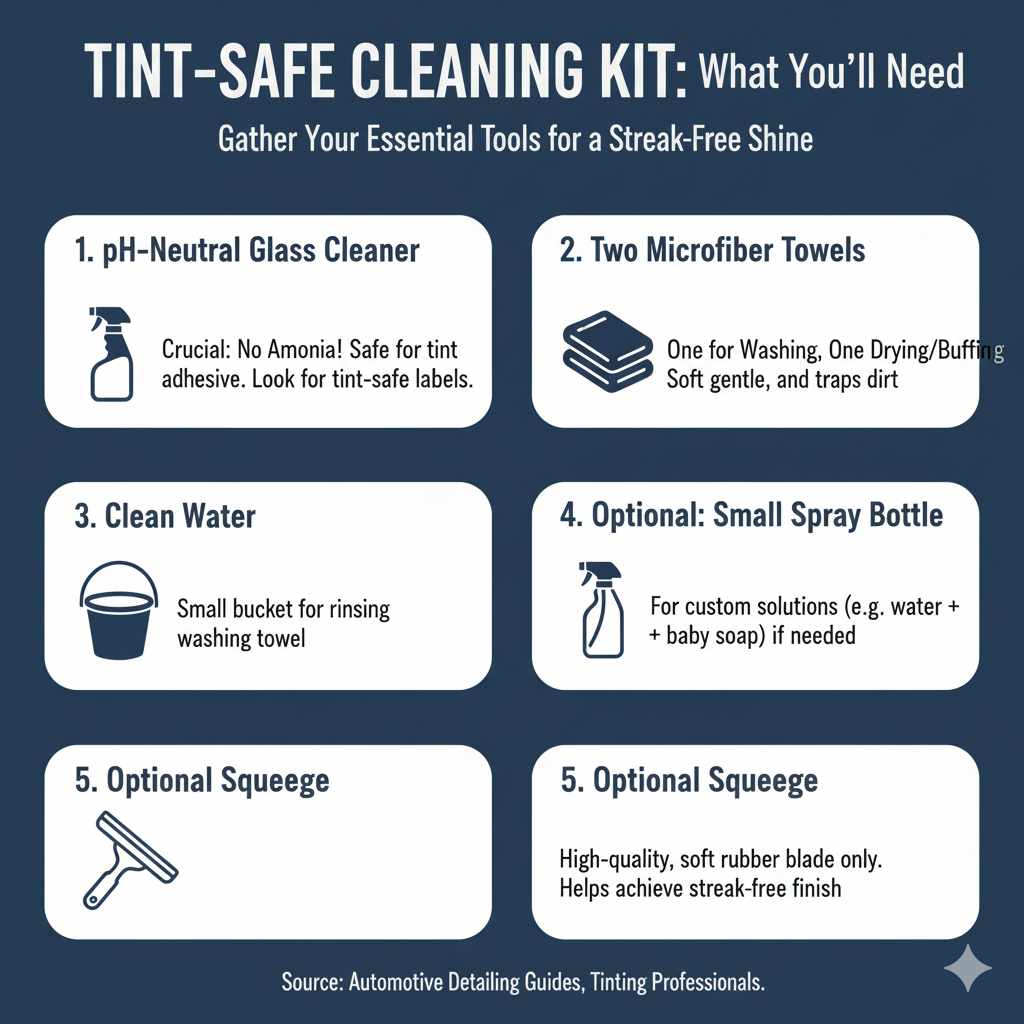
What You’ll Need: Your Tint-Safe Cleaning Kit
Gathering the right tools before you start is key to a smooth cleaning process. You don’t need fancy equipment; just a few key items will do the trick. Having everything ready means you can focus on cleaning without interruptions. Here’s what I recommend:
- pH-Neutral Glass Cleaner: This is crucial. Look for cleaners specifically labeled as safe for tinted windows or home window cleaners. Avoid anything with ammonia, as it can break down the tint adhesive. We’ll discuss why in a bit!
- Two Microfiber Towels: Microfiber is gentle on surfaces and great at trapping dirt without scratching. Bring at least two – one for washing and one for drying/buffing.
- Clean Water: A small bucket of clean water is handy for rinsing your washing towel.
- Optional: Small Spray Bottle: If your cleaner doesn’t come in a spray bottle, or you want to mix your own solution (like water and a tiny bit of baby soap, though a dedicated cleaner is best), use this.
- Optional: Squeegee with a Rubber Blade: A high-quality squeegee can help achieve a streak-free finish, but it must have a soft, clean rubber blade.
The Dreaded Ammonia: Why It’s a Tint’s Worst Enemy
You might be wondering why so many people warn against ammonia. Ammonia is a strong chemical found in many common household glass cleaners. While it’s effective at cutting through grease and grime on regular glass, it can be very harsh on the adhesives and the film of window tint. When ammonia touches the tint, it can:
- Degrade the Adhesive: The glue holding the tint film to the glass can weaken, leading to bubbling or peeling.
- Cloud the Film: Ammonia can damage the tint’s surface, creating a foggy appearance that permanently reduces visibility.
- Shorten Tint Life: Over time, ammonia use will significantly reduce how long your window tint lasts before it needs replacement.
Because of these risks, always opt for an ammonia-free cleaner. It’s the safest bet for preserving your tint’s integrity and appearance. Many auto parts stores carry specific tint-safe cleaners, or you can use a good quality ammonia-free household cleaner. When in doubt, check the product label carefully!
Step-by-Step Guide: How to Clean Tinted Car Windows
Alright, let’s get those windows sparkling! Follow these simple steps for the best results. Remember, patience and a gentle touch are your best friends here.
Step 1: Prepare the Area and Remove Loose Debris
Before you spray any cleaner, it’s important to get rid of any loose dirt, dust, or grit that might be sitting on your windows. Imagine scrubbing a dusty table with a wet cloth – you’d just be moving the dirt around, potentially scratching the surface. The same applies to your car windows. Dry debris can easily lead to scratches when you start wiping.
- Park in the Shade: Direct sunlight can cause cleaning solutions to dry too quickly, leading to streaks. A shady spot is ideal.
- Brush or Blow Away Debris: You can use a soft brush or even a gentle puff of air to remove loose particles from the window edges and the glass itself. This is especially important for the bottom edge of the window where dirt tends to accumulate.
Step 2: Apply Your Cleaner
Now it’s time to apply your tint-safe cleaner. Spray it directly onto your microfiber wash towel, not directly onto the window, especially for the inside. This gives you more control and prevents excess liquid from dripping into door panels or electronics.
- Dampen the Towel: Lightly spray your pH-neutral glass cleaner onto one of your microfiber towels. You want it damp, not soaking wet.
- Work in Sections: Don’t try to clean the entire window at once. Focus on one manageable section at a time.
Step 3: Gently Wipe the Window
This is where the actual cleaning happens. Use smooth, consistent motions.
- Use Overlapping Strokes: Gently wipe the window surface using overlapping, horizontal or vertical strokes. Start from the top and work your way down.
- Avoid Scrubbing: There’s no need to apply heavy pressure. Let the cleaner and the microfiber do the work. Scrubbing can push dirt and potentially scratch the tint.
- Rinse Your Towel Regularly: If you notice your towel is picking up a lot of dirt, rinse it in your bucket of clean water and wring it out thoroughly before applying more cleaner. This prevents you from re-depositing dirt onto the window.
Step 4: Rinse (Optional but Recommended for Inside Windows)
For interior windows, where a lot of grime can build up, a quick rinse can help ensure all cleaner residue is gone.
- Dampen a Clean Section of Towel: Take a clean section of your wash towel (or a fresh towel) and dampen it with just clean water.
- Wipe Down Again: Gently wipe over the areas you just cleaned. This removes any remaining cleaner residue that might cause streaks when drying.
Step 5: Dry and Buff for a Streak-Free Finish
This is the critical step for achieving that perfect, clear look. A clean, dry microfiber towel is your best friend here.
- Use a Dry Microfiber Towel: Take your second, completely dry microfiber towel.
- Buff the Glass: Gently buff the window dry using overlapping strokes. For best results, use a cross-hatch pattern (e.g., horizontal strokes followed by vertical strokes) to catch any remaining moisture or haziness.
- Check for Streaks: View the window from different angles in the light. If you see any streaks or missed spots, give them a quick touch-up buff.
Using a Squeegee (Advanced Tip for Exterior Windows)
If you prefer to use a squeegee, especially on the exterior windows, here’s how to do it effectively without streaks:
- Wet the Window Thoroughly: Ensure the window is well-covered with your tint-safe cleaner solution.
- Start at the Top: Place the squeegee blade at the top edge of the window.
- Pull Down in Overlapping Strokes: Pull the squeegee straight down or at a slight angle, overlapping each stroke by about an inch.
- Wipe the Blade: After each stroke, wipe the squeegee blade clean and dry with a lint-free cloth (another microfiber towel works well).
- Work Quickly: Try to work efficiently so the solution doesn’t start to dry on the glass before you can squeegee it.
- Detail Edges: Use your dry microfiber towel to wipe away any water drips along the edges of the window.
Cleaning Inside vs. Outside Tinted Windows
While the basic principles are the same, there are a few nuances when cleaning the inside versus the outside of your tinted car windows. Knowing these differences ensures you tackle each side effectively.
Exterior Windows
Exterior windows often accumulate more grime, road salt, bird droppings, and other road-born contaminants. They can also handle a slightly more robust approach if needed, but still with caution for the tint.
- More Grime: Be prepared for tougher dirt. A dedicated car wash soap mixed with water might be used here for the initial wash if very dirty, followed by the tint-safe cleaner.
- Water Can Drain: You don’t have to worry as much about water getting into sensitive areas.
- Squeegee Friendly: Exterior windows are often where a squeegee is most useful for a streak-free finish.
Interior Windows
Interior windows can be trickier due to the car’s sensitive electronics and upholstery. You want to avoid drips as much as possible.
- Less Grime, More Smudges: Typically, interior windows get smudged from fingerprints, breath, and dashboard dust.
- Minimize Dripping: Lightly spray cleaner onto your cloth, not the window. Work carefully to prevent liquids from reaching the door panels, dashboard, or electronic components. A damp, not wet, towel is key.
- Use a Lint-Free Cloth: Ensure your cleaning towels are very clean to avoid leaving lint behind, which is more noticeable on the inside.
For both interior and exterior, always use the same ammonia-free, pH-neutral cleaner and microfiber towels. The primary difference is how you handle the liquid and the type of dirt you’re dealing with.
What to Avoid (The Tint’s No-No List)
Beyond ammonia, there are other things you should steer clear of when cleaning your tinted windows to keep them in good condition:
- Abrasive Cleaners or Pads: Never use scouring pads, steel wool, or abrasive powders. They will scratch the tint film.
- Dirty Towels or Sponges: Always use clean microfiber towels. A dirty cloth is like sandpaper for your tint.
- Paper Towels: While convenient, paper towels can leave lint and are surprisingly abrasive, potentially causing micro-scratches over time.
- Scraping Tools: Never use razor blades or scrapers on tinted windows, even for stubborn spots. They will almost certainly damage the tint.
- Window Cleaning on Hot Days: As mentioned, direct sunlight makes the cleaner dry too fast, leaving streaks and making it harder to get a clean finish.
- Excessive Water: Especially on the inside, too much water can cause electrical issues or damage car interior components.
Table: Comparing Cleaning Products for Tinted Windows
To make it super clear what to use and what to avoid, here’s a quick comparison:
| Product Type | Effect on Tinted Windows | Recommendation |
|---|---|---|
| Ammonia-Based Cleaners | Can degrade adhesive, cause cloudiness, shorten tint life. | AVOID |
| pH-Neutral Glass Cleaner (Ammonia-Free) | Safely cleans and removes smudges without damage. | RECOMMENDED |
| Rubbing Alcohol (Isopropyl Alcohol) | Generally safe in diluted form or occasionally for tough spots, but use sparingly. Can dry out tint if overused. | Use with caution, sparingly. |
| Vinegar (Diluted) | Can be effective if heavily diluted (1:1 with water), but less ideal than dedicated cleaners and may leave slight odors. | Use as a last resort, heavily diluted. |
| Soapy Water (Mild Dish Soap) | A very small amount of mild dish soap in water can be used for exterior washing, but rinse thoroughly. Not ideal for interior due to potential residue. | Use sparingly for exterior; rinse well. |
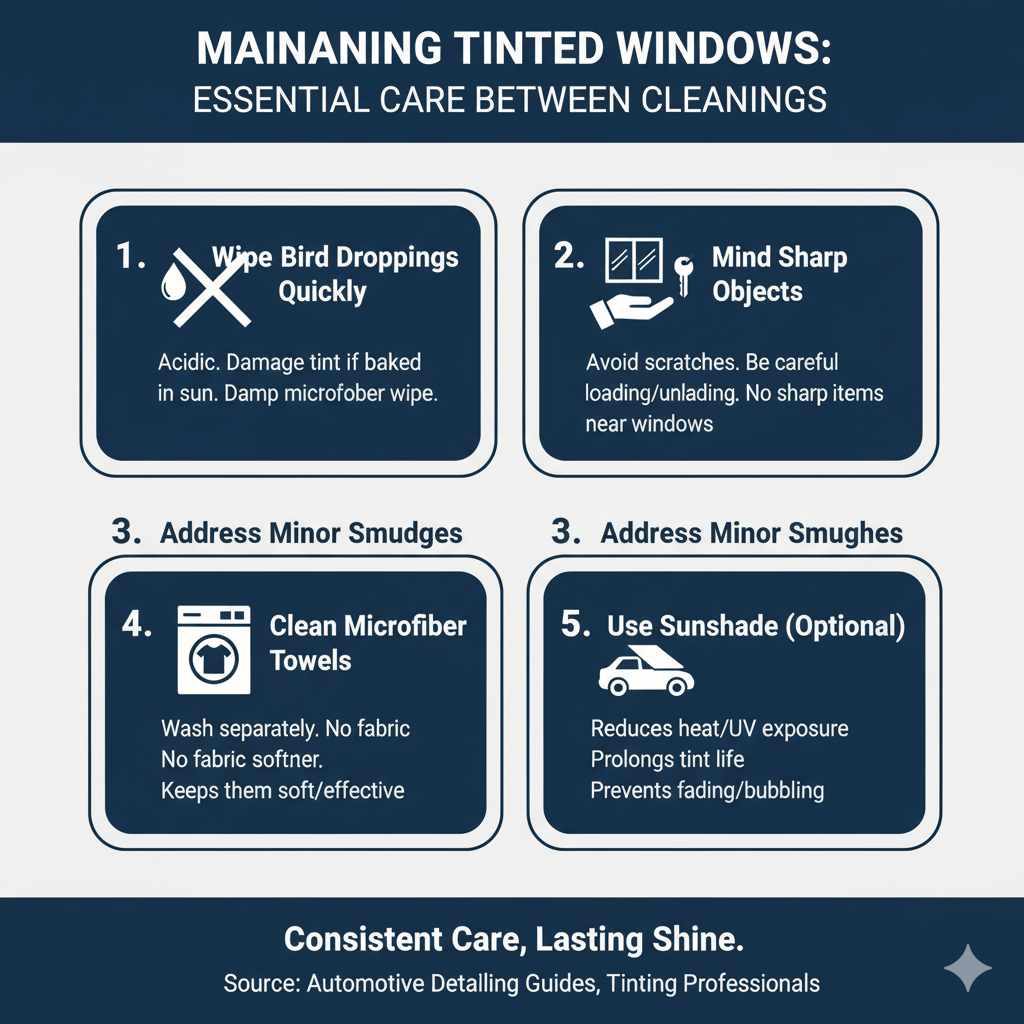
Maintaining Your Tinted Windows Between Cleanings
Keeping your tinted windows looking great isn’t just about the cleaning process; it’s also about what you do between washes. A little bit of regular care goes a long way!
- Wipe Away Bird Droppings Quickly: Bird droppings are acidic and can damage tint if left to bake in the sun. Gently wipe them away with a damp microfiber towel as soon as you notice them.
- Be Mindful of What Touches Your Windows: When loading or unloading things from your car, try not to let sharp objects or rough materials brush against the tinted glass.
- Address Minor Smudges Immediately: Keep a small, clean microfiber cloth in your car for quick touch-ups of fingerprints or minor smudges. A tiny spray of water can help if needed.
- Regularly Clean Your Microfiber Towels: Always wash your microfiber towels separately from other laundry, without fabric softener, to keep them soft and effective.
FAQ: Your Tinted Window Cleaning Questions Answered
Here are some common questions people have about cleaning tinted car windows:
Q1: Can I use Windex on my tinted windows?
A1: Absolutely not! Most Windex products contain ammonia, which is very harmful to window tint. Always check the label for “ammonia-free” if you’re considering any cleaner, but it’s best to use a product specifically labeled for tinted windows.
Q2: How often should I clean my tinted car windows?
A2: It depends on how dirty they get, but a good rule of thumb is to clean them whenever you wash your car, or at least once a month. Pay attention to buildup of dust, grime, or streaks that impair visibility.
Q3: My tinted windows have small bubbles. Can cleaning fix this?
A3: Unfortunately, small bubbles are often a sign that the tint is starting to fail or wasn’t applied perfectly. Regular cleaning won’t fix bubbles; in fact, improper cleaning could make them worse. If you have significant bubbling, you might need to have the tint professionally removed and reapplied.
Q4: Can I use a power washer on tinted windows?
A4: It’s best to avoid power washers on tinted windows. The high pressure can potentially force water under the tint edges or even damage the tint film itself, especially if there are any existing small tears or lifting. Stick to gentle hand washing.
Q5: What’s the difference between cleaning interior and exterior tint?
A5: Both should use the same ammonia-free cleaner and microfiber towels. However, interior cleaning requires extra care to avoid drips damaging the car’s interior, so spray cleaner onto the towel, not the glass. Exterior windows can handle more grime and are friendlier to squeegees.
Q6: Can I use Rain-X on my tinted windows?
A6: It’s generally not recommended to use products like Rain-X on the interior side of tinted windows. While it can be used on the exterior of most vehicles, always check the product’s compatibility with aftermarket window tint first, as some sealants might affect the tint’s finish or lifespan.
Conclusion
There you have it! Cleaning your tinted car windows doesn’t have to be a daunting task. By sticking to pH-neutral, ammonia-free cleaners and using soft microfiber towels, you can easily keep your tint looking sharp and your view unobstructed. Remember, gentle is key – your tint will thank you for it with a longer life and a consistently clear appearance. Grab your supplies, find a shady spot, and give your car the clarity it deserves. Happy cleaning, and happy driving!