How to Fix Seat Belt in Car: Genius Essential
Fixing a car seat belt is often simpler than you think! Common issues like slow retraction, a stubbornly locked belt, or a frayed strap can usually be addressed with basic cleaning, inspection, or simple adjustments without needing a mechanic. This guide helps you identify the problem and offers easy solutions to get your seat belt working safely and reliably again.
Seat belts are crucial for safety, but sometimes they don’t work as smoothly as they should. Does your seat belt retract slowly, get stuck, or seem loose? It can be frustrating and even a little worrying. But don’t worry, you don’t always need to call a mechanic for this. Often, a few simple checks and fixes can get your seat belt back in top shape. This guide is here to walk you through it, step-by-step, so you can feel confident making your car safer.
When Your Seat Belt Needs Some TLC
It’s easy to forget about our seat belts until they act up. A seat belt that doesn’t retract properly can be a minor nuisance or a serious safety hazard. If the belt stays pulled out too far, it can get in the way or not protect you effectively in an accident. Sometimes, the belt might lock up unexpectedly, making it difficult to buckle or unbuckle. In other cases, you might notice wear and tear, like fraying, which needs immediate attention.
Understanding the common problems is the first step to fixing them. Most of the time, the issue is with the retractor mechanism or the belt webbing itself. We’ll explore these issues and how you can tackle them yourself.
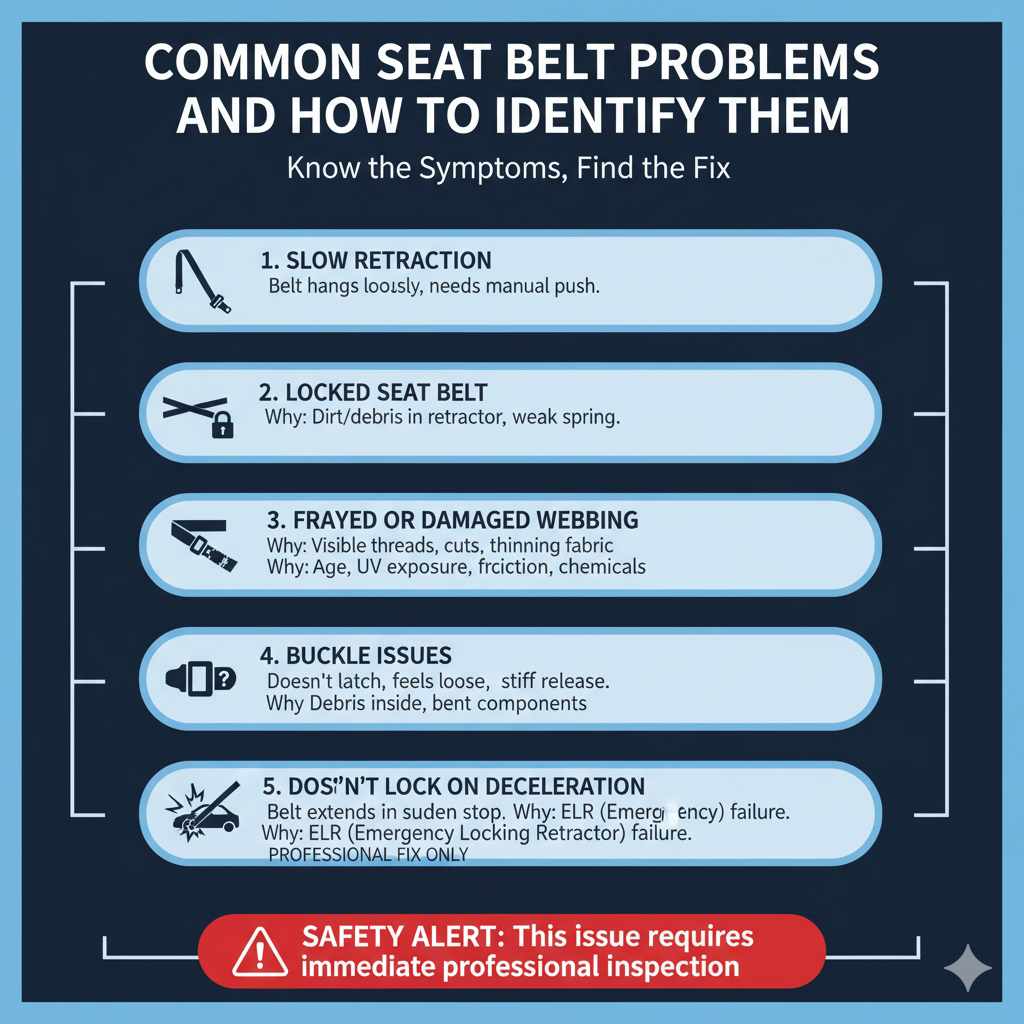
Common Seat Belt Problems and How to Identify Them
Let’s break down the most frequent seat belt woes. Knowing the symptom helps us pinpoint the fix.
1. Slow Retraction
This is perhaps the most common issue. You unbuckle, and the belt just kind of lazily climbs back into its housing, or worse, you have to push it back in yourself.
- What it looks like: Belt doesn’t snap back quickly, hangs loosely, or needs manual help to retract.
- Why it happens: Often, dirt and debris build up in the retractor mechanism or the belt guides. Sometimes, the spring inside the retractor might be losing tension, but this is less common than dirt.
2. Locked Seat Belt
This happens when the seat belt locks up mid-pull, usually during sudden stops, sharp turns, or if you pull the belt too quickly. While this is a safety feature, sometimes it can get stuck and stay locked.
- What it looks like: Belt won’t extend any further, no matter how gently you try to pull it.
- Why it happens: The internal locking mechanism in the retractor has a pendulum or ball bearing that engages when it senses rapid movement. If it gets stuck in the engaged position (rare), or if grit jams the mechanism, it can remain locked.
3. Frayed or Damaged Webbing
The fabric part of the seat belt shows signs of wear and tear.
- What it looks like: Visible threads pulling apart, cuts, or thinning in the webbing.
- Why it happens: Age, exposure to sunlight (UV degradation), friction against sharp edges (like car doors or seats), or chemical damage.
4. Buckle Issues
The metal tongue of the seat belt might not click securely into the buckle, or it might be difficult to release.
- What it looks like: Belt doesn’t latch properly, feels loose when latched, or the release button is stiff.
- Why it happens: Debris lodged inside the buckle mechanism can prevent proper engagement or release. Sometimes, the metal components can get slightly bent.
5. Belt Extends But Doesn’t Lock on Deceleration
This is a serious safety concern. The belt might extend fine, but it doesn’t stop you from moving forward as it should in a sudden stop.
- What it looks like: When you simulate a sudden stop (like a firm brake pedal press while stationary), the belt continues to extend or doesn’t provide restraint.
- Why it happens: This indicates a failure of the retractor’s emergency locking mechanism (ELR). This is not a DIY fix and requires professional attention.
Tools You Might Need for Seat Belt Fixes
Before you start, gather a few basic tools. Most fixes don’t require a full mechanic’s toolkit, but having these on hand will make the job much easier and safer.
- Screwdriver Set: Phillips head and flathead screwdrivers are essential for removing trim panels.
- Socket Wrench Set: You might need to remove the bolt that secures the seat belt anchor. Common sizes are 14mm or 17mm.
- Pliers: Needle-nose pliers can be helpful for manipulating small parts or cleaning debris.
- Mild Soap and Water: For cleaning the seat belt webbing.
- Clean Cloths or Rags: For drying and cleaning.
- Vacuum Cleaner (with a crevice tool): To suck out dirt and debris.
- Shop Towels or Paper Towels: For general cleaning.
- Safety Glasses: Always protect your eyes, especially when working with trim or parts that could snap.
- Gloves: To keep your hands clean and provide a better grip.
For more involved fixes, like replacing a damaged assembly, you might need a torque wrench to ensure bolts are tightened to the manufacturer’s specifications. This is critical for safety. Consult your car’s owner’s manual for specific torque values. The National Highway Traffic Safety Administration (NHTSA) provides valuable safety information and recalls, which can be a great resource for understanding vehicle safety standards, including those for seat belts: NHTSA Child Safety (while this link focuses on child restraints, NHTSA’s broader site offers extensive vehicle safety information).
Step-by-Step Guide: How to Fix Common Seat Belt Issues
Let’s get down to business. Here’s how you can tackle those annoying seat belt problems.
Fixing Slow Retraction: The Dirt and Grime Battle
Slow retraction is usually caused by a buildup of dust, dirt, and fabric fibers in the seat belt mechanism.
- Pull the Seat Belt Out Fully: Extend the entire length of the seat belt.
- Inspect the Webbing: Check the webbing for any obvious damage like cuts or fraying. If found, stop and plan for replacement (more on that later).
- Clean the Webbing: Use a damp cloth with a small amount of mild soap (like dish soap) to gently wipe down the webbing. Avoid harsh chemicals, as they can damage the fabric.
- Dry the Webbing: Let the seat belt air dry completely, or gently dry it with a clean cloth.
-
Clean the Retractor Area: This is the tricky part, but crucial.
- Locate the seat belt retractor. It’s usually found behind a plastic trim panel near the seat or in the door pillar (B-pillar).
- Carefully remove the trim panel. You might need a screwdriver or a trim removal tool. Be gentle to avoid breaking clips!
- Once the retractor is accessible, use a vacuum cleaner with a crevice tool to suck out any dust and debris from around the belt opening and the visible parts of the retractor.
- You can also use a can of compressed air (like for cleaning keyboards) to blow out dust.
- Sometimes, gently wiggling the belt back and forth through the retractor opening can help dislodge minor debris.
- Test Retraction: Slowly let the seat belt retract. If it’s still slow, repeat the cleaning process. Sometimes, a bit of lubrication can help, but this should be done with extreme caution and only with specific, safe lubricants as recommended by automotive experts. Usually, cleaning is sufficient.
If cleaning doesn’t help, the retractor’s internal spring mechanism might be worn. This is a more complex repair and often warrants replacing the entire seat belt assembly.
Fixing a Locked Seat Belt: The Gentle Approach
If your seat belt locks up and won’t budge, try these steps:
- Unlock Gently: Do NOT yank the belt hard. This will only engage the lock further.
- Retract Slightly: Try to gently push the belt back into the retractor a tiny bit. This can sometimes free the locking mechanism.
- Straighten the Belt: Ensure the belt is as straight as possible and not twisted or bunched up.
- Pull Steadily and Slowly: With the belt straightened and slightly retracted if possible, try pulling it out steadily and slowly, keeping it at a natural angle.
- If it Still Won’t Budge: Sometimes, the locking mechanism can be overly sensitive or get jammed with a tiny piece of debris. If you can access the retractor (as described in the “Slow Retraction” section), carefully try to blow some compressed air around the mechanism. Be extremely gentle.
- Check the ELR Mechanism: Seat belts have two locking modes: one for sudden movements (the pendulum) and one for vehicle tilt (the inclinometer). If the belt is locked and you haven’t made any sudden movements, the inclinometer might be stuck, possibly due to the car being parked on a severe incline. Try parking on a level surface.
If the seat belt remains locked and you haven’t performed any actions that should have triggered it, there might be an issue with the internal mechanism. In such cases, it’s best to seek professional help from an automotive repair shop.
Addressing Frayed or Damaged Webbing: Safety First!
Frayed or damaged seat belt webbing is a serious safety compromise. The belt’s strength is reduced, and it could fail during an impact.
For frayed or damaged webbing, the only safe solution is to replace the entire seat belt assembly.
Here’s a general overview of what this involves, but this is a more advanced DIY task or best left to professionals:
- Locate the Anchor Points: Seat belts are typically anchored at the floor, near the seat, and sometimes at the shoulder.
- Unbolt the Old Assembly: You’ll need to remove the bolts securing the seat belt mechanism. These bolts are critical safety components and must be reinstalled correctly. The floor anchor bolt is usually the largest and most critical.
- Remove the Old Assembly: Carefully maneuver the old seat belt out of the car.
- Install the New Assembly: Ensure you have the correct replacement part for your vehicle’s make, model, and year. Attach the new assembly, making sure all parts align correctly.
- Tighten Bolts to Specification: THIS IS CRITICAL. Seat belt bolts need to be tightened to the manufacturer’s specified torque. An improperly tightened bolt can lead to the seat belt detaching in an accident. If you don’t have a torque wrench or aren’t comfortable with this step, take it to a professional. You can often find torque specifications in your car’s service manual, or consult sites like Edmunds for vehicle-specific information and repair guides.
- Test the New Belt: Ensure it retracts smoothly, buckles securely, and locks on sudden movements.
Replacing a seat belt assembly can be complex due to the need for precise tightening of critical safety bolts. Always prioritize safety and consider professional installation if you have any doubts.
Fixing Buckle Issues: Cleaning is Key
A sticky or non-latching buckle is often fixed by removing debris.
- Inspect the Buckle: Look inside the buckle mechanism (where the metal tongue goes in) for any visible debris like dirt, food crumbs, or fallen leaves.
- Use Compressed Air: Spray compressed air directly into the buckle mechanism to blow out loose debris.
- Vacuum: Use a narrow nozzle attachment on your vacuum cleaner to suction out any dislodged debris.
- Clean with a Damp Cloth: If there’s sticky residue, use a lightly dampened cloth to wipe the surfaces inside the buckle. Avoid soaking it.
- Lubrication (Use Sparingly and Carefully): If the buckle is still stiff after cleaning, a very small amount of a dry lube like graphite powder or a silicone-based spray specifically designed for automotive use can be carefully applied. Avoid oil-based lubricants, as they can attract more dirt and gunk up the mechanism. Do not spray excessively.
- Test the Tongue: Insert and release the metal tongue several times to ensure it latches securely and releases smoothly.
If the buckle mechanism appears bent or damaged internally, or if cleaning and light lubrication don’t resolve the issue, the buckle assembly may need to be replaced.
When to Call a Professional
Sometimes, DIY isn’t the answer. Here’s when it’s time to hand it over to the experts:
- Seat Belt Fails to Lock on Deceleration: If your seat belt doesn’t engage and restrain you during sudden stops or even just quick braking, it’s a critical safety failure. This usually means the entire retractor mechanism needs professional diagnosis and likely replacement. You can perform a simple test by pulling the belt out strongly and quickly – it should lock.
- Damaged Webbing: As mentioned, any fraying, cuts, or significant wear on the webbing require full replacement.
- Compromised Anchor Bolts: If the bolts securing the seat belt anchors are rusted, stripped, or if you have any doubt about their integrity, a professional should inspect and repair them. The correct torque is vital.
- Internal Mechanism Failure: If your seat belt is jammed and won’t retract or extend after trying basic cleaning and retraction techniques, or if it feels loose even when locked, an internal component might be broken.
- Uncertainty or Lack of Confidence: If you’re not comfortable with any of the steps, or if the repair seems beyond your skill level, it’s always best and safest to consult a qualified mechanic or an automotive upholstery specialist.
A reputable repair shop can diagnose the problem accurately and ensure the seat belt is repaired or replaced to meet all safety standards. The cost of professional repair is a small price to pay for ensuring your safety and the safety of your passengers.
DIY vs. Professional Repair: Making the Smart Choice
Deciding whether to tackle a seat belt fix yourself or take it to a pro involves a few considerations.
DIY Advantages:
- Cost Savings: You save on labor costs, paying only for parts (if needed) and tools.
- Convenience: You can often fix minor issues immediately without scheduling an appointment.
- Learning Experience: It’s a great way to learn more about your car and build DIY confidence.
Professional Repair Advantages:
- Expertise: Mechanics have specialized knowledge and tools to diagnose and fix complex issues correctly.
- Safety Assurance: Professionals ensure repairs meet all safety regulations and standards. Replacing critical components like seat belts requires precision.
- Warranty: Reputable shops often provide a warranty on their work and parts.
- Time Savings: For complex issues, a professional can often complete the repair faster than a novice.
When to Lean Towards Professional Help:
- Safety Critical Issues: Anything related to the belt’s ability to restrain you (locking mechanism failure, damaged webbing, loose anchors).
- Complex Disassembly: If the fix requires extensive panel removal or access to intricate internal parts of the retractor.
- Lack of Tools or Experience: Specifically, if you don’t have a torque wrench for critical bolts or aren’t confident in reassembling trim panels correctly.
For simple issues like slow retraction due to dirt, a DIY approach is usually safe and effective. For anything that compromises the structural integrity or restraining function of the seat belt, professional intervention is highly recommended. Always prioritize safety above all else.
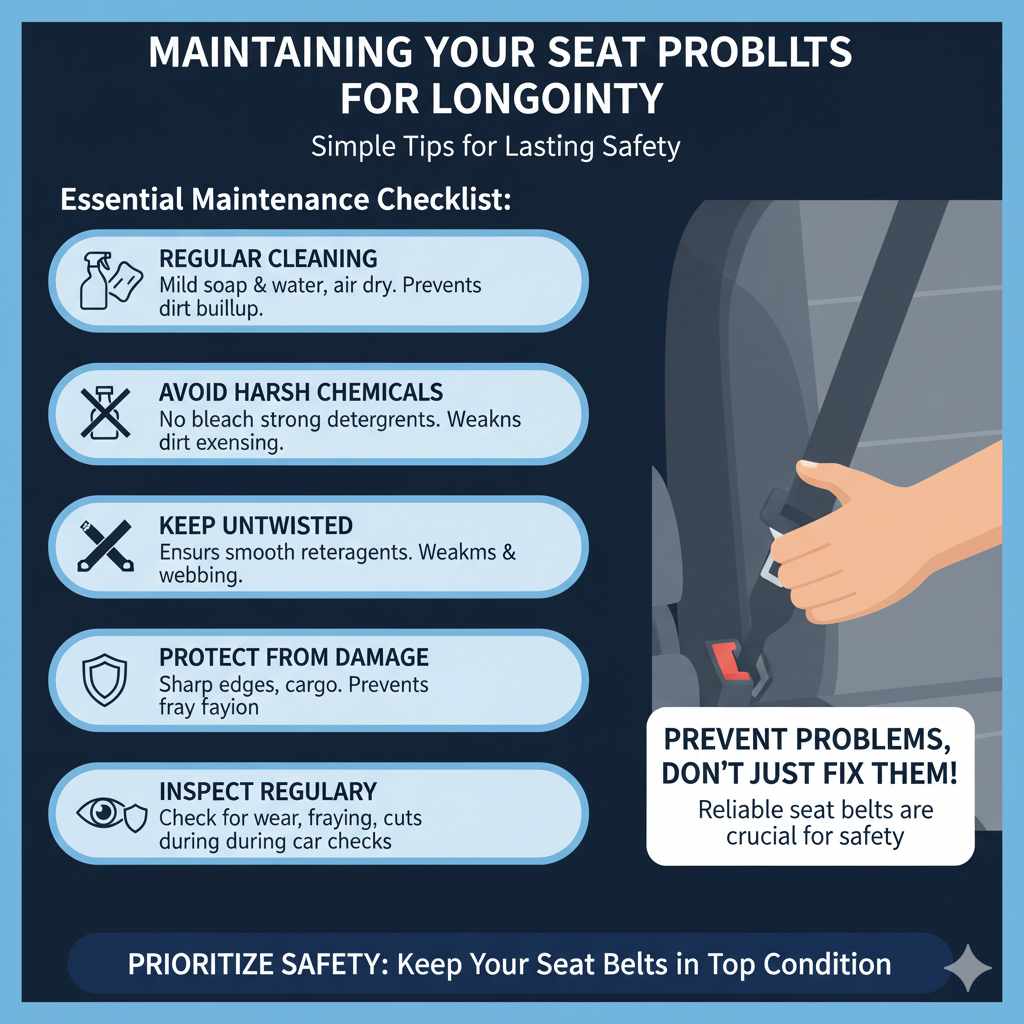
Maintaining Your Seat Belts for Longevity
Preventing problems is always better than fixing them. Here’s how to keep your seat belts in great condition:
- Regular Cleaning: Wipe down the webbing periodically with a mild soap and water solution, and let it air dry. This prevents dirt buildup in the retractor.
- Avoid Harsh Chemicals: Never use bleach, strong detergents, or solvents on seat belt webbing, as they can weaken the material over time.
- Keep Them Untwisted: Ensure the belt lies flat and isn’t twisted when extending or retracting.
- Protect from Sharp Objects: Be mindful of sharp edges on car doors, seats, or cargo that could snag and fray the webbing.
- Proper Use: Always pull the belt out smoothly and allow it to retract naturally. Avoid yanking it forcefully.
- Inspect Regularly: Make it a habit to visually inspect your seat belts for any signs of wear, fraying, or damage during your regular car checks.
By following these simple maintenance tips, you can help ensure your seat belts function correctly and remain a reliable safety feature for years to come.
Frequently Asked Questions (FAQ)
What is the most common reason a car seat belt won’t retract?
The most common reason is dirt, dust, and debris accumulated inside the retractor mechanism or where the belt enters the pillar. This gunk impedes the smooth movement of the belt and the spring-loaded retraction system.
Can I lubricate a sticky seat belt retractor?
It’s generally not recommended to lubricate a seat belt retractor with standard lubricants like WD-40. These can attract more dirt and gunk up the mechanism. If cleaning doesn’t solve the issue and the belt is still slow to retract, it might indicate a worn internal spring, which usually means the entire assembly needs replacement. If you must use a lubricant, opt for a dry lubricant like graphite powder or a silicone spray, applied very sparingly, after thorough cleaning.
How do I know if my entire seat belt assembly needs replacing?
You need to replace the entire assembly if the webbing is frayed, cut, or visibly worn, if the retractor mechanism is damaged or fails to lock during deceleration, or if the anchor bolts appear compromised or rusted.
Is it safe to drive with a malfunctioning seat belt?
No, it is not safe. Seat belts are a critical safety device. Driving with a seat belt that does not retract properly, lock securely, or is visibly damaged puts you and your passengers at significant risk in the event of an accident. Get it fixed immediately.
How tight should seat belt anchor bolts be?
Seat belt anchor bolts are critical safety components and must be tightened to the specific torque value recommended by the vehicle manufacturer. Overtightening can strip the threads, while undertightening can allow the belt to detach in a crash. Always consult your car’s service manual or a professional for the correct torque specifications.
Can I clean my seat belt with bleach or strong detergents?
Absolutely not. Bleach and strong detergents can weaken the fibers of the seat belt webbing, compromising its strength and making it less effective in an accident. Always use mild soap and water for cleaning.
Conclusion
Taking care of your car’s seat belts is a vital part of responsible car ownership. While some seat belt issues might seem daunting, many common problems like slow retraction or sticky buckles can be resolved with simple cleaning and gentle troubleshooting. By following these step-by-step guides, you can often restore your seat belt’s functionality and ensure its crucial role in keeping everyone safe. Remember to always prioritize safety – if you encounter frayed webbing, a faulty locking mechanism, or are unsure about any repair, don’t hesitate to consult a professional mechanic. A properly functioning seat belt is your first and most important line of defense on the road.