How To Remove A Car Stereo: Proven Effortless Fix
Removing a car stereo is an achievable DIY task. With the right tools and a step-by-step approach, you can safely disconnect and remove your car stereo without causing damage, opening the door to upgrades or simple repairs.
Ever faced a car stereo that’s acting up? Maybe the sound is crackling, it won’t power on, or you’re just ready for an exciting upgrade. Whatever the reason, figuring out how to get that stereo out can feel a bit daunting. You might picture yourself wrestling with wires and snapping plastic trim. But honestly, it’s much simpler than it looks! Many car stereos are designed to be accessed with basic tools and a little patience. Think of it as unlocking a puzzle, rather than a complex engine repair. This guide is here to walk you through it, step by simple step, so you can feel confident about tackling it yourself and save a trip to the auto shop.
Why Removing Your Car Stereo Might Be Necessary
There are several good reasons why you might need to remove your car stereo. Knowing these can help you understand the value of this skill. It’s not just for the tech-savvy; it’s for anyone who wants to keep their car in top shape or enhance their driving experience.
Upgrade Your Sound System
This is perhaps the most common reason. Newer car stereos often offer better sound quality, advanced features like Bluetooth, Apple CarPlay, or Android Auto, and a modern look. If your current stereo is outdated or lacks these features, removing it is the first step to installing a new one that brings your music and navigation to life.
Repair a Malfunctioning Unit
Sometimes, car stereos just stop working correctly. Buttons might not respond, the screen could be frozen, or it might cut out intermittently. Before assuming the worst, you might be able to fix a minor issue by removing the unit. This allows you to check connections, clean components, or even send it for professional repair if needed, which is often cheaper than a full replacement.
Replace a Damaged Stereo
Accidents happen. If your stereo got damaged by water, impact, or simply age, replacing it is the only option. Removing the old unit safely ensures you’re ready for a new one, whether it’s a direct replacement or an aftermarket model.
Access Other Dashboard Components
In some cases, removing the stereo might be necessary to gain access to other parts of your dashboard for repair or inspection. This hidden access can be crucial for fixing issues behind the dash.
Essential Tools and Preparations
Before you dive in, gather your tools. Having everything ready means the process will be smoother and quicker. Don’t worry; you likely won’t need anything more than what most people have in their home tool kit, or what’s readily available at an auto parts store.
Recommended Tools
These are the basic items that will help you get the job done efficiently and safely:
- Screwdriver Set: You’ll need a few different sizes, including Phillips head and flathead. Some cars might use Torx (star-shaped) screws, so a set with various bits is ideal.
- Plastic Trim Removal Tools: These are incredibly important! They are made of plastic and are designed to pry open dashboard panels without scratching or damaging them. Metal tools can easily leave marks. You can find these online or at auto parts stores. They are often sold in helpful kits.
- Socket Wrench Set: Some stereos are secured with nuts rather than screws. A small socket set will be very useful.
- Pliers: Needle-nose pliers can be handy for disconnecting stubborn wiring harnesses.
- Wire Connectors/Terminal Tools (Optional): If you plan to disconnect wires and reconnect them later, having some spare connectors or a crimping tool might be useful, though often the factory connectors just pull apart.
- Panel Pry Bar (Optional): Similar to trim tools, but sometimes larger and sturdier for more resistant panels.
- Gloves (Recommended): To protect your hands from sharp edges and keep the dashboard components clean.
- Small Container or Tray: To keep all the removed screws and small parts organized so you don’t lose them.
- Owner’s Manual or Vehicle-Specific Repair Guide: This can be invaluable for specific instructions related to your car’s make and model. Many are available online for free, sometimes through official manufacturer sites or resources like NHTSA, which promotes transparency in repair information.
Safety First!
Working on your car’s electrical system means safety is paramount. Always disconnect the battery before you start. This prevents accidental short circuits, which can damage your stereo, your car’s electrical system, or even cause a small fire. It also protects you from electric shock.
- Locate your car battery. It’s usually under the hood, but some vehicles have it in the trunk or under a seat.
- Identify the negative terminal. It’s typically marked with a minus (-) symbol and has a black cable.
- Use a wrench to loosen the nut on the negative terminal clamp. You don’t need to remove the clamp completely, just loosen it enough to slide it off the battery post.
- Remove the negative cable and set it aside. Make sure it doesn’t accidentally touch the battery terminal again. If it does, or if you’re unsure, you might want to wrap the cable end in tape or cloth.
Once the battery is disconnected, wait for about 10-15 minutes. This allows any residual power in the car’s system to dissipate safely.
Step-by-Step Guide: How to Remove a Car Stereo
Now that you’re prepared and have safety covered, let’s get to the actual removal process. Remember, patience is key. Take your time, and don’t force anything. If something feels stuck, there’s probably a clip or screw you’ve missed.
Step 1: Identify How Your Stereo is Mounted
Car stereos are generally mounted in one of two ways: with visible screws or hidden behind a dash panel that needs to be removed first. Your owner’s manual or a quick online search for “[Your Car Make and Model] stereo removal” can often provide specific diagrams or videos.
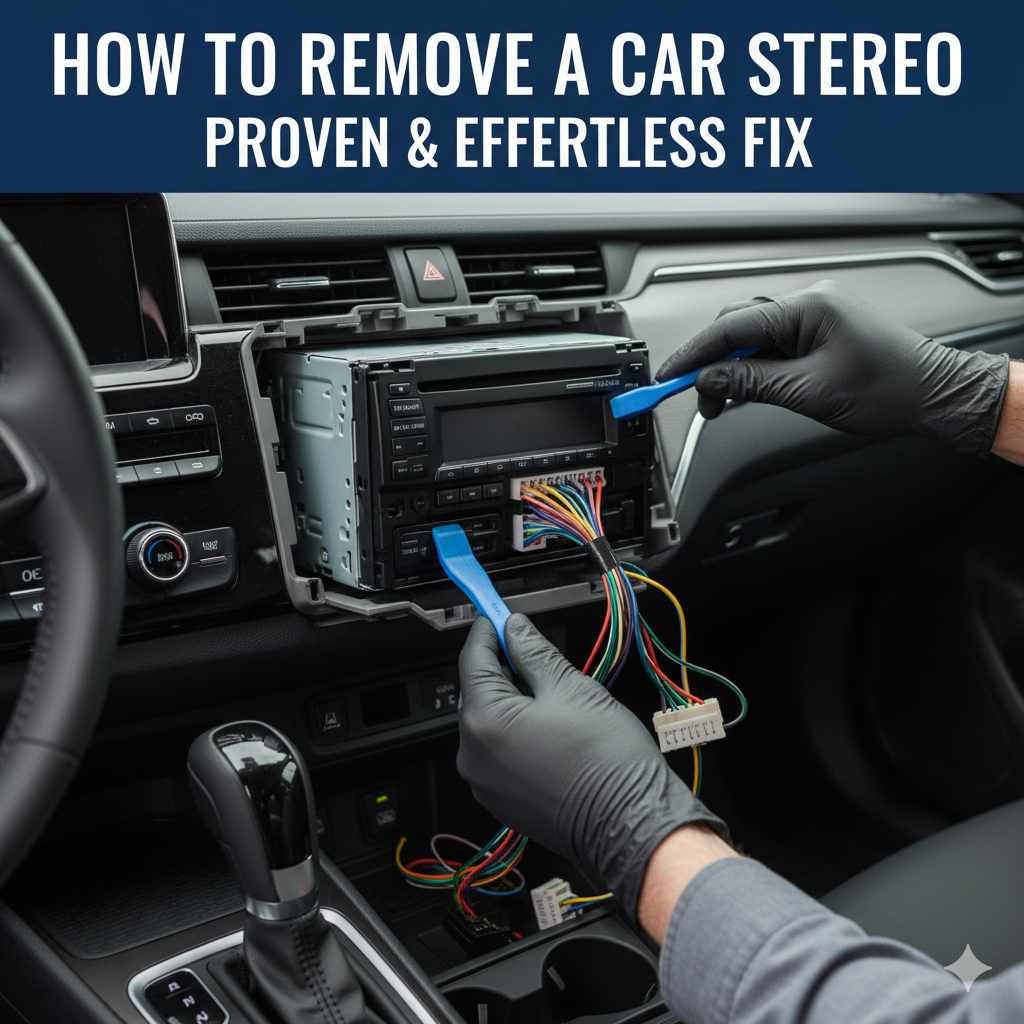
Step 2: Remove the Dashboard Trim Panels
This is where your plastic trim removal tools come in handy. Look for seams around the stereo and adjacent panels. Gently insert a trim tool into a seam and twist or pry softly to release the clips holding the panel in place.
- Start with the smallest panel that seems easiest to remove.
- Work your way around the panel, releasing clips one by one. Don’t try to yank the whole panel off at once.
- If you encounter resistance, check for screws that might be holding the panel. Sometimes they are hidden under small covers or in inconspicuous places.
- Place removed panels and any screws in your organized container.
Tip: Many modern cars use a system of clips and tabs. You’re essentially unhooking these. Be gentle to avoid breaking them, as replacement clips can be tricky to find.
Step 3: Access and Unscrew the Stereo Unit
Once the trim panels are off, you should see the stereo unit. Most aftermarket stereos will have screws on the sides or front holding them in place. Factory stereos might be secured with screws, or they might slide into a mounting bracket and be held by those.
If your stereo has a faceplate that appears to be integrated:
- Look for small panels or covers on the front of the stereo that might pop off to reveal screws.
- Gently pry these covers off with your trim tool.
- Use the appropriate screwdriver or socket to remove the visible screws.
If you see a mounting sleeve (common for aftermarket stereos):
- The stereo often slides out of a metal cage or sleeve that’s secured to the dashboard.
- Some stereos have small tabs you need to push to release them from the sleeve.
- If there are no visible screws on the face of the unit or a separate trim plate, the entire dashboard surround might need to be removed first to access the stereo’s mounting points.
Step 4: Gently Pull the Stereo Out
Once all screws are removed, the stereo should be loose. Gently pull it towards you. It might still be connected by wires. Don’t yank it out forcefully, as this could damage the wiring or the connectors.
Step 5: Disconnect the Wiring Harnesses and Antenna
This is a crucial step. Your stereo will be connected to your car’s wiring for power, speakers, and other functions. It will also have an antenna cable.
- Wiring Harnesses: There will be one or more plastic connectors plugged into the back of the stereo. These usually have a clip that you need to push or lift to release the connector. Gently wiggle each connector while pressing the release tab.
- Antenna Cable: This is typically a round, metal connector that just pulls straight out.
- Aftermarket Connections: If you have an aftermarket stereo, you might have an adapter harness. Disconnect this from the main stereo harness.
Important Note: For aftermarket stereos, you will often find a specific wiring harness adapter used to connect the new stereo to the car’s factory wiring. These adapters replace the need to cut and splice wires. Reputable brands like METRA or Scosche specialize in these adapters. You can often find guides and specifications for these adapters on their respective websites.
Step 6: Remove the Stereo Completely and Organize
With all wires and the antenna disconnected, the stereo should now be completely free. Carefully set it aside. Take a moment to look at how the wiring was connected – this will be helpful if you’re installing a new one or reconnecting this one later.
If your car uses a mounting sleeve or bracket, this will likely remain in the dashboard opening. You might need to remove this bracket as well, depending on whether you’re installing a new aftermarket stereo that uses a different size sleeve or re-installing the factory one.
Stereo Removal Comparison: Factory vs. Aftermarket
While the general process is similar, there are some key differences in how factory and aftermarket car stereos are removed.
| Feature | Factory Stereo | Aftermarket Stereo |
|---|---|---|
| Mounting | Often integrated into the dashboard design; may require removing larger dashboard sections. Secured with screws or clips on the sides or rear. | Typically sits within a universal mounting sleeve/cage. Screws are often visible on the front or sides of the stereo unit. |
| Wiring | Connects directly to the car’s harness, sometimes with proprietary connectors. May have an amplifier or speaker control module integrated. | Usually connects via a specific wiring harness adapter that plugs into the car’s factory harness. This simplifies installation and removal. |
| Dash Trim | May require more extensive trim removal to access mounting points. | Often less complex trim removal is needed, as the stereo is more standardized. |
| Tools Needed | Standard screwdrivers, trim tools, sometimes specific pry tools. | Standard screwdrivers, trim tools, and possibly specialized stereo removal keys (U-shaped metal tools that slide into slots on the front of the stereo). |
Troubleshooting Common Issues During Removal
It’s not always a perfectly smooth ride. Here are some common hiccups and how to fix them:
Stuck Trim Panels
Problem: A dashboard panel won’t budge, and you’re afraid of breaking it.
Solution: Double-check for any hidden screws. Sometimes they are behind small rubber grommets or inside air vents. You might also need to gently flex the panel slightly to find the clip’s release point. Using a second trim tool can help apply even pressure. Never force it.
Stereo Won’t Slide Out
Problem: You’ve removed all visible screws, but the stereo is still stuck.
Solution:
- Check for hidden screws: Some stereos have screws on the top or bottom of the faceplate, often under small, removable covers.
- Release tabs: Many stereos have small metal tabs on the sides of the unit that lock into the mounting sleeve. Look for small slots on the face of the stereo where you can insert special removal keys (often included with aftermarket stereos) or a thin flathead screwdriver to release these tabs.
- Mounting Bracket: The stereo might be screwed to a metal bracket that is then attached to the dash. You may need to remove the entire bracket.
Wiring Connectors Won’t Disconnect
Problem: The electrical connectors are stuck fast.
Solution: Ensure you are pressing the release clip firmly. Sometimes, these clips can get gummy or stiff with age. Try wiggling the connector gently while pressing the clip. Needle-nose pliers can sometimes help you grip the connector body for a better pull, but be careful not to damage the wires.
Reinstalling Your Car Stereo
Putting a stereo back in is essentially the reverse of removal. Here’s a quick rundown:
- Connect Wiring: Plug in the main wiring harness(es) and the antenna cable. Ensure they click securely into place.
- Slide Stereo In: Carefully slide the stereo unit back into its mounting sleeve or bracket until it clicks or locks into place. If it’s held by screws on the front, align it correctly and screw it in partially.
- Secure Stereo: Tighten any screws or engage any locking tabs that hold the stereo unit in its place.
- Reattach Trim Panels: Align the dashboard trim panels and gently press them back into place until the clips engage. Start from one end and work your way around.
- Reconnect Battery: Reattach the negative battery cable and tighten the nut.
- Test: Turn on your car and test all stereo functions (power, volume, radio stations, CD player, Bluetooth, etc.).
If installing a new stereo, this is where you’ll connect the wiring harness adapter to the stereo’s harness and then to the car’s factory harness. Many modern stereos come with a wiring diagram which is super handy. For more in-depth details on wiring aftermarket stereos, check out resources that detail vehicle-specific wiring diagrams, often found through automotive electrical forums or specialized websites.
Frequently Asked Questions (FAQ)
Is removing a car stereo a difficult DIY job?
For most cars, removing a car stereo is a straightforward DIY task that requires basic tools and patience. It’s less about technical skill and more about carefully following steps to avoid damaging surrounding trim or wiring.
Do I need special tools to remove a car stereo?
While a standard screwdriver set is essential, plastic trim removal tools are highly recommended to prevent scratching your dashboard. For some stereos, specific “stereo removal keys” might be needed, but these are inexpensive and widely available if required.
How do I know if my car stereo has hidden screws?
Check around the stereo unit for small panels, covers, or slots. Sometimes screws are hidden behind removable trim pieces or are accessible only after the main dashboard fascia has been partially removed. Consulting your car’s manual or an online guide for your specific model is the best way to find out.
What if I break a clip while removing a trim panel?
Don’t worry too much! Broken clips are common. You can often purchase replacement clips from auto parts stores or online retailers by searching for “dashboard trim clips [your car make model]”. Sometimes, a small amount of strong adhesive can also secure the panel if a clip is lost.
Will removing my stereo affect my car’s computer or security system?
As long as you disconnect the car battery before starting and reconnect the wiring harnesses correctly, removing and reinstalling the stereo should not affect your car’s computer or security system. Some high-end vehicle security systems might be integrated with the original stereo, but this is rare for typical car setups.
How long does it usually take to remove a car stereo?
For a beginner, removing a car stereo typically takes between 30 minutes to 2 hours. This can vary greatly depending on the car’s make and model, how easily the trim panels come off, and whether any hidden screws or complex mounting systems are involved.
Can I remove my car stereo without disconnecting the battery?
It is strongly advised that you disconnect the car battery. Working with the electrical system without disconnecting the power source can lead to short circuits, damage to the stereo or car’s electrical components, and a risk of electric shock. Always disconnect the negative battery terminal first.
Conclusion
See? Removing a car stereo is a completely manageable project for anyone wanting to upgrade their in-car entertainment or fix a glitchy sound system. By gathering the right tools, following these clear steps, and paying attention to safety, you’ve demystified a task that might have seemed intimidating at first. Remember to go slowly, be patient with stubborn trim pieces, and always double-check your connections. You’ve got this! Now you’re empowered to take on this task with confidence, ready to enjoy your refreshed audio experience on every drive.