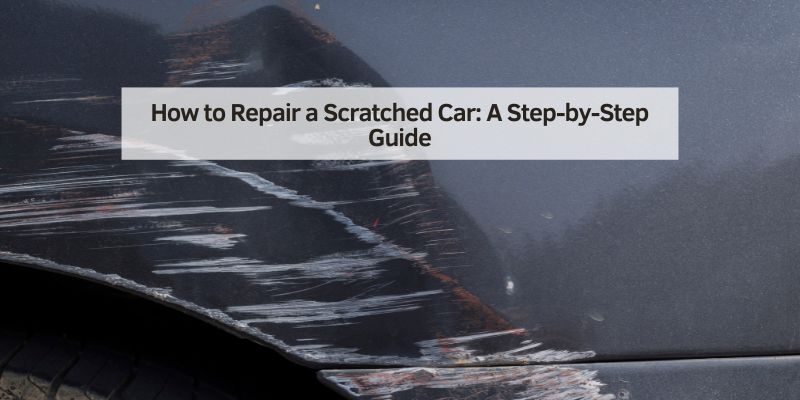
How to Repair a Scratched Car: A Step-by-Step Guide
Hey there! If you’ve ever looked at a scratch on your car and felt your heart sink, I totally get it. I’ve been there, cringing at a scrape on my sedan’s door after a careless moment in a parking lot. Figuring out how to repair a scratched car can feel overwhelming, but I’m here to tell you it’s not as tough as it seems. I’ve tackled scratches on my own cars over the years, from minor scuffs to deeper gouges, and I’ve learned what works and what doesn’t.
Whether you’re a car enthusiast or just want your ride to look good again, this guide will walk you through fixing those scratches step by step. I’ll share my experience in a way that’s easy to follow, so you can save money and get your car looking sharp. Let’s dive in and make those scratches disappear!
What Causes Car Scratches?
Scratches on your car can happen in so many ways, and I’ve seen my fair share. A stray shopping cart, a tree branch, or even a key can leave a mark. I once found a light scratch on my hood from a low-hanging branch I didn’t notice. Other common culprits include road debris, improper washing, or someone brushing against your car. Understanding what caused the scratch helps you figure out how bad it is and how to fix it. Scratches can range from surface-level scuffs to deep cuts that reach the metal, and each type needs a different approach. Let’s break down the types of scratches so you know what you’re dealing with.
Types of Car Scratches
I’ve learned that not all scratches are the same. Knowing the type helps you choose the right repair method. Here’s what I’ve come across:
- Clear Coat Scratches: These are shallow and only affect the top clear coat layer. I had one from a bad car wash that left swirl marks. They’re the easiest to fix.
- Paint Scratches: These go through the clear coat into the paint. I got one on my bumper from a parking mishap. They’re trickier but fixable.
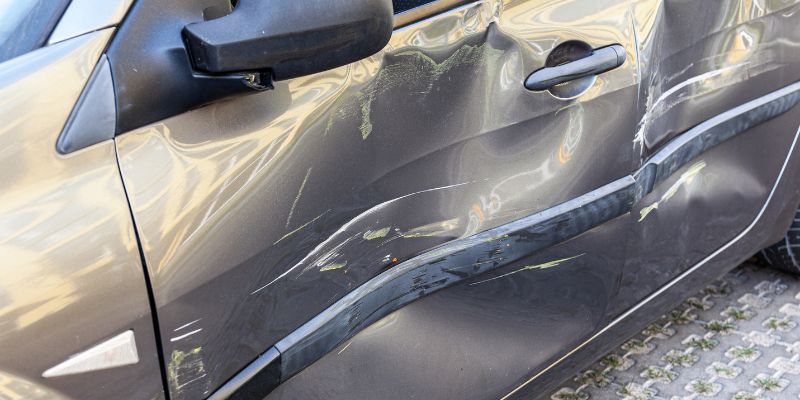
- Deep Scratches: These reach the primer or metal. I had a deep key scratch on my door once, and it needed more work to repair.
- Transfer Scratches: These happen when another object, like a rubber bumper, leaves its paint or material on your car. I dealt with one from a bike rack rubbing against my trunk.
Here’s a quick table to sum it up:
| Scratch Type | Description | Repair Difficulty |
|---|---|---|
| Clear Coat Scratch | Affects only the top clear coat layer. | Easy |
| Paint Scratch | Cuts into the colored paint layer. | Moderate |
| Deep Scratch | Reaches primer or metal. | Difficult |
| Transfer Scratch | Foreign material rubbed onto the surface. | Easy to Moderate |
Identifying the scratch type is the first step to fixing it right. Let’s talk about how to assess the damage.
Assessing the Scratch
Before I start any repair, I take a close look at the scratch. I run my fingernail across it to feel how deep it is. If my nail doesn’t catch, it’s usually a clear coat scratch. If it catches slightly, it’s likely in the paint. If it’s deep and rough, it might expose primer or metal. I also check the length and location—scratches on curved areas like bumpers are harder to fix. For example, I had a light scratch on my hood that was barely noticeable, but a deeper one on my door needed more attention. Cleaning the area with soapy water helps me see the scratch clearly. Once I know what I’m dealing with, I can gather the right tools.
Tools and Materials You’ll Need
I’ve found that having the right tools makes all the difference. Here’s what I keep in my garage for scratch repairs:
| Item | Purpose |
|---|---|
| Car Wash Soap | Cleans the scratched area before repair. |
| Microfiber Cloths | Wipes surfaces without scratching. |
| Rubbing Compound | Removes light scratches and smooths the surface. |
| Polishing Compound | Restores shine after scratch removal. |
| Sandpaper (2000–3000 grit) | Sands deeper scratches for a smooth finish. |
| Touch-Up Paint | Matches your car’s color to fill deeper scratches. |
| Clear Coat | Seals the repaired area for protection. |
| Applicator Pads | Applies compounds and polish evenly. |
| Painter’s Tape | Protects surrounding areas during repair. |
| Spray Bottle with Water | Keeps sandpaper wet for smooth sanding. |
| Wax or Sealant | Adds a protective layer after repair. |
I got most of these at an auto parts store for about $50–$100, depending on the repair. For touch-up paint, I checked my car’s color code (usually on the driver’s door jamb) and ordered an exact match online.
Step-by-Step Guide to Repairing a Scratched Car
Here’s how I fix scratches on my car, based on what I’ve learned. The steps vary depending on the scratch type, so I’ll cover each.
Fixing Clear Coat Scratches
Clear coat scratches are the easiest to tackle. I had a bunch of swirl marks from a bad car wash that I fixed this way:
- Clean the Area: I wash the scratched area with car soap and water, then dry it with a microfiber cloth. This removes dirt that could scratch more.
- Apply Rubbing Compound: I put a small amount of rubbing compound on an applicator pad and rub it in circular motions over the scratch. It takes some elbow grease, but the scratch usually fades.
- Polish the Surface: I use a polishing compound to restore the shine. I rub it on gently, then wipe it off with a clean microfiber cloth.
- Wax the Area: I apply wax to protect the repaired spot and make it blend with the rest of the car.
This process took me about 20 minutes for a small scratch on my hood, and it looked good as new.
Fixing Paint Scratches
Paint scratches are a bit tougher, but I’ve had success with these steps. I used them on a bumper scratch from a parking lot:
- Clean Thoroughly: I wash and dry the area to remove grime. A clean surface is key.
- Sand Lightly (if Needed): If the scratch is deep, I use 2000-grit sandpaper with water to smooth it out. I sand gently until the surface feels even.
- Apply Touch-Up Paint: I dab touch-up paint into the scratch with a small brush or toothpick. I build it up in thin layers, letting each dry for 10–15 minutes.
- Sand Again: Once the paint dries (about 24 hours), I wet-sand with 3000-grit sandpaper to level it with the surrounding paint.
- Apply Clear Coat: I add a thin layer of clear coat to seal the paint, letting it dry for another 24 hours.
- Polish and Wax: I polish the area to blend it, then wax for protection.
This took me a weekend because of drying times, but my bumper scratch disappeared.
Fixing Deep Scratches
Deep scratches are the toughest, like the key scratch I had on my door. Here’s how I handled it:
- Clean the Area: I washed the scratch thoroughly to remove dirt and debris.
- Sand the Scratch: I used 2000-grit sandpaper with water to smooth the scratch until I reached the primer or metal. I was careful not to sand too much.
- Apply Primer (if Needed): If metal is exposed, I dabbed on automotive primer and let it dry for 24 hours.
- Add Touch-Up Paint: I applied thin layers of touch-up paint, letting each layer dry. This took patience to build up the color.
- Sand and Smooth: I wet-sanded with 3000-grit sandpaper to level the paint, then applied clear coat.
- Polish and Wax: I polished the area and waxed it to match the rest of the car.
This was a big job, taking a few days with drying times, but it saved me from an expensive body shop visit.
Fixing Transfer Scratches
Transfer scratches are easier to fix. I had one from a bike rack rubbing my trunk:
- Clean the Area: I washed the area to remove loose material.
- Use Rubbing Alcohol: I wiped the transfer mark with isopropyl alcohol to remove foreign paint or rubber.
- Apply Rubbing Compound: If the mark persisted, I used rubbing compound to buff it out.
- Polish and Wax: I polished the area and added wax for a shiny finish.
This took about 15 minutes and left no trace of the mark.
Common Mistakes to Avoid
I’ve made some blunders fixing scratches, so here’s what to watch out for:
- Using Too Much Pressure: Sanding too hard can remove too much paint. I learned to go slow and gentle.
- Wrong Paint Color: I once used a close-but-not-perfect paint color, and it stood out. Always match your car’s color code.
- Skipping Drying Times: Rushing paint or clear coat application can ruin the finish. I wait the full time now.
- Not Cleaning First: Dirt can cause more scratches during repair. I always wash thoroughly.
- Using Household Products: Regular sandpaper or cleaners can damage paint. I stick to automotive-grade supplies.
Avoiding these mistakes saves time and keeps your car looking great.
Maintaining Your Car’s Paint After Repair
Once I fix a scratch, I take steps to keep my car’s paint in top shape:
- Wash regularly with a pH-neutral car soap and microfiber mitts.
- Apply wax or sealant every 3–6 months for extra protection.
- Park in a garage or shade to avoid UV damage.
- Use a clay bar yearly to remove contaminants.
- Inspect for new scratches often to catch them early.
These habits have kept my car’s paint looking sharp for years.
When to Call a Professional
Some scratches are too big for DIY. I had a deep scratch across my car’s side that was beyond my skills. If the scratch is very deep, covers a large area, or involves complex curves, a body shop is the way to go. Professional repairs cost $500–$2,000, depending on the damage. I paid $600 to fix a key scratch professionally, and it was worth it for a flawless finish.
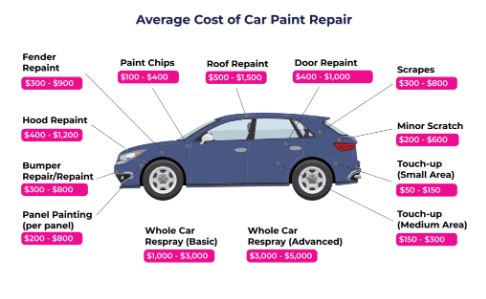
Cost of Repairing Scratches
DIY scratch repair is budget-friendly. My supplies cost $50–$100, including paint and tools. Here’s a rough breakdown:
- Clear Coat Scratch: $20–$50 (compounds, polish, wax)
- Paint Scratch: $50–$100 (paint, sandpaper, clear coat)
- Deep Scratch: $75–$150 (primer, paint, clear coat, sandpaper)
- Professional Repair: $500–$2,000
I saved hundreds by doing most repairs myself, but pros are worth it for tough jobs.
My Personal Experience
Let me share a story. A couple of years ago, I found a nasty key scratch on my car’s door. I was gutted—it looked awful! I decided to try fixing it myself. I spent a weekend sanding, painting, and polishing, following the steps I’ve shared. It wasn’t perfect, but it looked so much better, and I saved a ton of money. Since then, I’ve tackled smaller scratches with confidence. It’s empowering to fix your own car, and the results are so satisfying.
Conclusion
Repairing a scratched car might seem daunting, but I’ve learned it’s totally doable with the right tools and patience. From light scuffs to deep gouges, you can restore your car’s paint and save money in the process. I’ve shared my steps and mistakes so you can avoid the pitfalls I hit. Whether you’re buffing out a swirl mark or painting a key scratch, taking your time pays off with a shiny, scratch-free finish. I hope my guide gives you the confidence to tackle those scratches and keep your car looking its best. Grab your supplies, put on some music, and let’s make your car shine again!
Frequently Asked Questions
Can I fix a car scratch myself?
Yes, I’ve fixed many scratches myself. Light scratches are easy with rubbing compound, while deeper ones need paint and patience.
How do I know if a scratch is too deep to fix?
If my fingernail catches deeply or I see metal, it’s a tough one. I fixed a deep scratch once, but big ones might need a pro.
How long does it take to repair a scratch?
Light scratches take me 20–30 minutes. Deeper ones can take a weekend with drying times, like my key scratch repair.
Will fixing a scratch make it invisible?
I’ve gotten close, but deep scratches might still show slightly. My DIY fixes look great, but pros can make them nearly invisible.
How much does it cost to fix a scratch?
My DIY repairs cost $20–$150, depending on the scratch. Professional fixes can run $500–$2,000 for big jobs.
Can I prevent scratches on my car?
I try! Regular waxing, careful parking, and using microfiber wash mitts help. I also check for new scratches often to catch them early.