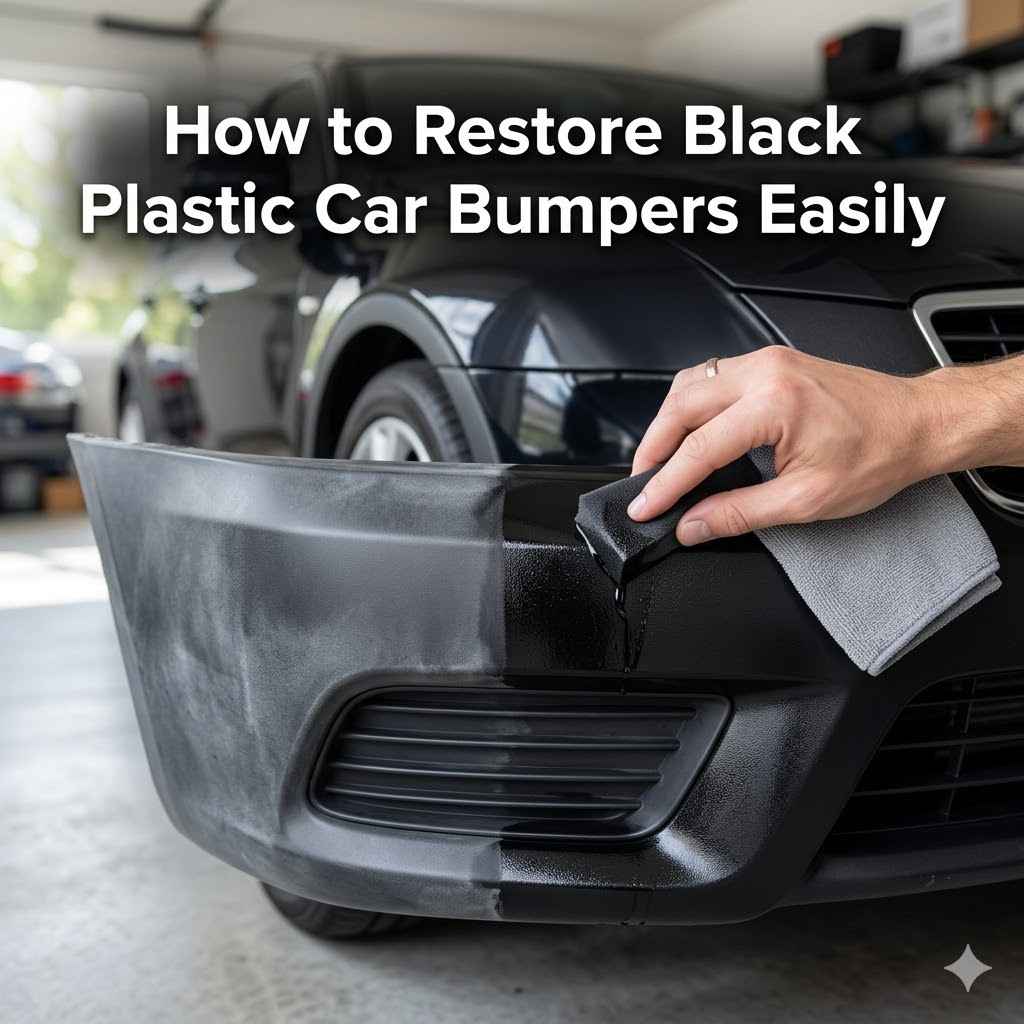
How to Restore Black Plastic Car Bumpers Easily
Has your car’s once-sleek black plastic bumper started to look faded and chalky? It’s a common problem, and for many car owners, figuring out how to fix it can seem tricky, especially if you’re new to car care. But don’t worry, getting that deep black finish back is much simpler than you might think.
This guide will walk you through how to restore black plastic car bumpers easily, step by step, so you can make your car look great again without a lot of fuss.
Restoring faded black plastic car bumpers is a popular task for car owners looking to refresh their vehicle’s appearance. Over time, exposure to sunlight, rain, and harsh weather can strip the color and protective oils from plastic, leaving it looking dull, chalky, and aged. This not only detracts from the car’s overall look but can also make it seem older than it is.
Many people find themselves unsure where to start, worrying about using the wrong products or techniques that could damage the plastic further. The good news is that with the right approach, this transformation is very achievable. This section will cover the essential steps and materials needed to bring your bumpers back to life.
Understanding Plastic Bumper Fading
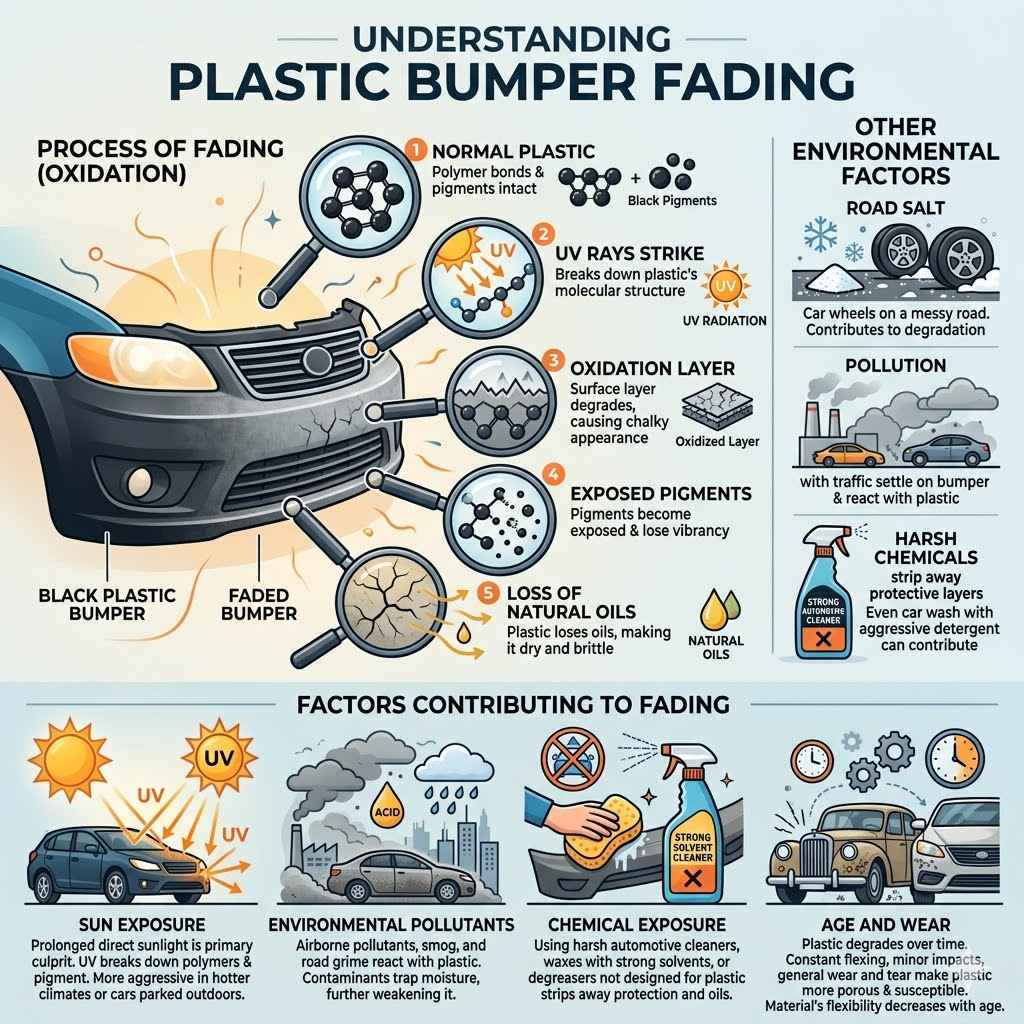
Plastic car bumpers, especially those made from materials like polypropylene, are designed to be durable and absorb impacts. However, they are also susceptible to the damaging effects of ultraviolet (UV) rays from the sun. These rays break down the plastic’s molecular structure, leading to a process called oxidation.
Oxidation causes the surface layer of the plastic to degrade, resulting in that unsightly chalky, faded appearance. Other environmental factors like road salt, pollution, and harsh cleaning chemicals can also contribute to this degradation.
The plastic itself contains pigments that give it its black color. When the surface oxidizes, these pigments become exposed and lose their vibrancy. The plastic also loses its natural oils, making it dry and brittle.
This is why the surface looks powdery and light gray or white. It’s not just dirt; it’s the actual material changing.
Factors Contributing to Fading
Sun Exposure: Prolonged direct sunlight is the primary culprit. UV radiation breaks down the plastic polymers and the pigment within them. This process is more aggressive in hotter climates or for cars parked outdoors frequently. The sun’s energy essentially “bleaches” the plastic over time.
Environmental Pollutants: Airborne pollutants, smog, and road grime can settle on the bumper and react with the plastic. Acid rain, for example, can accelerate the degradation process. These contaminants can also create a layer that traps moisture, further weakening the plastic.
Chemical Exposure: Using harsh automotive cleaners, waxes with strong solvents, or degreasers not designed for plastic can strip away protective layers and natural oils. This leaves the plastic more vulnerable to UV damage and drying out. Even car washes with aggressive detergents can contribute.
Age and Wear: Like all materials, plastic degrades over time. The constant flexing of bumpers during driving, minor impacts, and general wear and tear can make the plastic more porous and susceptible to fading. The material’s flexibility decreases with age, making it prone to cracking and fading.
Preparing Your Bumpers for Restoration
Before you can restore your black plastic bumpers, thorough preparation is key. This step ensures that any products you use will adhere properly and work effectively. Skipping this can lead to uneven results or the restoration not lasting as long.
It’s all about creating a clean, smooth surface for the treatment.
Thorough Cleaning Is Essential
The first and most crucial step is to clean the bumper thoroughly. You need to remove all dirt, grime, road film, wax residue, and any previous dressing that might be on the surface. If you don’t clean well, the restoration products won’t be able to penetrate the plastic or adhere properly, leading to a patchy or short-lived fix.
Imagine trying to paint over a dirty wall; it won’t look good.
Start by washing the bumper with a mild car wash soap and a soft sponge or microfiber mitt. Rinse it completely. Then, for a deeper clean, use a dedicated plastic cleaner or a degreaser specifically formulated for automotive plastics.
You can also use isopropyl alcohol (rubbing alcohol) diluted with water. Apply the cleaner with a clean microfiber cloth and wipe down the entire surface. Pay attention to textured areas where dirt tends to accumulate.
Rinse again and let the bumper dry completely.
Inspecting for Damage
While cleaning, take the opportunity to inspect the bumper for any physical damage. This includes cracks, deep scratches, or gouges. Most restoration methods will only address fading and dullness.
If the plastic is cracked or severely damaged, these methods won’t repair the structural integrity. In such cases, you might need to consider plastic repair kits or professional help.
Look closely for any sharp edges or areas where the plastic might be brittle. Small hairline cracks might be sealed with specific products, but larger ones require more advanced repair techniques. Dents usually won’t be fixed by simple restoration products either.
Knowing the extent of the damage helps you choose the right approach.
Using an All-Purpose Cleaner and IPA
- All-Purpose Cleaner (APC): An APC is great for removing general road grime and dirt. Spray it liberally onto the bumper, let it dwell for a minute, then agitate with a soft brush or sponge. APCs break down grease and dirt, making them easy to wipe away. Always use a pH-neutral APC to avoid damaging the plastic.
- Isopropyl Alcohol (IPA): After the APC wash, a wipe-down with diluted isopropyl alcohol (typically 50/50 with water) is highly recommended. IPA is excellent at stripping away any remaining wax, silicone, or oily residues. This leaves the plastic surface perfectly clean and ready for a restoration product. Ensure good ventilation when using IPA.
Easy Restoration Methods for Black Plastic
Now that your bumper is clean and ready, it’s time to choose a restoration method. There are several ways to bring back that deep black look, ranging from quick fixes to more durable solutions. The best method for you will depend on how faded your bumper is and how long you want the results to last.
Using a Dedicated Plastic Restorer or Trim Restorer
These products are specifically designed to rejuvenate faded plastic. They typically contain polymers and conditioners that penetrate the plastic, bringing back its natural oils and color. Many of them also offer UV protection, which helps prevent future fading.
They are usually easy to apply, similar to applying a wax or dressing.
Application typically involves applying a small amount of the product to an applicator pad and working it into the plastic surface. Wipe off any excess with a clean microfiber towel. Some products may require multiple applications or a curing time.
Read the product instructions carefully for best results. These are often the simplest and most beginner-friendly options.
Heat Gun Method for Dramatic Results
This method involves using a heat gun to gently warm the plastic. The heat causes the plastic to expand and its natural oils to rise to the surface, effectively restoring its color and finish. This technique can produce dramatic, like-new results, but it requires caution and practice.
Applying too much heat can melt or warp the plastic, causing permanent damage.
You’ll need a heat gun with adjustable temperature settings and a clean microfiber cloth. Hold the heat gun several inches away from the surface and keep it moving constantly. Apply heat evenly, watching the plastic transform from faded to black.
Work in small sections. Once cooled, wipe down any residue. This method is best for experienced users or those willing to practice on an inconspicuous area first.
Painting or Dyeing the Plastic
For severely faded or discolored bumpers, painting or dyeing might be the best long-term solution. This involves applying a specialized plastic bumper paint or dye that adheres directly to the plastic surface. This method offers the most durable and consistent results, essentially giving your bumper a new factory finish.
This process is more involved and requires careful preparation, masking off surrounding areas, and multiple thin coats of paint. Ensure you use a paint specifically designed for automotive plastic. You might need a plastic adhesion promoter as a primer first.
For a dyed look, you would use a plastic dye product. This method offers a more permanent fix than restorers but requires more skill and time.
Detailed Steps for Using Plastic Restorers
Plastic restorers are a fantastic choice for those looking for an easy way to revive their car’s bumpers. They offer a good balance of effectiveness and simplicity, making them ideal for DIY enthusiasts. The process itself is straightforward and doesn’t require specialized tools.
Step-by-Step Application Process
- Clean the Bumper: As discussed, this is the most important step. Ensure the bumper is completely dry after cleaning and degreasing. Any moisture or residue will prevent the restorer from working correctly.
- Apply the Restorer: Pour a small amount of the plastic restorer onto a clean applicator pad, foam applicator, or a microfiber towel. You don’t need a lot; a little goes a long way.
- Work it In: Gently rub the restorer into the plastic surface using a circular or back-and-forth motion. Ensure you cover the entire faded area. For textured plastics, you might need to use a soft-bristled brush to work the product into the crevices.
- Allow to Dwell: Let the restorer sit on the surface for the time recommended by the manufacturer. This allows it to penetrate the plastic. For some products, this might be a few minutes, while others might recommend longer dwell times.
- Wipe Off Excess: Use a clean, dry microfiber towel to buff away any excess product. This will reveal the restored black finish. Make sure to buff thoroughly to avoid any streaks or high spots.
- Apply Additional Coats if Needed: For heavily faded areas, you may need to apply a second coat. Allow the first coat to cure according to the product’s instructions before applying another.
- Protect and Cure: Some restorers offer UV protection. For best results, avoid washing the car or exposing the bumper to heavy rain for at least 24-48 hours to allow the product to fully cure and bond.
Choosing the Right Plastic Restorer Product
- Water-Based vs. Solvent-Based: Water-based restorers are generally safer for plastics and easier to clean up but may not last as long. Solvent-based products often offer a deeper, richer look and can last longer but require more care in application and can potentially dry out some plastics over time if not formulated well. Look for products specifically marked as safe for automotive plastic trim.
- Cream, Liquid, or Wipes: Restorers come in various forms. Creams and liquids are applied with an applicator pad and offer good control. Pre-soaked wipes are convenient for quick touch-ups but might not provide as even a coverage on large areas. Consider your preference and the size of the area you need to restore.
- Durability and UV Protection: Some restorers offer longer-lasting results than others. Look for products that explicitly state they provide UV protection, as this is crucial for preventing future fading. Many will claim durability of several months to over a year.
Sample Scenario: Restoring a Faded SUV Bumper
Imagine you have an SUV that’s spent years out in the sun. The black plastic bumpers are now a dull, chalky gray. You decide to use a popular cream-based plastic restorer.
After a thorough wash and dry, you apply a dime-sized amount to a foam applicator. You rub it into a section of the bumper, noticing the color immediately darkening. You continue this process over the entire bumper, working it into the textured areas with a soft brush.
After letting it sit for 5 minutes, you buff off the excess with a microfiber towel. The result is a deep, even black finish that makes the SUV look years younger.
Advanced Techniques for Severe Fading
When simple restorers aren’t enough, or you want a truly long-lasting solution, more advanced techniques come into play. These methods are generally more labor-intensive but yield superior and more permanent results.
The Heat Gun Method Explained
Using a heat gun can be incredibly effective for deeply faded plastic, as it essentially revitalizes the original material. The heat prompts the plastic to release its oils and pigments to the surface, restoring the color. It’s like bringing the bumper back to its original state.
Safety First: Always wear heat-resistant gloves. Work in a well-ventilated area. Keep a fire extinguisher nearby, just in case.
Never point the heat gun at yourself or others.
Application:
- Start with a clean, dry bumper.
- Set your heat gun to a low to medium setting. The exact temperature depends on your gun, but you want it hot enough to see a change without melting the plastic. A good starting point is around 300-400 degrees Fahrenheit (150-200 degrees Celsius).
- Hold the heat gun about 4-6 inches away from the plastic. Keep the gun moving constantly in a sweeping motion. Do not linger on any one spot.
- Watch the plastic carefully. You’ll see the color deepen and the faded look disappear as you heat it. The plastic might look slightly glossy as it warms up.
- Once a section is restored, move to the next. Overlap your heated areas slightly to ensure an even finish.
- Allow the bumper to cool completely before touching it or applying any protectants.
This method requires patience and a steady hand. It’s easy to overheat and cause damage. Practice on a scrap piece of plastic or an inconspicuous area first if you are unsure.
Painting or Dying for a Permanent Fix
Painting offers the most durable and comprehensive solution for severely damaged or faded plastic bumpers. It’s a process that effectively gives your bumper a brand-new look, similar to how it was when it left the factory.
Steps Involved:
- Clean and Degrease: As always, start with a spotless surface.
- Light Sanding (Optional but Recommended): For paint to adhere well, the plastic surface needs a slight “tooth.” A very light sanding with 400-600 grit sandpaper can help. Clean again after sanding.
- Masking: Carefully mask off any areas you don’t want to paint, such as paintwork, lights, or trim. Use automotive masking tape and paper.
- Apply Adhesion Promoter: Most plastic paints require a specialized adhesion promoter to bond properly. Apply one or two thin coats as directed by the product.
- Apply Plastic Bumper Paint: Use a spray paint specifically formulated for flexible automotive plastics. Apply multiple thin, even coats, allowing each coat to flash off (dry slightly) before applying the next. Proper technique prevents runs and sags.
- Apply Clear Coat (Optional): For added durability and a factory shine, you can apply a few coats of automotive clear coat.
- Curing: Allow the paint to cure completely according to the manufacturer’s instructions, which can take several days.
Dyeing is similar but involves using a specialized plastic dye that soaks into the plastic rather than forming a layer on top. It’s often used for interior plastics but can be effective for exterior trim if the correct product is chosen.
Comparison of Restoration Methods
| Method | Ease of Use | Durability | Cost | Appearance |
|---|---|---|---|---|
| Plastic Restorer | Very Easy | Moderate (Months) | Low | Good to Excellent |
| Heat Gun | Moderate (Requires Practice) | Good (Up to a Year or More) | Low (Tool Purchase) | Excellent |
| Painting/Dyeing | Difficult (Requires Skill) | Excellent (Years) | Moderate to High | Factory Like |
For a beginner wanting to try how to restore black plastic car bumpers easily, starting with a good quality plastic restorer is the most practical approach. If that doesn’t yield the desired results or you want something that lasts longer, then consider the heat gun method, or if you are aiming for a professional, long-term fix, painting is the way to go.
Maintaining Your Restored Bumpers
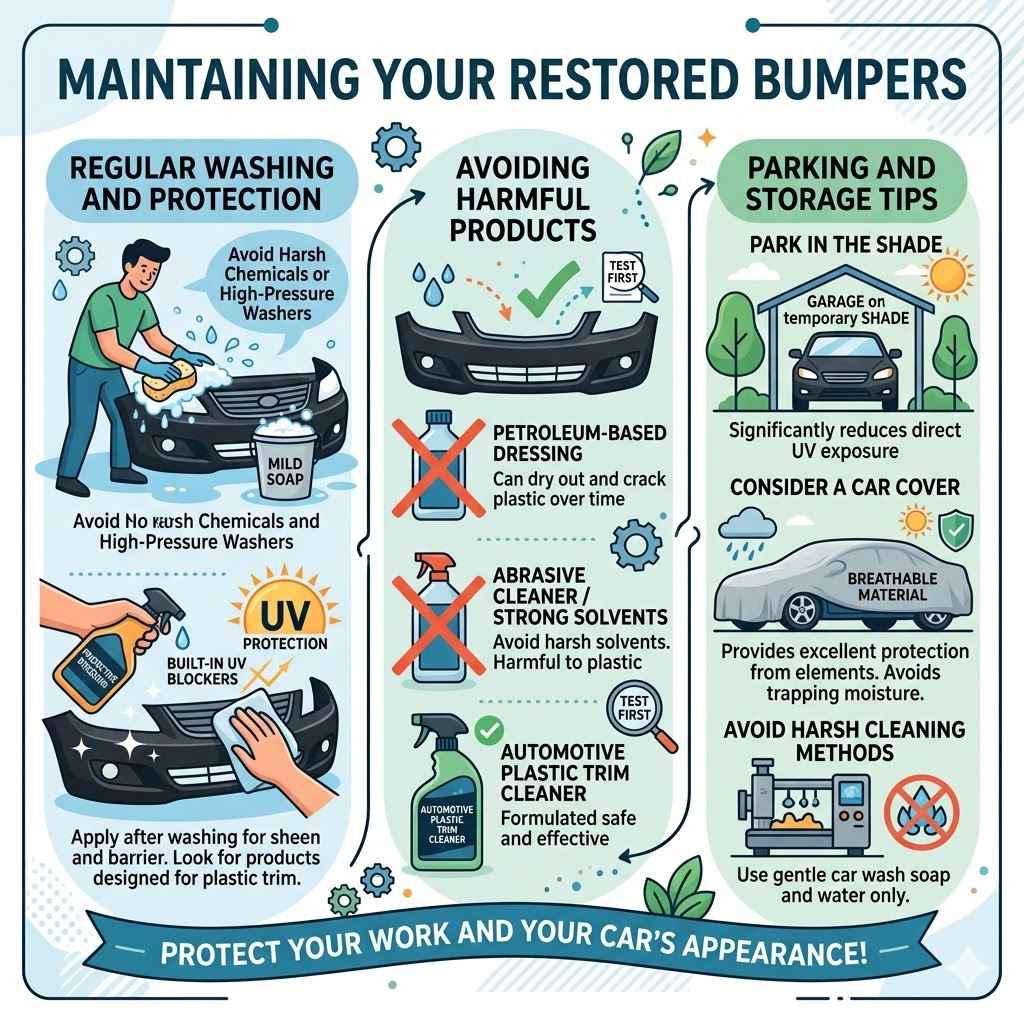
Once you’ve successfully restored your black plastic bumpers, you’ll want to keep them looking their best. Proper maintenance is key to extending the life of the restored finish and preventing them from fading again too quickly. It’s about protecting your work and your car’s appearance.
Regular Washing and Protection
The easiest way to maintain your bumpers is through regular washing. Use a mild car wash soap and a soft cloth or sponge. Avoid harsh chemicals, abrasive scrubbers, or high-pressure washers that can damage the plastic.
After washing, it’s beneficial to apply a protective dressing or sealant.
Many plastic restorers have built-in UV protection, but an additional layer of protection can help. Look for products specifically designed for plastic trim that offer UV blockers. These products create a barrier against the sun’s damaging rays and can also provide a nice sheen.
Apply them every few washes or as recommended by the product manufacturer.
Avoiding Harmful Products
Be mindful of the products you use on your car. Avoid petroleum-based dressings that can dry out and crack plastic over time, despite their initial shine. Also, steer clear of abrasive cleaners or waxes that contain strong solvents.
If you’re unsure about a product, test it on a small, inconspicuous area first.
When in doubt, stick to products explicitly designed for automotive plastic trim and bumpers. These are formulated to be safe and effective for this specific material.
Parking and Storage Tips
- Park in the Shade: Whenever possible, park your car in a shaded area or a garage. This significantly reduces the amount of direct UV exposure your bumpers receive. Even temporary shade can make a difference over time.
- Consider a Car Cover: If your car is parked outdoors for extended periods, a quality car cover can provide excellent protection from the sun, rain, and other environmental elements. Ensure the cover is made of breathable material to avoid trapping moisture.
- Avoid Harsh Cleaning Methods: When cleaning your car, be gentle. Do not use industrial degreasers or harsh solvents on your bumpers. A simple car wash soap and water are usually sufficient.
Frequently Asked Questions
Question: How often should I apply a plastic restorer
Answer: The frequency depends on the product and environmental conditions, but generally, you can reapply a plastic restorer every 2-6 months or as needed when you notice the fading returning.
Question: Can I use tire shine on my plastic bumpers
Answer: While tire shine makes tires black, it’s usually not recommended for plastic bumpers. Tire shine products can be too harsh for plastic trim and may cause it to dry out or become brittle over time.
Question: Will a heat gun damage my plastic bumper
Answer: A heat gun can cause damage if used improperly. Overheating can melt, warp, or scorch the plastic. It’s essential to keep the heat gun moving and at a safe distance.
Question: What is the easiest method for beginners
Answer: The easiest method for beginners is using a dedicated plastic restorer or trim restorer product. These are designed for simple application and provide good results with minimal risk.
Question: How long does it take for paint to cure on plastic bumpers
Answer: Paint curing times vary by product and environmental conditions, but it can take anywhere from 24 hours to several days for automotive plastic paint to fully cure and harden.
Wrap Up
You now know exactly how to restore black plastic car bumpers easily. From simple cleaning to using specialized products or advanced techniques like heat guns and painting, there are solutions for every level of fading. Keeping your bumpers clean and protected with quality products ensures they look great for much longer.