70s Chevy Starter Switch Wiring Explained
Working on classic cars can be a lot of fun, but sometimes finding the right information can be tough. For anyone trying to get their 70s Chevy running, the 70s Chevy Starter Switch Wiring Diagram Guide is super important. It might seem a bit tricky at first with all those wires and connections.
But don’t worry! We’re here to make it simple. We’ll walk you through it step-by-step so you can get your starter working again in no time.
Understanding 70s Chevy Starter Switch Wiring
70s Chevy Starter Switch Wiring Diagram Guide Basics
This section breaks down the essential parts of your 70s Chevy’s starting system. We’ll look at the main components involved and how they work together to get your engine cranking. Understanding these basics is key to easily following the wiring diagram later on.
Think of it as learning the alphabet before you read a book. We’ll cover the starter solenoid, the ignition switch, and the battery’s role. We want to make sure you feel confident about what’s happening under the hood.
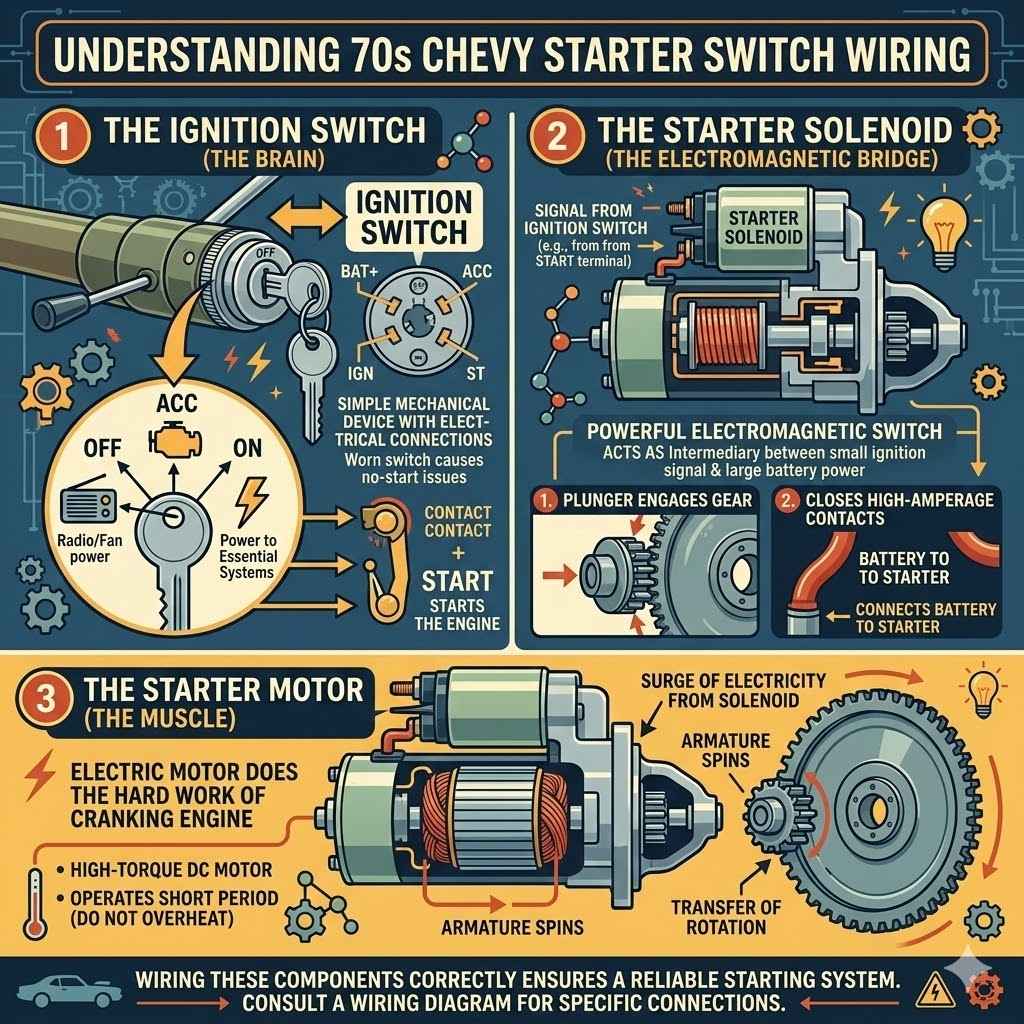
The Ignition Switch
The ignition switch is like the brain of your starting system. It’s the little keyhole you put your key into. When you turn the key, you’re telling the switch to send power to different parts of the car.
For starting the engine, the ignition switch has a few key positions. Usually, it’s OFF, ACC (Accessory), ON, and START. In the OFF position, nothing gets power.
In ACC, you can run things like your radio. When you turn it to ON, you power up the engine’s computer, fuel pump, and other essential systems. The START position is where the magic happens.
When you hold the key here, it sends a signal to the starter solenoid to engage the starter motor.
The internal workings of the ignition switch involve electrical contacts that connect and disconnect as you turn the key. These contacts are designed to handle specific electrical loads. It’s a simple mechanical device with electrical connections on the back.
These connections need to be wired correctly to the rest of the starting circuit. A worn or damaged ignition switch can cause a no-start condition or intermittent issues.
The Starter Solenoid
The starter solenoid is a powerful electromagnetic switch. It acts as a bridge between your battery and the starter motor. Your battery has a lot of power, more than the ignition switch can safely handle directly.
The solenoid takes a small electrical signal from the ignition switch and uses it to close a high-current circuit. This circuit sends a large amount of power from the battery directly to the starter motor.
Think of it like this: your ignition switch is a light switch, and the starter motor is a giant appliance. You wouldn’t wire a giant appliance directly to a small light switch. The solenoid is the intermediary.
It’s typically mounted on the starter motor itself or nearby.
When the solenoid receives power from the ignition switch, it does two things. First, it energizes a coil that pulls a heavy-duty plunger. This plunger engages the starter gear with the engine’s flywheel, allowing the starter motor to spin the engine.
Second, the plunger closes a set of high-amperage contacts, connecting the battery’s positive terminal to the starter motor. Once the engine starts and you release the key, the solenoid de-energizes, retracting the plunger and disengaging the starter gear.
The Starter Motor
The starter motor is an electric motor that does the hard work of cranking your engine. It’s a powerful component designed to spin the crankshaft until your engine can start running on its own.
When the starter solenoid sends a surge of electricity to it, the starter motor spins its armature. This rotation is transferred through a small gear, often called a Bendix drive, which meshes with the teeth on your engine’s flywheel. The engagement of this gear is critical.
If the gear doesn’t engage properly with the flywheel, the starter motor will spin freely without turning the engine.
Modern starter motors are usually high-torque DC motors. They are built to withstand the demanding conditions of starting an engine, which requires a significant amount of power and torque. The starter motor operates only for a very short period during startup.
It’s not designed for continuous use. Prolonged cranking can overheat and damage the starter motor.
Navigating the 70s Chevy Starter Switch Wiring Diagram Guide
Key Components in the Starter Circuit
To successfully understand and use a 70s Chevy Starter Switch Wiring Diagram Guide, you need to know the main players in the starting circuit. These are the components that electrically interact to get your engine turning over. We will detail each of these, explaining their function and how they connect to one another according to the diagrams you’ll find.
This will help demystify the lines and symbols you see on paper.
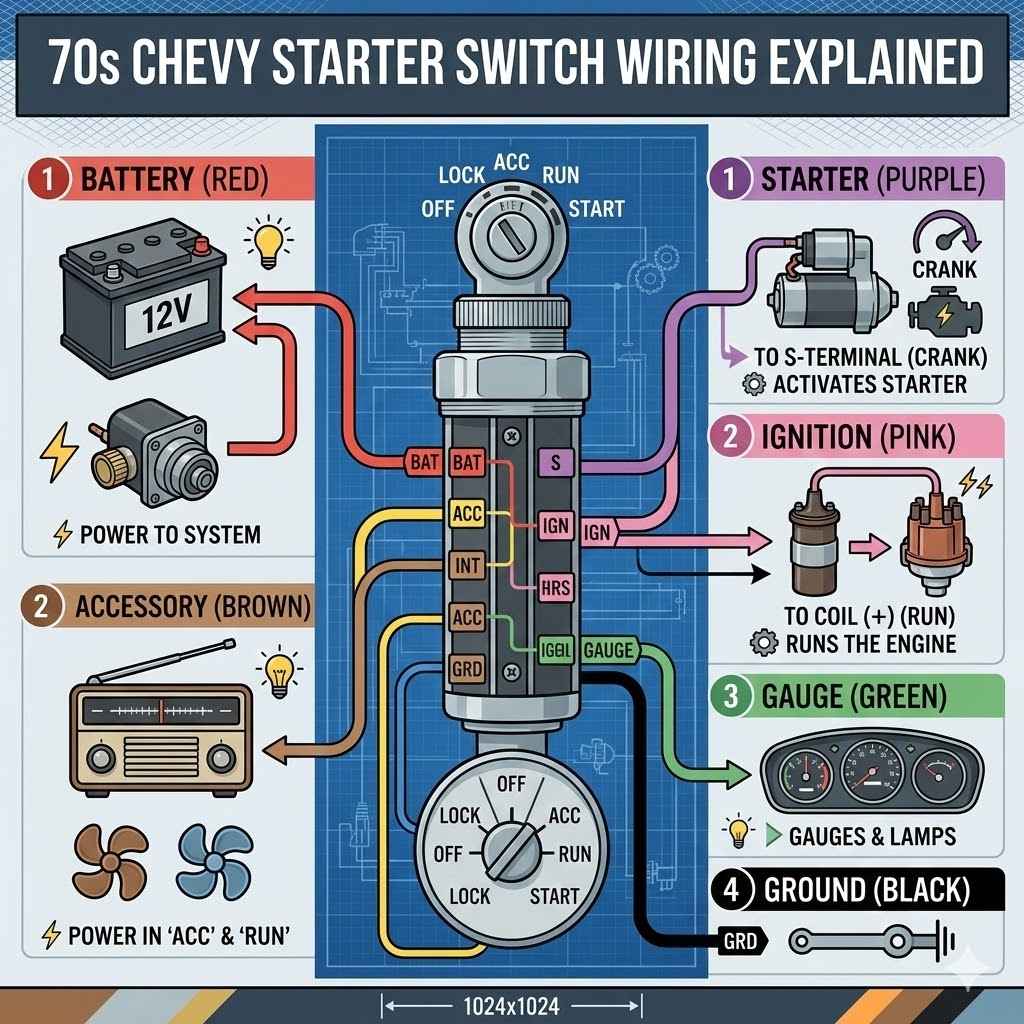
Battery and Battery Cables
The battery is the heart of your car’s electrical system, providing the raw power needed to start the engine. For the starter circuit, the battery’s role is paramount. It stores electrical energy as chemical energy, which is then converted back to electrical energy when needed.
In a 70s Chevy, the battery is typically a 12-volt lead-acid battery. It has two terminals: positive (+) and negative (-). The battery cables are thick, heavy-gauge wires designed to handle the massive amount of current required to spin the starter motor.
The positive battery cable runs from the positive terminal of the battery directly to the starter solenoid (or sometimes to a junction point that feeds the solenoid and other systems).
The negative battery cable runs from the negative terminal of the battery to the vehicle’s chassis or engine block. This connection provides a ground path for all electrical components. A poor connection at either terminal or a corroded or damaged cable can prevent the starter from operating or cause it to crank slowly.
It’s essential to ensure your battery is fully charged and that all battery cable connections are clean and tight. A weak battery or bad connections are very common reasons for starting problems. Always disconnect the negative cable first and reconnect it last when working on the battery to prevent accidental short circuits.
Wiring Harnesses and Connectors
Wiring harnesses are essentially bundles of wires that connect various electrical components throughout your vehicle. In a classic car like a 70s Chevy, these harnesses are crucial for organizing and protecting the electrical pathways.
A wiring harness for the starter circuit will contain the specific wires that run from the ignition switch, to the solenoid, and to other necessary points. These wires are often color-coded and run through protective conduits or loom to prevent chafing and damage. The connectors within these harnesses are designed to mate securely, ensuring a reliable electrical connection.
When you’re looking at a wiring diagram, the lines represent the wires within these harnesses. The symbols at the ends of lines often represent connectors. Understanding how these wires are routed and connected is what the diagram is all about.
Over time, insulation on wires can become brittle and crack, and connectors can become corroded or loose. These issues can interrupt the flow of electricity, leading to starting problems.
Regular inspection of wiring harnesses for any signs of damage, corrosion, or loose connections is a vital part of maintaining your classic Chevy’s electrical system. Cleaning and dielectric greasing of connectors can also help prevent future issues and ensure a solid electrical connection.
Ground Connections
Ground connections are as important as any direct power connection. They provide the return path for electrical current back to the negative terminal of the battery. Without a good ground, electricity can’t flow properly, and components won’t work.
In the starter circuit, the starter motor itself is grounded through its mounting bolts to the engine block, which is then grounded to the chassis. The engine block and chassis are connected to the negative battery terminal via a heavy-gauge ground strap or cable. This ground strap is critical for handling the high current of the starter motor.
A corroded or loose ground connection can cause all sorts of electrical gremlins, including slow cranking or a complete failure to start. It’s important to ensure that all ground points are clean, free of rust or paint, and securely fastened. Sometimes, a dedicated ground wire is run from the engine to the chassis to supplement the main ground strap.
When troubleshooting starting issues, always check the condition and security of your main battery ground cable and the engine-to-chassis ground strap. These are often overlooked but are fundamental to the proper operation of the entire electrical system, especially the high-demand starter circuit.
Wiring Diagram Symbols and Schematics Explained
Decoding Common Wiring Diagram Symbols
A 70s Chevy Starter Switch Wiring Diagram Guide is full of symbols. These symbols are a universal language for electricians and mechanics. Learning to read them is the key to understanding how your car’s electrical system is put together.
We will cover the most common symbols you’ll encounter. Knowing these will help you translate the diagram into a physical wiring job. It’s like learning a secret code that unlocks the secrets of your Chevy’s electrical pathways.
Lines Representing Wires
In any wiring diagram, lines are used to represent wires. The type and thickness of the line can sometimes indicate different things, but most often, a simple solid line represents a single conductor. Wires in a harness are bundled together, but the diagram shows each wire as a separate line.
Sometimes, you’ll see lines that are solid for a portion and then dotted or dashed for another. This might represent a wire that runs through a fuse or a break in the circuit. Lines crossing each other can indicate wires that are near each other but not connected, or they might be shown with a small loop or a jump over the other line to signify they do not connect.
When two lines meet and are shown as a solid dot at the intersection, it means the wires are connected. If lines cross without a dot, they are not connected, simply running adjacent to each other. Understanding these basic line conventions is the first step in interpreting the flow of electricity.
The diagram also shows connections to components. The lines will terminate at symbols representing switches, motors, solenoids, and other parts. Following these lines from the power source to the component helps you trace the circuit’s path.
Component Symbols
Each electrical part in your car has a specific symbol that represents it on a wiring diagram. These symbols are standardized to ensure clarity across different diagrams and manufacturers.
For the starter circuit, you’ll frequently see symbols for:
- Battery: Often shown as a series of long and short parallel lines, with the longer line representing the positive terminal.
- Ignition Switch: This can be represented in various ways, often showing a movable arm or contacts that close or open depending on the switch position.
- Solenoid: Typically depicted as a coil with an actuator arm, showing its electrical coil and the heavy-duty contacts it controls.
- Starter Motor: Usually a circle with an ‘M’ inside, sometimes with an additional symbol indicating its rotating nature.
- Ground: A symbol resembling a series of horizontal lines decreasing in length or a three-pronged fork.
Understanding these symbols allows you to identify each component at a glance. For instance, seeing the solenoid symbol connected by lines to the battery and ignition switch symbols immediately tells you its role in the circuit. Familiarizing yourself with a few key symbols will greatly speed up your comprehension of the entire diagram.
Color Codes and Wire Gauges
Wiring diagrams often include information about the color of the wires and their gauge (thickness). This information is incredibly useful for both troubleshooting and replacement.
Wire color coding is a convention where different colors are used for wires carrying different types of signals or power. For example, red is often used for hot (powered) wires, while black is used for ground wires. However, specific color codes can vary between manufacturers and even within different sections of the same vehicle’s wiring.
A good diagram will provide a key or legend that explains the color code being used.
Wire gauge refers to the thickness of the conductor. Thicker wires (lower gauge numbers) can carry more current without overheating. The starter circuit, due to the high current draw of the starter motor, will use very thick gauge wires (low numbers, e.g., 4 or 6 gauge) for the main battery and solenoid connections.
Thinner wires are used for control signals from the ignition switch.
When referring to a 70s Chevy Starter Switch Wiring Diagram Guide, pay close attention to any color coding or gauge specifications. If you need to replace a wire or connector, using the correct gauge is vital for safety and proper operation. Using a wire that is too thin can lead to overheating and fire hazards.
Step-by-Step Wiring Guide and Troubleshooting
Connecting the Starter Circuit Components
Now that you’re familiar with the symbols and components, let’s walk through the actual process of connecting everything. This guide is based on typical 70s Chevy Starter Switch Wiring Diagram Guide layouts. Always refer to your specific vehicle’s diagram for exact connections.
Safety first: disconnect the battery before you start any wiring work.
Power Feed to the Solenoid
The main power feed to the starter solenoid comes directly from the battery. This is typically the thickest wire in the starter circuit.
Locate your battery and the starter solenoid. You will have a heavy-gauge cable (often red) running from the positive (+) terminal of the battery to one of the large terminals on the starter solenoid. This terminal is often labeled “B” for Battery or has a ‘+’ symbol.
Ensure the cable is securely fastened at both the battery terminal and the solenoid terminal. Clean any corrosion off the battery posts and the cable ends before connecting them. A loose or corroded connection here is a very common cause of the starter not engaging.
This connection supplies the high current needed to turn the starter motor. It bypasses the ignition switch and goes directly to the solenoid, which then controls the flow to the starter motor itself.
Ignition Switch to Solenoid Signal Wire
This is the wire that tells the solenoid to engage. When you turn your ignition key to the START position, this wire receives a low-current signal from the ignition switch.
On the wiring diagram, find the ignition switch symbol and trace the wire that goes to the other large terminal on the starter solenoid. This terminal is often labeled “S” for Start or has a small lightning bolt symbol.
This wire is much thinner than the battery feed wire because it only carries a small amount of current to activate the solenoid’s internal coil. Ensure this wire is securely connected to the appropriate terminal on both the ignition switch and the solenoid. A poor connection here will prevent the solenoid from activating, and thus the starter motor won’t spin.
Some vehicles might have an additional relay between the ignition switch and the solenoid for added protection or to reduce the current draw through the ignition switch itself. However, for most 70s Chevys, it’s a direct connection.
Solenoid to Starter Motor Connection
The starter solenoid is typically mounted directly on or very close to the starter motor. The connection between them is usually internal within the solenoid assembly or via a short, heavy-duty wire.
When the solenoid is activated by the signal from the ignition switch, its internal plunger moves. This plunger connects the large battery terminal (where the thick cable from the battery is attached) to the electrical terminal that powers the starter motor. This is why the starter motor itself doesn’t need a separate large wire directly from the battery; it gets its power through the solenoid.
The starter motor also needs a good ground connection. This is usually achieved through its mounting bolts that attach it to the engine block. The engine block, in turn, must have a solid ground connection to the vehicle’s chassis and then to the negative battery terminal.
If the solenoid is engaging (you might hear a click) but the starter motor doesn’t spin, the problem could be a faulty solenoid, a bad connection between the solenoid and starter, or a poor ground connection for the starter motor or engine block.
Common Starting Problems and Solutions
Many issues can prevent your 70s Chevy from starting, and most are related to the starter circuit. A good 70s Chevy Starter Switch Wiring Diagram Guide is your best friend when troubleshooting.
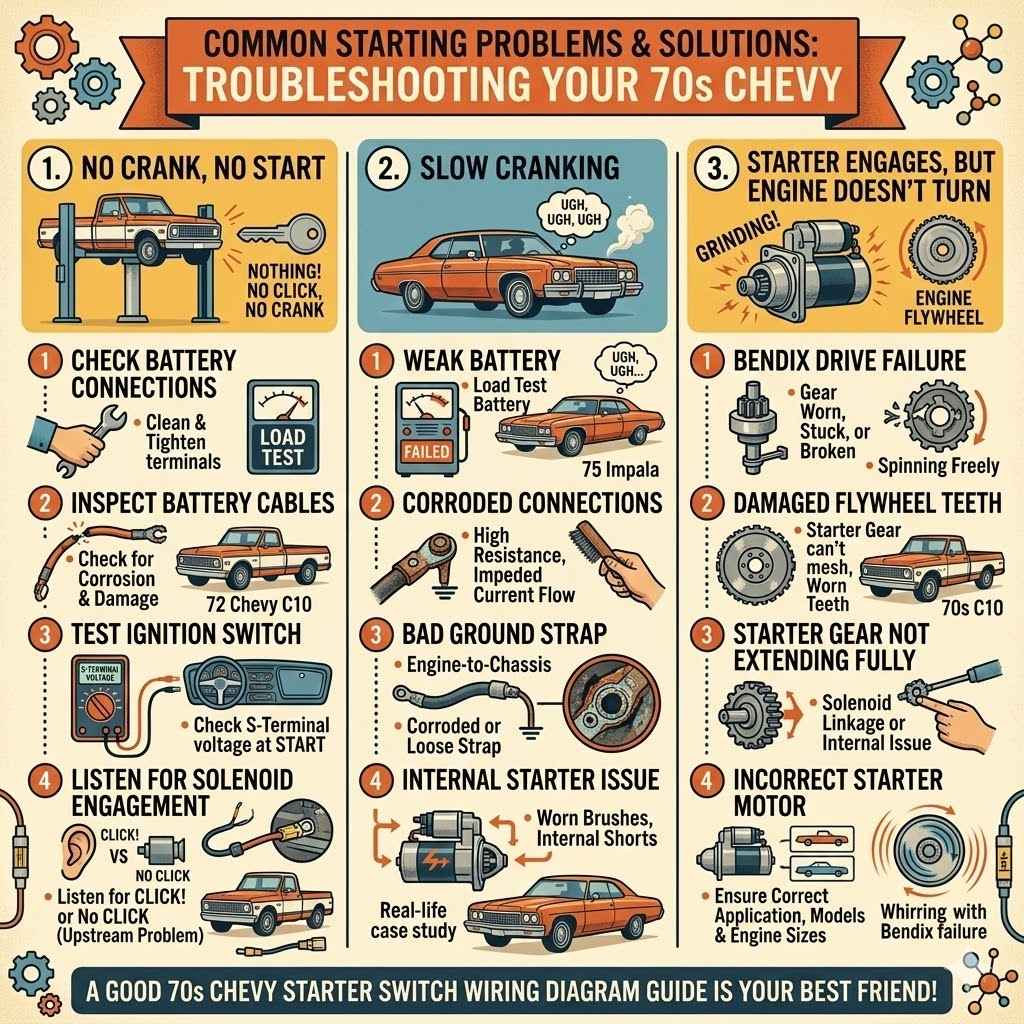
No Crank No Start
This is when you turn the key, and absolutely nothing happens. No clicking, no cranking, nothing. This usually points to a problem with the power supply or the signal that activates the starter.
- Check Battery Connections: Start with the basics. Are your battery terminals clean and tight? Is the battery charged? A completely dead battery or a loose connection will result in no power getting to the starter circuit.
- Inspect Battery Cables: Look for any signs of corrosion, fraying, or damage on both the positive and negative battery cables. These are heavy-duty cables and must be in good condition to carry the necessary current.
- Test Ignition Switch: The ignition switch might be faulty. Check if it’s sending power to the solenoid’s ‘S’ terminal when the key is in the START position. You can use a multimeter to test for voltage.
- Check Solenoid Engagement: Listen for a click from the solenoid when you turn the key. If you hear a click, the solenoid is likely receiving power, but it might not be engaging the starter motor, or the starter motor itself could be faulty. If you don’t hear a click, the problem is likely upstream of the solenoid (ignition switch, wiring, or fuses).
One real-life example involved a 1972 Chevy C10 that wouldn’t crank. The owner had a new battery and cables, but still nothing. Upon inspection, the wire connecting the ignition switch to the starter solenoid was found to be corroded at the connector.
Cleaning the connector and ensuring a tight fit resolved the issue.
Slow Cranking
If the engine cranks very slowly, like it’s struggling to turn over, it suggests there’s a power delivery problem, but not a complete blockage.
- Weak Battery: The most common cause of slow cranking is a weak battery. Even if it has enough power to light up the dashboard, it might not have enough amperage to spin the starter motor effectively. Have your battery load tested.
- Corroded Connections: Slow cranking can also be caused by high resistance in the circuit due to corrosion. Check the battery terminals, cable ends, and ground connections. Even slight corrosion can significantly impede current flow.
- Bad Ground Strap: A corroded or loose engine-to-chassis ground strap can significantly reduce the available power to the starter. This strap is crucial for handling the high amperage required.
- Internal Starter Issue: The starter motor itself might be wearing out. Worn brushes or internal shorts can cause it to draw excessive current and crank slowly.
A case study involved a 1975 Impala that would crank very sluggishly. The battery tested good, and connections were clean. After further investigation, it was found that the engine-to-chassis ground strap had internal corrosion within its terminals, which looked good from the outside but was creating high resistance.
Replacing the ground strap solved the slow cranking problem.
Starter Engages but Engine Doesn’t Turn
This is when you hear the starter motor spinning, sometimes loudly, but the engine’s flywheel isn’t being engaged. This is often referred to as “spinning freely” or “grinding.”
- Bendix Drive Failure: The starter motor has a Bendix drive mechanism. This gear is supposed to extend and engage the engine’s flywheel when the starter motor spins. If the Bendix drive is worn, stuck, or broken, it won’t engage the flywheel.
- Damaged Flywheel Teeth: The teeth on the engine’s flywheel might be worn or damaged. If the starter gear can’t mesh properly with the flywheel teeth, the starter will spin without turning the engine.
- Starter Gear Not Extending Fully: Sometimes, the solenoid might be working, and the starter motor is spinning, but the starter gear isn’t extending far enough to engage the flywheel. This could be a problem with the solenoid’s linkage or the starter motor’s internal mechanism.
- Incorrect Starter Motor: While less common, ensure you have the correct starter motor for your specific 70s Chevy application. Different models or engine sizes might use slightly different starters.
A common scenario is hearing a loud whirring sound when you try to start the car, but the engine doesn’t catch. This often points to a problem with the starter’s Bendix gear not engaging the flywheel properly. If you can see the starter, sometimes you can visually inspect if the starter gear is attempting to extend.
Frequently Asked Questions
Question: What is the most common wire color for the battery positive cable on a 70s Chevy?
Answer: The most common wire color for the battery positive cable on a 70s Chevy is red.
Question: How can I check if my starter solenoid is working?
Answer: You can check if your starter solenoid is working by listening for a click when you turn the ignition key to the START position. If you hear a click, the solenoid is likely receiving power. You can also test for voltage at the ‘S’ terminal of the solenoid while the key is in the START position.
Question: What does a low gauge number mean for a wire?
Answer: A low gauge number means the wire is thicker. Thicker wires can carry more electrical current safely without overheating, which is why heavy-duty components like starters use low-gauge wires.
Question: Can I use a wire thinner than recommended on my 70s Chevy starter circuit?
Answer: No, you should never use a wire thinner than recommended. Using a wire that is too thin can lead to it overheating, melting, and potentially causing a fire. It can also lead to poor performance or failure of the component.
Question: Where can I find a reliable 70s Chevy Starter Switch Wiring Diagram Guide?
Answer: You can find a reliable 70s Chevy Starter Switch Wiring Diagram Guide in your vehicle’s factory service manual, in Haynes or Chilton repair manuals specific to your year and model, or from reputable online automotive forums and classic car parts suppliers.
Wrap Up
This guide has shown you how to read a 70s Chevy Starter Switch Wiring Diagram Guide, understand its parts, and tackle common issues. You now know the key components and symbols. With this knowledge, you can confidently approach wiring tasks and troubleshooting.
You can get your classic Chevy running smoothly again. Take it step by step, and don’t be afraid to look closely at your diagram.