Best Dash Cam Mount for Clean Windshields (2026): we compared
The cleanest windshield setup usually comes from a rearview-mirror dash cam mount, or a low-profile adhesive mount tucked behind the mirror with hardwiring and a short right-angle cable. That setup keeps the camera high, hides more wire, and cuts the hanging loops that make a good dash cam look messy.
This guide is part of our Car accessories for comfort and convenience series.
Quick comparison
| Product | Badge | Best for | Price | ||
|---|---|---|---|---|---|
 |
volport Sticky Adhesive Pad Replacement for Dash Camvolport | Pair with it | 4 pcs · 2.2" · 3M VHB · Heat Resistant | $6.99
Price as of 27 Sep 2026
|
View |
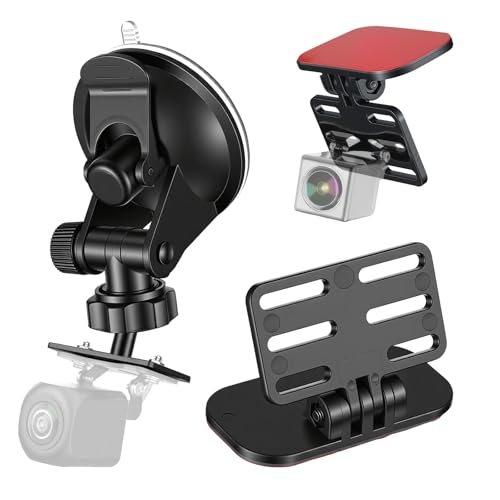 |
2 Pack Rear Camera Mount Dash Cam Mount ReplacementJxiwfvl | Budget pick | 2 pack · Suction + Adhesive · Rear Camera | $7.66
Price as of 27 Sep 2026
|
View |
 |
iSaddle Dash Cam Windshield Suction Cup Mount DashboardiSaddle | Our pick | Universal · Suction Cup · 360° Rotation | $9.99
Price as of 27 Sep 2026
|
View |
 |
Dash Cam Suction Cup Mount and Glue Adhesive MountSoeKoa | Also great | Suction + Glue · 10+ Joints · Heat Resistant | $9.99
Price as of 27 Sep 2026
|
View |
 |
COOAU Car Dash Cam Mounting Bracket,Adjustable WindshieldCOOAU | Upgrade pick | Suction + 3M Adhesive · Adjustable Angle | $15.19
Price as of 27 Sep 2026
|
View |
The cleanest installs usually come from the mount that sits highest and needs the least cable on glass. For most drivers, that means a rearview-mirror-style mount first, then a low-profile adhesive mount behind the mirror if the car’s sensors and shrouds leave enough room.
Temporary users and people who move a camera between vehicles should still consider suction, but it is the least discreet option in this group.
According to popsci.com — Miofive Dash Cam records in 4K video.
How we chose
The comparison here focuses on what actually changes windshield clutter: visible hardware size, how much wire can be hidden, heat and vibration resistance, and how well the mount fits modern mirror housings and sensor pods.
We also weighed residue risk, reinstallability, and whether the mount makes sense for parking mode, because parked recording often forces a more permanent power path.
Vehicle fit matters too. A mount that works in a wide, flat windshield can fail in a car with a thick sensor shroud, a low headliner, or a mirror housing that blocks the camera’s angle.

volport Sticky Adhesive Pad Replacement: best for fixed low-profile installs
This is a good fit for drivers who already use a suction-based holder and want a tighter, flatter connection to the glass. The low-profile 3M VHB-style pad helps reduce wobble, and it is a practical choice when the goal is to keep the camera tucked behind the mirror.
The tradeoff is simple: adhesive gives a cleaner look, but removal is harder and long-term residue is a real possibility, especially in heat. It is best for people who want a more permanent setup and are comfortable cleaning off tape later.
Jxiwfvl 2 Pack Rear Camera Mount: best for flexible repositioning
This mount suits drivers who want the option to switch between suction and adhesive-style attachment without buying separate parts. Based on the spec sheet and owner feedback, the angle adjustment makes it easier to work around mirror shrouds and awkward windshield shapes.
The drawback is bulk. Any multi-piece adjustable mount tends to sit farther from the glass than a dedicated low-profile adhesive setup, so it is better for flexibility than for the cleanest possible windshield.
iSaddle Dash Cam Windshield Suction Cup Mount: best for temporary use
This is the right choice when the camera moves between cars or when the install may need frequent adjustment. Suction mounts are easy to reposition and remove, which makes them useful during ownership changes, rental use, or test fitting a camera before committing.
The downside is visibility. Suction cups are bulkier from outside the car, and temperature swings can reduce hold over time, especially on hot glass or in cold weather. For a permanent clean look, suction is usually the second-choice mount.
SoeKoa Dash Cam Suction Cup Mount and Glue Adhesive Mount: best for heat-tolerant flexible installs
This option works for drivers who want a kit with more joint options than the average replacement mount. The heat-resistant design is useful in sun-loaded cabins, and the extra pivot pieces help tune the angle when the mirror housing or headliner limits placement.
The drawback is complexity. More joints can mean more visible hardware, and more visible hardware usually means more clutter. It is a better fit for function-first installs than for the most minimal windshield layout.
COOAU Car Dash Cam Mounting Bracket: best for mixed suction-and-adhesive setups
This is a practical choice for drivers who want to experiment with positioning before settling on a final spot. The suction-plus-3M approach gives some flexibility, and that can help when the windshield has a sensor pod or the mirror stalk blocks the ideal angle.
The drawback is that hybrid mounts can still end up looking busy. If the goal is absolute visual minimalism, a simpler adhesive or mirror-integrated solution usually looks cleaner from both inside and outside the car.
Which one should you buy
If your priority is the cleanest windshield possible, choose a rearview-mirror dash cam mount first. It usually hides the camera best and keeps the glass area around it visually quiet, especially when paired with hidden power routing.
If your car has a mirror shroud, rain sensor, or driver-assist camera cluster that blocks that area, move to a low-profile adhesive mount behind the mirror. It is the next-best option when the camera can sit high without entering the driver’s line of sight.
Choose suction only if you need frequent repositioning, plan to move the dash cam between vehicles, or want a temporary setup. It is convenient, but it is rarely the cleanest long-term answer.
What is the best dash cam mount for a clean windshield setup?
The best dash cam mount for a clean windshield setup is usually a rearview-mirror-style mount or a low-profile adhesive mount hidden behind the mirror. Both reduce visible hardware and shorten the exposed cable run, which matters more than raw camera size when the goal is a tidy cabin.
The mirror-style route wins when the car supports it. The adhesive route wins when the windshield layout is tight but still leaves enough room behind the mirror for the lens and power cable.
Rearview-mirror dash cam mount: cleanest-looking for many drivers
Integrated or mirror-replacement designs are the most discreet options for many cabins because they keep the camera centered where eyes already expect hardware to sit. That helps with front view placement, and many mirror-based systems can also support rear recording without adding a second visible unit.
The main drawback is compatibility. Some cars have sensor housings, oversized mirror covers, or unusually short mirror stalks that make mirror mounts awkward or impossible. Screen placement matters too; a big screen hanging below the mirror can undo the clean look.
Windshield adhesive mount: best fixed, low-profile option
A windshield adhesive mount is the best choice when you want a permanent, low-profile install and the car has enough glass behind the mirror. Low-profile tape or pad placement keeps the camera snug to the windshield, which usually means less vibration and less visible bulk than suction.
Heat resistance is the key concern. Adhesive can hold very well, but intense summer heat can still cause peel, and removal is more difficult than with suction. Long-term residue risk is part of the deal, so this mount is best when you are committed to the placement.
Suction-cup mount: best for temporary or moved setups
A suction-cup mount makes sense when the camera needs to come off the glass often. It is easy to reposition, easy to remove, and forgiving while testing camera angle or checking whether a specific windshield area has enough clearance.
For a permanent clean install, it usually loses. The profile is bulkier, the cup can be visible from outside the car, and suction can weaken in temperature swings or vibration. That makes it a convenience choice, not the neatest-looking one.
Best picks by setup
Different windshields reward different hardware. A small hatchback with limited glass space needs a different approach than a large SUV with a wide mirror area and plenty of room for hidden routing.
Mini dash cam form factor: best for tight glass space
A mini dash cam helps because less body means less visual obstruction. That matters in compact cars, cars with deep mirror shrouds, and dual-channel setups where a second cable and rear camera already add clutter. The Garmin Dash Cam Mini records 1080p footage and has a 140-degree angle, which shows how small cameras can still cover a useful view.
The drawback is obvious: small does not always mean better for every job. If the camera needs a larger screen, more controls, or a dual-channel housing, the size advantage shrinks quickly. A smaller body helps the windshield look cleaner, but only when the mount and wiring are equally tidy.
4K dash cam: best when detail matters and the mount can support the size
A 4K dash cam can be a smart choice when image detail is the priority and the windshield has enough room for the camera body. The Miofive Dash Cam records in 4K video, which is useful when the user wants stronger detail without moving up to a large screen-heavy unit.
But a 4K camera can still be too bulky for a tidy install. More heat management, more mass, or a larger shell can make the front glass look busier, so the mount has to be stable and the placement has to stay high and tight.
Hardwire kit: best for hidden wiring and parking mode
A hardwire kit is the cleanest power option when the goal is to eliminate the visible cord and support parking mode. It usually taps the fuse box, which lets the installer run a hidden path and choose constant-power or ignition-switched power based on whether the camera should record while parked.
Parking mode changes the mount decision because it favors a more permanent installation. The BlackVue DR900X-2CH is hardwired to the fuse panel and supports parking mode, which is exactly the sort of setup that keeps wires out of sight. The drawback is added install effort and a less forgiving removal process.
Cable management accessories: best for cleaning up the last visible wire run
Trim tools, adhesive clips, and zip ties are the small pieces that separate a decent install from a clean one. They let the installer tuck the lead into the headliner, route along the A-pillar, and move the cable from the 12V socket path to a more hidden fuse-box route.
These accessories cannot fix a bad mount choice. But they do keep the last few inches from hanging in the driver’s view, which is often where an otherwise neat install starts to look sloppy.
How do you hide dash cam wires without making the install worse?
The cleanest wire-hiding method is to run the cable along the headliner, down the A-pillar, and into a fuse-box hardwire kit or a concealed 12V route. Use adhesive clips and a trim tool to tuck the wire rather than stuffing it randomly into gaps, because sloppy routing creates bulges and rattle points.
If the camera needs power from the cigarette-lighter socket, keep the visible run as short as possible and use a right-angle connector when space is tight. Hardwiring looks cleaner than plug-in power, but a short, well-hidden plug-in cable is acceptable for temporary installs.
Trim tool, adhesive clips, and zip ties
A trim tool helps lift edge seals and tuck cable behind interior panels without marring the cabin. Adhesive clips keep a short run straight and controlled, while zip ties help secure slack under the dash where it cannot rattle loose.
These accessories matter most in older cars and compact cabins. In both cases, exposed cable tends to collect at the base of the mirror or around the center stack unless it is deliberately controlled.
A-pillar routing and the 12V to fuse-box route
A-pillar routing is usually the cleanest way to move the cable from the headliner to the dash, provided the cable does not interfere with airbag deployment zones. The 12V-to-fuse-box route is cleaner still when a hardwire kit is used, because it removes the long dangling line to the socket.
The key is restraint. Cable should disappear behind trim, not be jammed under it. A neat route is invisible first and secure second.
When to hardwire versus stay with a plug-in cable
Hardwire when you want parking mode, a permanent install, or the least visible wiring. Stay with plug-in power when the camera is temporary, the vehicle is leased, or the owner wants to avoid fuse-box work.
Do not hardwire just for the sake of it. If the camera will move between cars or the vehicle is only used seasonally, a short, concealed plug-in cable can still look clean enough.
How do I hide dash cam wires for a cleaner install?
Start at the camera, then plan the path before plugging anything in. The cleanest installs use a short power lead, headliner tucking, A-pillar routing, and a hidden drop to either the fuse box or a concealed 12V source. The goal is to remove loops, not just hide the plug.
Use adhesive clips where the cable needs to change direction, and avoid crossing open glass unless there is no other route. If parking mode matters, hardwire the camera so the wire can disappear completely instead of hanging into the cabin.
Can I mount a dash cam behind the rearview mirror?
Yes, behind the rearview mirror is often the best place for a clean install, as long as the lens stays out of the driver’s direct line of sight and does not block sensors or camera housings. This spot hides the unit well and shortens the visible wire path.
The catch is vehicle fit. Some mirrors sit inside a wide shroud that leaves almost no usable glass behind them, and some cars have rain sensors or safety cameras in the same zone. If the mount crowds those parts, move the camera slightly lower or off-center.
What to avoid around sensors, shrouds, and airbag zones
Avoid mounting on top of rain sensors, driver-assist camera housings, or any shroud that interferes with the lens angle. Do not run cable where an A-pillar airbag could deploy and snag it. The cleanest install is useless if it compromises visibility or interior safety hardware.
Also watch for wipers and tint bands. A high mount is good, but only if the camera still sees a clear path through the glass.
Should I use suction cup, adhesive, or mirror mount for a dash cam?
For a permanent clean look, use a mirror mount or a low-profile adhesive mount. Suction cups are better for temporary use and repositioning, but they are bulkier and more likely to look obvious from outside the vehicle. The right choice depends on whether you want flexibility or the least visible setup.
Adhesive wins on low profile. Mirror mounts win on appearance and cable control when the vehicle supports them. Suction wins only when the install needs to come apart often.
Where should a dash cam be mounted so it stays legal and unobtrusive?
Mount it high, usually behind the rearview mirror or near the headliner when allowed, and keep it out of the driver’s primary field of view. The camera should not block the windshield area the driver relies on, and it should avoid sensor zones and mirror shrouds that force awkward placement.
Legal placement varies by jurisdiction, so the practical rule is simple: keep the unit small, high, and outside the sightline. If the camera looks like an afterthought from the driver seat, it is usually close to the right spot.
Will a smaller dash cam make the windshield look cleaner?
Usually yes, but only if the mount and cable are also small. A mini dash cam reduces visual mass and works especially well in tight glass areas, yet a small body with a long exposed wire still looks untidy. The mount and routing matter as much as the camera shell.
That is why compact models pair well with adhesive or mirror mounts. A 4K unit can still look neat if it is tucked behind the mirror and wired cleanly, but larger bodies are harder to hide when the windshield space is limited.
Do hardwired dash cams look cleaner than plug-in setups?
Yes, hardwired dash cams usually look cleaner because they remove the visible cord that runs to the 12V socket. When the wire goes to the fuse box and disappears behind trim, the install tends to look factory-made rather than added later.
Plug-in setups are still acceptable for temporary use or leased cars. The trick is to shorten the visible section, tuck the cable into the headliner, and avoid loose loops around the mirror area.
What dash cam mount works best in cars with limited windshield space?
Cars with limited windshield space usually do best with a mini dash cam on a low-profile adhesive or mirror mount. The smaller body leaves more glass open, and the high placement behind the mirror uses dead space that is otherwise wasted by the mirror housing.
If the mirror shroud, sensor pod, or low headliner makes that impossible, the next best choice is a compact suction setup for testing placement before committing. Once the final position is known, adhesive or mirror mounting usually looks cleaner.
Best way to mount and clean the windshield before installation
A clean windshield matters because adhesive pads, suction cups, and mirror mounts all fail faster when dust, oil, or old tape are left behind. The best-looking install often starts with the least glamorous job: cleaning the glass properly before anything touches it.
5-step windshield cleanup checklist
- Remove old adhesive or suction residue completely before placing the new mount.
- Wash the glass area with interior-safe cleaner and a lint-free cloth.
- Dry the surface fully, including the edge where the mount will sit.
- Wipe once more with a clean microfiber to catch dust and streaks.
- Check the final spot from outside and inside before pressing the mount down.
This is also the moment to confirm that the chosen spot clears sensors, shrouds, and mirror movement. A mount placed a half-inch too low can be the difference between discreet and distracting.
What to avoid during cleanup and placement
Do not place adhesive over old residue, and do not install on a dusty glass edge expecting the pad to “settle” later. Avoid mounting where the rearview mirror swings into the camera’s path, and avoid any area that forces the cable to hang in front of the driver.
If the car has a camera or sensor cluster behind the mirror, test the position with the engine off and the mirror adjusted to normal driving height. That small check often prevents a messy redo.
Products related to this article
Sponsored / affiliate links. As an Amazon Associate I earn from qualifying purchases. I may earn additional commission from eligible campaigns.