Car Radio Capacitor: Keep ACC Power Longer
Figuring out why your car radio loses its settings can be a bit tricky, especially when you’re just starting out. The main reason often comes down to something called a Car Radio Capacitor: Keep ACC Power Longer. It might sound complicated, but it’s really about keeping a little bit of power flowing even when the car is off.
We’re going to break this down so it’s super simple, step by step. Stick around, and you’ll see exactly how to fix this common issue.
What Is A Car Radio Capacitor
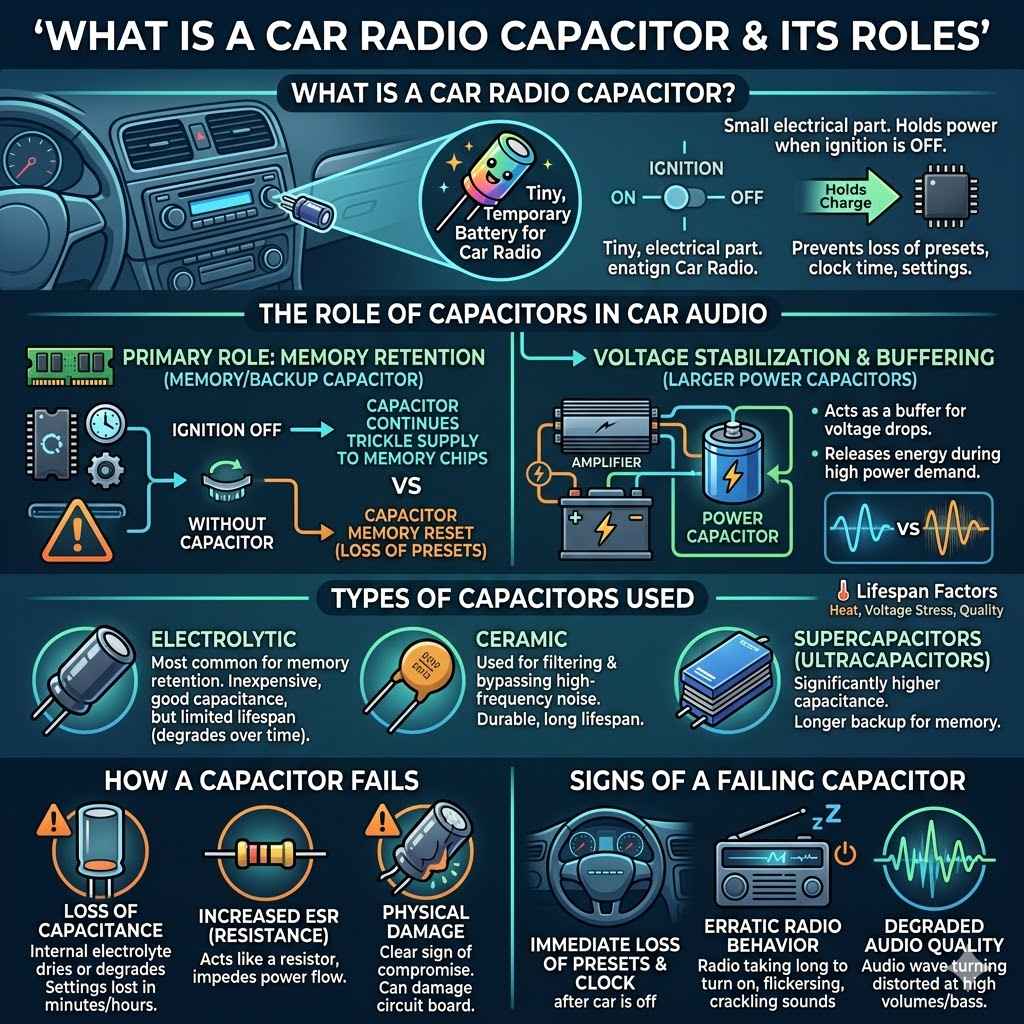
A car radio capacitor is a small electronic part that stores electrical energy. Think of it like a tiny, temporary battery for your car’s radio. Its main job is to hold a bit of power even when the car’s ignition is turned off.
This small charge is what keeps your radio’s memory alive, so you don’t lose your favorite stations, equalizer settings, or other personalized preferences every time you shut off the engine. It’s a vital component for maintaining continuity in your car audio experience.
The Role Of Capacitors In Car Audio
Capacitors play several key roles in car audio systems, but in the context of the radio itself, their primary function is memory retention. When the main power to the radio is cut, a small capacitor, often called a memory capacitor or backup capacitor, continues to supply just enough voltage to keep the volatile memory chips powered. These chips store settings like radio presets, clock time, and audio adjustments.
Without this constant trickle of power, the memory would reset, forcing you to re-enter all your preferences each time you start your car.
Beyond just memory, larger capacitors can also help stabilize voltage. Car electrical systems can experience voltage fluctuations, especially when powerful amplifiers are in use. A capacitor acts as a buffer, absorbing sudden drops in voltage and releasing stored energy when needed.
This helps prevent the radio from cutting out or acting strangely during moments of high power demand, contributing to a more stable and enjoyable listening experience.
The difference between a standard capacitor and a dedicated memory capacitor is primarily in their size and intended function. Memory capacitors are typically much smaller and designed for low-current, continuous supply. Larger power capacitors are designed for high-current bursts and voltage stabilization.
Both are important for a complete car audio setup, but for the specific problem of losing radio settings, we’re focusing on the smaller memory capacitor.
Types Of Capacitors Used In Car Radios
Car radios commonly use different types of capacitors depending on their function. The most prevalent type for memory retention is the electrolytic capacitor. These are relatively inexpensive and offer good capacitance for their size.
However, they have a limited lifespan and can degrade over time, which is often why a Car Radio Capacitor: Keep ACC Power Longer issue arises as the old one fails.
Another type you might find, especially in more modern or higher-end units, is the ceramic capacitor. These are generally used for filtering and bypassing high-frequency noise. They are very durable and have a long lifespan.
Supercapacitors, also known as ultracapacitors, are a more recent technology that offers much higher capacitance than traditional electrolytic capacitors in a similar physical size. They can store significantly more energy, providing longer backup power for memory.
The lifespan of a capacitor is influenced by several factors, including heat, voltage stress, and the quality of its construction. Electrolytic capacitors, being the most common for memory backup, are also the most susceptible to failure over the years. This degradation is a natural process, and it’s why a car radio that has worked fine for a decade might suddenly start losing its settings.
How A Car Radio Capacitor Fails
When a Car Radio Capacitor: Keep ACC Power Longer starts to fail, it usually does so gradually. The most common issue is a loss of capacitance, meaning it can no longer store as much electrical charge as it used to. This happens because the electrolyte inside the capacitor can dry out or degrade over time, especially when exposed to heat from the car’s interior or from the radio’s own operation.
Another failure mode is an increase in Equivalent Series Resistance (ESR). This means the capacitor becomes less efficient at passing electrical current, acting more like a resistor. This increased resistance impedes the flow of power to the radio’s memory chips, making it unable to hold settings for long, or even at all.
You might notice this as settings resetting after only a few minutes or hours of the car being turned off.
Sometimes, a capacitor can physically leak or even bulge. This is a clear sign of failure and indicates that the internal components have degraded to the point of being compromised. If you see any physical signs of damage on the capacitor, it definitely needs to be replaced.
Ignoring a failing capacitor can sometimes lead to further damage to other sensitive components on the radio’s circuit board.
Signs Of A Failing Capacitor
The most obvious sign of a failing Car Radio Capacitor: Keep ACC Power Longer is that your radio loses its presets, clock settings, and other personalized configurations whenever the car is turned off. This happens immediately, or very shortly after, you switch off the ignition. You’ll find yourself having to retune all your favorite stations and reset the time every single time you get into your car.
Another common symptom is that the radio may take longer than usual to turn on, or it might behave erratically for the first few minutes of operation. You might hear crackling sounds, or the display could flicker. These are all indications that the capacitor is struggling to provide a stable power source for the radio’s internal electronics.
If you notice that your radio’s audio quality seems to degrade, especially at higher volumes or during bass-heavy music, a failing capacitor could be part of the problem. While amplifiers and speakers are the primary drivers of sound quality, a compromised power source can affect the overall performance and clarity of the audio output.
Replacing A Car Radio Capacitor
Replacing a Car Radio Capacitor: Keep ACC Power Longer is a task that requires some basic electronic repair skills and tools. It involves opening up your car’s radio unit, identifying the faulty capacitor, carefully desoldering it, and then soldering in a new one. It’s a very achievable DIY project for those who are comfortable with small electronic components.
The reward is a fully functional radio that remembers your settings, saving you from constant re-tuning.
Step By Step Replacement Guide
First, gather your tools. You’ll need a small Phillips head screwdriver to open the radio casing, a soldering iron and solder, desoldering braid or a desoldering pump, wire cutters or strippers, and of course, the replacement capacitor. Make sure the new capacitor has the same capacitance value (measured in farads, often microfarads or µF) and a voltage rating that is equal to or higher than the original.
It’s also important to match the polarity if you’re replacing an electrolytic capacitor, as they can only be installed one way.
Carefully disconnect the car battery before you start. This is a crucial safety step to prevent short circuits and potential damage to your car’s electrical system or the radio itself. Once the battery is disconnected, you can proceed to remove the radio from its dashboard mounting.
This process varies by car model, so consulting your car’s manual or looking up a guide for your specific vehicle can be helpful.
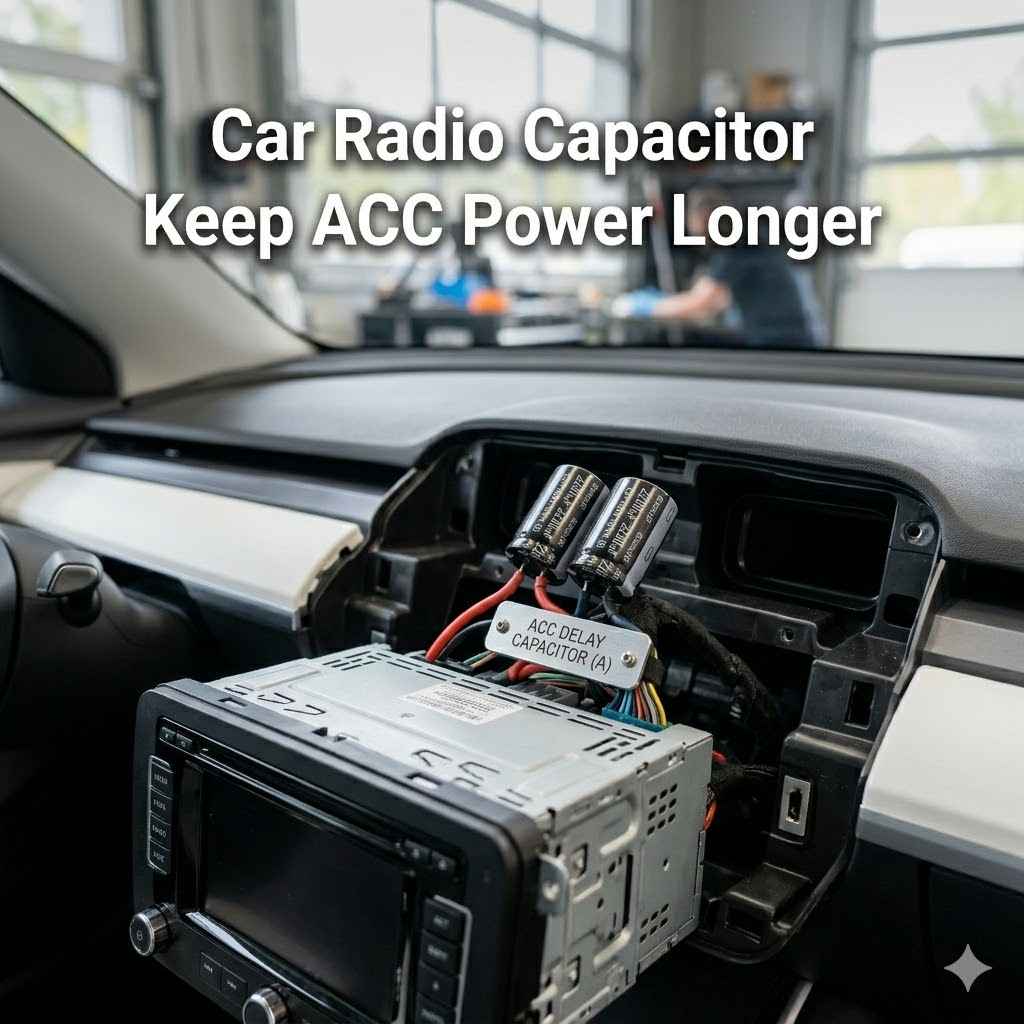
With the radio out, you’ll need to open its casing. This usually involves removing a few screws on the back or sides. Once inside, locate the capacitor that is responsible for memory backup.
It’s typically a small, cylindrical component, often brown or black, with two leads. It might be labeled with its capacitance and voltage ratings. Take a clear picture of its orientation, paying close attention to the polarity markings (often a band on the side indicating the negative lead).
Desoldering The Old Capacitor
Using your soldering iron, heat up the leads of the old capacitor where they connect to the circuit board. Apply the desoldering braid or pump to the heated solder joint to remove the molten solder. You may need to repeat this process for both leads.
Be patient and try not to apply excessive heat to the circuit board, as this can damage the traces.
Once the solder is removed from both leads, gently try to lift the capacitor out. If it’s still stuck, apply a little more heat and try again. Never force it, as you could rip traces off the circuit board.
If you’re using desoldering braid, ensure you clean the tip of the iron frequently to prevent bridging between solder points.
After the old capacitor is removed, inspect the solder pads on the circuit board. Ensure they are clean and free of any old solder residue that might interfere with the new component. If there’s any corrosion or damage, a small amount of flux and careful soldering can often repair minor issues.
Soldering In The New Capacitor
Now, take your new capacitor. If it’s an electrolytic capacitor, pay very close attention to the polarity. The negative lead is usually marked with a stripe or a minus sign.
Ensure this matches the orientation of the old capacitor. the old one was.
Using your soldering iron and fresh solder, carefully solder the leads of the new capacitor to the circuit board. You want to create a strong, shiny connection. Make sure the solder flows cleanly around the lead and onto the pad.
Avoid cold solder joints, which are dull and lumpy, as these can cause intermittent issues.
Trim any excess length from the capacitor leads using wire cutters. Double-check that the new capacitor is securely in place and that there are no unintended solder bridges connecting adjacent components. Once you’re confident with the soldering, you can reassemble the radio unit.
Tools And Materials Needed
To successfully
You’ll also need a desoldering tool. Options include desoldering braid (a copper mesh that wicks away solder when heated) or a desoldering pump (a spring-loaded vacuum tool that sucks up molten solder). A set of small precision screwdrivers is necessary for opening the radio casing.
Safety equipment is paramount. Safety glasses should be worn to protect your eyes from solder splashes or flying debris. If you’re sensitive to fumes, a fume extractor or good ventilation is recommended.
Finally, the correct replacement capacitor is the most critical material. Ensure it matches the original in capacitance value (e.g., 100µF) and has a voltage rating that is the same or higher (e.g., 16V or 25V).
Choosing The Right Replacement Capacitor
When selecting a
The voltage rating is also critical. The capacitor must have a voltage rating equal to or greater than the original. If the original is rated for 16 volts, do not use one rated for only 10 volts, as it could fail and potentially damage the radio.
Using a higher voltage rating (e.g., 25V instead of 16V) is perfectly fine and often offers a greater margin of safety.
Consider the capacitor’s type and temperature rating. For memory backup, standard electrolytic capacitors are common, but if the original was a low-ESR (Equivalent Series Resistance) type, try to
Troubleshooting Common Issues
After replacing the capacitor, if your radio still doesn’t remember settings, there are a few common issues to check. First, re-verify the polarity of the installed capacitor. If it’s an electrolytic capacitor and it was installed backward, it won’t work correctly and might even be damaged.
Ensure the negative lead (usually marked) is in the correct position as per the original.
Inspect your solder joints carefully. A cold solder joint or a bridge between two connections can prevent the capacitor from functioning or cause other problems. Gently try to wiggle the capacitor to ensure it’s firmly attached.
Sometimes, a seemingly good solder joint might not be making proper electrical contact.
Another possibility is that the original capacitor wasn’t the only problem. The constant power wire that feeds the radio might have a loose connection somewhere in the car’s wiring harness, or the ACC (Accessory) power fuse might be slightly corroded or not making good contact. Checking these external power sources can rule out issues beyond the radio itself.
Understanding ACC Power For Your Radio
Accessory (ACC) power is a crucial concept when discussing your Car Radio Capacitor: Keep ACC Power Longer. In your car’s electrical system, different circuits are powered when you turn the ignition key to different positions. The ACC position is designed to power accessories like the radio, power windows, and cigarette lighter when the engine isn’t running but you want some basic functions.
The key here is that ACC power is typically controlled by the ignition switch. When you turn the key to ACC, power flows to the radio. When you turn the key off, this ACC power is cut.
This is precisely why a capacitor is needed; it acts as a bridge to maintain power to the radio’s memory even when the ACC circuit is no longer active.
Understanding ACC power helps explain why your radio settings reset. The radio’s main power comes from the battery constantly (often labeled as B+ or Battery), which is needed to “wake up” the unit. However, the ACC wire is what tells the radio to turn on and use its features.
When ACC power is lost, the capacitor must step in to preserve settings.
The Role Of ACC Power
Accessory (ACC) power is a fundamental part of your car’s electrical setup. When you turn your ignition key to the ACC position, a specific set of circuits receives electrical current. This allows you to use features like your car radio, adjust power mirrors, or charge your phone without having the engine running.
It’s a convenience feature that provides power to non-essential systems when the vehicle is not in full operation mode.
For your car radio, the ACC wire is usually the trigger that turns the unit on and enables its display and audio functions. The main battery wire (often labeled B+) provides the constant power needed for the radio’s internal memory and clock to keep running, especially through the Car Radio Capacitor: Keep ACC Power Longer function. When the ignition is turned off, the ACC wire loses its power, but the capacitor should maintain enough residual charge to keep the memory alive.
If the ACC wire itself has a problem, such as a loose connection or a blown fuse, the radio will not receive the signal to turn on when the key is in the ACC position. While the capacitor can help retain settings, it cannot power the entire radio unit. Therefore, both a stable connection to the battery wire and a functional ACC trigger are essential for normal radio operation.
ACC Power And Radio Settings
The connection between ACC power and your radio’s settings is direct and essential. When you turn your car off, the ACC power supply to the radio is cut. If the Car Radio Capacitor: Keep ACC Power Longer is functioning correctly, it will have stored enough energy from the constant battery power to keep the radio’s internal memory powered.
This memory holds your presets, clock, equalizer settings, and any other personalized configurations.
If the capacitor is degraded or faulty, it will not hold sufficient charge. As a result, as soon as the ACC power is removed, the memory chips will lose power, and all your settings will be erased. You’ll be greeted with a factory reset every time you start your car.
This is a clear indicator that the capacitor needs attention.
Even if the capacitor is perfect, a faulty ACC circuit can cause problems. If the ACC wire is not properly delivering power to the radio when the key is in the ACC position, the radio may not turn on at all, or it might behave erratically. In such cases, the capacitor’s job of maintaining settings is still relevant, but the initial power-up signal is missing, leading to a situation where settings might still be lost if the constant battery power is also interrupted somehow.
Maintaining ACC Power
Maintaining ACC power for your car radio involves ensuring the electrical path from the ignition switch to the radio remains intact and functional. This begins with the fuse. Your car has a fuse specifically for the accessory circuit, which often powers the radio.
If this fuse blows, it will cut off ACC power, and your radio might not turn on or retain settings even with a good capacitor. Regularly checking and replacing blown fuses is a simple maintenance task.
The ignition switch itself is another point to consider. Over time, the contacts within an ignition switch can become worn or corroded, leading to intermittent or failed ACC power delivery. If you notice other accessories also failing to work in the ACC position, the ignition switch could be the culprit.
Wiring connections are also critical. The wires that carry ACC power to the radio can become loose, damaged, or corroded, especially if the radio has been installed or removed multiple times. Inspecting the wiring harness connected to the back of the radio for any signs of damage or loose connectors is a good preventative measure.
A secure connection ensures a consistent flow of ACC power.
Common Causes Of ACC Power Loss
Several factors can lead to a loss of ACC power for your car radio, directly impacting the effectiveness of your Car Radio Capacitor: Keep ACC Power Longer. The most frequent cause is a blown fuse. Fuses are designed to protect circuits from overcurrent, and when they blow, they interrupt the flow of electricity.
This is a safety mechanism, but it means your radio will temporarily lose ACC power.
Another common issue is a loose or corroded connection in the wiring harness. The wires that supply ACC power to the radio can become dislodged, especially after significant vibrations or if the radio has been installed by someone who didn’t secure the connections properly. Corrosion can build up over time, increasing resistance and impeding the flow of power.
The ignition switch itself can also fail. As you turn the key, different positions activate different circuits. If the contacts within the ignition switch that are responsible for the ACC position become worn or damaged, ACC power may not be delivered to the radio.
This often affects other accessories as well, so it’s a more systemic issue than just a radio problem.
Integration With Aftermarket Radios
When installing an aftermarket radio, the integration of ACC power is handled through the wiring harness adapter specific to your vehicle. These adapters have color-coded wires that correspond to the car’s original wiring and the new radio’s wiring. It’s essential to correctly identify and connect the ACC wire from the vehicle’s harness to the ACC input on the aftermarket radio.
Many aftermarket radios also have a separate wire for controlling an external amplifier (often labeled REM or Remote). This wire also typically receives ACC power, so when the radio turns on, it signals the amplifier to power up. If this connection is missed or incorrect, the amplifier won’t turn on, and you’ll have no sound from your speakers, even though the radio itself might be functioning.
The Car Radio Capacitor: Keep ACC Power Longer feature of the aftermarket radio relies on the same principles. While some units have a small internal capacitor, others might benefit from an external capacitor for longer memory retention, especially if the vehicle’s original ACC circuit is weak or prone to voltage drops. Understanding these connections ensures your new stereo works flawlessly.
When To Seek Professional Help
While many car radio capacitor issues can be resolved with a DIY approach, there are times when it’s best to consult a professional. If you’re not comfortable with soldering or handling delicate electronic components, attempting a repair could lead to further damage. Professionals have the experience, specialized tools, and knowledge to diagnose and fix the problem accurately.
Complex electrical problems within the car’s wiring system can also extend beyond the radio itself. If you suspect issues with the ignition switch, fuses, or the car’s main wiring harness, a qualified auto electrician or car audio specialist can perform a thorough diagnosis. They can trace the electrical pathways and identify the root cause of any power loss issues.
Sometimes, the radio unit itself might have multiple internal failures, making a single capacitor replacement insufficient. In such cases, a professional can assess whether repair is cost-effective or if a new head unit is a better option. They can also ensure the new unit is properly installed and integrated into your car’s electrical system, guaranteeing optimal performance and reliability for your Car Radio Capacitor: Keep ACC Power Longer functionality.
Signs You Need A Professional
If you’ve tried replacing the capacitor yourself and the issue persists, it’s a clear sign you need professional help. This suggests the problem might be more complex than a single faulty component. It could involve damaged traces on the circuit board, a problem with the constant power supply, or a failure in the ignition switch.
Another indicator is if you encounter unfamiliar or complex circuitry within the radio. Modern car radios have intricate multi-layer circuit boards, and attempting repairs without proper knowledge can easily cause irreparable damage. If you’re unsure about identifying components or the correct replacement parts, it’s safer to trust an expert.
If your car’s battery is draining unexpectedly, or if you notice other electrical glitches in your vehicle beyond just the radio losing settings, these could be symptoms of a larger electrical system problem. In such scenarios, a professional auto electrician is equipped to diagnose and resolve these broader issues, which might be indirectly affecting your Car Radio Capacitor: Keep ACC Power Longer.
Professional Diagnosis And Repair
A professional auto electrician or car audio technician can perform a thorough diagnosis of your car’s electrical system. They use specialized diagnostic tools like multimeters and oscilloscopes to test voltage levels, continuity, and signal integrity throughout the circuits. This allows them to pinpoint the exact cause of the problem, whether it’s a faulty component, a bad connection, or a wiring issue.
Their repair process often involves more than just component replacement. They can repair damaged circuit board traces, clean corroded connectors, and ensure all wiring is properly insulated and secured. For car radios, they can often access diagnostic modes or schematics that aren’t readily available to the public, leading to a more precise and effective repair.
When it comes to a Car Radio Capacitor: Keep ACC Power Longer issue, a professional can quickly identify if it’s the capacitor itself or if the problem lies upstream in the ACC power supply or the radio’s power management circuitry. They can also recommend the best replacement parts and ensure they are installed correctly for long-term reliability.
Cost Considerations
The cost of addressing a Car Radio Capacitor: Keep ACC Power Longer issue can vary significantly. A DIY replacement of the capacitor itself is very inexpensive, often costing only a few dollars for the component and a small amount for solder and other consumables if you don’t already have them. The main cost here is your time and effort.
If you decide to take your radio to a professional repair shop, expect to pay for their labor and diagnostic time. Depending on the complexity of the repair and the hourly rates of the technician, this could range from $50 to $150 or more for a simple capacitor replacement. Some shops might charge a flat fee for common repairs.
If the problem turns out to be more extensive, such as a fault in the ignition switch or a more significant wiring issue, the costs will increase. Replacing an ignition switch can cost several hundred dollars depending on the car model. Therefore, understanding the potential scope of the repair helps in budgeting and deciding whether to proceed with professional service.

Frequently Asked Questions
Question: Why does my car radio lose its settings every time I turn off the car?
Answer: This is most commonly caused by a faulty Car Radio Capacitor: Keep ACC Power Longer. This capacitor stores a small amount of power to keep the radio’s memory alive when the main power is cut off. When it degrades, it can no longer hold enough charge.
Question: Can I just ignore the problem of my radio losing settings?
Answer: You can, but it means you’ll have to re-tune your radio and reset the time every time you start your car. It’s an inconvenience that can be easily fixed by replacing the faulty capacitor.
Question: How do I know which capacitor to buy as a replacement?
Answer: You need to identify the original capacitor in your radio. Note its capacitance value (in microfarads, µF) and voltage rating (in volts, V). The replacement capacitor should have the same capacitance and a voltage rating equal to or higher than the original.
Question: Is it safe to solder electronic components inside my car radio?
Answer: Yes, it is safe if you take proper precautions. Always disconnect the car battery first. Use a stable soldering iron, good ventilation, and wear safety glasses.
If you are uncomfortable with soldering, it’s best to seek professional help.
Question: What if replacing the capacitor doesn’t fix the problem?
Answer: If replacing the capacitor doesn’t solve the issue, the problem might be elsewhere. It could be a faulty ACC power wire, a blown fuse, a problem with the ignition switch, or even another component within the radio itself that has failed.
Summary
The Car Radio Capacitor: Keep ACC Power Longer is key to retaining your radio’s settings. When it fails, your presets and clock disappear after the car turns off. Replacing this small part is often a straightforward DIY fix, involving careful desoldering and soldering of a new capacitor.
Ensure you match the original specifications for capacitance and voltage. If the problem persists after replacement, professional help might be needed to diagnose deeper electrical issues.