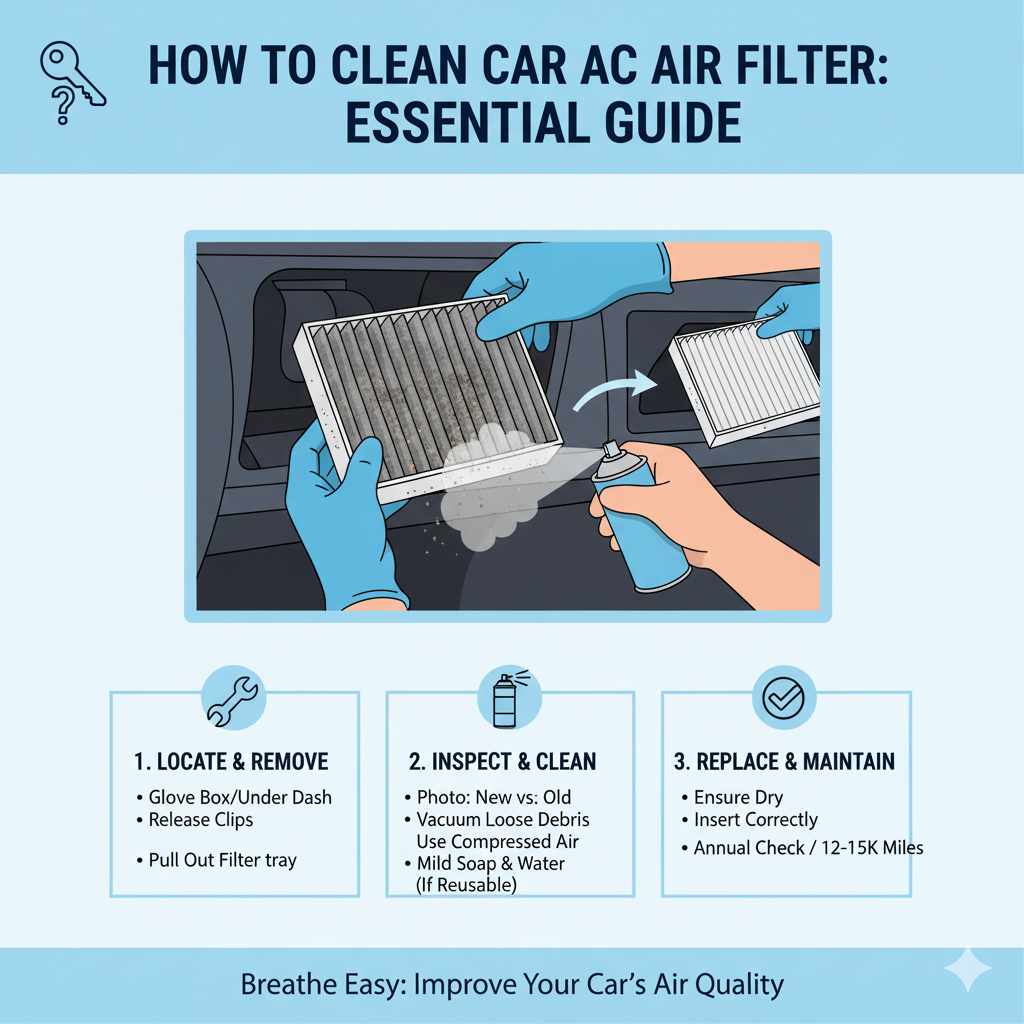
How To Clean Car AC Air Filter: Essential Guide
Cleaning your car’s AC air filter is a simple DIY task that improves air quality and AC performance. You can often do it yourself with basic tools, saving money and ensuring a healthier cabin. Follow these easy steps to get your car’s AC blowing fresh air again.
Ever notice a musty smell when you turn on your car’s air conditioning? Or maybe the airflow just doesn’t feel as strong as it used to? A dirty AC air filter could be the culprit. It’s a common issue that many drivers face, and thankfully, it’s often a simple fix that you can handle right at home. Don’t worry if you’ve never done this before; I’m here to guide you through it. We’ll go step-by-step, making it easy to understand and tackle. By the end, you’ll know exactly how to clean your car’s AC air filter, making your drives more comfortable and your car’s air system run more efficiently. Let’s get your AC breathing easy again!
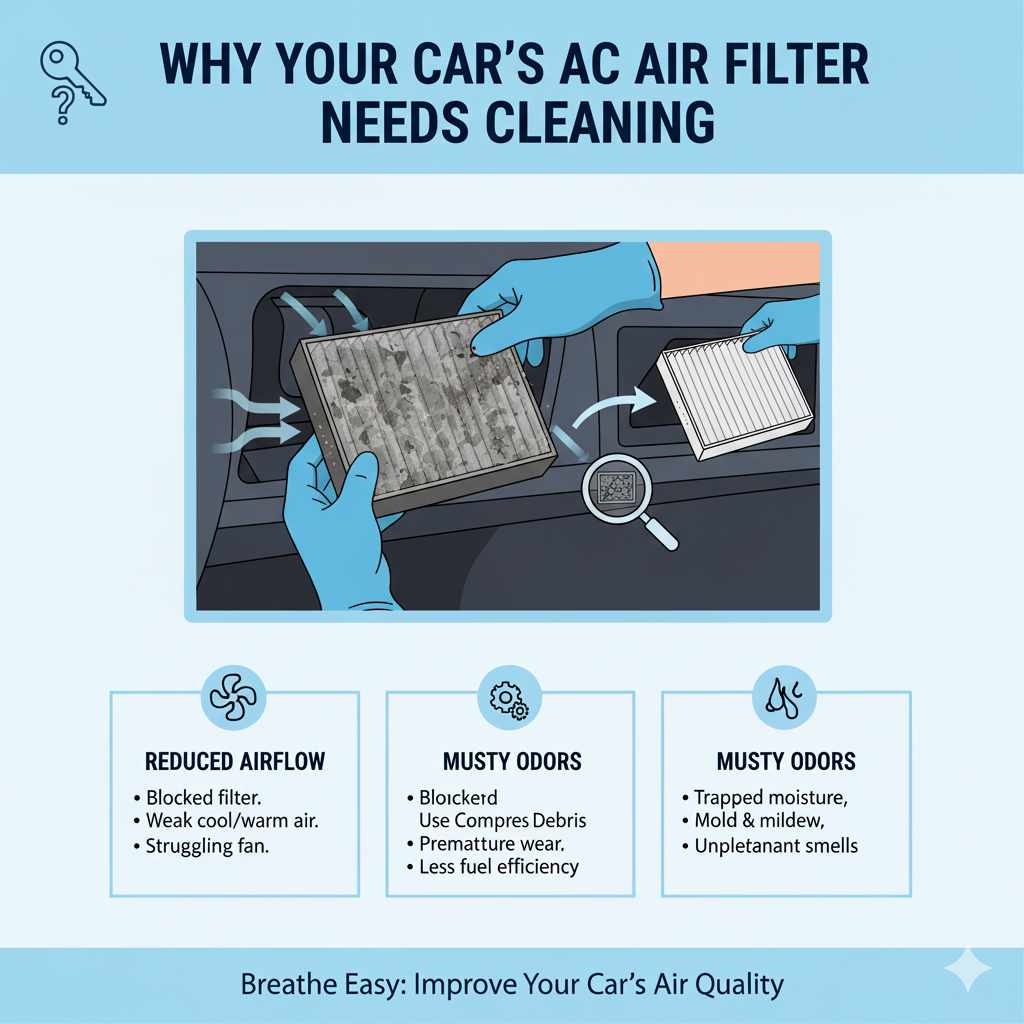
Why Your Car’s AC Air Filter Needs Cleaning
Your car’s AC air filter, also known as a cabin air filter, plays a crucial role in the air you breathe inside your vehicle. Think of it as the lungs of your car’s ventilation system. Its main job is to trap dust, pollen, soot, and other airborne irritants before they enter your car’s cabin. This keeps the air cleaner and healthier for you and your passengers.
Over time, these filters get clogged with debris. When this happens, several things can occur:
- Reduced Airflow: A blocked filter makes it harder for the AC system to push air through, resulting in weaker cool or warm air output.
- Musty Odors: Trapped moisture and debris can lead to mold and mildew growth, causing unpleasant smells.
- Increased Strain on the System: The AC system has to work harder to pull air through a dirty filter, which can lead to premature wear and tear on components.
- Decreased Efficiency: When the system struggles, it uses more energy, potentially impacting your car’s fuel economy.
- Health Concerns: For those with allergies or respiratory issues, a dirty filter can recirculate allergens, worsening symptoms.
Regularly cleaning or replacing your cabin air filter is a simple maintenance task that makes a big difference. It ensures your AC system works at its best and that you’re breathing the cleanest possible air.
When Should You Clean or Replace Your Car AC Air Filter?
Knowing when to act is key to keeping your car’s air system in top shape. There isn’t a single “one size fits all” answer, as it depends on a few factors. However, here are some general guidelines:
General Maintenance Schedule
Most car manufacturers recommend checking or replacing the cabin air filter every 12,000 to 15,000 miles or once a year. Some recommend every 20,000 to 30,000 miles. It’s always best to check your car’s owner’s manual for the specific recommendation for your vehicle model.
Driving Conditions
If you frequently drive in dusty environments, on gravel roads, or in areas with high pollution or pollen counts, your filter will likely clog up much faster. In such conditions, you might need to inspect and clean it more often than the recommended schedule, perhaps every 6 months.
Signs of a Clogged Filter
Pay attention to your car’s performance and air quality. These are often the best indicators:
- Weak Airflow: If the air coming from your vents isn’t as strong as it used to be, even on the highest fan setting.
- Unpleasant Odors: If you notice musty, stale, or even moldy smells when you turn on the AC or fan.
- Frequent Fogging: Windows that fog up more easily, especially on the inside, can sometimes be a sign of reduced airflow from the defroster.
- Allergies Worsening: If you or your passengers start experiencing more sneezing or itchy eyes when inside the car.
Don’t wait for these signs to become severe. A quick inspection can save you from potential problems down the road. For many filters, cleaning can be a temporary solution if it’s not too dirty. However, if the filter is heavily soiled or damaged, replacement is usually the better and more effective option.
Can You Clean a Car AC Air Filter?
How To Clean Car AC Air Filter
- Disposable Filters: These are the most common type in modern vehicles. They are typically made of paper-like or pleated synthetic material. These filters are designed to be replaced, not cleaned. Attempting to clean them often damages the delicate filter media, reducing its effectiveness. If you have a disposable filter, your best bet is to replace it with a new one.
- Washable/Reusable Filters: Less common, but they do exist, especially in older vehicles or aftermarket performance filters. These are usually made from sturdier materials like cotton gauze or foam. These are designed to be cleaned and reused multiple times.
For the purpose of this guide, we’ll focus on how to clean a filter if yours is a washable type. If you discover you have a disposable filter, don’t worry – replacing it is just as straightforward, and I’ll touch on that too!
Tools and Materials You’ll Need
Before you start, gather everything you need. Having your tools ready makes the process smooth and efficient. For cleaning a washable cabin air filter, you’ll typically need:
- Your car’s owner’s manual (to locate the filter)
- Screwdriver (Phillips or flathead, depending on your car)
- Pliers (sometimes needed to release clips)
- Vacuum cleaner with a brush attachment (for initial debris removal)
- Mild soap or a specialized filter cleaner
- Water source (hose or faucet)
- Clean cloth or towels
- The washable cabin air filter itself
For Replacing a Disposable Filter:
How To Clean Car AC Air Filter
- Your car’s owner’s manual
- Screwdriver or pliers (if needed)
- A new, compatible cabin air filter
Step-by-Step Guide: How to Clean Your Car’s AC Air Filter
Ready to get started? Cleaning a washable cabin air filter is quite manageable. If you have a disposable one, you’ll follow steps 1-3 and then install a new one. Let’s break it down:
Step 1: Locate Your Cabin Air Filter
This is the most crucial first step, and it varies by car model. The cabin air filter is usually located behind the glove box, under the dashboard, or sometimes under the hood near the firewall.
- Check Your Owner’s Manual: This is your best friend for this step. It will show you exactly where the filter is and how to access it, often with diagrams.
-
Common Locations:
- Behind the Glove Box: This is the most frequent spot. You’ll often need to open the glove box and then release it from its hinges or remove a housing cover.
- Under the Dashboard: Less common, but sometimes it’s accessible by removing a panel on the passenger side.
- Under the Hood: In some vehicles, you might need to access it from the engine bay side, near the windshield wipers.
Step 2: Access the Filter
Once you know where it is, you’ll need to get to it. This often involves releasing some clips, screws, or simply opening up a compartment.
- Glove Box Access: For filters behind the glove box, after opening it, you might need to squeeze the sides to drop it down, or there might be a plastic cover to unscrew or unclip. Be gentle; plastic can become brittle over time.
- Other Access Panels: If it’s elsewhere, you might need a screwdriver to remove screws holding a panel in place. Keep the screws safe in a small container.
Step 3: Remove the Old Filter
With the access panel open, you should see the cabin air filter. It usually slides out or is held in place by clips.
- Note the Airflow Direction: Before pulling the filter out, look for an arrow indicating the direction of airflow. This is extremely important for reinstalling it correctly. Take a photo with your phone if you’re unsure.
- Carefully Remove: Gently slide or pull the filter out. Be prepared for some dust or debris to fall. It’s a good idea to lay down a towel or newspaper underneath.
- Inspect the Filter: Now’s your chance to see how dirty it is! If it’s visibly covered in dirt, leaves, or the pleats are heavily packed, it’s either time for a cleaning (if washable) or replacement.
Step 4: Clean the Washable Filter (If Applicable)
If you have a washable filter, this is where you’ll clean it. If yours is disposable, skip to Step 5a (Replacing the Filter).
- Initial Dust Removal: First, take the filter outside and gently tap it to dislodge loose dirt. You can also use a vacuum cleaner with a brush attachment to carefully go over the pleats.
-
Washing the Filter:
- Prepare a cleaning solution: Mix a small amount of mild soap or a specialized cleaner with water.
- Submerge and Rinse: Gently submerge the filter in the solution and swish it around. Work on one side, then the other. Rinse thoroughly with clean water. Make sure all soap residue is gone.
- Avoid High Pressure: Do not use a pressure washer or high-pressure hose, as this can damage the filter material.
-
Drying the Filter: This is a critical step. The filter must be completely dry before reinstalling.
- Shake off excess water.
- Let it air dry completely. This might take several hours or even overnight, depending on humidity. You can place it in a sunny spot if possible.
- Do NOT use heat guns or hair dryers, as this can warp or damage the filter.
Step 5a: Install a New Filter (For Disposable Filters)
If you have a disposable filter, this is the point where you’ll insert a brand-new one. This is the recommended approach for most mainstream vehicles.
- Purchase the Correct Filter: Ensure you have a new cabin air filter that matches your car’s make, model, and year.
- Check Airflow Arrow: Locate the airflow direction arrow on your new filter.
- Insert the New Filter: Slide the new filter into place, making sure the airflow arrow points in the correct direction (as noted in Step 3 or shown in your owner’s manual). It should fit snugly without being forced.
Step 5b: Reinstall the Cleaned Filter (For Washable Filters)
Once your washable filter is thoroughly dry, it’s time to put it back.
- Check for Damage: Give it a final visual inspection to ensure it’s in good condition and completely dry.
- Install with Airflow Direction: Carefully slide the cleaned and dried filter back into its housing, ensuring the airflow arrow is pointing in the correct direction.
Step 6: Reassemble the Components
Now, reverse the process you used to access the filter.
- Replace Covers and Panels: Secure any covers or panels you removed. If you unscrewed anything, reattach the screws. If the glove box was detached, rehang it or reassemble it.
- Listen for Clicks: Make sure all clips snap back into place and everything feels secure.
Step 7: Test Your AC System
Start your car and turn on the AC. Test it at different fan speeds and settings.
- Check Airflow: You should feel a noticeable improvement in airflow from the vents.
- Check for Odors: The musty smell should be gone. If it persists strongly, the AC system might have other issues, or the filter might have been only part of the problem.
Congratulations! You’ve successfully cleaned or replaced your car’s AC air filter. This is a fantastic step towards maintaining your vehicle and ensuring a pleasant driving environment.
| Task | Frequency Recommendation | DIY Difficulty | Estimated Time | Cost Range |
|---|---|---|---|---|
| Clean Washable Cabin Air Filter | Every 6 months or as needed | Easy | 30-60 minutes | $0 – $10 for cleaner |
| Replace Disposable Cabin Air Filter | Every 12,000-15,000 miles or annually | Easy | 15-30 minutes | $20 – $60 for filter |
Choosing the Right Cabin Air Filter
If you’re replacing your filter, choosing the right one is important. Here’s a quick rundown of what to consider:
Types of Cabin Air Filters
- Standard/Pleated Paper Filters: These are the most common and affordable. They do a good job of trapping general dust and debris.
- Activated Carbon Filters: These filters have a layer of activated carbon designed to absorb odors and gases, making them great for areas with pollution or for people sensitive to smells. They are usually a bit more expensive.
- HEPA Filters: High-Efficiency Particulate Air (HEPA) filters are designed to capture very small particles, including allergens, mold spores, and bacteria. They offer the highest level of air purification but can sometimes restrict airflow more than other types, and they are the most expensive.
Where to Buy
You can purchase cabin air filters from:
- Auto Parts Stores: Both local chains and independent shops. Provide your car’s make, model, and year.
- Online Retailers: Websites like Amazon, eBay, or specialized auto parts online stores.
- New Car Dealerships: Often the most expensive option, but guaranteed to be the exact OEM (Original Equipment Manufacturer) part.
Tip for Online Purchases
When buying online, always double-check the part number and compatibility for your specific vehicle. Many websites have a “fitment guide” where you enter your car’s details to find the correct part.
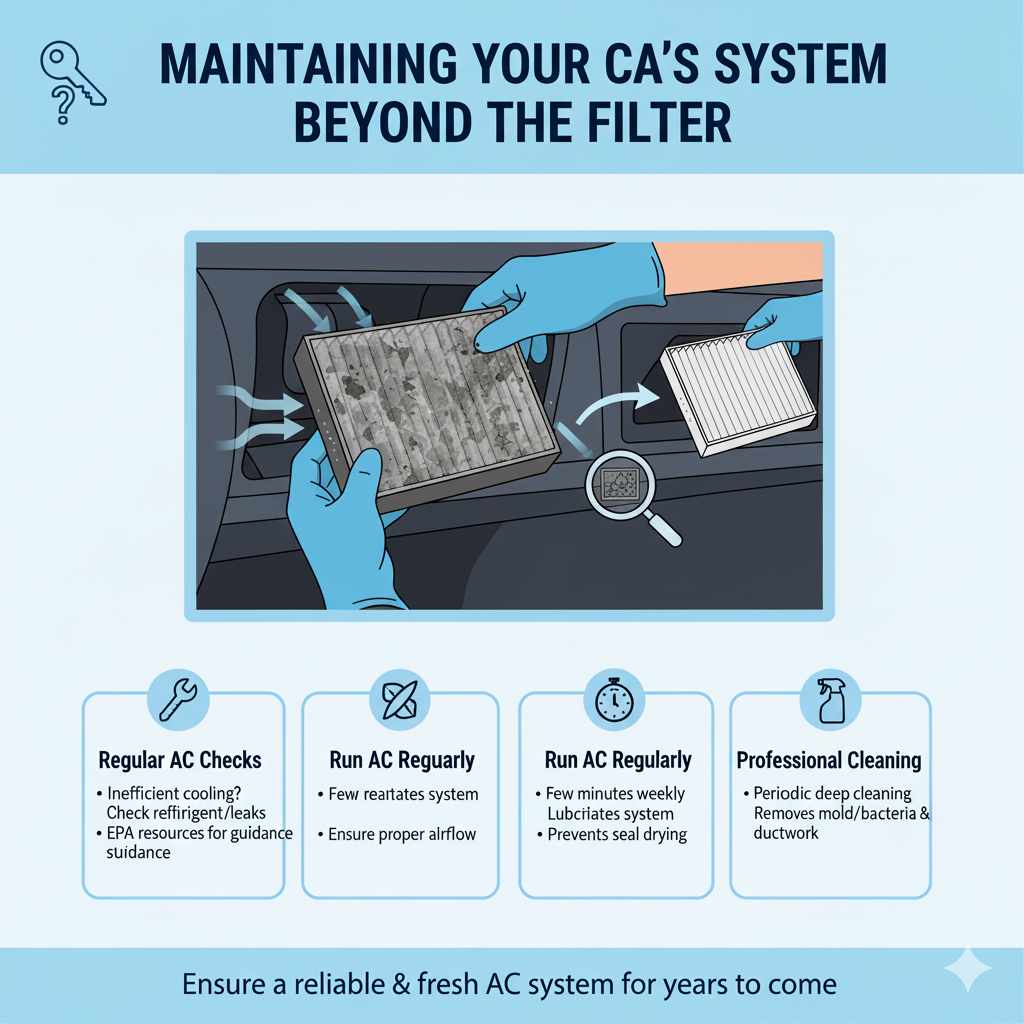
Maintaining Your Car’s AC System Beyond the Filter
While the cabin air filter is a key component, a healthy AC system relies on more. Here are a few additional tips:
- Regular AC Checks: If your AC isn’t cooling efficiently even with a clean filter, it might need a professional check for refrigerant levels or leaks. You can find resources on AC system maintenance from organizations like the U.S. Environmental Protection Agency (EPA), which oversees refrigerants and their environmental impact.
- Run the AC Regularly: Even in cooler months, run your AC for a few minutes each week. This helps keep the system lubricated and seals from drying out.
- Clean the Exterior Vents: Ensure the vents on the outside of your car (where air is drawn into the system) aren’t blocked by leaves or debris.
- Consider Professional Cleaning: Periodically, you might want to have your car’s entire AC system professionally cleaned. This can remove mold and bacteria from the evaporator core and ductwork the cabin filter doesn’t reach.
Taking these extra steps can help ensure your car’s air conditioning system remains reliable and provides clean, fresh air for years to come.
Frequently Asked Questions (FAQ)
Q1: How often should I really check my car’s AC air filter?
It’s a good idea to visually inspect your cabin air filter every 6 months. As a rule of thumb, plan to replace or clean it annually, or more often if you drive in dusty conditions or notice decreased airflow or odors.
Q2: Can I use a regular household air filter in my car?
No. Car cabin air filters are specifically designed to fit your vehicle’s AC system dimensions and airflow requirements. Household filters are too large and do not fit properly, which can cause damage or reduce effectiveness.
Q3: My cabin air filter looks really dirty. Can I just wash it with a hose?
For paper-based disposable filters, washing will destroy them. If you have a washable filter, you should use mild soap and water, and avoid high-pressure washing, which can damage the filter material.
Q4: The air still smells after I changed the filter. What else could it be?
A persistent smell might indicate mold or mildew in other parts of the AC system, like the evaporator core or ductwork. It could also be that the filter wasn’t the source of the odor, or the new filter hasn’t fully cleared the smell yet. Consider a professional AC system cleaning if the smell continues.
Q5: How do I know if my cabin air filter is washable or disposable?
The best way to know is to check your car’s owner’s manual. If that’s not clear, when you locate and remove the filter, its material will tell you. Disposable filters are usually made of a paper-like or fibrous material that cannot be washed. Washable filters are typically made of sturdier, mesh-like materials or foam that can withstand gentle washing.
Q6: Is it worth buying an expensive cabin air filter?
It depends on your priorities. Standard filters are effective for basic filtration. Filters with activated carbon are better for odor control, and HEPA filters offer the highest level of particle filtration. If you have allergies or live in a highly polluted area, the extra cost for a premium filter might be worth it for improved air quality and comfort.
Q7: Can I drive my car without a cabin air filter?
While you can drive without one, it’s not recommended for long periods. The filter protects your AC system’s evaporator and blower motor from debris, and more importantly, it keeps the air you breathe inside your car cleaner. Driving without it will allow dust, leaves, and other particles to enter your car and potentially damage your AC components.
Conclusion
Taking care of your car’s AC air filter is a straightforward piece of maintenance that pays off significantly. Whether you’re cleaning a reusable filter or replacing a disposable one, the process is definitely within reach for any car owner. You’ve learned where to find it, what tools you might need, and the step-by-step process to get it done. Remember, a clean filter means better air quality for you and your passengers, a more efficient AC system, and potentially longer life for your car’s components.
Don’t let that musty smell or weak airflow linger. Give your car the little bit of attention it needs, and enjoy fresher, cooler (or warmer!) air on every drive. You’ve got this!