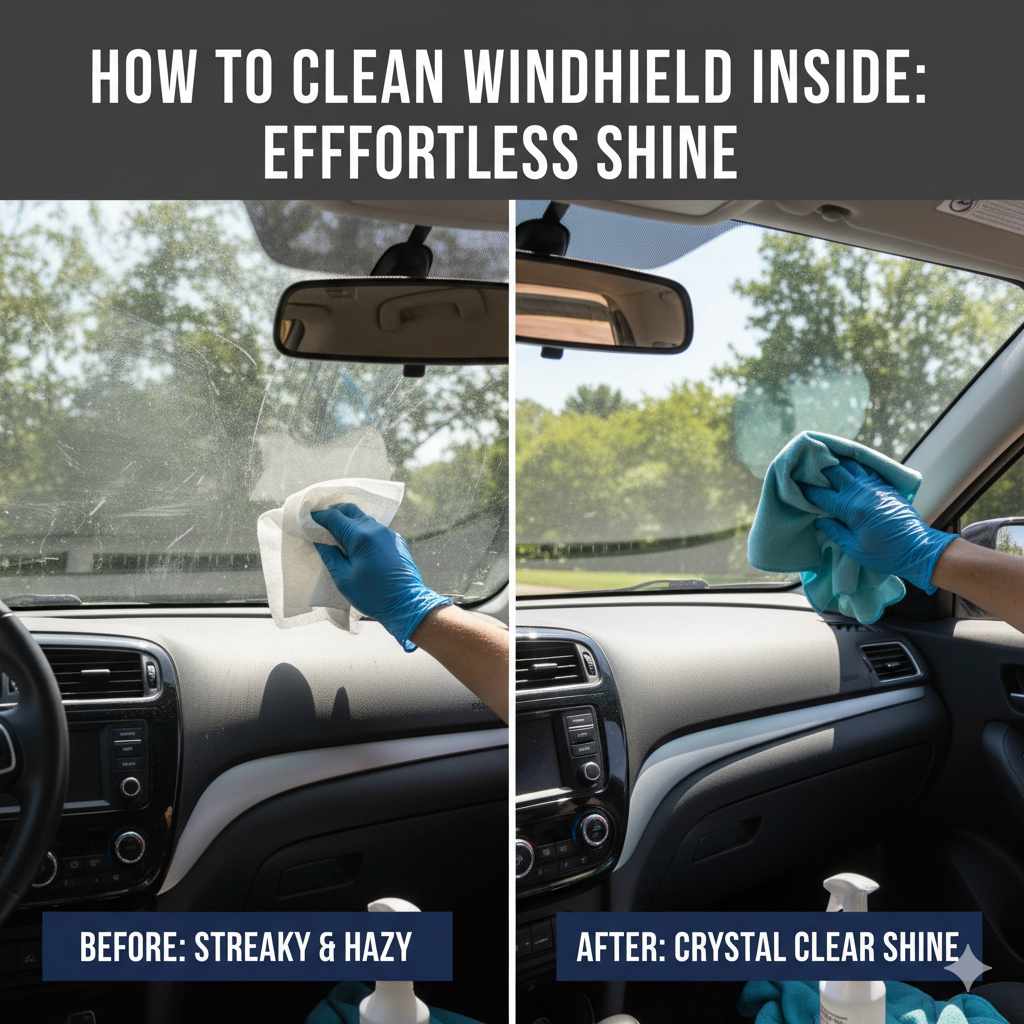
How to Clean Windshield Inside: Effortless Shine
To clean the inside of your car windshield for an effortless shine, gather a few simple supplies and follow these easy steps: spray a glass cleaner onto a microfiber cloth (not directly on the glass), wipe in a consistent pattern, and buff dry with a separate clean cloth. This method prevents streaks and haze, ensuring clear visibility.
Ever squinted through your windshield, frustrated by smudges and a foggy film that just won’t budge? You’re not alone. Cleaning the inside of your car’s windshield is one of those tasks that seems simple, but getting it streak-free and crystal clear can be surprisingly tricky. Those stubborn hazy spots aren’t just annoying; they can actually reduce your visibility, especially at night or in bright sunlight, which impacts your safety on the road.
But don’t worry, it doesn’t take a professional detailer or a secret product to achieve that flawless, effortless shine. With a few common household items and a straightforward method, you can tackle this common car care challenge confidently. Let’s walk through how to make your windshield inside sparkle and shine, improving both your view and your driving experience!
Why Cleaning Your Inside Windshield Matters
Keeping the inside of your windshield clean is more than just about aesthetics; it’s crucial for safe driving. A clean windshield ensures maximum visibility, allowing you to see pedestrians, other vehicles, road signs, and potential hazards clearly.
- Safety First: Reduced glare and clear vision are paramount for safe driving. Smudges and haze can refract light, creating distracting or blinding glare, especially from headlights at night or the sun during the day.
- Improved Driving Experience: There’s a definite sense of calm and control when you have a clear view of the road ahead. It makes your commute more pleasant and less stressful.
- Preventing Buildup: The inside of your windshield can accumulate a cocktail of grime, including dust, fingerprints, residue from air fresheners or vinyl protectants, and even nicotine films for smokers. Regular cleaning prevents this buildup from becoming deeply ingrained and harder to remove.
- Maintaining Resale Value: A well-maintained interior, including a spotless windshield, contributes to the overall appearance of your car, which can be a factor when selling or trading it in.
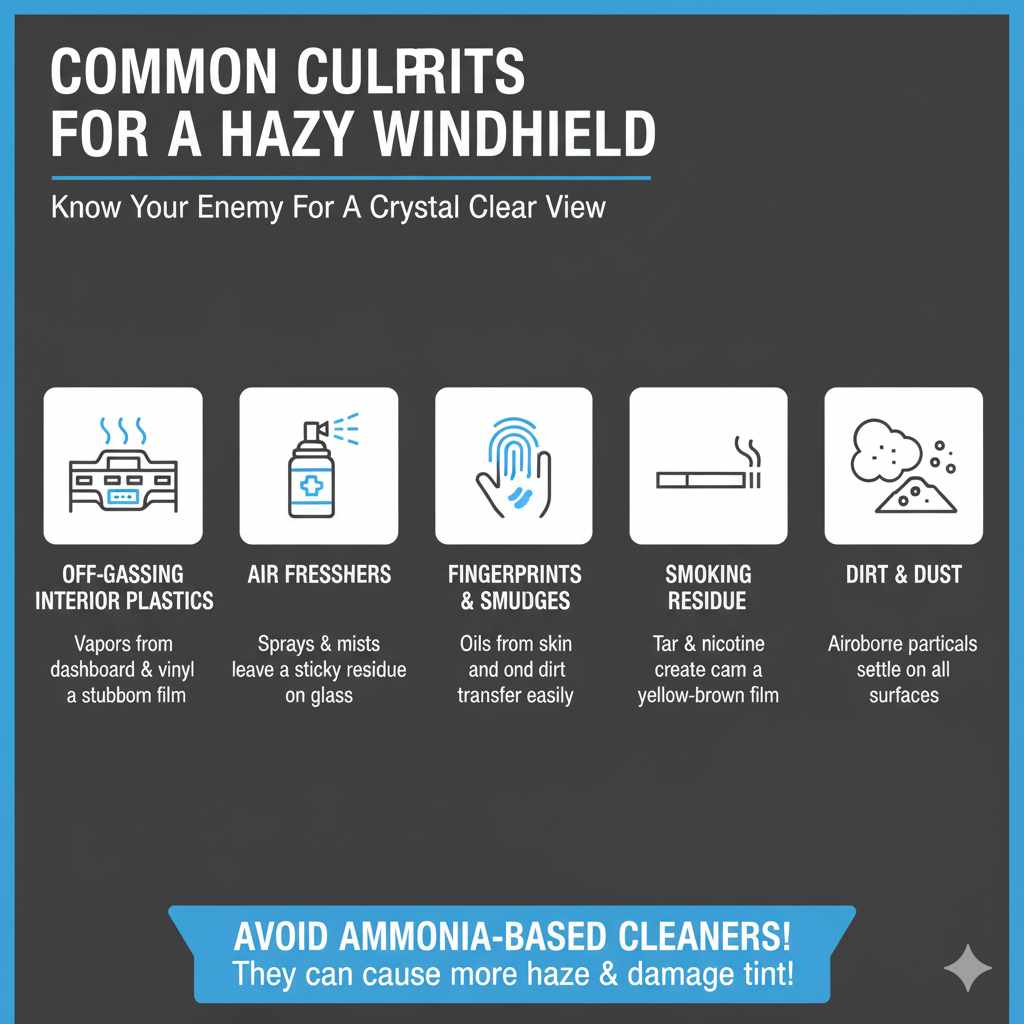
Common Culprits for a Hazy Windshield
Before we dive into the cleaning process, it’s helpful to understand what causes that frustrating haze on the inside of your windshield. Knowing the enemy helps you fight it more effectively.
- Off-Gassing from Interior Plastics and Vinyl: Heat inside your car can cause dashboard and other plastic components to release vapors. These vapors settle on the windshield and bond with the glass surface, creating a stubborn film. This is particularly common in newer cars or after using certain interior protectant products.
- Residue from Air Fresheners: Many air fresheners, especially aerosol or spray types, leave a fine mist that can settle on glass surfaces, contributing to a hazy appearance over time.
- Fingerprints and Smudges: Natural oils from our skin, along with dirt and grime picked up from our hands, are frequent visitors to your windshield.
- Smoking Residue: If you or passengers smoke in the car, the tar and nicotine particles will adhere to all interior surfaces, including the windshield, creating a yellow or brown film.
- Dirt and Dust: Airborne dust and dirt find their way into every crevice of your car, and the windshield is no exception.
- Improper Cleaning Products: Using household cleaners like Windex (which often contains ammonia) can sometimes cause more harm than good. Ammonia can damage tinted windows (if you have them) and can also cause hazing when it evaporates too quickly.
Tools and Supplies You’ll Need
You don’t need fancy equipment. Most of these items you likely already have around the house or can easily pick up at an auto parts store or even your local grocery store.
| Item | Description & Why You Need It |
|---|---|
| Two Microfiber Cloths | These are essential. Microfiber is highly absorbent and gentle, trapping dirt and grime effectively without scratching. One cloth for cleaning, one for buffing. |
| Automotive Glass Cleaner | Look for a cleaner specifically designed for car glass. Ammonia-free is ideal, especially if you have window tint. It’s formulated to break down automotive grime without damaging surfaces or leaving streaks. |
| Spray Bottle (Optional) | If your glass cleaner doesn’t come in a spray bottle, decant it into one. This allows for a controlled application. You can also mix your own solutions here (see below). |
| Rubbing Alcohol (Isopropyl Alcohol) | Can be mixed with water for a powerful streak-free solution, especially for removing stubborn films. A concentration of 70% isopropyl alcohol is common. |
| White Vinegar | A natural and effective degreaser and cleaner. Excellent for cutting through greasy films. Ensure it’s white vinegar, not apple cider or other colored vinegars. |
| Clean Water | Distilled water is best to avoid mineral deposits that can cause streaks and spots, especially if you have hard tap water. |
| Paper Towels (Use Sparingly or Not at All) | While they can be used, they are prone to leaving lint behind on the glass. Microfiber is superior. If you must use paper towels, choose high-quality, lint-free ones. |
| Detailing Brushes or Cotton Swabs (Optional) | Helpful for cleaning tight spots like the edges of the windshield where it meets the dashboard. |
DIY Glass Cleaner Recipes
If you want to go the DIY route or want to avoid store-bought chemicals, here are a couple of effective recipes. Remember to use distilled water for the best results.
Recipe 1: The Classic Vinegar Solution
- 1 part White Vinegar
- 1 part Distilled Water
Mix these in a clean spray bottle and shake gently. This is great for cutting through greasy films and general grime.
Recipe 2: The Alcohol Boost
- 1/4 cup Rubbing Alcohol (70% Isopropyl)
- 1/4 cup White Vinegar
- 1 tablespoon Cornstarch (optional, acts as a mild abrasive and helps prevent streaks)
- 2 cups Distilled Water
Mix all ingredients in a spray bottle. Shake well before each use, especially if you include cornstarch, as it can settle. Alcohol evaporates quickly, helping to prevent streaks.
Step-by-Step Guide: How to Clean Your Inside Windshield
Follow these simple steps for a truly spotless interior windshield. The key is patience and a systematic approach.
Step 1: Prepare Your Vehicle
Before spraying anything, take a moment to prepare. This prevents unnecessary mess and ensures you can reach all areas easily.
- Park in a Shaded Area: Direct sunlight can cause cleaning solutions to dry too quickly on the glass, leading to streaks and making your job harder. A shaded spot or doing this task early in the morning or late in the evening is ideal.
- Remove Obstacles: Take off any dashboard items, sun visors, or air fresheners that might get in your way.
- Protect Your Dashboard: Place an old towel or microfiber cloth on your dashboard to catch any drips. This is especially important if you’re using a strong DIY cleaner or if your dashboard is made of delicate material.
Step 2: Apply the Cleaner
This is where many people make a mistake. Never spray cleaner directly onto the glass. Spray it onto your cleaning cloth instead.
- Spray the Cloth: Lightly mist one of your clean microfiber cloths with your chosen glass cleaner (either store-bought or DIY). You want the cloth to be damp, not soaking wet.
- Why the Cloth? Spraying directly onto the glass can cause the cleaner to run down and potentially drip onto sensitive dashboard materials, leaving behind residue or even damage. It also makes it harder to control the amount of cleaner used, increasing the chance of streaks.
If you’re using a DIY cornstarch-based cleaner, give the spray bottle a good shake before spraying the cloth to ensure the cornstarch is evenly distributed.
Step 3: Wipe the Windshield (The Right Way!)
Consistency is key here to avoid missed spots and streaks. Think of it like painting or mopping.
- Start at the Top: Begin at the top edge of the windshield, on the driver’s side.
- Wipe in Sections: Work your way down the windshield, wiping in consistent, overlapping strokes. A good pattern is to wipe horizontally from left to right, then move down slightly and wipe horizontally from right to left. Continue this back-and-forth motion, overlapping each pass.
- Focus on Edges: Pay special attention to the edges where the windshield meets the dashboard and pillars. Use the edge of your cloth or a detailing brush/cotton swab to get into these crevices.
- Flip and Refold: As the cloth picks up dirt, refold it to expose a clean section. Once one side of the cloth is heavily soiled, switch to the clean side or grab your second cloth.
Step 4: Buff for a Streak-Free Shine
This is the crucial second half of achieving that effortless shine.
- Use a Dry Cloth: Take your second, completely dry microfiber cloth.
- Buff Immediately: While the glass is still slightly damp from the cleaner, begin buffing the windshield with the dry cloth.
- Use Similar Strokes: Again, work in a consistent pattern (horizontal or vertical strokes can work well here) to ensure you cover the entire surface and don’t miss any areas. Buffing helps to remove any remaining moisture and cleaner residue that could cause hazing or streaks.
- Check Your Work: Look at the windshield from different angles, both inside and outside the car, to spot any missed areas or streaks. Gently buff them out with the dry cloth.
Step 5: Clean the Wiper Blades (Optional but Recommended)
Dirty wiper blades can re-smear the clean glass the next time you use them. A quick clean can make a big difference.
- Lift your wiper blades away from the windshield.
- Use a damp microfiber cloth (you can use a bit of leftover glass cleaner or soapy water) to wipe down the rubber blade.
- Dry them with a clean part of your buffing cloth.
Tips for an Even Better Clean
Want to take your interior windshield cleaning from good to great? Here are some expert tips.
- Clean in Stages: If your windshield is extremely dirty, you might need to repeat the cleaning and buffing process. Don’t try to tackle heavy grime in one pass.
- Address Stubborn Spots: For really baked-on grime or sticky residue, a gentle glass cleaner should do the trick. If it’s still not budging, you can try a small amount of denatured alcohol or a dedicated automotive tar and bug remover (use sparingly and ensure it’s safe for glass). Always test in an inconspicuous area first.
- The “Secret” for Certain Smudges: Some people swear by a light application of car wax on the outside of the windshield to repel water spots. For the inside, a product like Chemical Guys All Clean APC, used according to directions, can help break down tough residues without residue. (Note: Always read product labels carefully and use as directed).
- Don’t Forget the Edges: The area where the windshield meets the dashboard can be a hotspot for dust and grime. A detailing brush or even an old toothbrush can help dislodge this before you do your main wipe-down.
- Regular Maintenance: A quick wipe-down with a clean, dry microfiber cloth every week or two can prevent heavy buildup from forming in the first place.
- Be Mindful of Window Tint: If your car has tinted windows, always use ammonia-free glass cleaners. Ammonia can damage and break down the tint over time, causing cloudiness and peeling.
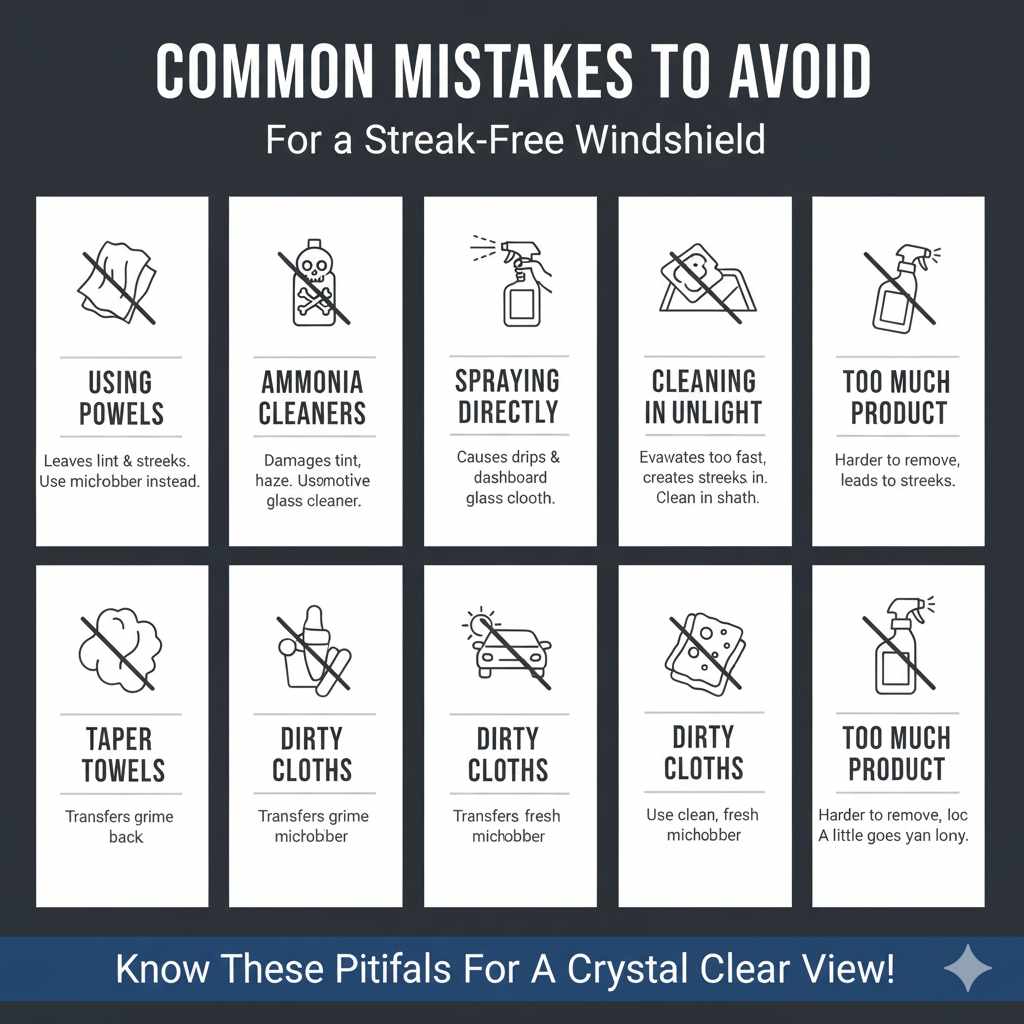
Common Mistakes to Avoid
Even with the best intentions, some common mistakes can lead to frustration and a less-than-perfect result. Be aware of these:
- Using Paper Towels: As mentioned, paper towels often leave lint residue, which is just as annoying as streaks. Stick with microfiber for excellent results.
- Using Household Cleaners with Ammonia: These can damage window tint and leave streaks on automotive glass.
- Spraying Cleaner Directly on the Glass: This can lead to drips, streaks, and potential damage to your dashboard.
- Cleaning in Direct Sunlight: The sun heats the glass and causes the cleaner to evaporate too quickly, making streaks inevitable.
- Using Dirty Cleaner or Buffing Cloths: Always use clean, freshly laundered microfiber towels. Grime on the cloth will just be transferred back to the glass.
- Too Much Product: Over-applying cleaner can make it harder to remove entirely, leading to streaks. A slightly damp cloth is usually sufficient.
Frequently Asked Questions (FAQ)
Q1: How often should I clean the inside of my car windshield?
A1: For optimal visibility and to prevent stubborn buildup, aim to clean your interior windshield at least once a month. If you’re a smoker or use many air fresheners, you might need to do it more often.
Q2: Can I use Windex to clean my car’s windshield?
A2: It’s best to avoid Windex or other household cleaners containing ammonia. Ammonia can damage window tint and often leaves streaks on automotive glass. Look for ammonia-free automotive glass cleaners or use one of the DIY recipes provided.
Q3: Why am I still seeing streaks after cleaning?
A3: Streaks are usually caused by the cleaner drying too quickly, using a dirty cloth, or not buffing thoroughly. Ensure you’re cleaning in the shade, using clean microfiber cloths, and buffing immediately with a dry cloth using a consistent pattern.
Q4: What’s the best way to clean the corners and edges of the windshield?
A4: These tight spots can be tricky. Use the edge of your microfiber cloth and refold it often. For very hard-to-reach areas, a detailing brush, an old toothbrush, or even cotton swabs (Q-tips) can help dislodge dirt before wiping.
Q5: Is distilled water really necessary for cleaning the windshield?
A5: While not strictly essential for all cleaning solutions (like a vinegar/water mix), using distilled water is highly recommended, especially when mixing your own potent cleaners or in areas with hard tap water. It contains no minerals, dramatically reducing the chance of water spots and streaks left behind as the cleaner evaporates. You can find distilled water at most grocery stores.
Q6: How can I remove the hazy film from my dashboard off-gassing?
A6: This is a common cause of haziness. A good automotive glass cleaner, especially one with a bit of alcohol or vinegar, should break it down. You might need to repeat the cleaning process a couple of times and ensure you’re buffing thoroughly with a dry cloth. For persistent haze, some detailers recommend a light application of a dedicated interior cleaner, followed by a thorough buffing, but always test in a small area first.
Q7: Can I clean the inside of my windshield while it’s raining?
A7: Yes, if you park in a garage or under a covered area, rain provides a perfect opportunity to clean your windshield without worrying about direct sunlight. The humidity in the air can also sometimes help prevent cleaners from drying too quickly.
Conclusion
Cleaning the inside of your car’s windshield doesn’t have to be a chore that leaves you with frustrating streaks and hazy views. By understanding the causes of smudges and following a simple, systematic approach with the right tools, you can achieve a sparkling, crystal-clear finish. Remember to always work in the shade, spray your cleaner onto a microfiber cloth rather than the glass, and utilize the power of a second, dry microfiber cloth for buffing. With these easy steps, you’ll not only improve the look of your car’s interior but, more importantly, ensure your driving safety by maximizing your visibility. So, grab your supplies and give your windshield the shine it deserves – you’ll see the difference immediately!