
Top Rated 5 How to Discharge a Car Ac System
“Discharging” a car A/C system means refrigerant must be recovered with approved equipment before any repair; you can safely replace parts at home only after the system is empty, and vacuum evacuation still requires a vacuum pump and gauges. Venting refrigerant can trigger fines, harm the environment, and damage system parts. This guide explains legal recovery, DIY-safe steps, and when to stop for a shop evacuation and recharge.
What discharge means here


In automotive A/C work, recovery, evacuation, and recharge are generally treated as separate jobs. Refrigerant moves through the evaporator, compressor, and condenser, so opening the system without controlling pressure can release pressurized gas and oil mist. The right process depends on what you plan to remove, repair, or refill.
Refrigerant types vary by vehicle. Modern systems may use R134a or R1234yf, and many vehicles switched to R-1234yf since about 2017. Older systems used R-12. Check the vehicle label or owner’s manual before you do anything else.
Discharge versus recovery
In practical terms, discharge means the system no longer contains usable refrigerant for service. Recovery is the legal way to remove that refrigerant with an A/C recovery machine and store it in a sealed recovery tank. Venting to air is not a substitute, and U.S. federal law prohibits deliberate venting.
That matters because a “zero pressure” gauge reading does not prove the system is safe to open in every case. It only tells you the pressure at the moment of the reading. It does not prove the system is empty, leak-free, or ready for a new compressor seal, hose, or condenser.
Why evacuation is different from venting
Evacuation removes air and moisture after the system has been opened and repaired. Evacuation typically uses a vacuum pump and manifold gauge set. That is not the same thing as dumping refrigerant to the atmosphere. A vacuum pump pulls pressure down; it does not recover refrigerant into a tank.
A common first-timer mistake is to treat “vacuum held” as proof that refrigerant was removed legally. It proves only that the system can hold a vacuum for the test period. It does not prove the refrigerant was recovered properly before the repair started.
What zero pressure does and does not tell you
Zero on the gauge is one checkpoint, not the finish line. A vacuum-based removal example says to wait until the pressure gauge reaches 0 PSI, but the next step still depends on the repair, the refrigerant type, and whether the system held vacuum afterward. If pressure returns, there is still a leak or trapped refrigerant.
Suppose the low side reads 0 PSI after shutdown, but the high side still shows residual pressure. That means the system is not fully equalized. Stop there and verify the setup before loosening any line or port.
Can you do this at home?
Yes, but only for the parts that do not require refrigerant to be released. You can replace accessible parts at home once the system has been recovered with the proper equipment, and you can recharge after repairs if the system is sealed and you can verify pressure and leak status. If the system still contains refrigerant, stop.
When a simple recharge is still on the table
A simple recharge plan makes sense only after the system has been repaired, evacuated, and checked for leaks. If the A/C was already opened and the refrigerant is gone, you are not “discharging” it again. You are moving from repair to evacuation and then to recharge.
The recharge step is where the correct refrigerant type matters most. Use the exact refrigerant specified for the vehicle. Do not mix R134a and R1234yf. If the label is missing or unclear, stop and verify the system specification before proceeding.
When compressor or line replacement changes the job
Compressor replacement, line replacement, condenser replacement, and seal replacement all change the work from a quick top-off to a repair job. Those parts sit in the sealed circuit, so the system must be recovered before opening it. After assembly, you still need evacuation before recharge so air and moisture do not stay inside.
Picture a car with a failed compressor clutch and a line that must come off at the firewall. That job is not a “spray and charge” fix. It is recover, open, repair, evacuate, then recharge.
When a leak means stop and repair first
If the system leaked down on its own, a recharge without repair only buys time. Refrigerant loss usually points to a leak somewhere in the circuit. Adding gas to a leaking system can waste refrigerant, cost money, and leave the original fault untouched.
Do not keep charging a system that will not hold pressure. A vacuum pump can help with evacuation, but it cannot seal a hole. If vacuum does not hold, the system needs leak repair before any recharge.
Can I DIY this AC job?
| Symptom | System state | Required equipment | Legal risk | Recommended action |
|---|---|---|---|---|
| Compressor replacement planned | System still may contain refrigerant | A/C recovery machine, recovery tank, manifold gauge set, PPE | High if you vent refrigerant | Stop until refrigerant is recovered by approved equipment or a licensed technician |
| Leaking system with poor cooling | May be low on charge or empty | Gauge set, leak repair parts, vacuum pump, PPE | High if you add refrigerant without repair | Repair the leak first, then evacuate and recharge to the proper specification |
| Simple recharge planning | System already recovered and repaired | Manifold gauge set, vacuum pump, correct refrigerant, PPE | Moderate if refrigerant type is wrong | Verify the refrigerant type, evacuate the system, confirm it holds vacuum, then recharge |
| Gauge reads 0 PSI after shutdown | Residual pressure may still exist elsewhere in the circuit | Manifold gauge set | Moderate | Do not assume the system is empty; check both sides and the service procedure before opening lines |
| System will not hold vacuum | Leak or open connection likely remains | Vacuum pump, manifold gauge set | Low if you stop and inspect | Find the leak, fix it, and repeat evacuation before recharge |
What tools do you need?
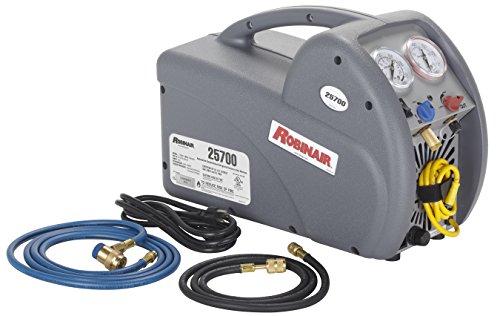
The basic tools depend on whether you are recovering refrigerant, evacuating the system, or checking pressure before recharge. A manifold gauge set shows low-side and high-side pressure through blue, red, and yellow hoses. A vacuum pump removes air and moisture after repair. An A/C recovery machine captures refrigerant into a recovery tank.
Manifold gauge set and service ports
The low-pressure service port is usually near the compressor, and it may be labeled L or LP. The high-pressure service port is marked H. Placement varies by vehicle, so do not guess by hose color or part location alone. Use the service port labels and the vehicle manual.
The manifold set connects through the low and high sides so you can monitor pressure correctly. The low side tells you what the suction circuit is doing. The high side tells you what the discharge side is doing. Together, they help verify whether the system is empty, recovering, or ready for evacuation.
Recovery machine and recovery tank
An A/C recovery machine is used to capture refrigerant safely and move it into a recovery tank. The tank must stay sealed and properly labeled. This is the compliant way to remove refrigerant before opening the system, and it is preferred over venting.
Do not substitute a vacuum pump for recovery. A vacuum pump is for evacuation, not refrigerant capture. If refrigerant is still in the lines, use recovery equipment first or stop and let a licensed technician handle it.
Vacuum pump and PPE
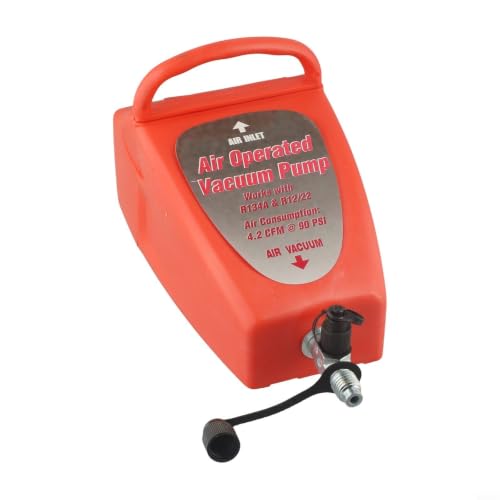
A vacuum pump helps pull air and moisture from the repaired system. A pump should have a minimum 5 CFM rating, recommends a deep vacuum under 500 microns, and says to let the pump run for at least 45 minutes. Use the vehicle manual and the pump instructions for the exact procedure.
Wear safety glasses or goggles and gloves. Refrigerant can burn skin and cause eye injury. Work in a well-ventilated area, and keep your hands clear of service fittings when pressure is present.
How recovery and evacuation work
Recovery and evacuation happen in sequence, not at the same time. Recovery removes refrigerant into a sealed tank. Evacuation removes air and moisture after the system has been opened and repaired. Recharge comes after that, once the system is closed and ready for the correct refrigerant charge.
Connecting the gauges correctly
- Confirm the refrigerant type listed for the vehicle.
- Attach the blue hose to the low-side port and the red hose to the high-side port.
- Connect the yellow hose to the recovery machine, recovery tank, or vacuum pump, depending on the step.
- Keep the engine off unless the service procedure specifically calls for running it.
- Follow the machine manual and the vehicle manual before opening any valve.
Capturing refrigerant into a sealed tank
When recovery is required, the machine pulls refrigerant from the vehicle and stores it in the recovery tank. That tank must remain sealed. Do not release captured refrigerant. Do not open fittings while the system still shows pressure. If the machine or tank setup is unfamiliar, stop and use the manufacturer’s procedure.
Pulling vacuum before recharge
After repairs, connect the vacuum pump through the manifold set and evacuate the system. One vacuum-based removal example says to wait until the pressure gauge reaches 0 PSI, but a deeper evacuation target is better described in service terms as a deep vacuum under 500 microns when the equipment supports that reading. The important part is that the system must be closed, dry, and leak-free before recharge.
Discharging a car A/C system can take thirty minutes to an hour. That timing can vary by system size, leak condition, and equipment. Do not rush the pump-off step if the system has been open for repair.
What to check before recharge
Before recharge, verify the system is empty of air, sealed, and using the correct refrigerant. A zero reading on one gauge does not finish the job by itself. You still need to know whether the system held vacuum and whether any residual pressure returned after shutdown.
Confirming pressure and leak status
Watch both gauges, not just one. If pressure rises after the pump is off, that suggests a leak or trapped refrigerant. If the system cannot hold vacuum, do not recharge it yet. Find and fix the fault first.
A common first-timer mistake is to recharge the system because the low side “looks empty.” That can hide a leak or an incomplete recovery. The usual order is to verify, repair, evacuate, then recharge.
Why residual pressure matters
Residual pressure can remain in hoses, valves, or the other side of the circuit even when one gauge reads zero. That is why zero pressure does not prove readiness. It only confirms that the line you checked is not showing positive pressure at that moment.
If the service valve is stuck or the system behaves oddly after shutdown, stop before opening the circuit. Stuck valves and mixed pressure readings are not a signal to force a fitting loose.
When not to continue
Do not continue if the system will not hold vacuum, if refrigerant type is unknown, if residual pressure remains after shutdown, or if the recovery setup is not available. Those are all stop points. The safest move is to hand the job to a shop with proper recovery equipment.
That handoff is especially important for systems that still contain refrigerant, or for vehicles that use a refrigerant you cannot identify from the label. The cost of a wrong step can be higher than the cost of the repair.
Frequently asked questions
How to recharge your vehicle ac
Recharge only after the system is repaired, evacuated, and verified to hold vacuum. Use the refrigerant type listed for the vehicle, such as R134a or R1234yf, and do not mix them. If the system will not hold vacuum, stop and fix the leak before adding refrigerant.
Products related to this article
Sponsored / affiliate links. As an Amazon Associate I earn from qualifying purchases. I may earn additional commission from eligible campaigns.