How To Evacuate A Car Ac System With A Vacuum Pump Safely
Safely evacuating a car AC system with a vacuum pump involves removing all air and moisture. This is done before recharging with refrigerant. Proper evacuation ensures the system works efficiently and prevents damage from contaminants like water.
It’s a vital step for long-lasting AC performance.
Understanding AC System Evacuation
Your car’s air conditioning system is a bit like a sealed loop. It has a special gas called refrigerant. This gas moves around to make your car cool.
For this system to work well, it needs to be completely clean inside. It must be free of air and water. Air can make the system weak.
Water can turn into ice. Ice can block small parts. It can also cause rust.
This is where evacuation comes in. It’s like giving the system a deep clean.
A vacuum pump is a tool. It pulls all the air and moisture out of the AC system. Imagine trying to fill a balloon that’s already full of air.
It won’t hold much more. Your AC system is similar. If it has air in it, the refrigerant can’t do its job as well.
It won’t cool as much. Plus, air has moisture. This moisture is bad news for the system’s delicate parts.
The goal is to create a deep vacuum. This means making the pressure inside the system very, very low. Think of it like sucking all the air out of a jar.
When the pressure is super low, any water inside turns into a gas. This gas can then be easily removed by the pump. This process is key.
It makes sure the new refrigerant can work its magic. It also helps protect the expensive parts of your AC.
Why Evacuation is Absolutely Necessary
You might ask, “Why can’t I just add more refrigerant?” Well, it’s more than just adding gas. Think of your car’s AC like a complex recipe. Every ingredient has to be just right.
If you skip a step, the whole dish can be ruined. Adding refrigerant to a system with air or moisture is like adding too much salt. It just won’t taste right, and it can damage the cooking pot.
Here are the main reasons why evacuation is not just a good idea, but a must-do:
- Removes Moisture: This is the big one. Air contains water vapor. When this vapor enters the AC system, it can freeze. Freezing can block tiny passages. It can also mix with the refrigerant oil. This creates an acidic sludge. This sludge eats away at metal parts. It can ruin compressors and other vital components.
- Removes Air: Air is not a refrigerant. When air mixes with refrigerant, it takes up space. This reduces the system’s cooling ability. It makes the compressor work harder. This uses more fuel and can lead to overheating.
- Prevents Corrosion: Moisture and air can cause rust and corrosion inside the system. This weakens metal pipes and seals. Over time, this leads to leaks and system failure.
- Ensures Proper Lubrication: The refrigerant oil is crucial for lubricating the compressor. Moisture in the system can break down this oil. This leads to poor lubrication. It causes premature wear on the compressor.
- Maximizes Cooling Efficiency: A system that is properly evacuated and recharged will cool better. It will use less energy. This means more comfort for you and better gas mileage.
- Protects Against System Failure: Skipping this step is like playing Russian roulette with your car’s AC. You might get lucky once. But eventually, the damage will catch up. This can lead to expensive repairs.
It’s like preparing your body for a healthy meal. You wash the vegetables. You remove any bad spots.
You don’t just throw everything in a pot and hope for the best. The AC system deserves the same care. A clean system is a happy system.
And a happy AC system means a cool you.
My Own AC Scare: A Lesson Learned
I remember one sweltering summer, my car’s AC decided to quit. It was a Friday afternoon, and the temperature was soaring. I was on my way to pick up my kids from camp.
The car felt like a hot box. Panic started to set in. I’m not a mechanic, but I’m good at fixing things around the house.
I thought, “How hard can this be?”
I went online and bought a cheap AC recharge kit. It came with a can of refrigerant and a simple gauge. The instructions looked easy enough.
“Connect, charge, check pressure.” I followed them carefully. I connected the hose to the low-side port. I let some of the magic green stuff into the system.
The gauge showed the pressure went up. I thought I was a genius. For about an hour, I had cool air!
Then, it started to fade. By the time I got home, it was barely blowing cool air. The next day, it was useless.
I took it to a professional shop. The mechanic looked at me with a knowing smile. He hooked up his equipment.
He told me, “You added refrigerant to a system that was low because it had air and moisture in it. You basically diluted the oil and made things worse.”
He explained that the air and moisture had started to damage the compressor. He had to completely drain the system. Then he had to flush it.
After that, he could vacuum it down properly. He then recharged it with the correct amount of refrigerant and oil. It cost me way more than the recharge kit.
It was a hard lesson. Sometimes, the easy way is actually the expensive way. Proper tools and proper steps are crucial.
Especially with something as sensitive as a car’s AC system.
The Tools You’ll Need
Before you can start evacuating your AC system, you need the right gear. Trying to do this without the proper tools is like trying to build a birdhouse with just a hammer. You might get somewhere, but it won’t be pretty or functional.
Here’s a list of what you’ll need:
Essential Tools for AC Evacuation
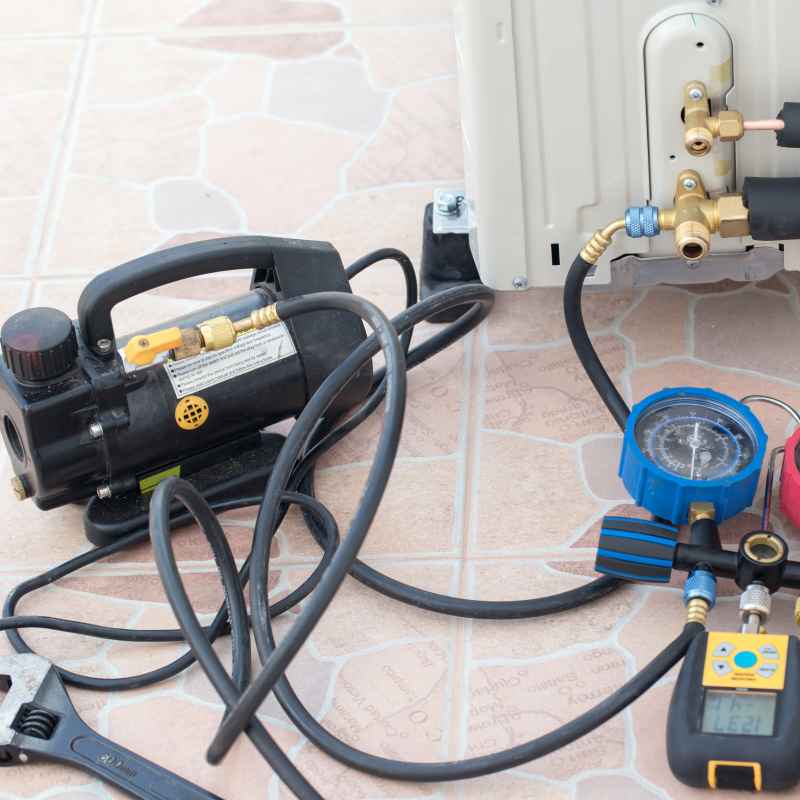
- Vacuum Pump: This is the heart of the operation. You can buy them or rent them from auto parts stores. Look for one that pulls a good vacuum (around 28-29 inches of mercury or 1-200 microns).
- AC Manifold Gauge Set: This tool lets you see the pressure in both the high and low sides of the system. It also connects the pump and refrigerant cans.
- Refrigerant Oil: You’ll need the correct type for your car’s AC system. Check your owner’s manual or the AC system labels.
- Refrigerant: Again, use the correct type specified for your vehicle. Common types are R-134a or R-1234yf.
- Hoses: The gauge set usually comes with hoses. Make sure they are rated for AC service.
- Can Tap: This is used to connect to cans of refrigerant.
- Safety Glasses: Always protect your eyes. AC refrigerants can be harmful.
- Gloves: Protect your skin from refrigerant and oil.
- Rags: For cleaning up any spills.
- Service Manual: A manual for your specific car is a great help. It shows the location of AC ports.
Having these tools ready makes the job much smoother. It also helps ensure you do it right the first time. Don’t skimp on the pump.
A cheap pump might not pull a deep enough vacuum. This means you won’t remove all the moisture. That defeats the whole purpose.
Think of it as an investment in cool air and a healthy car.
Step-by-Step: Evacuating Your Car AC System
Now that you have your tools, let’s walk through the process. Remember, safety first. Always wear your safety gear.
If you are unsure at any point, stop and consult a professional. This is a detailed process. We’ll break it down into simple steps.
1. Prepare the Vehicle
Park your car on a level surface. Turn off the engine. Open the hood.
Locate the AC service ports. These are usually labeled “H” for high pressure and “L” for low pressure. They look like small caps.
You’ll typically find them on the AC lines near the compressor or firewall.
2. Connect the Gauge Set
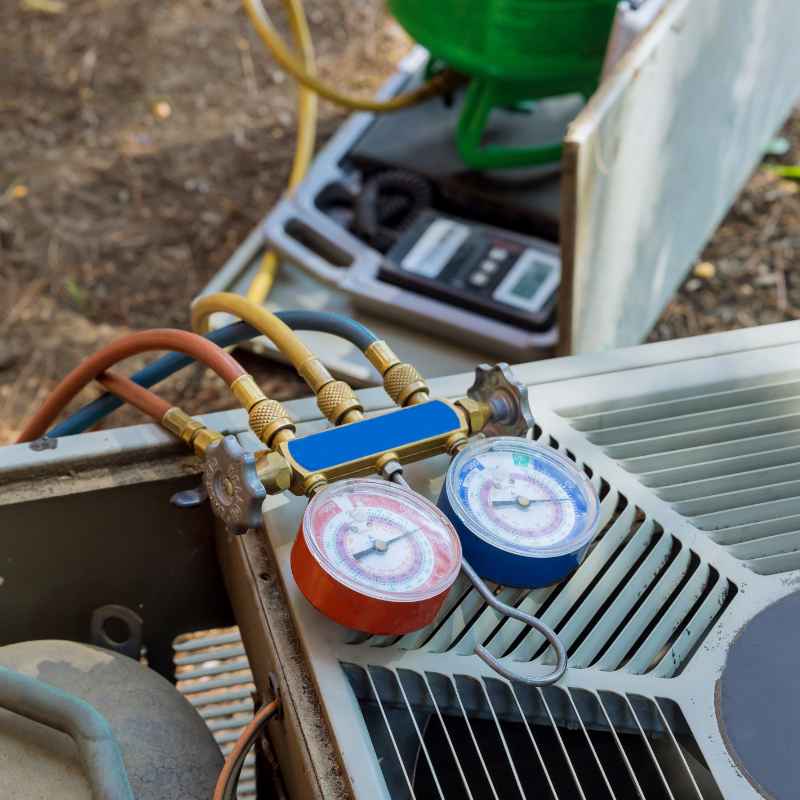
Connect the manifold gauge set to the service ports. The red hose typically connects to the high-pressure port. The blue hose connects to the low-pressure port.
The yellow hose is for connecting to the vacuum pump or the refrigerant. Make sure the connections are snug. But don’t overtighten them.
Leave the service valves on the gauge set closed for now.
3. Connect the Vacuum Pump
Attach the vacuum pump to the yellow hose of the gauge set. If you are using a pump that has a built-in vacuum gauge, that’s great. Otherwise, rely on the gauge set’s readings.
Ensure the pump is in a stable position. You’ll need it to run for a good amount of time.
4. Start the Evacuation Process
Open the service valves on the gauge set that connect to the blue (low-side) and yellow hoses. Make sure the valve connecting to the red (high-side) hose remains closed at this stage. Turn on the vacuum pump.
You should see the low-side gauge start to drop. The high-side gauge will also start to fall. This indicates the pump is pulling air and moisture out of the system.
The goal is to reach a deep vacuum. This is usually around 28 to 29 inches of mercury (inHg). Or, a micron reading of 1000 or lower.
It may take some time to reach this level. This can be anywhere from 15 to 60 minutes. It depends on the size of the system and the pump’s power.
You may see the gauges flicker. This is normal as moisture boils off at low pressure. Let the pump run.
This allows it to pull out as much moisture as possible.
Quick Vacuum Check
- Target Pressure: Aim for 28-29 inHg or 1000 microns.
- Time: Allow 15-60 minutes.
- Observation: Watch gauges for steady drop.
- Boiling Moisture: Expect gauge to fluctuate slightly.
5. The “Soak” or “Static” Test
After reaching the desired vacuum, turn off the vacuum pump. Close the service valves on the gauge set. This isolates the AC system from the pump.
Now, watch the gauges for about 10-15 minutes. The vacuum should hold steady. If the pressure starts to rise significantly, it means there’s a leak in the system.
Or, there’s still a lot of moisture that needs more time to evaporate.
If the pressure rises too much, you might need to find and fix leaks. Or, you may need to run the pump for a longer period. A small rise is sometimes normal.
But a rapid climb means something is wrong. This test is crucial. It confirms that your system is sealed and dry.
6. Adding Refrigerant Oil (If Needed)
Before adding refrigerant, you usually need to add a specific amount of AC oil. Check your service manual for the correct type and quantity. You can add it through the low-side port using a special oil injector.
Or, if you’re using a brand new compressor, it will already have oil. If you’re just topping off a system that lost refrigerant, you may need to add oil.
This step is important for compressor longevity. The oil circulates with the refrigerant. It keeps the moving parts of the compressor lubricated.
Adding the right amount prevents damage. Too little oil causes wear. Too much oil can affect cooling performance.
7. Recharging the System
Once the vacuum holds steady, you’re ready to add refrigerant. Connect the can tap to your refrigerant can. Attach the can tap to the yellow hose of the gauge set.
Make sure the can is upright. Slowly open the valve on the can tap. Open the low-side service valve on the gauge set.
Watch the gauges. The refrigerant will flow into the system. The pressure will rise on the gauges.
Follow the recommended fill levels for your vehicle. This information is often on a sticker under the hood. Or, in your car’s service manual.
Overcharging can be just as bad as undercharging. It can damage the system and reduce cooling. Once the correct amount is in, close the can tap valve and the low-side service valve.
Disconnect the gauge set and pump. Replace the service port caps.
8. Start the Engine and Test
Start your car’s engine. Turn on the AC to its coldest setting and highest fan speed. Let the system run for a few minutes.
Check the vent temperatures. They should be significantly colder than the outside air. Monitor the manifold gauges (if still connected for a quick check).
The low-side pressure should typically be between 25-45 psi. The high-side pressure will vary with ambient temperature. But it should be in a normal range.
Consult your manual for specifics.
A successful evacuation and recharge should result in cold, consistent airflow. If the air isn’t cold, or if the system is making strange noises, there might be another issue. Or, the evacuation wasn’t complete.
Or, the charge is incorrect. It’s time to re-evaluate or call a pro.
Recharging Quick Guide
- Add Oil: Use the correct type and amount.
- Connect Can: Use an upright can.
- Open Valves: Low-side and can tap valve.
- Monitor Gauges: Add refrigerant slowly.
- Fill Correctly: Follow vehicle specifications.
- Close Valves: Remove connections.
- Test System: Check for cold air.
Common Mistakes to Avoid
Even with the right tools and steps, things can go wrong. People often make the same mistakes when working on car AC systems. Being aware of these can save you a lot of hassle and money.
It’s like knowing the common pitfalls when baking a cake. You can avoid them to get a perfect result.
Here are some common errors:
- Not Evacuating Long Enough: This is perhaps the most frequent mistake. People rush the process. They don’t let the pump run long enough. This means moisture and air are left behind. This leads to poor cooling and system damage. Be patient. Deep vacuum takes time.
- Skipping the “Soak” Test: Not letting the system sit under vacuum is a big no-no. This test is essential for detecting leaks. If the vacuum doesn’t hold, you have a problem. Trying to charge a leaky system is a waste of time and money.
- Using the Wrong Type of Refrigerant or Oil: Cars are designed for specific refrigerants (like R-134a or R-1234yf) and oils. Using the wrong type can cause immediate damage. It can also lead to long-term system failure. Always double-check your vehicle’s requirements.
- Overcharging or Undercharging: Too much refrigerant causes high pressures. This strains the compressor and reduces efficiency. Too little refrigerant means the system can’t cool properly. It can also lead to the compressor running too much and overheating. The gauges are there for a reason. Use them.
- Adding Refrigerant to a Leaky System: This is a cycle of problems. A leak means the system will lose refrigerant again. Trying to fix the symptoms without addressing the cause is futile. Find and fix leaks first.
- Ignoring Safety Precautions: Refrigerants can be very cold. They can cause frostbite. They can also be harmful if inhaled. Always wear safety glasses and gloves. Work in a well-ventilated area.
- Using a Cheap/Weak Vacuum Pump: A pump that can’t pull a deep vacuum is useless for AC service. It won’t remove enough moisture. Invest in a decent pump or rent a good one.
Mistakes happen, and that’s okay. The key is to learn from them. If something doesn’t feel right, or if the results aren’t what you expect, it’s always better to stop.
Ask for help or consult a professional. Your car’s AC system is complex. It deserves careful attention.
Real-World Context: When is it Not Just Air?
Sometimes, a car’s AC system acts up for reasons beyond simple air or moisture. Understanding these scenarios helps you diagnose issues better. It’s like knowing when a headache might be just a headache, or something more.
Here are some other factors that can affect your AC performance:
AC System Performance Factors
Blocked Condenser: The condenser is like a radiator for your AC. If it’s blocked by leaves, dirt, or debris, it can’t release heat. This makes the system work harder and cool less effectively.
Cleaning it regularly is a good idea.
Faulty Compressor Clutch: The compressor is the heart of the system. Its clutch engages to turn it on. If the clutch isn’t engaging, the compressor won’t run.
This means no cooling.
Expansion Valve or Orifice Tube Issues: These small parts control refrigerant flow. If they get stuck or blocked, refrigerant can’t move through the system properly. This severely impacts cooling.
Electrical Problems: Fuses, relays, or wiring issues can prevent the AC system from operating. Even if the refrigerant levels are perfect.
Low Refrigerant Charge: While evacuation removes air, if the system starts with very low refrigerant, it needs a full charge. However, if it’s low, it means there’s likely a leak that needs fixing first.
It’s important to remember that an AC system relies on a precise balance of pressures and flow. Anything that disrupts this balance will affect its performance. Evacuation is a critical first step, but it might not be the only fix needed.
What This Means For You: When to Worry
Knowing when your AC system is just a bit off versus when it’s seriously broken is important. A little bit of moisture might not cause immediate failure. But it will degrade performance over time.
And it can lead to bigger problems down the road. It’s like not changing the oil in your car. It might run for a while, but it’s not good for its long-term health.
When is it normal for your AC to need attention? Maybe it’s been a few years. Maybe you notice the cooling isn’t as crisp as it used to be.
This is when you might consider an evacuation and recharge. It’s preventative care.
When should you worry and definitely seek professional help?
- Rapid Loss of Cooling: If your AC suddenly stops blowing cold, it’s a red flag. It could be a major leak or compressor failure.
- Strange Noises: Grinding, squealing, or hissing sounds from the AC system are not good. These often indicate internal damage.
- AC System Freezing Up: If the AC lines or vents freeze over, there’s a serious airflow or pressure problem.
- Compressor Not Engaging: If you don’t hear the AC clutch click and the compressor spin up, there’s an electrical or mechanical issue.
- Persistent Leaks: If you keep finding oily residue around AC fittings, you have a leak. These need to be properly diagnosed and repaired.
A DIY evacuation and recharge can be rewarding. But if you encounter complex issues, don’t hesitate to call a certified technician. They have specialized equipment and knowledge to handle tougher problems.
Sometimes, the best approach is a combination of DIY for the basics and professional help for the complex stuff.
Quick Tips for AC Maintenance
Keeping your car’s AC system in good shape doesn’t always require a vacuum pump. Simple habits can make a big difference. Think of it as maintaining a healthy lifestyle.
Small, consistent efforts pay off.
Simple AC Care Tips
- Run Your AC Regularly: Even in winter, run your AC for a few minutes every week or two. This helps keep seals lubricated and prevents them from drying out.
- Keep the Condenser Clean: Periodically inspect the condenser (the radiator-like part at the front of your car). Gently wash away dirt and debris with a hose. Don’t use high pressure.
- Check for Leaks: Look for oily spots or residue around AC lines and fittings. This often indicates a refrigerant leak.
- Don’t Ignore Poor Cooling: If you notice a drop in performance, address it sooner rather than later. Small issues can become big ones quickly.
- Replace Cabin Air Filter: A clogged cabin air filter restricts airflow. This makes your AC work harder. Replace it according to your car’s maintenance schedule.
These simple steps can help extend the life of your AC system. They also ensure it performs at its best. Regular checks and basic cleaning are easy wins.

Frequently Asked Questions About Car AC Evacuation
You’ve learned a lot about evacuating your car’s AC system. But you might still have some lingering questions. Here are some common ones people ask.
How long does it take to evacuate a car AC system?
It typically takes between 15 to 60 minutes. This depends on the size of the system and the power of your vacuum pump. The key is to reach a deep vacuum and let it hold steady.
Can I recharge my AC without evacuating it?
While you can technically add refrigerant without evacuating, it’s not recommended. Air and moisture left in the system will significantly reduce cooling performance. They can also cause long-term damage to the compressor and other parts.
What happens if I don’t remove all the moisture?
Moisture can freeze in the expansion valve or orifice tube, blocking refrigerant flow. It can also mix with refrigerant oil to create an acid. This acid corrodes internal parts and can lead to system failure.
How do I know if my AC system has a leak?
Signs of a leak include a rapid loss of cooling performance, oily residue around AC fittings, or a hissing sound. A professional can perform a leak test using UV dye or electronic leak detectors.
What is a “deep vacuum” for an AC system?
A deep vacuum means the pressure inside the system is very low. This is typically measured as 28 to 29 inches of mercury (inHg) or below 1000 microns. This low pressure helps to boil off any remaining moisture.
Do I need to add oil every time I recharge the AC?
You only need to add oil if the system has lost a significant amount of refrigerant due to a leak. If it’s a small top-off, the existing oil may be sufficient. Always refer to your service manual or a professional for specific recommendations.
Is it safe to do this myself?
With the right tools, knowledge, and safety precautions, it can be a safe DIY project. However, AC systems contain pressurized refrigerant. Mishandling can lead to injury or environmental damage.
If you’re not comfortable, it’s best to let a professional handle it.
Conclusion: Cool Air Starts With a Clean System
Getting your car’s AC to blow cold again is satisfying. Evacuating the system with a vacuum pump is a crucial step. It ensures your system is free from harmful air and moisture.
This leads to better cooling and longer component life. Remember to be patient, use the right tools, and always prioritize safety. A little effort now can save you a lot of trouble later.
Enjoy your cool ride!