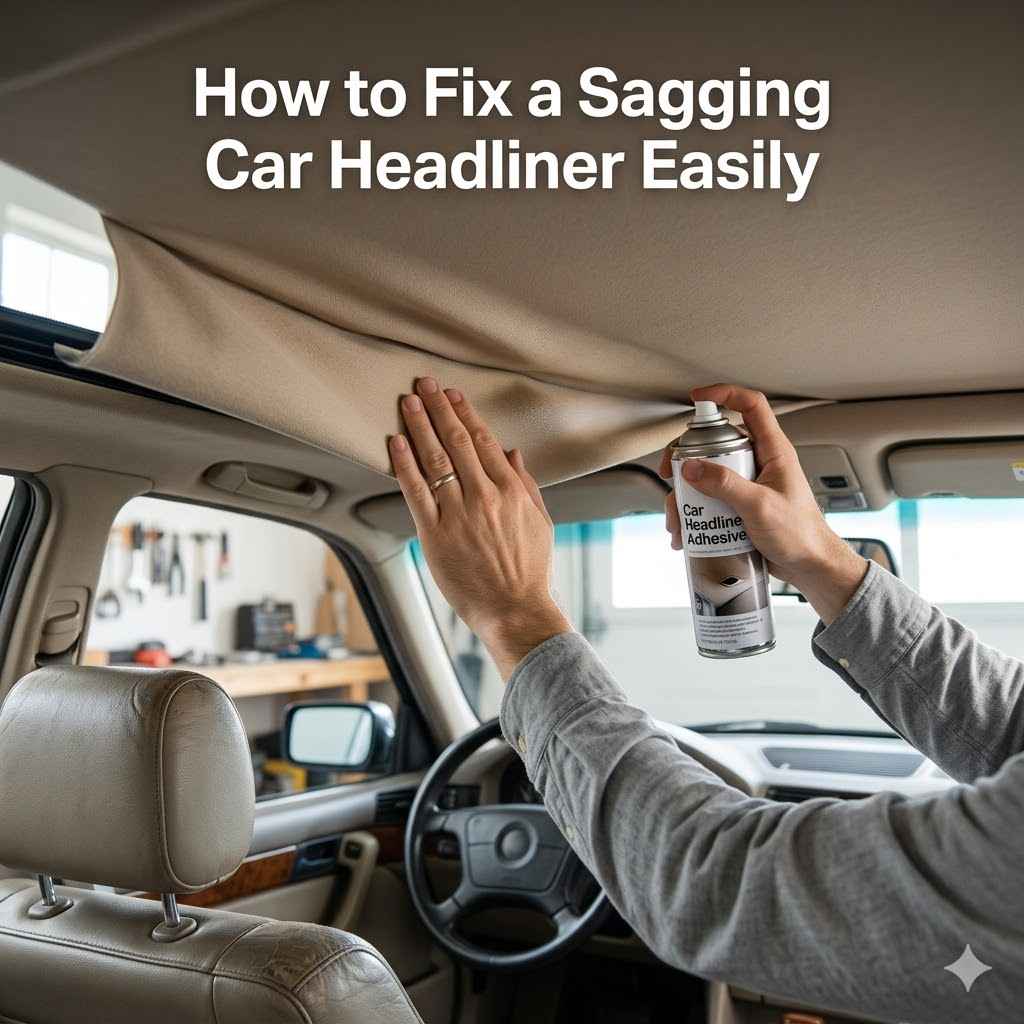
How to Fix a Sagging Car Headliner Easily
Is your car’s ceiling looking a bit droopy? A sagging car headliner is a common issue that can make your ride feel old and worn out. Many folks think fixing it is a big, tough job, especially if you’re new to car repairs.
But guess what? It doesn’t have to be! We’re here to show you exactly How to Fix a Sagging Car Headliner Easily with simple steps anyone can follow.
Get ready to make your car’s interior look great again without a lot of fuss.
Easy Steps How to Fix a Sagging Car Headliner
This section guides you through the entire process of tackling that annoying droopy headliner. We’ll break down what you need and how to use it. You’ll learn about preparing your car and making sure the fix lasts.
This part is all about getting you ready for a successful repair.
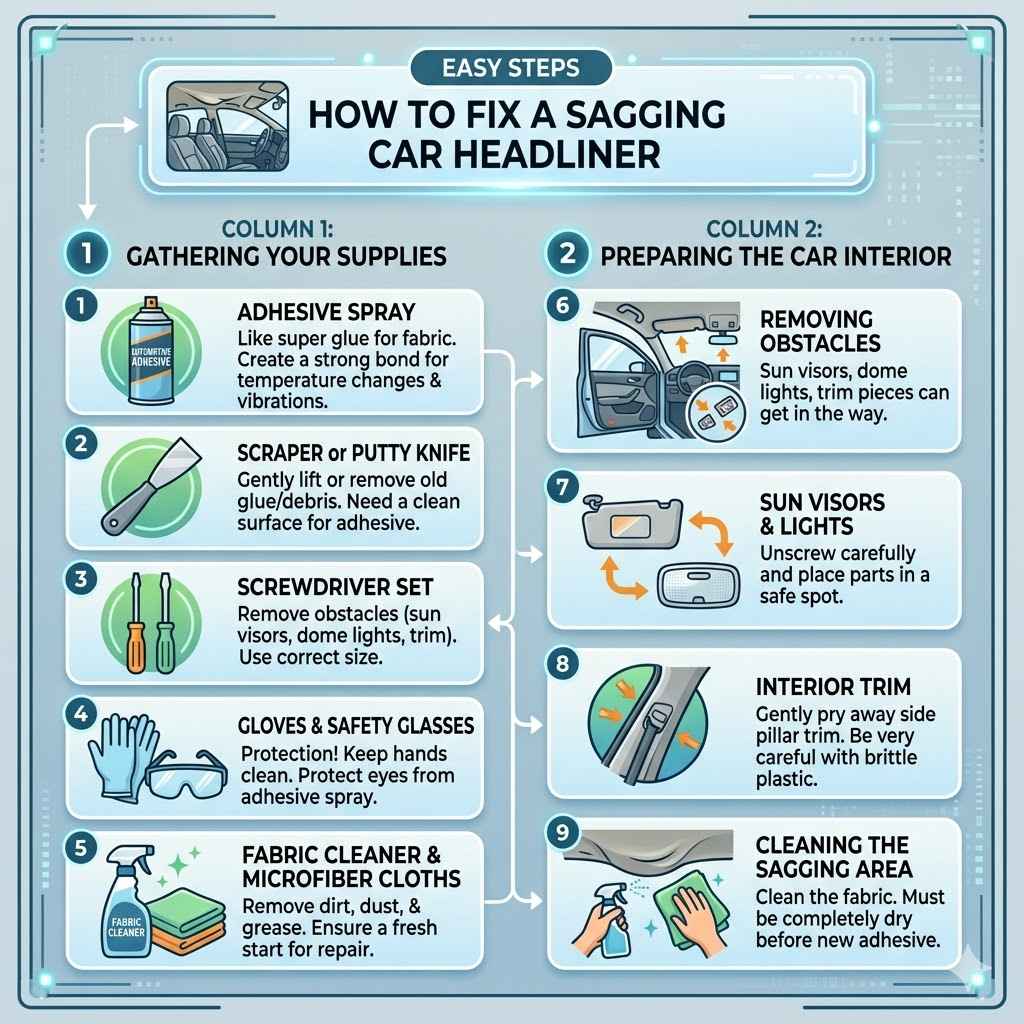
Gathering Your Supplies
Before you start, having the right tools makes everything go smoothly. You don’t need fancy equipment for this job. Think simple, everyday items that you might already have at home or can easily pick up.
Adhesive Spray
Adhesive spray is like super glue for fabric, but it’s designed to hold materials together without making them stiff or crunchy. It comes in aerosol cans, kind of like spray paint. When you spray it, tiny little droplets of sticky stuff shoot out and land on both surfaces you want to join.
This is key for headliners because you need a strong bond that can handle temperature changes and vibrations without failing. There are different types, so choose one specifically made for automotive interiors or upholstery. Some are stronger than others.
Make sure it’s a flexible adhesive so the headliner still feels like fabric, not hard plastic. It should dry clear or match your headliner color if possible to avoid showing through.
Scraper or Putty Knife
A scraper or putty knife is a flat, often metal or plastic, tool with a thin edge. It’s mostly used for gently lifting or removing old glue or debris. You want one that’s not too sharp, so you don’t accidentally tear the headliner material or damage the car’s interior panels.
Think of it as a gentle lever. It helps you carefully pry away any loose bits of old adhesive or foam that might be left behind from the original glue. This step is super important because you need a clean surface for the new adhesive to stick to properly.
A duller, wider scraper is usually best to avoid making holes or rips.
Screwdriver Set
You’ll need a few screwdrivers, probably both Phillips head (the ones with a cross shape) and flathead (the ones with a single slot). These are for removing parts that might be in the way, like sun visors, dome lights, or trim pieces. Cars have lots of screws holding things together.
Using the right size screwdriver prevents stripping the screw heads, which makes them impossible to remove. If a screw is stuck, a little gentle persuasion might be needed, but always try to use the correct tool first. You’ll want a set with various sizes to handle different screws you encounter in your car’s interior.
Gloves and Safety Glasses
These are your protection! Gloves keep your hands clean and protect them from the adhesive. Safety glasses are vital because spray adhesives can sometimes mist or drip unexpectedly, and you don’t want that stuff in your eyes.
It might seem like overkill for a simple repair, but it’s always better to be safe than sorry, especially when working with chemicals. They are inexpensive and make the whole experience safer and more comfortable.
Fabric Cleaner and Microfiber Cloths
You’ll need these to clean the headliner before you start. A good fabric cleaner will remove dirt, dust, and grease that could prevent the new adhesive from sticking. Microfiber cloths are gentle and absorbent, so they won’t leave lint behind.
Cleaning the area ensures a fresh start for the repair. A clean surface is a sticky surface. You want the new glue to bond directly to the headliner material and the car’s frame, not to a layer of grime.
Preparing the Car Interior
Getting your car ready is a crucial step for any repair. It ensures you have enough space to work and protects parts of your car that you aren’t fixing. This preparation makes the actual repair much smoother and cleaner.
Removing Obstacles
Sometimes, things like sun visors, dome lights, or trim pieces can get in the way of your headliner repair. You’ll need to take these out carefully. This gives you better access to the sagging areas and prevents you from accidentally damaging these parts while you work.
Always look for screws or clips holding them in place.
Sun Visors and Lights
Sun visors are usually attached with screws, often hidden under plastic caps. Dome lights might be clipped in or screwed. Gently pry off any plastic covers to reveal the screws.
Unscrew them slowly and place the parts in a safe spot.
Interior Trim
Side pillar trim pieces can sometimes be lifted or gently pried away. Be very careful here, as they can be brittle. Sometimes, they just clip out.
Cleaning the Sagging Area
This is where your fabric cleaner and microfiber cloths come in. You want to clean the area that’s sagging. Dust, dirt, and grease can stop the new glue from sticking well.
Gently wipe down the fabric. Make sure it’s completely dry before you move on. A clean surface is vital for the adhesive to do its job.
It’s important that the fabric is dry. Moisture can interfere with how the adhesive works. Let it air dry completely or gently pat it with a dry microfiber cloth.
How to Fix a Sagging Car Headliner Easily The Adhesive Method
This is the core of our guide. Here, we get into the practical application of fixing that droopy headliner. We’ll explain how to apply the adhesive and reattach the fabric.
This is where you’ll see the most visible results.
Applying the Adhesive Spray
Adhesive spray is your best friend here. It creates a strong bond between the headliner material and the car’s backing. The key is to apply it correctly for a lasting fix.
Protect the Area
Spray adhesives can be messy. Use old newspapers or plastic sheeting to cover your car seats and floor. This prevents overspray from sticking where you don’t want it.
Apply to Both Surfaces (or One)
Check the instructions on your adhesive can. Some sprays require application to both the headliner fabric and the car’s backing board. Others are “one-surface” adhesives.
For headliners, it’s often best to spray the backing board where the fabric has detached. This is because the headliner board is porous and will soak up the adhesive well. You usually want to spray in thin, even coats.
Over-spraying can cause the fabric to get too wet and damage it.
Think about it like painting. You want a light, even coat. Too much in one spot can make the fabric sag even more or create hard, lumpy spots.
You’re aiming for a consistent layer of stickiness.
Allow to Tack Up
Most spray adhesives need a few minutes to become “tacky” before you press the surfaces together. This means it’s not wet anymore, but it’s still very sticky. Check the can for specific drying times.
This tackiness helps create a stronger bond. If you press them together too soon, the adhesive might just spread out thinly and not hold as well. Waiting until it’s just right is a small step that makes a big difference.
Reattaching the Headliner Fabric
Once the adhesive is ready, it’s time to stick the headliner back up. This requires a bit of patience and careful work to get it smooth.
Start from One Edge
Begin at one edge of the sagging area and carefully press the headliner fabric back into place against the adhesive-covered board. Work your way across slowly.
Smooth as You Go
As you press the fabric down, use your hands or a clean, soft cloth to smooth out any wrinkles or bubbles. Gently push the fabric from the center outwards towards the edges. This ensures a nice, flat finish and prevents new sags from forming.
If you see a wrinkle, try to gently lift the fabric just a bit and smooth it again.
Allow to Cure
Once the headliner is reattached, let the adhesive cure fully. This usually takes several hours or even a full day. Avoid touching or putting pressure on the headliner during this time.
The full cure time is important for the strongest possible bond.
Dealing with Stubborn Sagging
Sometimes, a small section might need extra attention. If you have a larger sag or a spot that keeps pulling away, you might need to repeat the adhesive application or use a different method for that specific area.
Repeat Adhesive Application
If a section isn’t holding well, you might need to carefully peel it back and reapply the spray adhesive. Make sure to clean off any old, clumpy glue first. A clean surface is always key.
Use Upholstery Staples (with Caution)
For very stubborn areas, especially along edges where the fabric is tucked, you might consider using a few small upholstery staples. These are tiny metal fasteners that can hold the fabric in place. However, use these very sparingly and in hidden spots if possible, as they can be visible if not placed carefully.
The goal is to use them only if the adhesive isn’t enough.
A small staple gun designed for upholstery is best. You want very fine staples that don’t go too deep. Aim to secure the fabric to the edge of the board where it’s less noticeable.
How to Fix a Sagging Car Headliner With Fabric Repair Kits
Fabric repair kits offer a more specialized approach. They often come with everything you need, including specific adhesives and applicators, designed to make the process even simpler.
What’s In A Typical Kit
These kits are put together for DIYers. They aim to reduce the guesswork involved in selecting the right products.
Specialized Adhesive
The adhesive in these kits is usually formulated for automotive headliner fabrics. It’s designed to be strong, flexible, and resistant to heat and humidity, which are common in car interiors. Some kits might offer an aerosol spray, while others provide a brush-on or even a special applicator pen for precise application.
The goal is a bond that won’t fail over time.
Application Tools
Kits often include plastic spatulas, rollers, or even small brushes. These tools help you spread the adhesive evenly and smooth out the fabric without damaging it. They’re designed to fit into tight spaces and provide better control than just using your hands.
Cleaning Wipes or Solution
Some kits include pre-moistened wipes or a small bottle of cleaning solution to help prepare the surface. This ensures you have the right cleaning agent for your headliner fabric, making the preparation step easier.
Instructions
Clear, step-by-step instructions are a big plus. They often provide diagrams or specific tips for different types of headliner materials and sagging issues. These guides are tailored to the products in the kit.
Using a Fabric Repair Kit
Using a kit is often more straightforward because the components are designed to work together seamlessly.
Read the Kit’s Instructions
Always start by reading the specific instructions that come with your repair kit. Different kits have slightly different methods and recommended drying times.
Prepare the Area As Directed
Follow the kit’s guidance for cleaning and preparing the sagging area. This might involve using their included cleaner or a specific technique.
Apply Adhesive With Provided Tools
Use the spatulas or rollers included in the kit to apply the adhesive. The kit’s tools are designed to help you spread it evenly and smoothly without creating lumps or gaps. Be sure to follow their recommendations on how much to apply and whether to apply to one or both surfaces.
Smooth and Reattach
Gently press the headliner fabric back into place, using the kit’s tools or a clean cloth to smooth out any wrinkles or bubbles. Work from the center outwards.
Allow for Curing
Let the adhesive cure completely according to the kit’s instructions. Patience here is key to a strong, lasting repair.
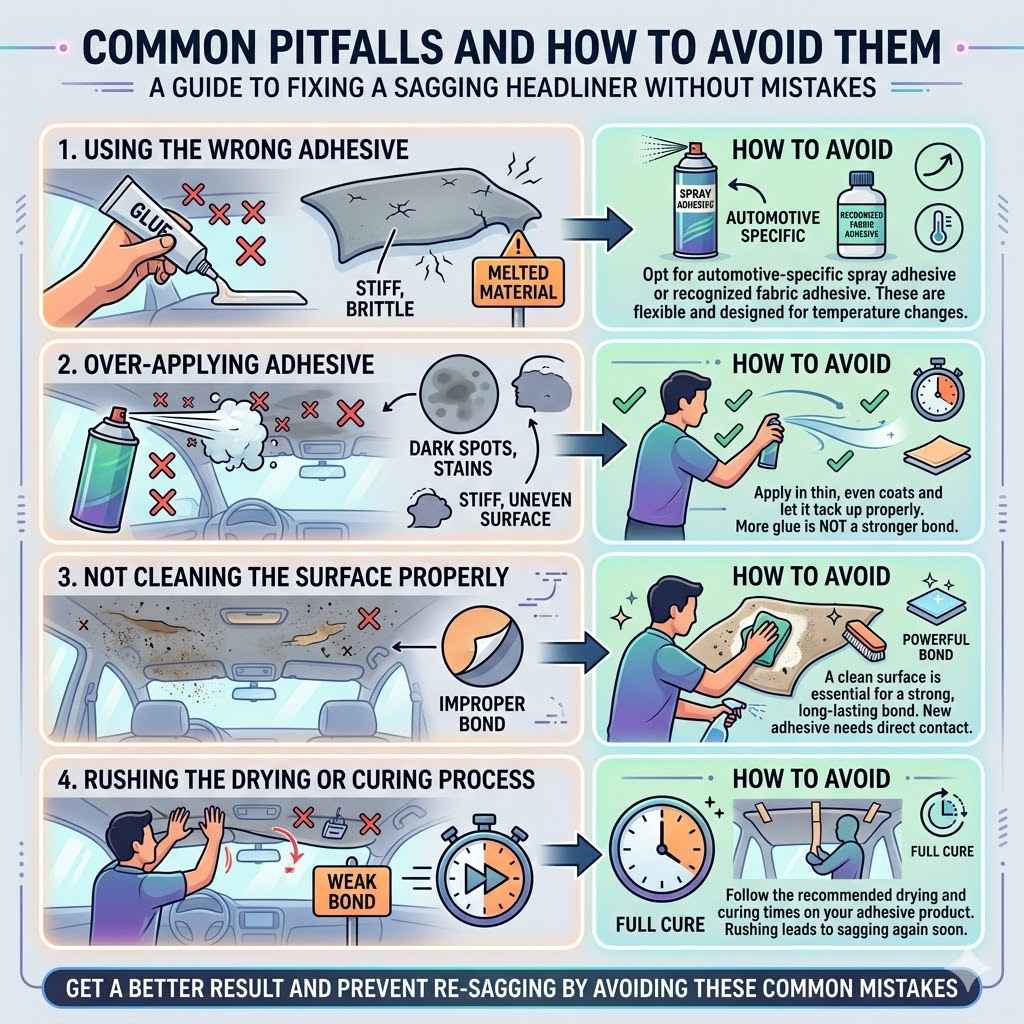
Common Pitfalls and How to Avoid Them
Even with simple instructions, there are a few common mistakes people make when fixing a sagging headliner. Knowing these can help you avoid them and get a better result.
Using the Wrong Adhesive
Not all glues are created equal. Using a craft glue or a super-strong industrial adhesive not meant for fabrics can make the headliner stiff, brittle, or even melt the material. Always opt for an automotive-specific spray adhesive or a recognized fabric adhesive.
These are flexible and designed to withstand temperature changes inside a car.
Over-Applying Adhesive
It might seem like more glue means a stronger bond, but it’s often the opposite. Too much spray adhesive can soak through the fabric, creating dark spots, stains, or a stiff, uneven surface. It can also be harder to spread evenly, leading to lumps.
Apply in thin, even coats and let it tack up properly.
Not Cleaning the Surface Properly
Dirt, dust, grease, or old glue residue on the car’s backing board will prevent the new adhesive from sticking securely. Always clean the area thoroughly. A clean surface is essential for a strong, long-lasting bond.
The new adhesive needs direct contact with the backing material.
Rushing the Drying or Curing Process
Adhesives need time to work. If you press the headliner back into place too soon, or if you put things back on top of it before it’s fully cured, the bond might not be as strong. This can lead to the headliner sagging again sooner rather than later.
Follow the recommended drying and curing times on your adhesive product.
Damaging the Fabric During Removal or Reattachment
Headliner fabric can be delicate. Using sharp tools too aggressively, or pulling too hard, can tear or stretch the material. Be gentle when removing any attached components and when smoothing the fabric back into place.
A plastic scraper is usually safer than a metal one.
Frequently Asked Questions
Question: How long does it take to fix a sagging car headliner?
Answer: The actual repair time, once you have your supplies, is usually between 1 to 3 hours. This includes preparation, applying adhesive, and smoothing the fabric. However, you need to factor in drying and curing time, which can be several hours or overnight.
Question: Can I use regular spray glue from a craft store?
Answer: It’s not recommended. Craft glues might not be flexible enough for car interiors and can become brittle with temperature changes, causing the headliner to sag again. Automotive-specific spray adhesives are best.
Question: What if my headliner fabric is ripped?
Answer: If the fabric is ripped, you’ll need to repair the rip first using fabric glue or a special fabric patch before attempting to reattach the headliner. Sometimes, minor rips can be hidden once the headliner is resecured.
Question: How do I prevent overspray on my car seats?
Answer: Cover your seats and floor with old newspapers or plastic sheeting before you start spraying. Also, spray in short bursts and try to aim the nozzle directly at the area you need to adhere.
Question: Do I need to take the whole headliner out?
Answer: No, usually you only need to detach parts that are in the way, like sun visors or lights. The headliner board itself stays in place.
Summary
Fixing a sagging car headliner is totally doable with a few simple steps. By gathering the right supplies like adhesive spray and cleaning tools, and preparing your car’s interior carefully, you can achieve a great result. You learned how to apply adhesive correctly and reattach the fabric smoothly for a lasting fix.
With a little patience, you can make your car’s interior look new again.