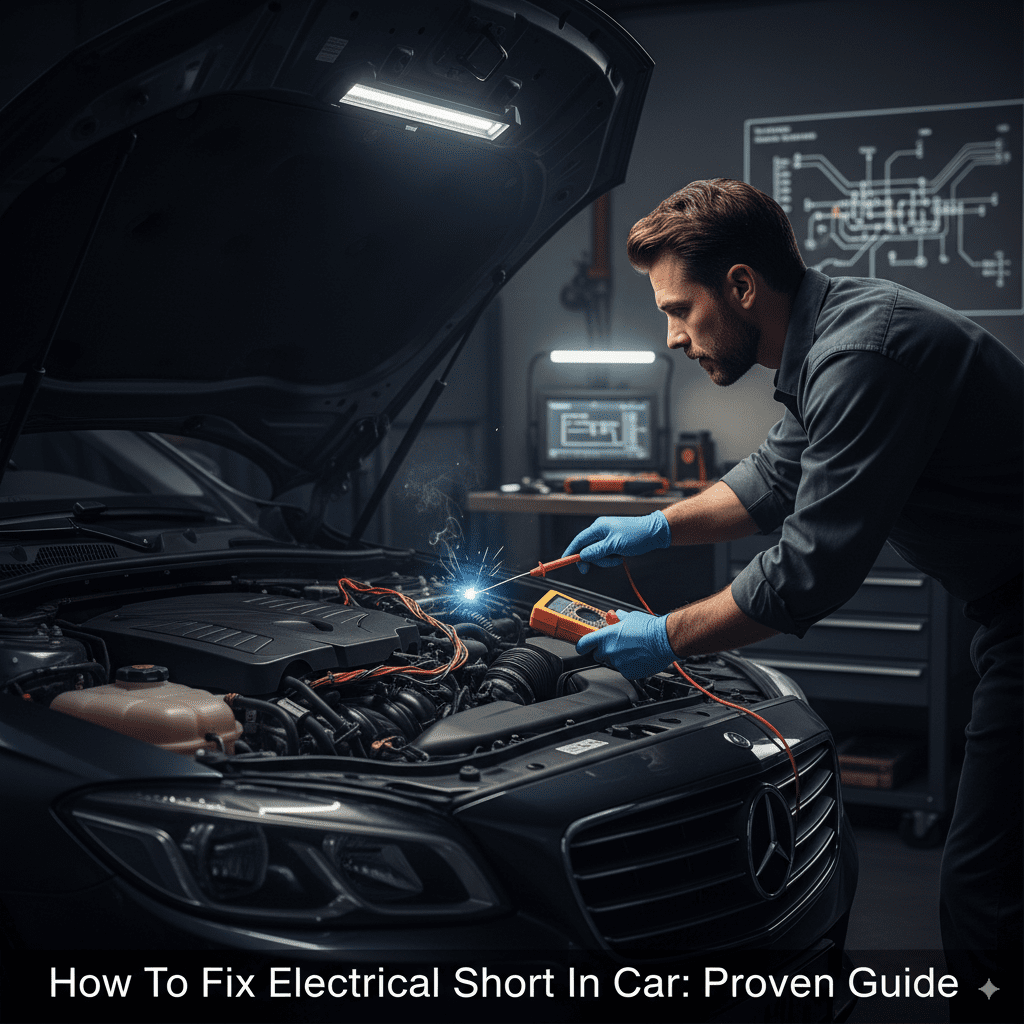
How To Fix Electrical Short In Car: Proven Guide
Fixing an electrical short in your car involves identifying the faulty circuit, locating the short by checking for frayed wires or damaged insulation, and repairing it by replacing the damaged component or reconnecting wires safely, often starting with blown fuses.
How To Fix Electrical Short In Car: A Proven Guide for Beginners
Seeing warning lights flash on your dashboard or discovering a dead battery can be a real headache. Often, these issues stem from a common problem: an electrical short circuit. It sounds intimidating, but understanding how it happens and knowing the basic steps to diagnose and fix it can save you time and money. I’m Md Meraj, here to guide you through this process in a way that’s easy to understand and safe for you to tackle. Let’s demystify car electrical shorts and get your vehicle back in reliable shape!
An electrical short happens when the electrical current takes an unintended path, bypassing the normal circuit. This usually means a “hot” wire touches a metal part of the car’s body or another wire it shouldn’t. This can cause anything from a flickering dashboard light to a complete system failure, and in worst-case scenarios, even a fire. The good news is that by following a systematic approach, many common electrical shorts can be diagnosed and repaired by a beginner.
We’ll walk through the process step-by-step, starting with the easiest things to check and moving to more involved methods. You don’t need to be a master mechanic to understand these principles. By the end of this guide, you’ll have the confidence and knowledge to tackle this common car problem.
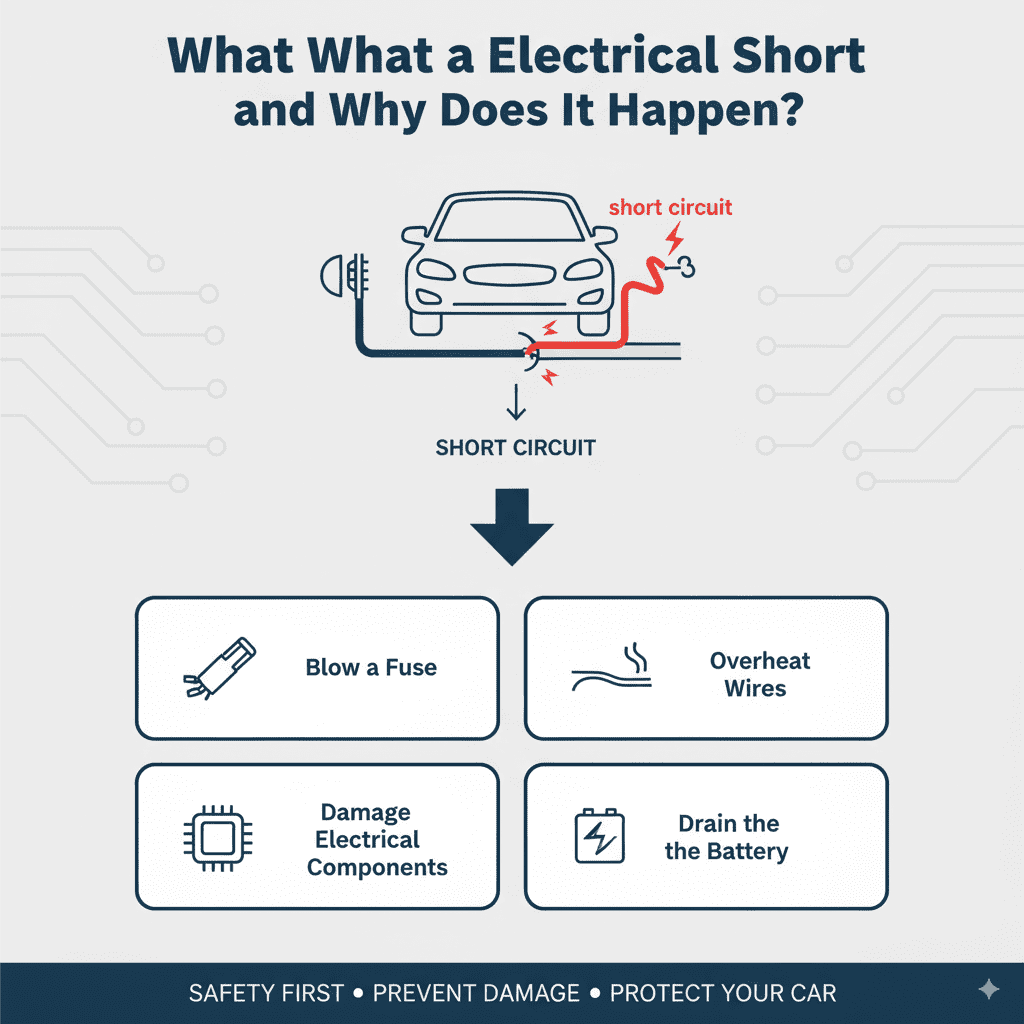
What is an Electrical Short and Why Does It Happen?
Imagine electricity in your car as water flowing through pipes. Each wire is a pipe designed to carry electricity to a specific component, like your headlights, radio, or wipers. An electrical short is like a leak in those pipes, but instead of water, it’s electricity finding a shortcut. This shortcut usually happens when the protective insulation around a wire gets damaged, allowing the metal wire inside to touch something it shouldn’t. This could be a metal part of your car’s frame, an unpainted surface, or even another wire.
When a short circuit occurs, a large amount of electricity flows through this unintended path. This sudden surge can:
- Blow a fuse: Fuses are designed thin wires that melt and break the circuit when too much current flows through them. This is a safety feature to prevent damage and fire.
- Overheat wires: The excessive current can make wires get very hot, melting insulation and potentially starting a fire.
- Damage electrical components: Sensitive electronics can be fried by the sudden surge of electricity.
- Drain the battery: A continuous short can quickly drain your car’s battery.
Common Signs of an Electrical Short
Recognizing the signs of an electrical short is the first step to fixing it. Sometimes, the problem is obvious, but other times it can be sneaky. Here are some common indicators:
- Frequently Blown Fuses: If you keep replacing the same fuse, only for it to blow again shortly after, there’s likely a short circuit somewhere in that circuit.
- Burning Smell: A distinct burning odor, especially near the dashboard or under the hood, can indicate overheating wires due to a short.
- Dimming or Flickering Lights: Headlights, taillights, or interior lights that suddenly dim, flicker, or go out completely can point to an electrical issue.
- Malfunctioning Accessories: Electrical components like power windows, the radio, windshield wipers, or power locks that stop working, work intermittently, or behave erratically are strong signs.
- Dead Battery: If your car battery keeps dying without an obvious reason (like leaving lights on), a persistent short circuit might be draining it overnight.
- Smoke or Sparks: In severe cases, you might see smoke or even sparks coming from under the dashboard or the engine bay. This is a critical situation and requires immediate attention.
- Warning Lights: While warning lights can indicate many things, a series of unusual warning lights on the dashboard, especially if they appear together, could be related to an electrical short affecting multiple systems.
Tools You’ll Need
Before you start, gather the right tools. You don’t need a professional mechanic’s toolkit, but a few basic items will make the job much easier and safer.
Essential Tools:
- Owner’s Manual: Don’t underestimate this! It has diagrams for fuse boxes and can tell you what each fuse controls.
- Set of Screwdrivers: Both Phillips head and flathead in various sizes.
- Pliers: Needle-nose pliers are particularly useful for reaching small wires.
- Wire Strippers/Cutters: For preparing wires if you need to make repairs.
- Electrical Tape: High-quality, automotive-grade electrical tape for insulating repairs.
- Circuit Tester or Multimeter: This is crucial for testing voltage and continuity. A simple non-contact voltage tester is good for initial checks, while a multimeter offers more precise readings. You can find a decent one for under $30 from brands like Klein Tools or Fluke.
- Socket Set or Wrenches: For disconnecting the battery if needed.
- Work Gloves and Safety Glasses: Always protect yourself!
- Flashlight or Headlamp: Good lighting is essential for spotting small issues.
Step-by-Step Guide to Fixing an Electrical Short
Let’s get started. Remember to always work safely, and if you’re ever unsure, it’s best to consult a professional mechanic.
Step 1: Safety First – Disconnect the Battery!
This is the most critical step. Before you touch any wires or components, disconnect the negative (-) terminal of your car battery. This prevents accidental shocks and further damage to the electrical system. Use a wrench to loosen the nut on the negative terminal clamp, then carefully lift the clamp off the battery post. Tuck it aside so it can’t accidentally touch the post again. You should hear a faint ticking sound as the system powers down.
Step 2: Identify the Affected Circuit
How do you know which circuit is shorted? Look for the symptoms. If a specific accessory isn’t working (like your radio), that’s your starting point. If multiple things are acting up or you have a persistent blown fuse, consult your owner’s manual. It will have a diagram showing which fuse controls which circuits. Locate the fuse box (usually under the dashboard or in the engine bay) and identify the fuse related to the problem.
Common Fuse Box Locations:
- Under the dashboard: Often on the driver’s side, behind a small panel.
- Inside the engine compartment: Usually a black or grey plastic box.
- In the glove compartment: Less common but possible.
Step 3: Check the Fuses
Pull out the fuse identified in Step 2. Look at the metal bridge inside. If the bridge is broken or melted, the fuse has blown, indicating an overload or short circuit in that circuit. Even if the fuse looks okay, it’s a good idea to replace it with a new one of the exact same amperage rating. If the new fuse blows immediately, you have a confirmed short somewhere in that circuit.
Table: Understanding Fuse Amperage
| Fuse Color | Amperage (Amps) |
|---|---|
| Brown | 1 Amp |
| Pink | 3 Amps |
| Tan | 7.5 Amps |
| Red | 10 Amps |
| Blue | 15 Amps |
| Yellow | 20 Amps |
| Clear/White | 25 Amps |
| Green | 30 Amps |
| Blue (Larger) | 30 Amps |
| Orange | 40 Amps |
Important Note: Never replace a blown fuse with one of a higher amperage rating. This can cause wires to overheat and lead to a fire.
Step 4: Visual Inspection of Wiring
Now that you know which circuit is likely the culprit (or if you have a general idea), it’s time for a visual inspection. Follow the wires associated with the faulty circuit. Look for:
- Frayed or Worn Insulation: Areas where the plastic coating around the wire is cracked, rubbed raw, or missing entirely.
- Damaged Connectors: Corroded, loose, or burnt connectors.
- Wires Touching Metal: Any wires that are pressed against unpainted metal parts of the car’s body or engine components.
- Pinch Points: Areas where wires might be pinched by doors, hoods, or moving parts.
- Evidence of Heat Damage: Melted plastic, discolored wires, or a strong burning smell emanating from a specific area.
Pay close attention to areas where wires pass through firewall grommets, move with steering or suspension components, or are secured with clips. Often, a short develops where vibration or friction causes the insulation to wear away over time. For more in-depth understanding of automotive wiring, resources like RepairPlex.gov from the U.S. Department of Transportation can offer valuable technical insights.
Step 5: Using a Circuit Tester or Multimeter for Pinpointing
If you can’t find the short visually, a circuit tester or multimeter is your best friend. After reconnecting the battery temporarily (with extreme caution, and ready to disconnect again if smoke appears), you can use these tools.
For Non-Contact Voltage Testers:
- Turn the ignition to the “ON” position (but don’t start the engine).
- Hold the tester near the wiring harness. If it lights up or beeps when it shouldn’t (e.g., on a ground wire), you’ve found a faulty connection.
For Multimeters:
- Continuity Test: Disconnect the battery again. Set your multimeter to the continuity setting (often indicated by a beeping symbol). Touch the probes to the two ends of a wire that should be continuous. If it beeps, the wire is intact. If it doesn’t beep, the wire is broken. Now, test the wire against the car’s metal chassis. If it beeps, there’s a short to ground.
- Voltage Test: Reconnect the battery. Set the multimeter to DC voltage. Touch the red probe to the positive side of a component (or the wire feeding it) and the black probe to the negative terminal of the battery (or chassis ground). This tells you if power is reaching the component. If you have no voltage when you should, there’s a break in the circuit or a blown fuse up the line. If you have unexpected voltage, it points to a short.
This process can take patience. You might need to test segments of wires or individual connectors. If a fuse keeps blowing, you can disconnect components within that circuit one by one. When you disconnect a component and the fuse stops blowing, that component or its wiring is the source of the short.
Step 6: Repairing the Short
Once you’ve found the faulty wire or connection, it’s time to fix it. The repair depends on what you find:
- Damaged Insulation: If a wire’s insulation is frayed or cracked but the wire itself isn’t broken, clean the area well, and then use high-quality automotive electrical tape to wrap the damaged section thoroughly. Ensure at least an inch of tape overlaps the undamaged parts of the wire on either side. For a more robust repair, you can use heat-shrink tubing over top of the electrical tape.
- Broken Wire: If a wire is completely broken, you’ll need to splice it. Strip a small amount of insulation from both ends of the broken wire and use a butt connector and crimping tool to join them. Ensure a secure connection. For critical circuits, soldering might be a better option, followed by heat-shrink tubing for insulation.
- Loose or Corroded Connector: Clean any corrosion from the connector pins and the socket using a contact cleaner and a small brush or wire wool. Ensure the connection is snug. If a connector is melted or severely damaged, it will need to be replaced.
- Faulty Component: If testing reveals that a specific component (like a bad switch or motor) is causing the short, you’ll need to replace that part.
A great resource for learning about specific car wiring diagrams and repair procedures is often found in service manuals available from reputable automotive publishers like Haynes or Chilton, or via online subscription services.
Step 7: Testing the Repair
After making your repair, it’s time to test.
- Double-check that all your connections are secure and insulated.
- Reconnect the negative battery terminal.
- Turn the ignition to the “ON” position.
- Check if the accessory or system that was malfunctioning is now working correctly.
- Monitor the affected area for any signs of smoke or unusual smells.
- Check the fuse again to ensure it’s not blowing.
If everything is working and the fuse remains intact, congratulations! You’ve likely fixed the electrical short.
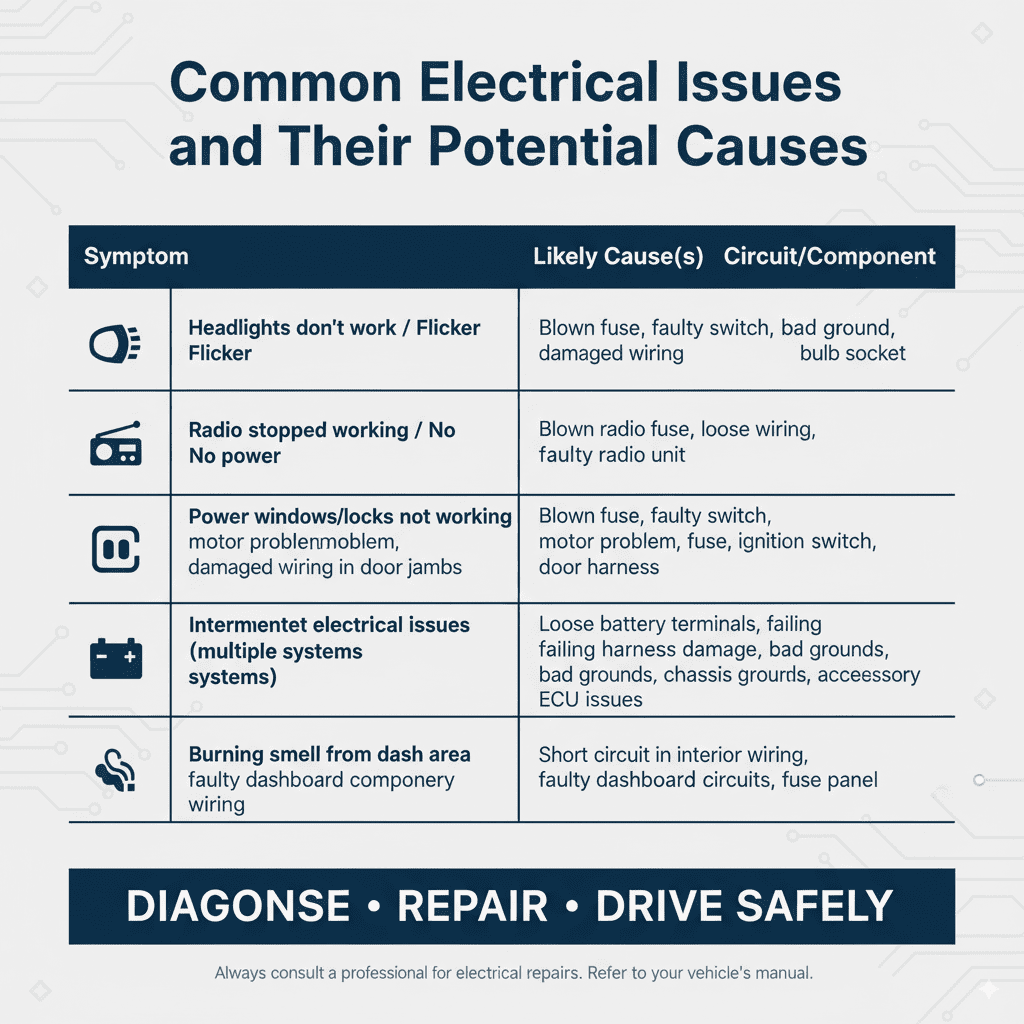
Table: Common Electrical Issues and Their Potential Causes
| Symptom | Possible Cause(s) | Likely Circuit/Component |
|---|---|---|
| Headlights don’t work / Flicker | Blown fuse, faulty headlight switch, bad ground connection, damaged wiring harness (especially near the headlights). | Headlight circuit fuse, headlight switch, ground point, bulb socket. |
| Radio stopped working / No power | Blown radio fuse, loose wiring to the radio, faulty radio unit itself, bad antenna connection (less likely for power). | Radio/Accessory fuse, ignition switch wiring, rear of radio unit. |
| Power windows/locks not working | Blown fuse for power accessories, faulty window/lock switch, problem with the motor, damaged wiring in door jambs. | Power accessory fuse, door lock/window switches, door harness. |
| Intermittent electrical issues (multiple systems) | Loose battery terminals, failing alternator, general wiring harness damage, faulty ground points, ECU (Engine Control Unit) issues. | Battery, alternator, main fuse/relay box, chassis grounds, ECU. |
| Burning smell from dash area | Short circuit in interior wiring, faulty dashboard components (e.g., instrument cluster, HVAC controls), accessory wiring. | Various interior circuits, fuse panel, accessory wiring. |
When to Call a Professional
While this guide empowers you to tackle many common electrical shorts, there are times when it’s best to seek professional help:
- Uncertainty: If you’ve gone through the steps and are still unsure about the cause or how to proceed.
- Complex Systems: Issues involving the car’s computer (ECU), advanced safety systems (ABS, airbags), or complex wiring harnesses are best left to experienced technicians.
- Persistent Problems: If you’ve tried to fix it, but the problem keeps returning, there might be a deeper, less obvious issue.
- Safety Concerns: If you’re dealing with potential fire hazards or intricate high-voltage systems (like in hybrid or electric vehicles), it’s crucial to involve a professional.
- Lack of Tools/Time: If you don’t have the necessary tools or the time to dedicate to troubleshooting.
A qualified auto electrician has specialized diagnostic tools and extensive experience that can quickly pinpoint and repair complex electrical faults, saving you frustration and potential further damage.
Frequently Asked Questions (FAQ)
Q1: How much does it typically cost to fix an electrical short in a car?
A: The cost can vary greatly. Simple fixes like replacing a fuse or re-taping a wire might cost just a few dollars for parts. If a wiring harness needs extensive repair or a component is replaced, it could range from $100 to several hundred dollars. Professional diagnosis can add $100-$200 to the cost.