How To Mix Paint For Car: Essential Guide
Mixing car paint involves carefully combining base coat, clear coat, and sometimes reducers or activators according to manufacturer instructions. Getting the ratios right is crucial for a smooth, durable, and color-matched finish. This guide simplifies the process, ensuring a professional-looking result for DIYers.
Hey there, car enthusiasts! Ever looked at a scratch or a faded spot on your beloved ride and thought, “I wish I could just fix that myself”? You’re not alone! One of the trickiest parts of DIY car repair and painting is getting the paint mix just right. It can seem super complicated with all those measurements and types of paint. But don’t worry, I’m here to break it down for you. We’ll go through it step-by-step, making sure you understand exactly what’s going on. You’ll be well on your way to a professional-looking paint job in no time, giving your car the fresh look it deserves without the high cost of a body shop. Let’s get your project started!
Why Getting Your Car Paint Mix Right Matters
Think of mixing car paint like baking a cake. If you get the ingredients wrong, or don’t measure them precisely, you won’t get that delicious, fluffy result. With car paint, an incorrect mix can lead to all sorts of problems. A poorly mixed paint might:
- Not adhere properly to your car’s surface, leading to peeling or chipping later on.
- Dry with a dull, uneven finish instead of a glossy sheen.
- Show imperfections like streaks or a cloudy appearance, making the repair obvious.
- Fail to match the original color, leaving you with a patchy look.
- Be harder to work with, causing spray gun clogs or drips.
The good news is that with a little attention to detail and by following the right steps, you can achieve a fantastic result. It’s all about understanding the components and their ratios. This guide is designed to give you that confidence.

Understanding Different Types of Car Paint
Before we dive into mixing, it’s helpful to know the basic types of automotive paint you’ll encounter. Each has its own characteristics and mixing requirements.
1. Single-Stage Paint
This is the simplest type of paint. It contains pigment and gloss all in one. After applying the color coat, you don’t need a separate clear coat. It’s often used for solid colors (like basic reds, blues, or whites) and can be more budget-friendly. However, it might not offer the same depth of shine or durability as base coat/clear coat systems.
2. Base Coat/Clear Coat System
This is the most common type of paint system used on modern vehicles. It’s a two-part process:
- Base Coat: This layer provides the actual color and effect (like metallic or pearl). It has little to no gloss on its own and needs to be protected by a clear coat.
- Clear Coat: This is a transparent layer applied over the base coat. It provides the shine, depth, protection from UV rays, and durability against scratches and environmental damage.
Mixing base coat/clear coat systems is crucial because both components often require specific reducers and activators to achieve the correct viscosity and drying properties.
3. Specialty Paints
These include finishes like matte paints, candy colors, or chameleon paints. They often have unique mixing requirements and application processes, and might not be ideal for beginners. For this guide, we’ll focus on the more common single-stage and base coat/clear coat systems.
Essential Tools and Materials for Mixing
Having the right tools makes a world of difference. Here’s what you’ll need before you start mixing:
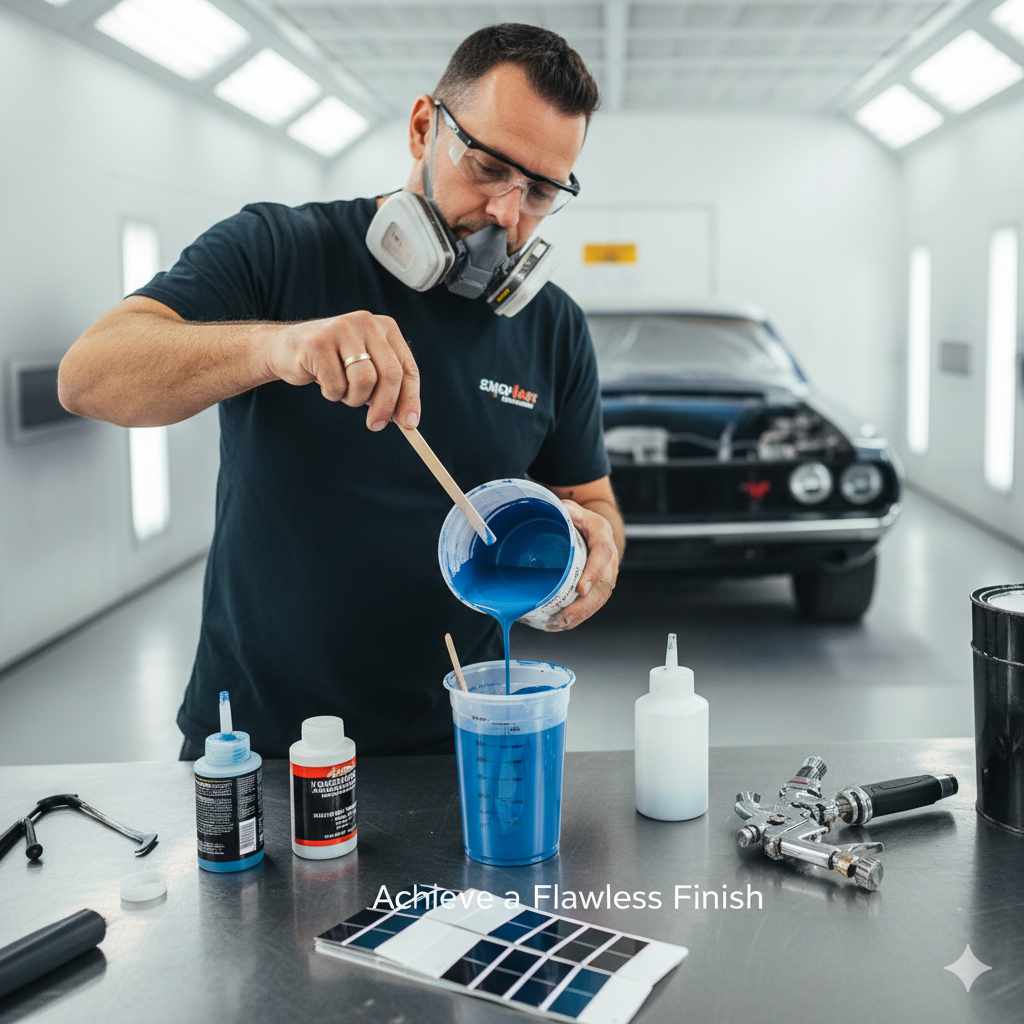
- Paint Mixing Cups: These disposable cups have pre-marked ratios for common paint and reducer amounts. They are inexpensive and crucial for accuracy.
- Stir Sticks: Wooden or plastic sticks specifically designed for mixing paint to ensure all components are blended thoroughly.
- Scale (Optional but Recommended): For highly precise measurements, especially with certain specialty paints or when manufacturer guidelines specify weight instead of volume.
- Paint Gun/Sprayer: Even for touch-ups, a spray gun is usually required. Ensure it’s clean and set up correctly.
-
Personal Protective Equipment (PPE): This is non-negotiable for safety. You’ll need:
- Respirator Mask: A good quality respirator designed for organic vapors will protect your lungs. Visit the OSHA guide on organic chemicals for more information on fumes.
- Safety Glasses or Goggles: To protect your eyes from splashes.
- Gloves: Nitrile gloves are best for chemical resistance.
- Coveralls or Old Clothes: To protect your skin and clothing from paint stains.
- Manufacturer’s Product Data Sheet (PDS): This is your most important document! It contains the exact mixing ratios, reducer types, and application instructions for the specific paint you are using. Always refer to this.
- Reducer/Thinner: This solvent is used to thin the paint to the correct spray viscosity. The type of reducer (fast, medium, slow) depends on the temperature and humidity.
- Activator/Hardener (for 2K paints): This chemical is added to certain paints (like 2K clear coats or single-stage urethanes) to initiate a chemical reaction that cures the paint, making it incredibly hard and durable.
Step-by-Step: How to Mix Car Paint Accurately
Here’s how to mix paint like a pro, focusing on the common base coat/clear coat system, but the principles apply to single-stage too. Always remember: READ YOUR PRODUCT DATA SHEET (PDS)! Every paint manufacturer has slightly different recommendations.
Step 1: Prepare Your Workspace and Gather Supplies
Ensure you are in a well-ventilated area, ideally a spray booth or a clean garage with good airflow. Wear all your PPE. Have your mixing cups, stir sticks, paint, reducer, and activator ready.
Step 2: Read the Product Data Sheet (PDS)
This is the most critical step. Locate the PDS for your specific paint product. It will tell you:
- The paint-to-reducer ratio (e.g., 2:1 meaning 2 parts paint to 1 part reducer).
- Whether an activator is needed, and its ratio (e.g., 4:1:1 meaning 4 parts base coat, 1 part reducer, 1 part activator).
- The type of reducer required (e.g., fast, medium, slow, or urethane grade reducer).
- The type of activator required.
- The required viscosity for spraying.
You can usually find PDS documents on the paint manufacturer’s website by searching for the product name or number. For example, PPG, Sherwin-Williams, and Axalta all provide extensive technical data for their automotive paint lines. Looking up a specific product like “PPG Deltron DBC Basecoat” will lead you to their technical guides.
Step 3: Measure Your Paint
Use a paint mixing cup. If your PDS calls for a 2:1 ratio of base coat to reducer, and you need, say, 6 ounces of mixed paint, you would fill the cup to the “2” mark with base coat and then to the “3” mark with reducer (2 parts + 1 part = 3 total parts). If your paint requires an activator, the ratios become more complex, and using a cup with more detailed markings is essential. For a 4:1:1 ratio, if you start with 4 ounces of paint, you’d add 1 ounce of reducer and 1 ounce of activator, bringing your total to 6 ounces.
Step 4: Add Reducer (and Activator if Applicable)
Pour the correct amount of reducer into the cup with the base coat. If you are using a 2K system that requires an activator (like most clear coats and some single-stage paints), add the specified amount of activator now. Remember to follow the ratios precisely!
Step 5: Stir Thoroughly
Use a clean stir stick to mix the paint, reducer, and activator. Stir vigorously for at least 1-2 minutes. Make sure to scrape the bottom and sides of the cup to ensure all components are fully incorporated. Undermixed paint can lead to application problems and poor performance.
Step 6: Check Viscosity (If Necessary)
Your PDS might specify a target viscosity, often measured in seconds using a viscosity cup. For most DIYers, especially when using pre-marked mixing cups, ensuring the paint looks and feels right after stirring is often sufficient. If the paint appears too thick for spraying after mixing, you might need to add a tiny bit more reducer. If it looks too thin, you’ve likely added too much reducer, and it’s best to start over to maintain accuracy.
Step 7: Let it Induction Time (If Required)
Some paint systems, especially 2K urethanes and clear coats, require an “induction period” after mixing. This is a waiting time that allows the chemicals in the activator to properly react with the paint. The PDS will state if this is needed and how long to wait (e.g., 15-30 minutes). During this time, the paint can often be briefly covered with a lid to prevent contamination.
Step 8: Strain the Paint
Always strain your mixed paint into your spray gun’s cup using a paint strainer. This catches any tiny bits of dried paint, dirt, or other contaminants that could clog your spray gun or create imperfections on your finish. Use the appropriate mesh size for your paint type (e.g., 125-150 micron for base coats, 190-250 micron for clear coats).
Step 9: Clean Up
Properly seal any leftover paint and store according to the manufacturer’s instructions. Dispose of used cups, sticks, and strainers responsibly. Clean your spray gun immediately after use with the appropriate gun wash solvent. For more on cleaning your tools, check out resources from reputable paint suppliers like TCP Global on spray gun cleaning.
Mixing Ratios: A Practical Example
Let’s imagine you are using a common urethane clear coat that requires a 4:1:1 ratio of clear coat : hardener : reducer. You need enough to cover a small area, let’s say about 1 quart (32 fluid ounces) in total mixed product.
First, determine the total number of “parts” for the ratio: 4 + 1 + 1 = 6 parts.
Now, divide the total volume needed by the total number of parts:
32 fluid ounces / 6 parts = approximately 5.33 fluid ounces per part.
Calculate the amount of each component:
- Clear Coat: 4 parts 5.33 oz/part = 21.32 oz
- Hardener: 1 part 5.33 oz/part = 5.33 oz
- Reducer: 1 part 5.33 oz/part = 5.33 oz
Total: 21.32 + 5.33 + 5.33 = 32.01 oz (close enough due to rounding).
If you were using a mixing cup with markings, you would find the line for your total volume (e.g., 32 oz) and then follow the lines up for the 4:1:1 ratio. The largest portion would be for the clear coat, the next for the reducer, and the smallest for the hardener. Using these cups, you don’t need to do the math yourself, but understanding the math helps confirm you’re on the right track.
| Component | Ratio Part | Amount (for 1 Quart / 32oz Total) |
|---|---|---|
| Clear Coat | 4 | ~21.3 oz |
| Hardener (Activator) | 1 | ~5.3 oz |
| Reducer | 1 | ~5.3 oz |
| Total | 6 | ~32 oz |
Note: The type of reducer (fast, medium, slow) is crucial. Slow reducers are used in hot conditions to give the paint more time to flow out. Fast reducers are used in cold conditions so the paint dries faster. Medium is for moderate temperatures. Always check the PDS and consider the ambient temperature and humidity.
Common Mistakes to Avoid
Even with a guide, mistakes happen. Here are some common pitfalls and how to steer clear of them:
- Not Reading the PDS: This is the number one mistake. Every paint product is different.
- Inaccurate Measuring: Eyeballing ratios leads to disaster. Use marked cups or a scale.
- Using the Wrong Reducer/Activator: Always use the specific type recommended by the paint manufacturer.
- Insufficient Stirring: Poorly mixed components won’t cure or flow properly.
- Mixing Too Much Paint: Only mix what you need for the job. Paint has a limited pot life after mixing, especially 2K systems, and unused mixed paint must be properly disposed of.
- Skipping Stirring/Induction Time: These steps are there for a reason – don’t skip them.
- Not Straining the Paint: This can ruin your finish instantly with debris or dried bits.
Tips for Success
To make your paint mixing and application go smoothly, consider these tips:
- Start Small: If you’re nervous, practice mixing and spraying on a scrap panel or an old piece of metal first.
- Work in Batches: For larger jobs, mix smaller batches more frequently rather than one massive batch whose pot life might expire.
- Consistent Temperature: Try to maintain a consistent temperature in your workspace. Extreme heat or cold can affect paint drying and curing.
- Use Quality Products: Don’t skimp on paint, reducers, or activators. Higher quality products generally yield better results and are easier to work with.
- Keep it Clean: Dust and contaminants are the enemies of a good paint job. Keep your workspace as spotless as possible.

Frequently Asked Questions (FAQ)
Q1: Can I mix different brands of car paint together?
A1: No, it’s generally not recommended. Different brands use different chemical formulations, and mixing them can lead to unpredictable results, such as poor adhesion, uneven curing, or finish defects. Always stick to the same brand for your primer, base coat, clear coat, reducers, and activators.
Q2: What happens if I add too much reducer?
A2: Adding too much reducer thins the paint too much. This can cause it to run and sag, reduce its gloss and durability, and make it more susceptible to imperfections like solvent pop. It’s often best to discard the batch and start over with the correct ratio.
Q3: How long does mixed car paint last (pot life)?
A3: The pot life varies significantly depending on the paint type and temperature. Single-stage paints might last an hour or more. 2K paints (especially clear coats mixed with activators) have much shorter pot lives, often ranging from 30 minutes to a few hours. Always refer to the PDS for the specific pot life of your product. Once the pot life is reached, the paint should be discarded.
Q4: Do I need a special reducer for metallic or pearl paints?
A4: Usually, the base coat itself doesn’t require a reducer unless* specified by the PDS. The reducer is primarily used to achieve the correct spray viscosity. For metallic and pearl finishes, the base coat is typically mixed with a specific reducer to achieve the right consistency for proper flake orientation when sprayed, which is key to the effect. Clear coats and single-stage paints will regularly require reducer and/or activator.